Sliverlight中PagedCollectionView的总结
在Sl中只要绑定到实现IEnumerable接口的集合,都会有一个默认的视图被隐式的插入到源和目标之间,这个视图存储着当前项的信息,也支持
排序,分组,过滤,导航这些功能,这里主要总结了PagedCollectionView这个视图的几点使用。
事实上,视图会自动关联到源集合,而不是与源的目标对象关联,这样对视图的改变,就会自动在目标对象上显示出来。
下面将这几个功能分别总结一下:
排序:
主要用SortDescriptions 属性来控制视图项,基本思路是选择集合中的某个属性作为参照,再设置排序的方式,这种设置最终会被一个SortDescription对象捕获。
用一个示例说明这个问题:
首先创建一个数据类型,这里以Photo类为例:
public class Photo{public string Name { get; set; }public DateTime date { get; set; }public int Id { get; set; }}
取得其一个数据集合:
public class Photos{public List<Photo> GetList(){var list = new List<Photo>{new Photo{Name="Simens",Id=1,date=Convert.ToDateTime("2010/8/10")},new Photo{Name="Sunshine",Id=2,date=Convert.ToDateTime("2010/8/13")},new Photo{Name="TreeInforest",Id=3,date=Convert.ToDateTime("2010/8/15")},new Photo{Name="WaterNaturl",Id=4,date=Convert.ToDateTime("2010/8/12")},};return list;}
这里我们以DataGrid为例,为了整个过程更加清晰,我们将其CanUserSortColumns属性设为False,并通过单击Button对DataGrid中的数据进行排序设置
UI:
<data:DataGrid AutoGenerateColumns="True" Height="131" HorizontalAlignment="Left" Margin="43,75,0,0" Name="dataGrid1"CanUserSortColumns="False" VerticalAlignment="Top" Width="289" /><Button Content="SortByName" Height="23" HorizontalAlignment="Left" Margin="52,221,0,0" Name="SortByName" VerticalAlignment="Top"Width="75" Click="SortByName_Click" /><Button Content="SortByDateTime" Height="23" HorizontalAlignment="Left" Margin="141,221,0,0" Name="SortByDateTime"VerticalAlignment="Top" Width="75" Click="SortByDateTime_Click" />
如开篇所讲,视图会自动关联到源集合,这样对于操作源提供了很大的方便性
先声明一个视图对象
那么我们可以源和目标对象之间用p连接起来,一般而言,我们不外乎通过ItemSource,DataContext属性关联到数据集合中PagedCollectionView p = new PagedCollectionView(new Photos().GetList());
this.dataGrid1.ItemsSource = p; 这时,我们已经可以在DataGrid中看到关联的数据了,接下来,继续完成排序的工作,用属性名与ListSortDirection枚举值创建SortDescription对象 p.SortDescriptions.Add(new SortDescription(“Name”, ListSortDirection.Descending));
对于SortDescriptions而言,其可以同时对多个属性进行排序,按照添加至SortDescriptions的顺序表示优先级p.SortDescriptions.Add(new SortDescription("Name", ListSortDirection.Descending));p.SortDescriptions.Add(new SortDescription("date", ListSortDirection.Descending));
以上面为例,集合会根据Name属性进行降序排序,如果Name属性相同,则根据date进行降序排序
C#完整代码:
PagedCollectionView p = new PagedCollectionView(new Photos().GetList());public MainPage(){InitializeComponent();this.dataGrid1.ItemsSource = p;}private void SortByName_Click(object sender, RoutedEventArgs e){Help("Name");}private void SortByDateTime_Click(object sender, RoutedEventArgs e){Help("date");}private void Help(string property){if (p.SortDescriptions.Count > 0 && p.SortDescriptions[0].PropertyName == property &&p.SortDescriptions[0].Direction == ListSortDirection.Ascending){p.SortDescriptions.Clear();p.SortDescriptions.Add(new SortDescription(property, ListSortDirection.Descending));}else{p.SortDescriptions.Clear();p.SortDescriptions.Add(new SortDescription(property, ListSortDirection.Ascending));}}
代码中的Clear用于返回默认排序的,实际上就是返回的源集合项。
分组:
主要使用了GroupDescriptions这一属性,它与上面所讲的SortDescriptions很类似,其可以添加PropertyGroupDescription对象,把源集合进行分组
例如根据date属性进行分组:
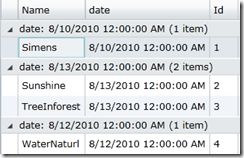
p.GroupDescriptions.Add(new PropertyGroupDescription("date"));
这样产生的效果:
对于这每一组的组名,可以自己定制一下,这主要使用PropertyGroupDescription类的重载,可以在分组之前对属性值进行转换
先声明一个值转换器
public class DateValueConverter:IValueConverter{public object Convert(object value, Type targetType, object parameter, System.Globalization.CultureInfo culture){return ((DateTime)value).ToShortDateString();}public object ConvertBack(object value, Type targetType, object parameter, System.Globalization.CultureInfo culture){throw new NotImplementedException();}}
如此,我们修改一下分组的参数
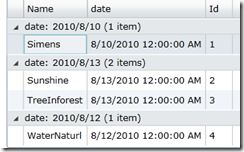
p.GroupDescriptions.Add(new PropertyGroupDescription("date",new DateValueConverter()));这样我们可以再看一看页面效果:
这个只是简单的对字符串格式转化了一下,对分组之前可以先进行排序,这样的话,主排序属性会应用到每个组,次排序属性会应用到分组的项中
当然对于分组的样式我们也是可以控制的,我们可以利用样式进行控制
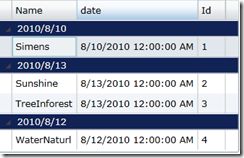
<data:DataGrid.RowGroupHeaderStyles><Style TargetType="data:DataGridRowGroupHeader"><Setter Property="PropertyNameVisibility" Value="Collapsed" /><Setter Property="Background" Value="#FF112255" /><Setter Property="Foreground" Value="#FFEEEEEE" /><Setter Property="SublevelIndent" Value="15" /><Setter Property="ItemCountVisibility" Value="Collapsed" /></Style></data:DataGrid.RowGroupHeaderStyles>
这个时候页面效果就变成这样了:
是不是效果好多了:)
导航:
这里的导航主要是指项的导航,而不是页面的导航,在需要对数据进行“上一条”,“下一条”这样的场景中很方便。
我在UI上添加了2个Button,用于实现对当前项的获取
private void Previous_Click(object sender, RoutedEventArgs e){p.MoveCurrentToPrevious();if (p.IsCurrentBeforeFirst){p.MoveCurrentToLast();}MessageBox.Show(p.CurrentPosition.ToString());}private void Next_Click(object sender, RoutedEventArgs e){p.MoveCurrentToNext();if (p.IsCurrentAfterLast)p.MoveCurrentToFirst();MessageBox.Show((p.CurrentItem as Photo).Id.ToString());}
实际情况是这样的,如果这些MoveXXX()返回的CurrentItem是视图中的项,则返回true,否则返回false
在这个例子中,可以尝试一下,若设置p.PageSize = 2;那么只能在当前视图中这两个项之间进行读取。
最后注意的是CurrentItem在源某一项被选择前值为null,CurrentPosition值为-1;
过滤:
过滤可以根据任意的条件选择性的删除项,其声明如下:
public Predicate<Object> Filter { get; set; }
它返回值为bool类型的一个委托,当其值设为一个委托时,该委托会在回调中对源进行排序,其返回的Bool值就表示显示还是隐藏。
我们仍利用上面的例子进行演示:
p.Filter = (obj) =>{ return (obj as Photo).Id > 3; };这时候所以id<3的项都不会在视图中显示了,如果需要删除过滤器,只须对其设为null就可以了。
扩展:下面的这个例子主要是看了紫色永恒的文章学习的:
根据页面上的选择框过滤的条件加载数据,
UI上添加一个Stackpanel:
<StackPanel Height="31" HorizontalAlignment="Left" Margin="98,176,0,0" Name="stackPanel1" VerticalAlignment="Top" Width="92" Orientation="Horizontal"><CheckBox Content="1" Height="16" Name="checkBox1" Click="checkBox_Click" /><CheckBox Content="2" Height="16" Name="checkBox2" Click="checkBox_Click" /><CheckBox Content="3" Height="16" Name="checkBox3" Click="checkBox_Click"/></StackPanel>
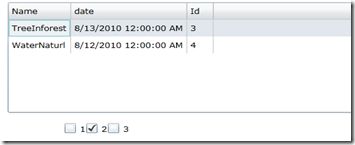
页面效果:
这是可以多条件过滤的,具体实现请参看原文
首先定义一个扩展方法:
using System;using System.Linq;using System.Linq.Expressions;namespace NewWork{public static class PredicateBuilder{public static Expression<Func<T, bool>> True<T>() { return f => true; }public static Expression<Func<T, bool>> False<T>() { return f => false; }public static Expression<Func<T, bool>> Or<T>(this Expression<Func<T, bool>> expr1,Expression<Func<T, bool>> expr2){var invokedExpr = Expression.Invoke(expr2, expr1.Parameters.Cast<Expression>());return Expression.Lambda<Func<T, bool>>(Expression.OrElse(expr1.Body, invokedExpr), expr1.Parameters);}public static Expression<Func<T, bool>> And<T>(this Expression<Func<T, bool>> expr1,Expression<Func<T, bool>> expr2){var invokedExpr = Expression.Invoke(expr2, expr1.Parameters.Cast<Expression>());return Expression.Lambda<Func<T, bool>>(Expression.AndAlso(expr1.Body, invokedExpr), expr1.Parameters);}public static Predicate<T> ConvertToPredicate<T>(this Func<T, bool> func){return new Predicate<T>(func);} }}
C#代码如下:
private void checkBox_Click(object sender, RoutedEventArgs e){var els = this.stackPanel1.Children;var predicate = PredicateBuilder.False<object>();foreach (var el in els){var cb = el as CheckBox;if (cb.IsChecked == true){predicate = predicate.Or(s => ((Photo)s).Id > Convert.ToInt32(cb.Content));}}p.Filter = predicate.Compile().ConvertToPredicate<object>();}
如此就可以以动态的过滤条件实现视图


