Squid 代理服务
文章目录
- 一、Squid 简介
-
- 1.1 Squid 一些概念性解释
- 1.2 Squid 工作模式分类
-
- 正向代理与反向代理的区别
- 1.2.1 传统模式 (标准的代理缓冲服务器)
- 1.2.2 透明模式 (透明代理缓冲服务器)
- 1.2.3 反向代理模式 (反向代理缓冲器)
- 1.3 Squid 软件及配置说明
-
- 1.3.1 软件介绍
- 1.3.2 squid 常用配置选项
- 二、实验构建
-
- 2.1 传统代理模式
-
- 2.1.1 内网客户端(10.10.10.11)
- 2.1.2 网关服务器 (Squid 服务器10.10.10.12)
- 2.1.3 模拟外网 WEB 服务器 (20.20.20.13)
- 2.2 透明代理模式
-
- 2.2.1 内网客户端(10.10.10.11)
- 2.2.2 网关服务器 (Squid 服务器10.10.10.12)
- 2.2.3 模拟外网 WEB 服务器 (20.20.20.13)
- 2.3.4 下载限速
- 2.3 反向代理模式
-
- 2.3.1 内网服务器(10.10.10.11、12)
- 2.3.2 网关服务器 (Squid 服务器10.10.10.13)
- 2.3.2 公网客户端(20.20.20.14)
- 三、Squid ACL 设置
-
- 3.1 ACL 配置
- 3.2 规则总结说明
一、Squid 简介
1.1 Squid 一些概念性解释
squid是一种用来缓存Internet数据的软件。接受来自人们需要下载的目标(object)的请求并适当的处理这些请求。也就是说,如果一个人想下载一web界面,他请求squid为他取得这个页面。squid随之连接到远程服务器并向这个页面发出请求。然后,squid显式地聚集数据到客户端机器,而且同时复制一份。当下一次有人需要同一页面时, squid可以简单的从磁盘中读到它,那样数据会立即传输到客户机上。
定义: 一个缓存服务器的守护进程
支持的代理协议: FTP、HTTP、SSL、套接字
存储分类: 磁盘 > 分区 > 目录 > Object(缓存文件)
索引方式
- Hash Tables 目录 每个 Digest 的索引信息
- Digest Tables 索引 不同分区对应的 Object 大概说明
squid代理的作用
- 通过缓存的方式为用户提供Web访问加速
- 对用户的Web访问进行过滤控制
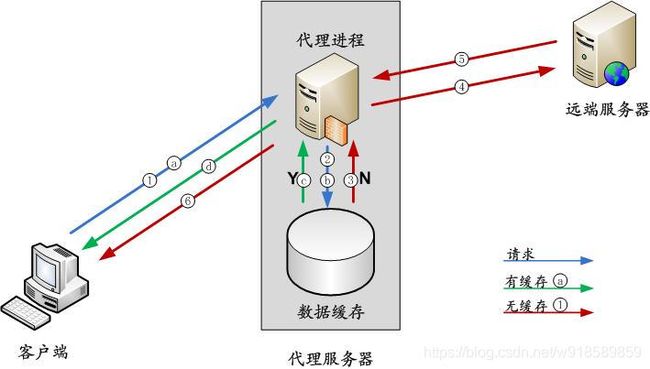
当代理服务器中有客户端需要的数据时:
a. 客户端向代理服务器发送数据请求;
b. 代理服务器检查自己的数据缓存;
c. 代理服务器在缓存中找到了用户想要的数据,取出数据;
d. 代理服务器将从缓存中取得的数据返回给客户端。
当代理服务器中没有客户端需要的数据时:
-
客户端向代理服务器发送数据请求;
-
代理服务器检查自己的数据缓存;
-
代理服务器在缓存中没有找到用户想要的数据;
-
代理服务器向Internet 上的远端服务器发送数据请求;
-
远端服务器响应,返回相应的数据;
-
代理服务器取得远端服务器的数据,返回给客户端,并保留一份到自己的数据缓存中。
1.2 Squid 工作模式分类
正向代理与反向代理的区别
概念
- 正向代理: 对于原始服务器而言,就是客户端的代言人
- 反向代理: 对于客户端而言,就像是原始服务器
用途
- 正向代理的典型用途是为在防火墙内的局域网客户端提供访问Internet的途径。正向代理还可以使用缓冲特性减少网络使用率。
- 反向代理还可以为后端的多台服务器提供负载平衡,或为后端较慢的服务器提供缓冲服务。另外,反向代理还可以启用高级URL策略和管理技术,从而使处于不同web服务器系统的web页面同时存在于同一个URL空间下。
安全性
- 正向代理允许客户端通过它访问任意网站并且隐藏客户端自身,因此你必须采取安全措施以确保仅为经过授权的客户端提供服务。
- 反向代理对外都是透明的,访问者并不知道自己访问的是一个代理。
应用场景
- 正向和透明代理:一般用于公司内网用户访问互联网,根据需求进行访问控制
- 反向代理:一般用于公司服务器集群前做web缓存,提高用户访问效率,同时可以起到负责均衡作用,为互联网提供可持续端web服务。
1.2.1 传统模式 (标准的代理缓冲服务器)
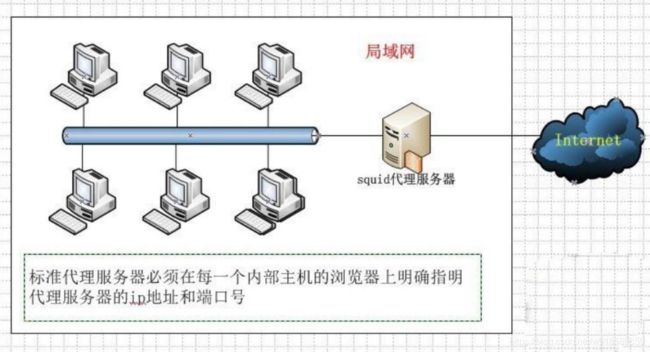
一个标准的代理缓冲服务被用于缓存静态的网页到本地网络上的一台主机上(即代理服务器)。当被缓存的页面被第二次访问的时候,浏览器将直接从本地代理服务器那里获取请求数据而不再向原web站点请求数据。这样就节省了宝贵的网络带宽,而且提高了访问速度。但是,要想实现这种方式,必须在每一个内部主机的浏览器上明确指名代理服务器的IP地址和端口号。客户端上网时,每次都把请求发送给代理服务器处理,代理服务器根据请求确定是否连接到远程web服务器获取数据。如果在本地缓冲区有目标文件,则直接将文件传给用户即可。如果没有的话则先取回文件,先在本地保存一份缓冲,然后将文件发送给客户端浏览器。
模式说明: 此类工作模式为三种模式中最简单的构成,对客户端配置较不友好,主要功能为加速 内网用户的访问速度,减少出口流量
工作架构图
1.2.2 透明模式 (透明代理缓冲服务器)
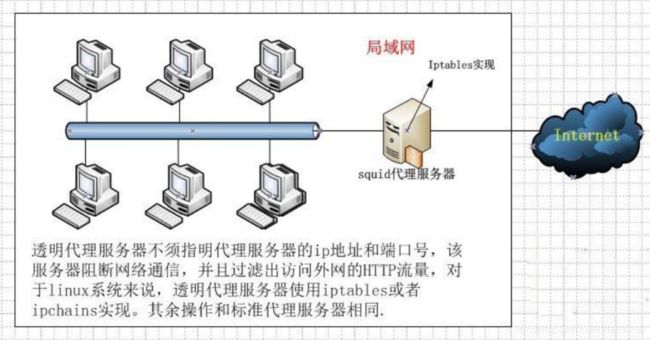
透明代理缓冲服务器和标准代理服务器的功能完全相同。但是,代理操作对客户端的浏览器是透明的(即不需指明代理服务器的IP和端口)。透明代理服务器阻断网络通信,并且过滤出访问外部的HTTP(80端口)流量。如果客户端的请求在本地有缓冲则将缓冲的数据直接发给用户,如果在本地没有缓冲则向远程web服务器发出请求,其余操作和标准的代理服务器完全相同。对于linux操作系统来说,透明代理使用Iptables或者Ipchains实现。因此不需要对浏览器作任何设置,所以,透明代理对于ISP(Internet服务器提供商)特别有用。
模式说明: 此类工作模式配置较为复杂,需要借助防火墙对端口进行重定向操作。但是,对于客 户端来说配置较为友好无需进行任何配置即可使用代理功能,主要功能为加速内网用户的访问速度, 减少出口流量
工作架构图
1.2.3 反向代理模式 (反向代理缓冲器)
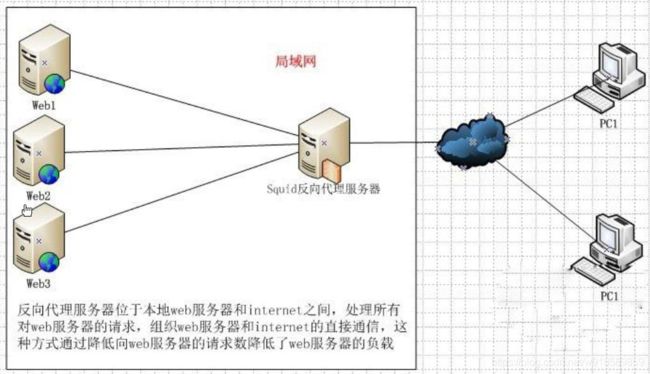
反向代理是和前两种代理完全不同的一种代理服务。使用它可以降低原始WEB服务器的负载。反向代理服务器承担了对原始WEB服务器的静态页面的请求,防止原始服务器过载。它位于WEB服务器和Internet之间,处理所有对WEB服务器的请求,组织了WEB服务器和Internet的直接通信。如果互联网用户请求的页面在代理服务器上有缓冲的话,代理服务器直接将缓冲内容发送给用户。如果没有缓冲则先向WEB服务器发出请求,取回数据,本地缓存后再发给用户。这种方式通过降低了WEB服务器的请求数从而降低了WEB服务器的负载。
模式说明: 反向代理服务器位于本地 WEB 服务器和互联网用户之间,处理公网用户发送的请求 并代理至内网服务中,有效减轻后端真实服务器压力,增加服务并发能力
工作架构图
1.3 Squid 软件及配置说明
1.3.1 软件介绍
软件包: squid-3.1.STABLE21-6.el6
系统服务: squid
主程序: /usr/sbin/squid
配置目录: /etc/squid
主配置文件: /etc/squid/squid.conf
默认监听端口: TCP 3128
默认访问日志: /var/log/squid/access.log
特别说明:Squid 在经过 3.0 版本后使用 C 语言进行重构,效率大大提升,Centos6 标配 Squid 3.0 以后版本
1.3.2 squid 常用配置选项
文件位置 /etc/squid/squid.conf
[root@localhost ~]$ vim /etc/squid/squid.conf
# Squid 启动端口为 3128
http_port 3128

#指定 Squid 进程能够使用的内存大小(默认大小)
cache_mem	256MB

#设置squid磁盘缓存最大文件,超过4M端文件不保存到磁盘
maximum_object_size 4MB

#设置squid磁盘缓存最小文件
minimum_object_size 0 KB

#设置squid内存缓存最大文件,超过4M不保存到内存
maximum_object_size_in_memory 4096 KB

#指定允许通过 Squid 的单个元素大小
reply_body_max_size 10 MB

#指定 Squid 对象文件存储路径使用大小限制为 100MB ,一级目录个数为 16 个,二级目录个数为 256 个
cache_dir ufs /var/spool/squid 100 16 256

#log文件日志格式
#logformat combined %>a %ui %un [%tl] "%rm %ru HTTP/%rv" %>Hs %h" "%{User-Agent}>h" %Ss:%Sh

#log文件存放路径和日志格式
# access_log /var/log/squid/access.log squid

#设置缓存日志
cache_log /var/log/suqid/cache.log

#log轮转60天
logfile_rotate 60

#cache目录使用量大于95%时,开始清理旧的cache
cache_swap_high 95

#cache目录清理到90%时停止
cache_swap_low 90


#定义本地网段
acl localnet src 192.168.1.0/24

#允许本地网段使用
http_access allow localnet

#拒绝所有
http_access deny all

#指定 Squid 服务器自身的主机名
visible_hostname xxx.xxxx.xxxx

#管理员邮箱
cache_mgr 123456@qq.com
二、实验构建
2.1 传统代理模式
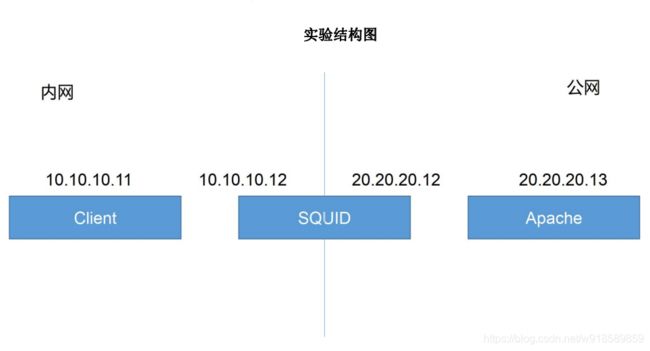
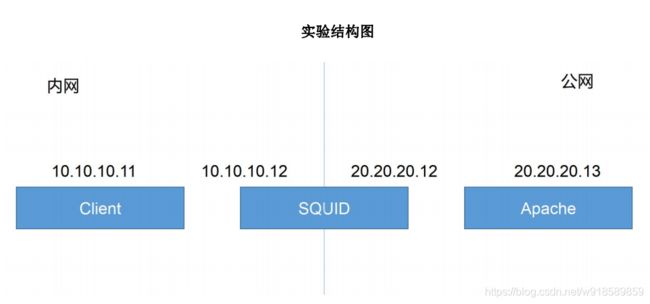
实验结构图
环境
可以参考之前的文章2.3章节搭建环境
https://blog.csdn.net/w918589859/article/details/111146921
client: 10.10.10.11(内网)
squid—server: 10.10.10.12(内网) 和 20.20.20.12(公网)
apache 20.20.20.13(公网)
2.1.1 内网客户端(10.10.10.11)
#客户端添加网关指向squid服务器
[root@localhost ~]$ echo "GATEWAY=10.10.10.12" >> /etc/sysconfig/network-scripts/ifcfg-eth0
[root@localhost ~]$ service network restart
2.1.2 网关服务器 (Squid 服务器10.10.10.12)
开启第二块网卡
[root@localhost ~]$ mount -t iso9660 /dev/cdrom /mnt/cdrom #挂载本地yum源
[root@localhost ~]$ service NetworkManager stop # 关闭网卡守护进程


[root@localhost ~]$ vim /etc/sysconfig/network-scripts/ifcfg-eth1
DEVICE=eth1
TYPE=Ethernet
UUID=ea68e93b-9aff-4379-b5a8-abac819dcd3b
ONBOOT=yes
NM_CONTROLLED=yes
BOOTPROTO=static
IPADDR=20.20.20.12
NETMASK=255.255.255.0

[root@localhost ~]$ service network restart
#报错:弹出界面 eth1: 错误:没有找到合适的设备:没有找到可用于连接 'System eth1' 的设备。
#解决办法
#删除网卡配置文件的mac地址,然后删除这个文件,重启就好了
#rm -f /etc/udev/rules.d/70-persistent-net.rules


#报错:弹出界面 eth1: 错误:激活连接失败:The connection is not for this device.
#解决办法 关闭网卡守护进程
#service NetworkManager stop


[root@localhost ~]$ vim /etc/sysctl.conf
net.ipv4.ip_forward = 1 #开启路由转发,0改为1

[root@localhost ~]$ sysctl -p
安装squid服务
[root@localhost ~]$ yum -y install squid #安装 squid 服务
[root@localhost ~]$ vim /etc/squid/squid.conf
http_port 3128
visible_hostname www.test.com


[root@localhost ~]$ service squid start
2.1.3 模拟外网 WEB 服务器 (20.20.20.13)
xshell可能连接不了,需要登录到虚拟机操作
[root@localhost ~]$ vim /etc/sysconfig/network-scripts/ifcfg-eth0
DEVICE=eth0
TYPE=Ethernet
UUID=b1f0c82e-6315-4827-91f7-8a5f8fa0b929
ONBOOT=yes
NM_CONTROLLED=yes
BOOTPROTO=static
IPADDR=20.20.20.13
NETMASK=255.255.255.0

[root@localhost ~]$ service network restart

[root@localhost ~]$ service httpd start
[root@localhost ~]$ echo "this is server1" >> /var/www/html/index.html
测试
10.10.10.11 输入init 5 启动图形界面,然后测试
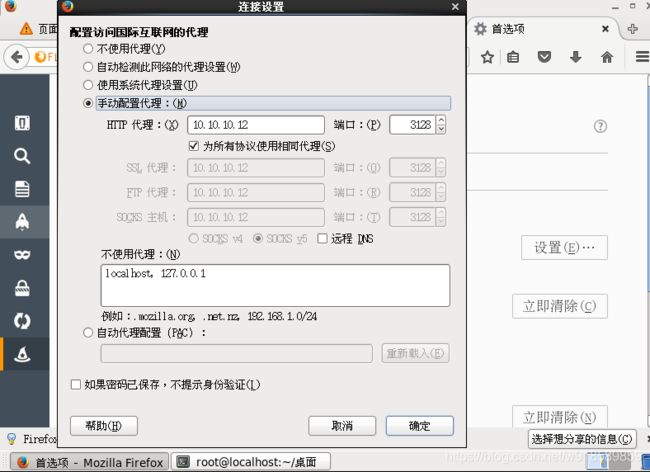
客户端输入20.20.20.13发现访问不了,这是因为,要在浏览器设置代理,代理ip地址是squid服务器地址
这时候在访问,就可以访问到,把20.20.20.13的服务器停掉,依然可以访问到,这就是缓存
2.2 透明代理模式
环境
可以参考之前的文章2.3章节搭建环境
https://blog.csdn.net/w918589859/article/details/111146921
client: 10.10.10.11(内网)
squid—server: 10.10.10.12(内网) 和 20.20.20.12(公网)
apache 20.20.20.13(公网)
2.2.1 内网客户端(10.10.10.11)
#客户端添加网关指向squid服务器
[root@localhost ~]$ echo "GATEWAY=10.10.10.12" >> /etc/sysconfig/network-scripts/ifcfg-eth0
[root@localhost ~]$ service network restart
2.2.2 网关服务器 (Squid 服务器10.10.10.12)
开启第二块网卡
[root@localhost ~]$ mount -t iso9660 /dev/cdrom /mnt/cdrom #挂载本地yum源
[root@localhost ~]$ service NetworkManager stop # 关闭网卡守护进程


[root@localhost ~]$ vim /etc/sysconfig/network-scripts/ifcfg-eth1
DEVICE=eth1
TYPE=Ethernet
UUID=ea68e93b-9aff-4379-b5a8-abac819dcd3b
ONBOOT=yes
NM_CONTROLLED=yes
BOOTPROTO=static
IPADDR=20.20.20.12
NETMASK=255.255.255.0

[root@localhost ~]$ service network restart
#报错:弹出界面 eth1: 错误:没有找到合适的设备:没有找到可用于连接 'System eth1' 的设备。
#解决办法
#删除网卡配置文件的mac地址,然后删除这个文件,重启就好了
#rm -f /etc/udev/rules.d/70-persistent-net.rules


#报错:弹出界面 eth1: 错误:激活连接失败:The connection is not for this device.
#解决办法 关闭网卡守护进程
#service NetworkManager stop


[root@localhost ~]$ vim /etc/sysctl.conf
net.ipv4.ip_forward = 1 #开启路由转发,0改为1

[root@localhost ~]$ sysctl -p
安装squid服务
[root@localhost ~]$ yum -y install squid #安装 squid 服务
[root@localhost ~]$ vim /etc/squid/squid.conf
http_port 10.10.10.12:3128 transparent # transparent ip 为网关内网 IP
visible_hostname www.test.com #指定主机名称
#相比于传统代理,这里有变动


[root@localhost ~]$ service squid reload #重新加载配置文件

[root@localhost ~]$ service iptables start && chkconfig iptables on
[root@localhost ~]$ iptables -F && iptables -L
[root@localhost ~]$ iptables -t nat -A PREROUTING -i eth0 -s 10.10.10.0/24 -p tcp --dport 80 -j REDIRECT --to-ports 3128 # 添加路由规则
#往nat表上添加一条信息,当入站网卡是eth0(内网网卡),内网网段是,协议是tcp,目标端口是80的话,做一个端口重定向,重定向到3128

[root@localhost ~]$ iptables -t nat -L
Chain PREROUTING (policy ACCEPT)
target     prot opt source               destination
REDIRECT   tcp  --  10.10.10.0/24        anywhere            tcp dpt:http redir ports 3128

[root@localhost ~]$ service iptables save
2.2.3 模拟外网 WEB 服务器 (20.20.20.13)
xshell可能连接不了,需要登录到虚拟机操作
[root@localhost ~]$ vim /etc/sysconfig/network-scripts/ifcfg-eth0
DEVICE=eth0
TYPE=Ethernet
UUID=b1f0c82e-6315-4827-91f7-8a5f8fa0b929
ONBOOT=yes
NM_CONTROLLED=yes
BOOTPROTO=static
IPADDR=20.20.20.13
NETMASK=255.255.255.0

[root@localhost ~]$ service network restart

[root@localhost ~]$ service httpd start
[root@localhost ~]$ echo "this is server1" >> /var/www/html/index.html
2.3.4 下载限速
#在服务器(20.20.20.13)创建一个文件
[root@localhost ~]$ cd /var/www/html
[root@localhost ~]$ dd if=/dev/zero of=1.txt bs=1M count=256

[root@localhost ~]$ vim /etc/squid/squid.conf
#添加下面一行
reply_body_max_size 500 MB


[root@localhost ~]$ service Squid reload
测试
10.10.10.11 输入init 5 启动图形界面,然后测试
客户端输入20.20.20.13/1.txt访问,会报错
2.3 反向代理模式
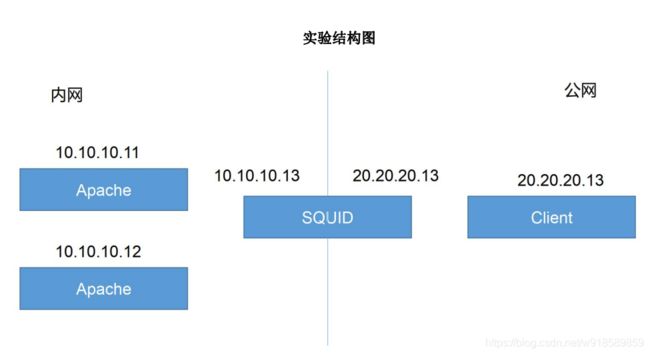
实验结构图
环境
可以参考之前的文章2.3章节搭建环境
https://blog.csdn.net/w918589859/article/details/111146921
apache1 10.10.10.11(内网)
apache1 10.10.10.12(内网)
squid—server: 10.10.10.13(内网) 和 20.20.20.13(公网)
client: 20.20.20.14(公网)
2.3.1 内网服务器(10.10.10.11、12)
两台apache服务器都要操作
[root@localhost ~]$ service httpd start && chkconfig httpd on
[root@localhost ~]$ echo "this is server1" >> /var/www/html/index.html
#echo "this is server2" >> /var/www/html/index.html  10.10.10.12

#添加网关指向squid服务器
[root@localhost ~]$ echo "GATEWAY=10.10.10.13" >> /etc/sysconfig/network-scripts/ifcfg-eth0

[root@localhost ~]$ service network restart
2.3.2 网关服务器 (Squid 服务器10.10.10.13)
开启第二块网卡
[root@localhost ~]$ mount -t iso9660 /dev/cdrom /mnt/cdrom #挂载本地yum源
[root@localhost ~]$ service NetworkManager stop # 关闭网卡守护进程


[root@localhost ~]$ vim /etc/sysconfig/network-scripts/ifcfg-eth1
DEVICE=eth1
TYPE=Ethernet
UUID=ea68e93b-9aff-4379-b5a8-abac819dcd3b
ONBOOT=yes
NM_CONTROLLED=yes
BOOTPROTO=static
IPADDR=20.20.20.13
NETMASK=255.255.255.0

[root@localhost ~]$ service network restart
#报错:弹出界面 eth1: 错误:没有找到合适的设备:没有找到可用于连接 'System eth1' 的设备。
#弹出界面 eth1: eth1 设备的 MAC 地址与预想的不符,忽略。
#解决办法
#删除网卡配置文件的mac地址,然后删除这个文件,重启就好了
#rm -f /etc/udev/rules.d/70-persistent-net.rules


#报错:弹出界面 eth1: 错误:激活连接失败:The connection is not for this device.
#解决办法 关闭网卡守护进程
#service NetworkManager stop


[root@localhost ~]$ vim /etc/sysctl.conf
net.ipv4.ip_forward = 1 #开启路由转发,0改为1

[root@localhost ~]$ sysctl -p
安装squid服务
[root@localhost ~]$ yum -y install squid 安装 squid 服务
[root@localhost ~]$ vim /etc/squid/squid.conf
http_port 20.20.20.13:80 vhost
#公网ip,# squid监听的端口,客户访问网站的端口,也可以只写端口,vhost不写也可以

visible_hostname www.test.com

#cache_peer 192.168.1.2(内网中网页服务器 IP) parent 80 0 (网络中是否还有其他代理) originserver round-robin (节点以轮询的方式)
cache_peer 10.10.10.11 parent 80 0 originserver round-robin
cache_peer 10.10.10.12 parent 80 0 originserver round-robin


[root@localhost ~]$ service squid start
2.3.2 公网客户端(20.20.20.14)
[root@localhost ~]$ vim /etc/sysconfig/network-scripts/ifcfg-eth0
DEVICE=eth1
TYPE=Ethernet
UUID=ea68e93b-9aff-4379-b5a8-abac819dcd3b
ONBOOT=yes
NM_CONTROLLED=yes
BOOTPROTO=static
IPADDR=20.20.20.14
NETMASK=255.255.255.0

#xshell可能会断,需要登录到虚拟机操作
测试
20.20.20.14 输入init 5 启动图形界面,然后测试
客户端输入20.20.20.13访问,会报错,不能访问,这是因为acl的设置,之前的可以访问,是因为刚好在10网段刚好在放行列表
[root@localhost ~]$ vim /etc/squid/squid.conf
#放行列表,添加20的网段
acl localnet src 20.20.20.0/24     # RFC1918 possible internal network
acl localnet src 10.0.0.0/8     # RFC1918 possible internal network
acl localnet src 172.16.0.0/12  # RFC1918 possible internal network
acl localnet src 192.168.0.0/16 # RFC1918 possible internal network
acl localnet src fc00::/7       # RFC 4193 local private network range
acl localnet src fe80::/10      # RFC 4291 link-local (directly plugged) machines

[root@localhost ~]$ service squid start
三、Squid ACL 设置
所谓ACL(Access Control List)就是在服务器端设定特定的上网策略,哪些用户能上网,能访问什么网站,能下载什么文件等等对用户的上网行为进行约束和管理,这个企业一般都会进行ACL上网控制,对员工的上网行为进行控制,从而提高工作效率。这里要说的就是基于redhat代理服务程序squid的ACL控制。
3.1 ACL 配置
使用访问控制特性,可以控制在访问时根据特定的时间间隔进行缓存、访问特定站点或一组站点等等。squid访问控制有两个要素:ACL元素和访问列表。访问列表可以允许或拒绝某些用户对此服务的访问。
ACL格式
为了使用控制功能,必须先设置ACL规则并应用。ACL声明的格式如下:
如果出现acl,但没有定义http_access,相当于没写
acl  列表名称   列表类型    列表内容
acl localnet    src     20.20.20.0/24

列表名称:由管理员自行指定,用来识别控制条件

列表类型:必须使用Squid预定义的值,对应不同类别的控制条件
	src: 源地址(即客户机IP地址)
    dst: 目标地址(即服务器IP地址)
	port: 目标端口
	srcdomain: 源名称(即客户机名称)
	dstdomain: 目标名称(即服务器名称)
	time: 一天中的时刻和一周内的一天
	url_regex: URL规则表达式匹配
	urlpath_regex: URL-path规则表达式匹配,略去协议和主机名
	proxy_auth: 通过外部程序进行用户验证
	maxconn: 单一IP的最大连接数

列表内容:具体控制的对象,不同的类型对应的内容也不一样,可以有多个值,用空格分隔
针对已定义的 acl 列表进行限制
http_access allow 或 deny 列表名称 ...
3.2 规则总结说明
- 如果仅仅只有 acl 设定没有 http_access 设置默认拒绝
- 如果 http_access deny all 未定义,并且自己定义了一个 acl 范围,默认使用最后一条规则的反向 规则
