SpringBoot核心技术
基础篇 SpringBoot基础入门
1.1 SpringBoot入门
1.1.1 系统要求
- Java8+
- Maven3.3+
- idea2019.2+
1.1.2 maven设置
- 配置为阿里云的仓库
- 设置jdk版本为1.8
1.1.3 SpringBoot常见注解
@RequestMapping:映射请求。
@ResponseBody:表明返回的是字符串,而不是跳转页面。
@RestController:轻量级的标注,为@ResponseBody和@RequestMapping的合体。
1.1.4 创建SpringBoot项目
- 创建maven项目
- 导入父工程
    <parent>
        <groupId>org.springframework.bootgroupId>
        <artifactId>spring-boot-starter-parentartifactId>
        <version>2.4.3version>
    parent>
- 添加场景依赖
    <dependency>
        <groupId>org.springframework.bootgroupId>
        <artifactId>spring-boot-starter-webartifactId>
    dependency>
- 写主程序,在主程序上标注 @SpringBootApplication,表示这是一个SpringBoot应用。在主程序中运用run()把应用跑起来
	@SpringBootApplication
    public static void main(String[] args) {
        SpringApplication.run(Example.class, args);
    }
- 编写业务
- 测试
- 简化配置,所有的配置内容,都可以在application.properties中配置。
server.port=8080
- 简化部署【添加插件】,把项目打成jar包,直接在目标服务器运行。
<build>
    <plugins>
        <plugin>
            <groupId>org.springframework.bootgroupId>
            <artifactId>spring-boot-maven-pluginartifactId>
        plugin>
    plugins>
build>
1.2 了解自动配置
1.2.1 依赖管理
- 父项目做依赖管理
    <parent>
        <groupId>org.springframework.bootgroupId>
        <artifactId>spring-boot-starter-parentartifactId>
        <version>2.4.3version>
    parent>
- 开发导入starter场景启动器
1.spring-boot-starter-*表示各种类型的场景。
2.只要引入starter,这个场景的各种依赖我们都能自动引入。
3.SpringBoot支持的各种场景:https://docs.spring.io/spring-boot/docs/2.4.3/reference/html/using-spring-boot.html#using-boot-starter
4.见到的*-spring-boot-starter-*为第三方的场景。
- 无需关注版本,自动仲裁版本【引入依赖基本不用写版本号,但引入非版本仲裁的要写版本号】。
- 可以自定义依赖版本号,在pom.xml中修改< properties><\properties>。
1.2.2 自动配置
- 自动配好Tomcat。
1.引入Tomcat组件
2.自动配好Tomcat依赖
- 自动配好SpringMVC。
1.引入SpringMVC全套组件
2.自动配好SpringMVC常用组件
- 自动配好Web常见功能,如:字符编码问题。
- 默认的包结构。
1.主程序下所在包下及其下的所有子包里面的组件都会被默认扫描,以前的包扫描不用配置。
2.若想扫描主程序之上的包则需要如下配置:@SpringBootApplication(scanBasePackages="xxx.xxx")或通过@Component("xxx.xxx")。
- 各种配置拥有默认值
- 按需加载各种配置项
非常多的starter
引入哪个场景这个场景的自动配置才会开启
SpringBoot的所有自动配置功能都在spring-boot-autoConfigure包里
1.2.3 组件添加
@Configuration
- 用@Configuration标注的配置类本身也是组件。
- 配置类里面使用@Bean标注在方法上给容器注册组件,默认也是单实例。
- full模式:@Configuration(proxyBeanMethods=true)。
- lite模式:@Configuration(proxyBeanMethods=false)。
- 最佳实战:
 - 配置类组件之间没有依赖关系,使用lite模式,加快容器启动过程,减少判断。
 - 配置类组件之间有依赖关系,会使用到之前的单实例组件,使用full模式,但容器启动会变慢。
@Import({User.class,DBHelper.class}):给容器中创建出这两个类型的组件,默认组件就是全类名。
@ImportResource:导入资源文件
1.2.4 配置绑定
把配置文件中的值绑定在容器中。
- @Component+@ConfigurationProperties【只有在容器中,才能使用SpringBoot的功能】
@Component
@ConfigurationProperties(preifx="myCar")
public class Car{
}
- @EnableConfigurationProperties+ @ConfigurationProperties【在配置类中加入@EnableConfigurationProperties,来开启配置绑定功能,并把组件自动注册到容器中】
1.2.5 自动配置入门
- 引导加载自动配置类
//注解@SpringBootApplication拆分
@SpringBootConfiguration
@EnableAutoConfiguration
@ComponentScan(
    excludeFilters = {@Filter(
    type = FilterType.CUSTOM,
    classes = {TypeExcludeFilter.class}
), @Filter(
    type = FilterType.CUSTOM,
    classes = {AutoConfigurationExcludeFilter.class}
)}
)
@SpringBootConfiguration:代表当前是一个配置类。
@ComponentScan:开启包扫描。
@EnableAutoConfiguration:
//@EnableAutoConfiguration的注解
@AutoConfigurationPackage
@Import({AutoConfigurationImportSelector.class})
public @interface EnableAutoConfiguration {}
@AutoConfigurationPackage:
@Import({Registrar.class})//给容器中导入一个组件
public @interface AutoConfigurationPackage {}

//利用Registrar给容器导入一系列组件
//将主程序所在的包下的所有组件都导进来
- 按需开启自动配置项:虽然127个场景的所有自动配置启动时默认全部加载,但是要按照条件装配原则,最终会按需加载【@Conditional】。
\META-INF\spring.factories
# Auto Configure
org.springframework.boot.autoconfigure.EnableAutoConfiguration=\
org.springframework.boot.autoconfigure.admin.SpringApplicationAdminJmxAutoConfiguration,\
org.springframework.boot.autoconfigure.aop.AopAutoConfiguration,\
......
org.springframework.boot.autoconfigure.webservices.WebServicesAutoConfiguration,\
org.springframework.boot.autoconfigure.webservices.client.WebServiceTemplateAutoConfiguration
- 修改默认配置。SpringBoot会在底层配置好所有组件,但是如果用户自己配置了,以用户配置的优先。
总结:
- SpringBoot先加载所有的自动配置类:xxxxAutoConfiguration。
- 每个自动配置类按照条件自动生效,默认都会绑定配置文件指定的值。xxxProperties里面拿,xxxProperties和配置文件进行了绑定。
- 生效的配置类会在容器中装配很多组件。
- 只要容器中这些组件有了,就相当于这些功能有了。
- 定制化配置:用户自己用@Bean替换底层的组件。用户去看这个组件绑定了配置文件中的什么值就去修改。xxxxAutoConfiguration---->组件---->xxxxProperties里面拿值---->application.properties
1.2.6 最佳实践
- 引入场景依赖
- 查看有哪些自动配置了【选做】
1.自己分析,引入场景对应的自动配置一般都生效了
2.配置文件中debug=true开启自动配置报告。Negative(不生效)\Positive(生效)
- 是否需要修改
参照文档修改配置项
自定义加入或替换组件
自定义器xxxxCustomizer
1.2.7 开发小技巧
1.2.7.1 Lombok
简化Java Bean的开发。
- 引入依赖
	<dependency>
    	<groupId>org.projectlombokgroupId>
    	<artifactId>lombokartifactId>
	dependency>
- 安装插件【在idea中安装】
- 相关注解。
@Data:注解在类上, 为类提供读写属性, 此外还提供了 equals()、hashCode()、toString() 方法。
@ToString:重写tostring()。
@NoArgsConstructor:无参构造器。
@AllArgsConstructor:全参构造器。
@EqualsAndHashCode:重写equals()和hashCode()。
@Slf4j:开启日志功能。
1.2.7.2 dev-tools
Ctrl+F9:重新编译,自动重启,利于修改静态页面。
	//引入依赖。
    <dependency>
        <groupId>org.springframework.bootgroupId>
        <artifactId>spring-boot-devtoolsartifactId>
        <optional>trueoptional>
    dependency>
1.2.7.3 Spring Initailizr
项目初始化向导,帮助开发SpringBoot项目。
核心篇 SpringBoot核心技术
2.1 配置文件
常规的是properties文件,也可以使用yaml。yaml非常适合以数据为中心的配置文件,是轻量级的。但按照优先级,SpringBoot会最终加载properties中的配置。
2.1.1 基本语法
- 使用key: value来储存,kv之间有空格。
- 使用缩进来表示层级关系。
- 只可以使用空格来表示缩进,不可以使用tab。【但idea等设置了用空格代替缩进的IDE可以随意使用空格或者tab】
- 缩进的空格数可以不同,只要相同的层级的元素左对齐就可以。
- '#'代表注释。
- 大小写敏感。
- 字符串无需加引号,如果要加,’'与""表示字符串内容,会被转义/不转义。
2.1.2 数据类型
- 字面量:单个不可再分的。data,Boolean,string,number,null。
k: v
- 对象:map,hash,set,object。
行内写法:   k: {k1: v1,k2: v2,k3: v3}
#或
k:
	k1: v1
	k2: v2
	k3: v3
- 数组:array,list,queue。
行内写法:   k: [v1,v2,v3]
#或
k:
	- v1
	- v2
	- v3
2.1.3 配置提示
pom.xml在添加:
<dependencys>
	<dependency>
	    <groupId>org.springframework.bootgroupId>
	    <artifactId>spring-boot-configuration-processorartifactId>
	    <optional>trueoptional>
	dependency>
dependencys>

<plugin>
    <groupId>org.apache.maven.pluginsgroupId>
    <artifactId>maven-compiler-pluginartifactId>
    <configuration>
        <proc>noneproc>
    configuration>
plugin>
2.2 Web开发
2.2.1 简单功能分析
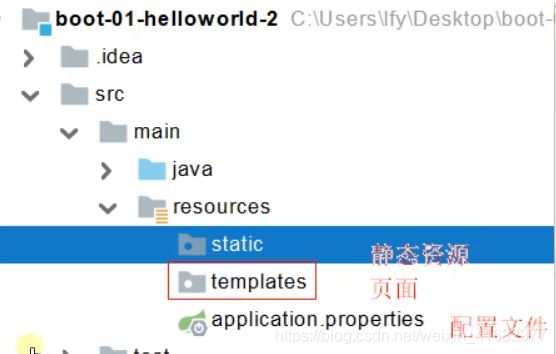
2.2.1.1 静态资源访问
静态资源目录:只要静态资源放在类路径下的/static、/public、/resources、/META-INF/resources,访问当前项目根路径/+静态资源名。
原理:静态资源/**。请求进来,先去找Controller看能不能处理,不能处理的请求又交给静态资源处理器,静态资源找不到就404。
静态资源访问前缀:默认无前缀,可在配置文件中修改。当前项目+static-path-pattern+静态资源名=静态资源文件夹下找。
webjar:支持webjar。
2.2.1.2 欢迎页访问
- 静态路径下的index.html
- controller能处理/index
2.2.1.3 自定义Favicon
将favicon.ico图标放在静态资源路径下即可以访问。
2.2.1.4 静态资源配置原理
- 项目启动,SpringBoot加载xxxAutoConfiguration(自动配置类)。
- SpringMVC的自动配置类大多在webMvcAutoConfiguration。
@Configuration(
    proxyBeanMethods = false
)
@ConditionalOnWebApplication(
    type = Type.SERVLET
)
@ConditionalOnClass({Servlet.class, DispatcherServlet.class, WebMvcConfigurer.class})
@ConditionalOnMissingBean({WebMvcConfigurationSupport.class})
@AutoConfigureOrder(-2147483638)
@AutoConfigureAfter({DispatcherServletAutoConfiguration.class, TaskExecutionAutoConfiguration.class, ValidationAutoConfiguration.class})
public class WebMvcAutoConfiguration {}
- 给容器中配了什么。
    @Configuration(
        proxyBeanMethods = false
    )
    @Import({WebMvcAutoConfiguration.EnableWebMvcConfiguration.class})
    @EnableConfigurationProperties({WebMvcProperties.class, ResourceProperties.class})
    @Order(0)
    public static class WebMvcAutoConfigurationAdapter implements WebMvcConfigurer {}
- 配置文件的相关属性和xxx进行了绑定。WebMvcProperties跟spring.mvc进行了绑定,ResourceProperties跟spring.resources进行了绑定。
2.2.2 SpringMVC在底层可以处理的web请求
- 注解:@RequestParam
- Servlet API:HTTPSession
- 复杂参数:Map、Model
- 自定义对象参数:Person
@GetMapping:用于处理请求方法的GET类型。
@PathVariable:获取路径变量上的参数。可以单个获取,也可以用Map
@RequestHeader:获取请求头信息。可以单个获取,也可以用Map
@RequestParam:获取请求参数。可以单个获取,也可以用Map
@CookieValue:获取Cookie中的值。可以单个获取,也可以用Cookie的方式整体获取。
@RequestBody:获取请求体【POST请求才有请求体】。
@RequestAttribute:获取请求域属性的值。
@MatrixVariable:获取矩阵变量的值。但是SpringBoot默认禁用了矩阵变量的功能,需要手动开启。原理:对于路径处理,都是用UrlPathHelper解析的。UrlPathHelper中的removeSemicolonContent属性是用来设置是否禁用分号内容【矩阵变量必须有路径变量才可以被解析】。
/cars/{path}?xxx=xxx?xxx=xxx queryString 查询字符串,使用@RequestParam的方式获取请求参数。
/cars/{path};xxx=xxx;yyy=aaa,bbb,ccc 矩阵变量,使用@MatrixVariable的方式获取参数。

面试题:当Cookie禁用了,session中的值怎么使用?
【session.set(a,b)--->jsessionid--->cookie--->每次发请求携带】
通过URL重写:/abc;jsessionid=xxx 把cookie的值用矩阵变量进行传递。
2.2.3 视图解析
thymeleaf使用
- 引入依赖
<dependency>
    <groupId>org.thymeleafgroupId>
    <artifactId>thymeleafartifactId>
    <version>3.0.12.RELEASEversion>
dependency>
- 自动配置好了thymeleaf
2.3 数据访问
2.3.1 数据源的自动配置
- 导入jdbc场景
<dependency>
	<groupId>org.springframework.bootgroupId>
	<artifactId>spring-boot-starter-data-jdbcartifactId>
dependency>
自动配置的项:
 因为官方不知道我们需要操作什么数据库,所有缺少数据库驱动,需要手动导入。
<dependency>
    <groupId>mysqlgroupId>
    <artifactId>mysql-connector-javaartifactId>
dependency>
- 分析自动配置类。
- 修改配置项。在配置文件中配置数据库连接地址、用户名、密码、数据库驱动【spring.datasource】。配置数据库相关的属性【spring.jdbc】。
2.3.2 使用druid数据源
- 引入druid-starter。
- 分析自动配置。
1.扩展配置项spring.datasource.durid。
2.DruidSpringAopConfiguration.class:监控SpringBean的。配置项:spring.datasource.durid.aop-pattern。
3.DruidStatViewServletConfiguration.class:监控页的配置:spring.datasource.durid.stat-view-servlet,默认开启。
4.DruidWebStatFilterConfiguration.class:web监控的配置:spring.datasource.durid.web-stat-filter,默认开启。
5.DruidFilterConfiguration.class:所有Druid都有自己filter的配置。
2.3.3 整合mybatis
- 引入第三方starter。
- 编写Mapper接口,标注@Mapper注解。
- 编写sql映射文件并绑定Mapper接口。
- 在application.yaml中指定Mapper配置文件的位置,以及指定全局配置文件的信息。【建议全局配置文件的配置配置在application.yaml的mybatis.coniguration下就行】。
<dependency>
    <groupId>org.mybatis.spring.bootgroupId>
    <artifactId>mybatis-spring-boot-starterartifactId>
    <version>2.1.4version>
dependency>
-
配置模式
1.全局配置文件。
2.SqlSessionFactory:自动配置好了。
3.SqlSession:自动配置了SqlSessionTemplate组合了SqlSession。
4.@Import(AutoConfiguredMapperScannerRegisterar.class)
5.Mapper:只要我们写的操作Mybatis的接口标注了 @Mapper就会被自动扫描进来。【可以用 @MapperScan来扫描Mapper,代替@Mapper】#配置mybatis规则 #Mapper接口绑定xml mybatis: config-location: #全局配置文件 mapper-location: #sql映射文件位置 -
注解模式
@Select:写查询语句。
@Insert:写插入语句。
@Options:写语句的属性项。 -
混合模式
2.3.4 整合Mybatis-Plus完成CRUD
什么是Mybatis-Plus:是一个Mybatis的增强工具,为简化开发提高效率而生。建议安装MybatisX插件。
引入mybatis-plus
<dependency>
    <groupId>com.baomidougroupId>
    <artifactId>mybatis-plus-boot-starterartifactId>
    <version>Latest Versionversion>
dependency>
自动配置:
- MybatisPlusAutoConfiguration配置类,MybatisPlusProperties配置项绑定。mybatis-plus:xxx就是对mybatis-plus的定制。
- SQLSessionFactory自动配置好,底层是容器中默认的数据源。
- mapperLocation自动配置好。有默认值。classpath*:/mapper/**/*.xml;任意包的类路径下的所有Mapper文件夹下的任意路径的所有xml都是映射文件。建议以后sql所有映射文件都写在mapper下。
- 容器中也自动配置好了SqlSessionTemplate。
- @Mapper标注的接口也会被自动扫描,建议写@MapperScan批量扫描就行。
优点:
- 只要我们的Mapper继承BaseMapper,就可以拥有crud能力。
- 使用 @TableField可以标注属性是否存在于数据表中。
- 使用 @TableName可以指定数据库中对应数据表名字。
- 在Service接口中继承IService。
- 在ServiceImplement中继承ServiceImpl。
2.3.5 NoSql(以Redis为例)
引入依赖:
<dependency>
	<groupId>org.springframework.bootgroupId>
	<artifactId>spring-boot-starter-data-redisartifactId>
dependency>
自动配置:
- RedisAutoConfiguration自动配置类。RedisProperties属性类—>spring.redis.xxx是对Redis的配置。
- 连接工厂是准备好的,LettuceConnectConfiguration、JedisConnectConfiguration。
- 自动注入了RedisTemplate
:xxxTemplate。 - 自动注入了StringRedisTemplate;k,v都是String。
- key:value。
- 底层只要我们使用RedisTemplate或者StringRedisTemplate就可以操作Redis。
Redis环境搭建:
- 使用阿里云按量付费Redis。经典网络。
- 申请Redis的公网连接地址。
- 修改Redis白名单【0.0.0.0/0】。
RedisTemplate与Lettuce:
application.yaml中配置spring.redis.host、spring.redis.port、spring.redis.password。
 切换到jedis:
- 添加redis和jedis的依赖
<dependency>
	<groupId>org.springframework.bootgroupId>
	<artifactId>spring-boot-starter-data-redisartifactId>
dependency>

<dependency>
	<groupId>redis.clientsgroupId>
	<artifactId>jedisartifactId>
dependency>
- application.yaml中配置spring.redis.host、spring.redis.port、spring.redis.password、spring.redis.client-type:jedis。
2.4 单元测试
2.4.1 JUnit变化及与SpringBoot整合
JUnit5:
- JUnit Platform:是在JVM启动测试框架的基础,不仅支持JUnit自制的测试引擎,其他测试引擎也可以接入。
- JUnit Jupiter:提供了JUnit5的新的编程模型,是JUnit5新特性的核心,内部包含了一个测试引擎在JUnit Platform运行。
- JUnit Vintage:提供了兼容JUnit4.x,JUnit3.x的测试引擎。
注意:
- SpringBoot2.4及其以上版本移除了默认对Vintage的依赖。如果需要使用JUnit4需要自行引入。(不能使用JUnit4的功能 @Test)。
- 在SpringBoot使用Junit4及以前版本需要在测试类标注 @SpringBootTest和 @RunWith(SpringTest.class)。
- 在SpringBoot使用JUnit5只需要在测试类中标注 @SpringBootTest。
SpringBoot整合JUnit后:
- 编写测试方法:@Test标注(注意需要使用Junit5版本的注解)。
- Junit类具有Spring功能,可以使用@Autowired、@Transaction【测试完成后会自动回滚】注解。
2.4.2 JUnit5常用注解
@DisplayName:为测试类或者测试方法展示名称。
@DisplayName("测试displayName方法")
@Test
void testDisplayName(){
	System.out.println(1);
}
@BeforeEach:在每个测试单元测试之前执行。
@BeforeEach
void testBeforeEach(){
	System.out.println("当前测试之前执行");
}
@AfterEach:在每个测试单元测试之后执行。
@BeforeEach
void testAfterEach(){
	System.out.println("当前测试之后执行");
}
@BeforeAll:在所有测试单元测试之前执行。
//因为只执行一次,所有方法之前要加上static
@BeforeAll
static void testBeforeAll(){
	System.out.println("所有测试之前执行");
}
@AfterAll:在所有测试单元测试之后执行。
//因为只执行一次,所有方法之前要加上static
@AfterAll
static void testAfterAll(){
	System.out.println("所有测试之后执行");
}
@Tag:表示单元测试类别,相当于JUnit4的 @Categories。
@Disable:表示测试类或测试方法不执行,类似于JUnit4的 @Ignore。
@Timeout:表示测试方法运行如果超过了指定时间将会返回错误。
 @RepeatedTest:测试重复测试的次数。
2.4.3 断言
断言是测试中的核心部分,用来测试需要满足的条件进行验证。这些断言方法都是静态方法。用来检查业务逻辑返回的数据是否合理。所有测试运行结束后会有一个详细的测试报告。
断言失败后,后面的代码都不会执行。
断言有以下分类:
- 简单断言
- assertEquals:判断两个对象或两个原始类型是否相等。
@Test
@DisplayName("测试简单断言")
void testSimpleAssertions(){
	int cal=cal(2,3);
	//可以自定义失败信息
	assertEquals(5,cal,"业务逻辑计算失败");
}

int cal(int a,int b){
	return a+b;
}
- assertNotEquals:判断两个对象或两个原始类型是否不相等。
- assertSame:判断两个对象引用是否指向同一个对象。
- assertNotSame:判断两个对象引用是否指向不同对象。
- assertTrue:判断给定的布尔值是否为True。
- assertFalse:判断给定的布尔值是否为False。
- assertNull:判断给定的对象引用是否为Null。
- assertNotNull:判断给定的对象引用是否不为Null。
- 数组断言
- assertArrayEquals:判断两个对象或者原始类型数组是否相等。
- 组合断言
- assertAll:只有组合断言中的所有断言都成功,才算成功。
@Test
@DisplayName("测试组合断言")
void testAll(){
	assertAll(
		"testAll";
		()->assertEquals(5,5,"结果不是5"),
		()->assertTrue(true,true,"结果不为True"));
}
- 异常断言
- assertThrows:断定业务逻辑一定出现异常。
@Test
@DisplayName("测试异常断言")
void testException(){
	assertThrows(
		ArithmeticException.class,
		()->{
			int i=10/0;
		},
		"业务逻辑居然正常");
}

//结果为:测试通过
- 超时异常
- assertTimeout:测试方法有无超时。
@Test
@DisplayName("测试超时断言")
void testTimeout(){
	assertTimeout(
		Duration.ofMillis(1000),
		()->Thread.sleep(500)
	);
}
- 快速失败
- fail:直接使得测试失败。
@Test
@DisplayName("测试快速断言")
void testFail(){
	fail("is should fail");
}
2.4.4 前置条件(assumption)
前置条件:assumption【假设】类似于断言,不同之处是在于不满足的断言会使得测试方法失效,而不满足的前置条件只会使得测试方法的执行终止。前置方法可以看作测试方法的前提,当该前提不满足时,没有继续的必要。
2.4.5 嵌套测试
- 通过Java中的内部类和 @Nested注解实现嵌套测试。
- 嵌套测试情况下,外层的的Test不能驱动内层的Before(After)All/Each之类的方法运行,而内层的可以驱动外层的。
import static org.junit.jupiter.api.Assertions.assertEquals;
import static org.junit.jupiter.api.Assertions.assertFalse;
import static org.junit.jupiter.api.Assertions.assertThrows;
import static org.junit.jupiter.api.Assertions.assertTrue;

import java.util.EmptyStackException;
import java.util.Stack;

import org.junit.jupiter.api.BeforeEach;
import org.junit.jupiter.api.DisplayName;
import org.junit.jupiter.api.Nested;
import org.junit.jupiter.api.Test;

@DisplayName("A stack")
class TestingAStackDemo {

    Stack<Object> stack;

    @Test
    @DisplayName("is instantiated with new Stack()")
    void isInstantiatedWithNew() {
        new Stack<>();
    }

    @Nested
    @DisplayName("when new")
    class WhenNew {

        @BeforeEach
        void createNewStack() {
            stack = new Stack<>();
        }

        @Test
        @DisplayName("is empty")
        void isEmpty() {
            assertTrue(stack.isEmpty());
        }

        @Test
        @DisplayName("throws EmptyStackException when popped")
        void throwsExceptionWhenPopped() {
            assertThrows(EmptyStackException.class, stack::pop);
        }

        @Test
        @DisplayName("throws EmptyStackException when peeked")
        void throwsExceptionWhenPeeked() {
            assertThrows(EmptyStackException.class, stack::peek);
        }

        @Nested
        @DisplayName("after pushing an element")
        class AfterPushing {

            String anElement = "an element";

            @BeforeEach
            void pushAnElement() {
                stack.push(anElement);
            }

            @Test
            @DisplayName("it is no longer empty")
            void isNotEmpty() {
                assertFalse(stack.isEmpty());
            }

            @Test
            @DisplayName("returns the element when popped and is empty")
            void returnElementWhenPopped() {
                assertEquals(anElement, stack.pop());
                assertTrue(stack.isEmpty());
            }

            @Test
            @DisplayName("returns the element when peeked but remains not empty")
            void returnElementWhenPeeked() {
                assertEquals(anElement, stack.peek());
                assertFalse(stack.isEmpty());
            }
        }
    }
}
2.4.6 参数化测试
- 参数化测试时Junit5的一个很重要的特性,它使得使用不用的参数多次运行测试成为了可能,给单元测试带来了遍历。
- 利用@ValueSource等注解指定入参,我们就可以使用不同的参数进行多次测试,不用每新增一个参数就多写一个方法,就省去很多的冗余代码。
- 使用 @ParamsterizedTest表明该方法为参数化测试的方法。
- @ValueSource:为参数测试指定入参,支持八大基础类型、String类型及class类型。
@ParamsterizedTest
@DisplayName("参数化测试1")
@ValueSource(ints={1,2,3,4,5})
void testParamsterizedTest1(int i){
	System.out.println(i);
}
- @NullSource:表示为参数化测试提供一个Null的入参。
- @EnumSource:表示为参数化测试提供一个枚举入参。
- @CsvFileSource:表示读取指定CSV文件内容作为参数化测试入参。
- @MethodSource:表示读取指定函数的返回值作为参数化测试入参。
@ParamsterizedTest
@DisplayName("参数化测试2")
@MethodSource("stringProvider")
void testParamsterizedTest2(String i){
	System.out.println(i);
}

static Stream<String> stringProvider(){
	return Stream.of("apple","pear","cry");
}
2.4.7 Junit5迁移到JUnit4
参照JUnit官方文档:https://junit.org/junit5/docs/current/user-guide/#migrating-from-junit4
2.5 指标控制
2.5.1 SpringBoot Actuator
2.5.1.1 简介
SpringBoot Actuator:SpringBoot抽取Actuator场景,使得我们每个微服务都可以快速应用应用监控、审计等功能。
导入starter:
<dependency>
	<groupId>org.springframework.bootgroupId>
	<artifactId>spring-boot-starter-actuatorartifactId>
dependency>
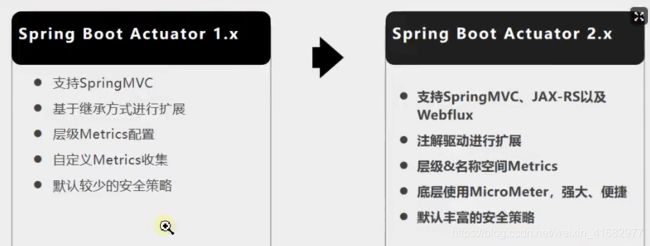
2.5.1.2 1.x与2.x的不同
2.5.1.3 如何使用
- 引入场景
- 访问http://localhost:8080/actuator/**
- 暴露所有监控信息为HTTP
management:
	endpoints:
		enable-by-default: true    #暴露所有端点信息
		web:
			exposure:
				include: '*'	#以web方式暴露
- 测试【http://localhost:8080/actuator/监控端点名/详细要监控的路径】
http://localhost:8080/actuator/beans
http://localhost:8080/actuator/metrics
…
2.5.1.4 可视化
https://github.com/codecentric/spring-boot-admin
- 创建SpringBoot快速向导项目作为可视化平台项目,引入场景。
- 在主入口类上标注 @EnableAdminServer
- 在客户端【被监测微服务模块】引入客户端场景

- 在客户端的application.yaml中配置spring.boot.admin.client.url=监控项目的地址
spring:
	boot:
		admin:
			client:
				url: http://localhost:8888	#此为监控端ip
				instance:
					prefer-ip: true	#使用IP注册进来,默认值为false
	application:
		name: boot-01-admin	#设置项目名
2.5.2 Actuator Endpoint
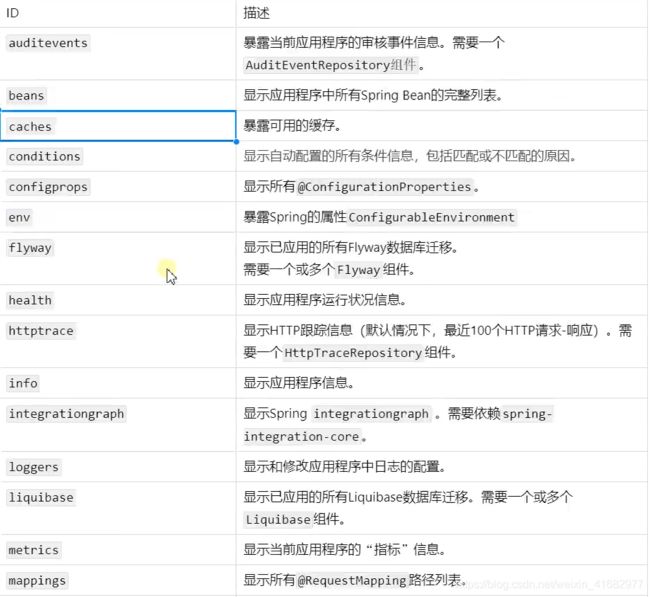
2.5.2.1 最常用的端点


如果应用程序是Web应用程序,还可以使用以下:

最常用的Endpoint:
- Health:监控状况。
- Metrics:运行时指标。
- Loggers:日志记录。
2.5.2.2 Health Endpoint
健康检查端点,用于云平台,定时检查应用的健康状况。我们就需要Health Endpoint为平台返回当前应用的一些列组件健康状况的集合。
注意:
- health Endpoint的返回结果,应该是一系列健康检查的汇总报告【up/down】。
- 很多健康检查已经默认配置好了,如redis、数据库。
- 可以添加自定义的健康检查机制。
- 可以在application.yaml中配置展示health endpoint的详细信息。
#management.endpoints:对所有端点进行配置
#management.endpoint: 对某个端点进行配置
management:
	endpoint:
		health:
			show-details: always
2.5.2.3 Metrics Endpoint
提供详细的、层级的、空间指标信息,这些信息可以被pull(主动推送)或push(被动获取)的方式获得。
- 通过Metrics对接多种监控系统。
- 简化核心Metrics开发。
- 添加自定义的Metrics或者扩展已有的Metrics。
- 需要获取Metrics中的某项指标的详细内容,还需要二次请求获取。【http://localhost:8080/actuator/metrics/具体指标】
2.5.2.4 管理Endpoint
由于某些端点比较敏感,所有有时候要按需开启端点,方法如下:
management:
	endpoints:
		enable-by-default: false    #关闭所有端点信息
		web:
			exposure:
				include: '*'	#以web方式暴露
	endpoint:
		health:
			show-details: always
			enable: true

		info:
			enable: true

		beans:
			enable: true

		metrics:
			enable: true
2.5.3 定制Endpoint
2.5.3.1 定制Health信息
- 方式一:实现HealthIndicator接口
- 方式二:继承AbstractHealthIndicator抽象类
//继承AbstractHealthIndicator抽象类
@Component
public class MyComHealthIndicator extends AbstractHealthIndicator{
@Override
protect void doHealthCheck(Health.Builder builder) throws Exception{
//mongodb.进行连接测试
//存储详细数据
Map<String,Object> map=new HashMap<>();
//进行检查业务逻辑
if(1=1){
// builder.up(); //方式一:健康
builder.status(Stauts.UP); //方式二:取具体的状态Stauts.UP
map.put("count",1);
map.put("ms",100);
}else{
// builder.down();
builder.status(Stauts.OUT_OF_SERVICE); //方式二:取具体的状态Stauts.OUT_OF_SERVICE
map.put("err","连接超时");
map.put("ms",300);
}
//withDetail()放键值对
//withDetails()放Map2.5.3.2 定制Info信息
- 方式一:编写application.yaml配置文件
info:
	##在application.yaml写死
	appName: boot-gul
	version: 2.0.2

	#使用@@获取maven的pom文件的值
	mavenProjectName: @project.artifactId@
	mavenProjectVersion: @project.version@
- 方式二:实现InfoContributor接口
//实现InfoContributor接口
@Component
public class AppInfoInfoContributor implements InfoContributor{
	@Override
	public void contribute(Info.Builder builder){
		builder.withDetail("msg","hello")
			   .withDetails(Collections.singletonMap("time","20200000"));
	}
}
2.5.3.3 定制Metrics信息
- 方式一:在需要调用的类中创建一个构造武,传入MeterRegistry参数,并调用meterRegistry的具体方法。
class MyService{
	Counter counter;
	public Myservice(MeterRegistry meterRegistry){
		counter=meterRegistry.counter("myService.method.running.counter");
	}

	public void hello(){
		counter.increament();
	}
}
2.5.3.4 定制Endpoint
@Compoment
@Endpoint(id="myservice")
public class DockerEndpoint{

	@ReadOperation
	public Map getDockerInfo(){
		return Collection.singletonMap("info","docker start...");
	}

	@WriteOpertion
	public void restartDocker(){
		System.out.println("docker stop...");
	}
}
2.6 原理解析
2.6.1 Profile
2.6.1.1 application-profile功能
- 默认配置环境application.yaml在任何时候都会加载。
- 指定环境配置文件命名规则:application-{env}.yaml。
- 激活指定环境:
1.默认的配置文件中激活:spring.profiles.active= yyy。
2.命令行激活【更灵活,在打包之后还可以激活,且配置文件中所有的配置项都可以改变】:java -jar xxx.jar --spring.profiles.active= yyy。 - 默认配置和环境配置同时生效。
- 同名配置项,profile配置优先。
2.6.1.2 @Profile条件装配功能
@Profile可以在类上或方法上使用。
@Profile("prod")
public class prodEnv(){

	//...

}
2.6.1.3 profile配置分组
在默认配置的application.properties中配置分组。
spring.profiles.group.myprod[0]=prod0
spring.profiles.group.myprod[1]=prod1


spring.profiles.active=myprod
2.6.2 外部化配置
2.6.2.1 外部配置源
常用:Java属性文件、yaml文件、环境变量、命令行参数。
1.Default properties (specified by setting SpringApplication.setDefaultProperties).

2.@PropertySource annotations on your @Configuration classes. Please note that such property sources are not added to the Environment until the application context is being refreshed. This is too late to configure certain properties such as logging.* and spring.main.* which are read before refresh begins.

【3.Config data (such as application.properties files)】配置文件application.properties、application.yaml

4.A RandomValuePropertySource that has properties only in random.*.

5.OS environment variables.

6.Java System properties (System.getProperties()).

7.JNDI attributes from java:comp/env.

8.ServletContext init parameters.

9.ServletConfig init parameters.

10.Properties from SPRING_APPLICATION_JSON (inline JSON embedded in an environment variable or system property).

【11.Command line arguments.】命令行参数
- properties attribute on your tests. Available on @SpringBootTest and the test annotations for testing a particular slice of your application.
13.@TestPropertySource annotations on your tests.

14.Devtools global settings properties in the $HOME/.config/spring-boot directory when devtools is active.
2.6.2.2 配置文件查找顺序
至上而下查找,后面的会覆盖前面的。
- classpath根路径。
- classpath根路径下的config目录。
- jar包当前目录。
- jar包当前目录的config目录。
- /config子目录的直接子目录。
【2.6.2总结:指定环境优先,外部配置优先】
总结篇
学习过程中难免会接触到一些源码的解析,但也可以整体把握好SpringBoot的基本应用,回头再来理解好源码。这样便于减少枯燥,保持学习兴趣。后续的SpringBoot一些核心技术的学习还包括虚拟化技术、安全控制、缓存技术、消息中间件、对象存储、定时调度、异步任务、分布式系统等。以及SpringBoot的响应式编程,包括响应式编程基础、Weflux开发web应用、响应式访问持久层、响应式安全开发和响应式原理。


