div弹出层的ajax登录(Jquery版)
今天别人都在休息,还要上班,自我安慰一下,他人笑我没长假,我笑他人没事干!
本人不善于jquery,也不善于div+css的排版,今天把vs2008打了个补丁,然后摸索了2个多小时做完这个例子和博客,手都敲软了,在这里和大家分享学习下!
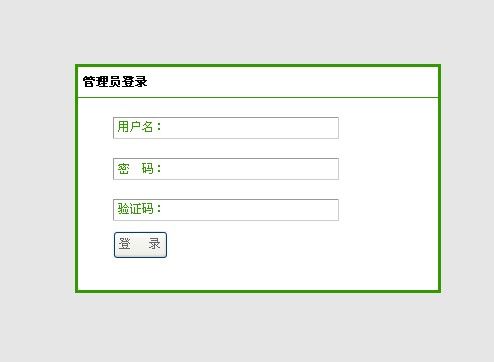
div弹出层,我没有点击事件,是页面一加载就弹出来,你也可以改成$("#id").click(function(){});放这里面就可以点击某个id事件来弹出层了,上预览图:
页面加载完成时:

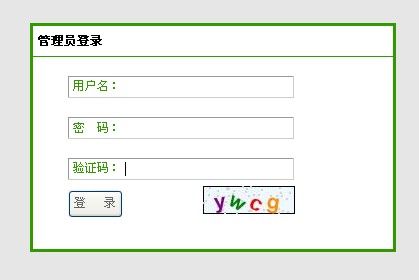
当验证码得到焦点时:

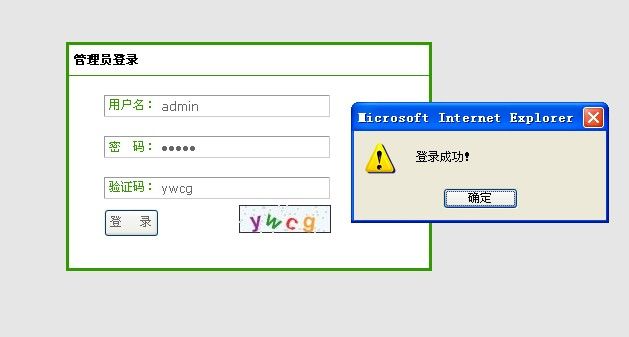
实现这个ajax为了节约时间,用户名/密码/验证码我都没判断是否为空,我也没用数据库,登录用户名和密码都是admin
登录成功时:

这里说明一下,由于时间有限,你可以把这个登录成功或者登录失败,效果做一下,直接在登录窗口上放一个<div id="message"><div>然后设置其样式,把提示内容追加上去,根据自己个人需求来,下面贴我的全部代码:
静态页面login.html代码如下图所示:
 login.html
1 <!DOCTYPE html PUBLIC "-//W3C//DTD XHTML 1.0 Transitional//EN" "http://www.w3.org/TR/xhtml1/DTD/xhtml1-transitional.dtd">
2 <html xmlns="http://www.w3.org/1999/xhtml">
3 <head>
4 <title>mydream_后台登录</title>
5 <link href="css/login.css" rel="stylesheet" type="text/css" />
6 <script src="../js/jquery-1.4.1-vsdoc.js" type="text/javascript"></script>
7 <script src="js/login.js" type="text/javascript"></script>
8 </head>
9 <body>
10 <div id="login" class="login">
11 <div class="title"><b>管理员登录</b></div>
12 <div class="pad">
13 <div><p class="selectinput loginpsw"><label>用户名:</label><input type="text" tabindex="1" class="txt" size="36" name="username" id="txtName" /></p></div>
14 <div><p class="selectinput loginpsw"><label>密 码:</label><input type="password" tabindex="1" class="txt" size="36" name="password" id="txtPassword" /></p></div>
15 <div><div><p class="selectinput loginpsw"><label>验证码:</label><input type="text" tabindex="1" class="txt" size="36" name="code" id="txtCode"/></p></div></div>
16 <div><input id="btnLogin" type="button" value="登 录" /></div>
17 </div>
18 <div class="divCode"><img alt="验证码" title="点击刷新验证码" src="../ashx/verifyCode.ashx" /></div>
19 </div>
20 </body>
21 </html>
login.html层叠样式表login.css代码如下所示:
 login.css
 1 .selectinput{margin-bottom:10px;width:224px;height:20px;background-color:#FFF;border:1px solid;border-color:#999 #CCC #CCC #999;}


 2 .selectinput .txt{float:left;width:165px;border:none;}


 3 .loginpsw label{float:left;display:inline;margin:0 0 0 4px;width:50px;height:auto;line-height:150%; color:#339900}


 4 body,td,input,textarea,select,button{color:#666;font:12px/1.6em Verdana,Helvetica,Arial,sans-serif;}


 5 input,select,button{vertical-align:middle;}


 6 .txt,.txtarea{padding:2px;*padding:0 2px;height:16px;*height:20px;border:1px solid;border-color:#999 #CCC #CCC #999;background:#FFF;}


 7 body{ margin:0 auto;}


 8 .login{border:solid 3px #339900; width:360px; height:223px;display:none; z-index:101;position:absolute; background-color:#FFFFFF;}


 9 .login .title{width:100%;height:30px;line-height:30px; border-bottom:solid 1px #339900;}


10 .login .title b{ padding-left:5px; color:#000000;}


11 .login .pad{padding-left:35px;}


12 .login .divCode{width:80px; height:30px;position:relative;top: -32px;left:170px; display:none;}


13 .login #btnLogin{width:55px; height:28px;}


14 #greybackground{background:#000000;width:100%; display:block; z-index:100; top:0px; left:0px; position:absolute;}
login.html页面所需js文件login.js代码如下所示:
 login.js
 1 /// <reference path="http://www.cnblogs.com/js/jquery-1.4.1-vsdoc.js" />


 2 $(document).ready(function() {


 3 var screenwidth, screenheight, mytop, getPosLeft, getPosTop


 4 screenwidth = $(window).width();


 5 screenheight = $(window).height();


 6 //获取滚动条距顶部的偏移


 7  mytop = $(document).scrollTop();


 8 //计算弹出层的left


 9  getPosLeft = screenwidth / 2 - 200;


10 //计算弹出层的top


11  getPosTop = screenheight / 2 - 150;


12 //css定位弹出层


13  $("#login").css({ "left": getPosLeft, "top": getPosTop });


14 //当浏览器窗口大小改变时


15  $(window).resize(function() {


16 screenwidth = $(window).width();


17 screenheight = $(window).height();


18 mytop = $(document).scrollTop();


19 getPosLeft = screenwidth / 2 - 200;


20 getPosTop = screenheight / 2 - 150;


21 $("#login").css({ "left": getPosLeft, "top": getPosTop + mytop });


22 });


23 //当拉动滚动条时,弹出层跟着移动


24  $(window).scroll(function() {


25 screenwidth = $(window).width();


26 screenheight = $(window).height();


27 mytop = $(document).scrollTop();


28 getPosLeft = screenwidth / 2 - 200;


29 getPosTop = screenheight / 2 - 150;


30 $("#login").css({ "left": getPosLeft, "top": getPosTop + mytop });


31 });


32 //失去焦点与得到焦点


33  $("#txtCode").focus(function() {


34 $(".divCode").fadeIn(1200);


35 });


36 $("#txtCode").blur(function() {


37 $(".divCode").fadeOut();


38 });


39 $("#login").fadeIn("slow"); //toggle("slow");


40  //获取页面文档的高度


41  var docheight = $(document).height();


42 //追加一个层,使背景变灰


43  $("body").append("<div id='greybackground'></div>");


44 $("#greybackground").css({ "opacity": "0.1", "height": docheight });


45 //登录


46  $("#btnLogin").click(function() {


47 $.get("../ashx/login.ashx",


48 { name: $("#txtName").val(),


49 pwd: encodeURIComponent($("#txtPassword").val()),


50 code: $("#txtCode").val()


51 },


52 function(data) {


53 switch (data) {


54 case "code error":


55 alert("验证码错误!");


56 break;


57 case "success":


58 alert("登录成功!");


59 break;


60 case "false":


61 alert("登录失败!");


62 break;


63 default:


64 alert("数据加载失败,请稍后再试!");


65 break;


66 }


67 });


68 });


69 });
login.html交互的后台cs文件login.ashx代码如下所示:
 login.ashx
 1 <%@ WebHandler Language="C#" Class="login" %>


 2


 3 using System;


 4 using System.Web;


 5 using System.Web.SessionState;


 6


 7 public class login : IHttpHandler, IRequiresSessionState


 8 {


 9 public void ProcessRequest(HttpContext context)


10 {


11 string code = context.Request.QueryString["code"];


12 context.Response.ContentType = "text/plain";


13 if (code.ToLower() != context.Session["checkCode"].ToString())


14 {


15 context.Response.Write("code error");


16 }


17 else


18 {


19 string name = context.Request.QueryString["name"];


20 string pwd = HttpUtility.UrlDecode(context.Request.QueryString["pwd"]);


21 if (name == "admin" && pwd == "admin")


22 {


23 context.Response.Write("success");


24 }


25 else


26 {


27 context.Response.Write("false");


28 }


29 }


30 }


31


32 public bool IsReusable


33 {


34 get


35 {


36 return false;


37 }


38 }


39


40 }
login.html页面验证码文件verifyCode.ashx代码如下所示:
 verifyCode
 1 <%@ WebHandler Language="C#" Class="verifyCode" %>


 2


 3 using System;


 4 using System.Web;


 5 using System.Web.SessionState;//第一步导入命名空间


 6 using System.Drawing;


 7


 8 public class VerifyCode : IHttpHandler, IRequiresSessionState


 9 {//第二步实现接口 就和平常一样可以使用session


 10


 11 public void ProcessRequest(HttpContext context)


 12 {


 13 string checkCode = this.CreateRandomCode(4).ToLower();


 14 context.Session["checkCode"] = checkCode;


 15 this.CreateImage(context, checkCode);


 16 }


 17


 18 public bool IsReusable


 19 {


 20 get


 21 {


 22 return false;


 23 }


 24 }


 25


 26 /// <summary>


 27  /// 按位生成随机


 28  /// </summary>


 29  /// <param name="codeCount"></param>


 30  /// <returns></returns>


 31  private string CreateRandomCode(int codeCount)


 32 {


 33 int number;


 34 string checkCode = String.Empty;


 35 Random random = new Random();


 36 for (int i = 0; i < codeCount; i++)


 37 {


 38 number = random.Next(100);


 39 switch (number % 3)


 40 {


 41 case 0:


 42 checkCode += ((char)('0' + (char)(number % 10))).ToString();


 43 break;


 44 case 1:


 45 checkCode += ((char)('a' + (char)(number % 26))).ToString();


 46 break;


 47 case 2:


 48 checkCode += ((char)('A' + (char)(number % 26))).ToString();


 49 break;


 50 default:


 51 break;


 52 }


 53 }


 54 return checkCode;


 55 }


 56


 57 /// <summary>


 58  /// 根据字符生成图片


 59  /// </summary>


 60  /// <param name="context"></param>


 61  /// <param name="checkCode"></param>


 62  private void CreateImage(HttpContext context,string checkCode)


 63 {


 64 int randAngle = 45;//随机转动角度


 65  int iwidth = (int)(checkCode.Length * 23);


 66 //封装GDI+ 位图,此位图由图形图像及其属性的像素数据组成,指定的宽度和高度。以像素为单位


 67  System.Drawing.Bitmap image = new System.Drawing.Bitmap(iwidth, 28);


 68


 69 //封装一个 GDI+绘图图面。无法继承此类。从指定的Image创建新的 Graphics


 70  Graphics g = Graphics.FromImage(image);


 71


 72 //清除整个绘图面并以指定背景填充


 73  g.Clear(Color.AliceBlue);


 74


 75 //画一个边框


 76  g.DrawRectangle(new Pen(Color.Black, 0), 0, 0, image.Width - 1, image.Height - 1);


 77


 78 //定义绘制直线和曲线的对象。(只是Pen的颜色,指示此Pen的宽度的值)


 79  Pen blackPen = new Pen(Color.LightGray, 0);


 80


 81 Random rand = new Random();


 82


 83 //划横线的条数 可以根据自己的要求


 84


 85 for (int i = 0; i < 50; i++)


 86 {


 87 //随机高度


 88  //int y = rand.Next(image.Height);


 89  /*绘制一条连线由坐标对指定的两个点的线条


 90  线条颜色、宽度和样式,第一个点的x坐标和y坐标,第二个点的x坐标和y坐标*/


 91 //g.DrawLine(blackPen, 0, y, image.Width, y);


 92  int x = rand.Next(0, image.Width);


 93 int y = rand.Next(0, image.Height);


 94 //画矩形,坐标(x,y)宽高(1,1)


 95  g.DrawRectangle(blackPen, x, y, 1, 1);


 96 }


 97


 98 //拆散字符串成单个字符数组


 99  char[] chars = checkCode.ToCharArray();


100


101 //文字居中


102  StringFormat format = new StringFormat(StringFormatFlags.NoClip);


103 format.Alignment = StringAlignment.Center;


104 format.LineAlignment = StringAlignment.Center;


105


106 //定义颜色


107  Color[] c = { Color.Black, Color.DarkGray, Color.DarkOrange, Color.Red, Color.DarkBlue, Color.Green, Color.Orange, Color.Brown, Color.DarkCyan, Color.Purple };


108 //定义字体


109  string[] font = { "Verdana", "Microsoft Sans Serif", "Comic Sans MS", "Arial", "宋体", "Arial Baltic" };


110


111 for (int i = 0; i < chars.Length; i++)


112 {


113 int cindex = rand.Next(c.Length);


114 int findex = rand.Next(font.Length);


115


116 //font 封装在特定设备上呈现特定字体所需的纹理和资源(字体,大小,字体样式)


117  Font f = new System.Drawing.Font(font[findex], 16, System.Drawing.FontStyle.Bold);


118


119 /*Brush定义用于填充图形图像(如矩形、椭圆、圆形、多边形和封闭路径)的内部对象


120  SolidBrush(Color.White)初始化指定的颜色 指定画笔颜色为白色*/


121 Brush b = new System.Drawing.SolidBrush(c[cindex]);


122


123 Point dot = new Point(16, 16);


124


125 //转动的度数


126  float angle = rand.Next(-randAngle, randAngle);


127


128 //移动光标到指定位置


129  g.TranslateTransform(dot.X, dot.Y);


130 g.RotateTransform(angle);


131 /*在指定的位置并且用指定的Brush和Font对象绘制指定的文本字符串


132  (指定的字符串,字符串的文本格式,绘制文本颜色和纹理,所绘制文本的左上角的x坐标,坐标)*/


133 g.DrawString(chars[i].ToString(), f, b, 1, 1, format);


134 //转回去


135  g.RotateTransform(-angle);


136 //移动光标指定位置


137  g.TranslateTransform(2, -dot.Y);


138 }


139 //创建存储区为内存流


140  System.IO.MemoryStream ms = new System.IO.MemoryStream();


141


142 //将此图像以指定的格式保存到指定的流中(将其保存在内存流中,图像的格式)


143  image.Save(ms, System.Drawing.Imaging.ImageFormat.Jpeg);


144


145 //清除缓冲区将流中的内容输出


146  context.Response.ClearContent();


147


148 //获取输出流的类型


149  context.Response.ContentType = "image/Jpeg";


150


151 //将二进制字符串写入HTTP输出流


152  context.Response.BinaryWrite(ms.ToArray());


153


154 g.Dispose();


155


156 image.Dispose();


157 }


158 }
有了以上文件,就可以做你想要的谈出div层效果了,我js不是很擅长,有好的意见欢迎拍砖,不要喷,谢谢!
版权所有,转载请注明出处!
一切伟大的行动和思想,都有一个微不足道的开始。微不足道的我,正在吸取知识的土壤,希望能取得成功!不嫌弃我微不足道的,愿交天下好友!
