pytorch学习笔记——3.6~3.7Pytorch中定义网络的方式以及模型保存和加载方法
摘要:
在Pytorch中提供了多种高搭建网络的方式,我们这里会以一个简单的全连接神经网络作为例子来介绍pytorch中 定义网络的两种方式:Module以及Sequential。在本文中我们将使用boston房价数据,分别使用 Module以及Sequential两种方式来定义一个简单的全连接神经网络,并用于网络模型的训练。在最后我们会介绍模型的保存和加载的方法。
一、导入模块以及数据准备
在本文中我们将使用boston房价数据,分别使用 Module以及Sequential两种方式来定义一个简单的全连接神经网络,并用于网络模型的训练。
首先我们导入需要使用的模块以及库:nn模块方便用户使用网络中的层,Data模块用于对数据进行预处理,load_boston模块用于导入需要使用的boston房价数据集,StandardScaler用于对数据进行标准化处理。
import torch
import torch.nn as nn
from torch.optim import SGD
import torch.utils.data as Data
from sklearn.datasets import load_boston
from sklearn.preprocessing import StandardScaler
import pandas as pd
import numpy as np
import matplotlib.pyplot as plt
接下来,在定义网络之前,我们需要先导入数据,并对数据进行预处理,代码如下:
#读取数据
boston_X,boston_y = load_boston(return_X_y=True)
print("boston_X.shape=",boston_X.shape)
print("boston_y.shape=",boston_y.shape)
#对因变量y可视化
plt.figure()
plt.hist(boston_y,bins=20)
plt.show()
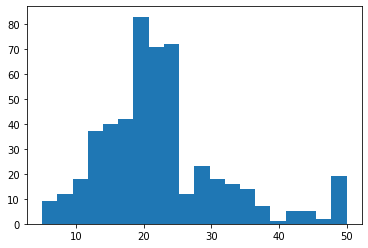
如上代码通过sklearn库中的datasets模块使用load_boston()函数来导入数据,导入成功后我们使用直方图对数据集的因变量y进行可视化处理,用于查看数据的分布,结果如下:
boston_X.shape= (506, 13)
boston_y.shape= (506,)
接下来,我们使用StanardScaler()函数对数据集中的自变量进行标准化处理,在标准化处理后我们需要将数据集转化为张量并设置为一个DataLoader用于模型的训练,代码如下:
#数据标准化处理
ss = StandardScaler(with_mean=True,with_std=True)
#with_meanT对数据中心化,F使数据平均值为0
#with_stdT对数据缩放到单位标准差,F使标准差为1
boston_Xs = ss.fit_transform(boston_X)
#将数据预处理为可以使用Pytorch进行训练的格式

#训练集X转化为张量
train_xt = torch.from_numpy(boston_Xs.astype(np.float32))
#训练集y转化为张量
train_yt = torch.from_numpy(boston_y.astype(np.float32))

#将训练集转化为张量后,使用TensorDataset将X,Y整理到一起
train_data = Data.TensorDataset(train_xt,train_yt)


#定义数据加载器
train_loader = Data.DataLoader(
    dataset=train_data,
    batch_size=64,
    shuffle=True,
    num_workers=1,)
在上面的代码中,我们首先使用了StandardScaler()函数对数据集的自变量进行了标准化处理,然后使用torch.from_numpy将标准化处理得到的数组转换为张量。然后,我们针对转化为张量后的train_xt和train_yt使用Data.TensorDataset()函数将数据集整合到一起,并使用Data.DataLoader()函数定义了一个数据加载器,方便模型训练。
二、网络定义与训练方式1——继承Module方式
在对数据进行预处理后,我们可以使用继承Module的方式定义一个包含层的全连接神经网络。代码如下:
#使用继承module方式定义全连接神经网络
class MLPmodel(nn.Module):
    def __init__(self):
        super(MLPmodel,self).__init__()
        #定义第一个隐藏层
        self.hidden1 = nn.Linear(
            in_features=13,#第一个隐藏层的输入,数据的特征数
            out_features=10,#第一个隐藏层的输出,神经元的数量
            bias=True#默认偏置
        )
        self.active1 = nn.ReLU()
        #定义第二个隐藏层
        self.hidden2 = nn.Linear(10,10)
        self.active2 = nn.ReLU()
        #定义预测回归层
        self.regression = nn.Linear(10,1)
    #定义网络的前向传播路径
    def forward(self,x):
            x = self.hidden1(x)
            x = self.active1(x)
            x = self.hidden2(x)
            x = self.active2(x)
            output = self.regression(x)
            return output
在上面的程序里,我们定义了一个类MLPmodel,在继承nn.Module基础上对功能进行了定义:第一部分是定义网络结构,第二部分是定义前向传播过程函数。 在程序中网络结构使用3个使用nn.Linear()定义的全连接层和2个使用nn.ReLU()定义的激活函数层。在前向传播过程中,通过对输入x进行一系列层运算得到输出output。
对于定义好的网络结构可以使用MLPmodel()函数类得到网络结构并输出展示:
#输出网络结构
mlp1 = MLPmodel()
print(mlp1)
结果为:
MLPmodel(
  (hidden1): Linear(in_features=13, out_features=10, bias=True)
  (active1): ReLU()
  (hidden2): Linear(in_features=10, out_features=10, bias=True)
  (active2): ReLU()
  (regression): Linear(in_features=10, out_features=1, bias=True)
)
可以看到网络包含hidden1、active1、hidden2、active2、regression等五个层。
定义好网络后,我们使用已经预处理的数据集进行模型的训练,代码如下:
#对回归模型mlp1进行训练并输出损失函数的变化情况,定义优化器和损失函数
optimizer = SGD(mlp1.parameters(),lr=0.001)#优化器
loss_func = nn.MSELoss()#均方根误差损失函数
train_loss_all = []#输出每个batch的损失函数
#进行训练 输出每个batch的损失函数
for epoch in range(30):
    for step,(b_x,b_y) in enumerate(train_loader):
        output = mlp1(b_x).flatten()#MLP在训练batch上的输出
        train_loss = loss_func(output,b_y)#均方根误差
        optimizer.zero_grad()#每步迭代的梯度初始化为0
        train_loss.backward()#损失后向传播 计算梯度
        optimizer.step()#用梯度进行优化,更新网络参数
        train_loss_all.append(train_loss.item())#使用item是为了更好的精度
    print("training:epoch:{},loss is:{}".format(epoch,train_loss))
在上面程序中,我们使用SGD优化算法对网络进行优化,并使用最小均方根误差(nn.MSELoss)作为损失函数。在代码中我们使用两层for循环对模型进行训练。第一层for循环定义了epoch次数——30次,第二层for循环利用dataloader中的每一个batch对模型参数进行优化,并在优化训练的过程中,把每个batch的损失函数保存到train_loss_all列表中。结果为:
training:epoch:0,loss is:651.8478393554688
training:epoch:1,loss is:451.8705139160156
training:epoch:2,loss is:222.9663543701172
training:epoch:3,loss is:43.8781852722168
training:epoch:4,loss is:36.01059341430664
training:epoch:5,loss is:34.02287673950195
training:epoch:6,loss is:16.315336227416992
training:epoch:7,loss is:27.012081146240234
training:epoch:8,loss is:27.3387508392334
training:epoch:9,loss is:15.65408706665039
training:epoch:10,loss is:11.391887664794922
training:epoch:11,loss is:14.950801849365234
training:epoch:12,loss is:7.878189563751221
training:epoch:13,loss is:10.389168739318848
training:epoch:14,loss is:38.699710845947266
training:epoch:15,loss is:33.012184143066406
training:epoch:16,loss is:16.20742416381836
training:epoch:17,loss is:8.10318374633789
training:epoch:18,loss is:11.674643516540527
training:epoch:19,loss is:12.047943115234375
training:epoch:20,loss is:9.584135055541992
training:epoch:21,loss is:8.645150184631348
training:epoch:22,loss is:12.71487808227539
training:epoch:23,loss is:21.70963478088379
training:epoch:24,loss is:15.55139446258545
training:epoch:25,loss is:16.53809356689453
training:epoch:26,loss is:8.164796829223633
training:epoch:27,loss is:8.541359901428223
training:epoch:28,loss is:20.232585906982422
training:epoch:29,loss is:15.832387924194336
在训练完成后,我们将train_loss进行可视化,输出每个batch上的损失函数值,代码如下;
#将loss可视化
plt.figure()
plt.plot(train_loss_all,"r-")
plt.title("Train loss per iteration")
plt.show()
结果为:
三、网络定义与训练方式2——使用Sequential方式
我们在定义网络结构时,每个层都指定了一个名称,在pytorch中我们有可以将多个功能层连接在一起的函数nn.Sequential,用来方便网络前向传播函数的定义。代码如下:
#定义网络时使用nn.sequential形式

class MLPmodel2(nn.Module):
    def __init__(self):
        super(MLPmodel2,self).__init__()
        #定义隐藏层
        self.hidden = nn.Sequential(
            nn.Linear(13,10),
            nn.ReLU(),
            nn.Linear(10,10),
            nn.ReLU()
            )
        self.regression = nn.Linear(10,1)
    #定义网络的前向传播路径
    def forward(self,x):
        x = self.hidden(x)
        output = self.regression(x)
        return output
由于使用了nn.Sequential()函数,上面的程序定义网络的结构和前向传播过程得到了简化,网络中通过nn.Sequential()函数将两个nn.Linear()层和两个nn.ReLU()层统一打包为self.hidden()层,从而简化了前向传播过程。
下面我们输出新的网络模型,代码如下:
#输出网络结构
mlp2 = MLPmodel2()
print(mlp2)
结果为:
MLPmodel2(
  (hidden): Sequential(
    (0): Linear(in_features=13, out_features=10, bias=True)
    (1): ReLU()
    (2): Linear(in_features=10, out_features=10, bias=True)
    (3): ReLU()
  )
  (regression): Linear(in_features=10, out_features=1, bias=True)
)
下面使用与上一个模型相同的训练方式对mlp2进行训练,并可视化损失函数的变化情况,代码如下:
#对回归模型mlp2进行训练并输出损失函数的变化情况,定义优化器和损失函数
optimizer = SGD(mlp2.parameters(),lr=0.001)#优化器
loss_func = nn.MSELoss()#均方根误差损失函数
train_loss_all = []#输出每个batch的损失函数
#进行训练 输出每个batch的损失函数
for epoch in range(30):
    for step,(b_x,b_y) in enumerate(train_loader):
        output = mlp2(b_x).flatten()#MLP在训练batch上的输出
        train_loss = loss_func(output,b_y)#均方根误差
        optimizer.zero_grad()#每步迭代的梯度初始化为0
        train_loss.backward()#损失后向传播 计算梯度
        optimizer.step()#用梯度进行优化,更新网络参数
        train_loss_all.append(train_loss.item())#使用item是为了更好的精度
    print("training:epoch:{},loss is:{}".format(step,train_loss))


#将loss可视化
plt.figure()
plt.plot(train_loss_all,"r-")
plt.title("Train loss per iteration")
plt.show()
结果为:
training:epoch:0,loss is:436.60546875
training:epoch:1,loss is:582.7129516601562
training:epoch:2,loss is:409.6592712402344
training:epoch:3,loss is:173.41856384277344
training:epoch:4,loss is:44.96323013305664
training:epoch:5,loss is:17.938114166259766
training:epoch:6,loss is:15.396425247192383
training:epoch:7,loss is:21.345027923583984
training:epoch:8,loss is:21.450403213500977
training:epoch:9,loss is:31.526996612548828
training:epoch:10,loss is:16.86117172241211
training:epoch:11,loss is:13.187933921813965
training:epoch:12,loss is:16.603776931762695
training:epoch:13,loss is:11.954453468322754
training:epoch:14,loss is:13.164793014526367
training:epoch:15,loss is:16.980178833007812
training:epoch:16,loss is:10.694413185119629
training:epoch:17,loss is:26.266019821166992
training:epoch:18,loss is:9.10973834991455
training:epoch:19,loss is:25.490833282470703
training:epoch:20,loss is:30.570960998535156
training:epoch:21,loss is:8.850362777709961
training:epoch:22,loss is:17.68893051147461
training:epoch:23,loss is:11.046181678771973
training:epoch:24,loss is:26.081111907958984
training:epoch:25,loss is:37.37417221069336
training:epoch:26,loss is:10.504935264587402
training:epoch:27,loss is:15.730428695678711
training:epoch:28,loss is:33.034278869628906
training:epoch:29,loss is:12.501280784606934
四、Pytorch模型保存和加载方法
在Pytorch中,保存模型有两种方法,分别是保存整个模型和保存模型的参数。下面我们分别简单介绍一下:
1、保存整个模型:
保存整个模型的代码如下,使用torch.save()函数将已经训练好的mlp1模型保存到指定路径下的mlp1.pkl文件。
##保存整个模型
#pth/pkl都一样
torch.save(mlp1,"model/chap3/mlp1.pkl")
在保存整个模型后,我们可以使用torch.load()函数,将指定的模型导入,代码如下:
#导入保存的模型
mlp1load = torch.load("model/chap3/mlp1.pkl")
输出导入的模型,结果为:
mlp1load
MLPmodel(
  (hidden1): Linear(in_features=13, out_features=10, bias=True)
  (active1): ReLU()
  (hidden2): Linear(in_features=10, out_features=10, bias=True)
  (active2): ReLU()
  (regression): Linear(in_features=10, out_features=1, bias=True)
)
2、保存模型的参数:
保存模型参数的代码如下,使用torch.save()函数并通过mlp2.state_dict()来获取网络中已经训练好的参数,从而将已经训练好的mlp2模型参数保存到指定路径下的mlp2.pkl文件。
torch.save(mlp2.state_dict(),"model/chap3/mlp2_param.pkl")在保存整个模型后,我们可以使用torch.load()函数,将指定的模型导入,代码如下:
#导入保存的模型
mlp2load = torch.load("model/chap3/mlp2_param.pkl")
输出导入的模型,结果为:
mlp2load
OrderedDict([('hidden.0.weight',
              tensor([[-0.2132,  0.2305, -0.3366, -0.2649, -0.1252,  0.8415,  0.0502,  0.0361,
                       -0.4234, -0.5494, -0.4924, -0.0738, -0.1656],
                      [ 0.0830, -0.0911, -0.0362,  0.1496,  0.1463, -0.2113, -0.1137, -0.1642,
                       -0.2623, -0.0793, -0.1016, -0.1717, -0.1972],
                      [-0.2800, -0.1617, -0.0751,  0.0053, -0.1634,  0.2190,  0.0618, -0.2121,
                        0.2654,  0.1841, -0.1182,  0.1035, -0.4117],
                      [-0.3292, -0.2940,  0.0461,  0.2259, -0.0652, -0.4952, -0.1125, -0.2642,
                        0.2339, -0.0210,  0.2419,  0.2453, -0.0510],
                      [-0.1584, -0.2223, -0.0186, -0.1980, -0.2813,  0.1431,  0.0585,  0.0022,
                        0.0581, -0.2585, -0.0291, -0.0165, -0.0530],
                      [-0.3257, -0.2950,  0.3473,  0.3138, -0.0478,  0.0700,  0.0868, -0.5014,
                        0.4903,  0.2924,  0.0558, -0.0344, -0.7907],
                      [-0.2362,  0.0233, -0.0668,  0.0022,  0.0403,  0.0933,  0.0418,  0.0439,
                        0.0411,  0.1725,  0.1417, -0.1404,  0.0076],
                      [ 0.1142,  0.1649,  0.2305, -0.2533, -0.0381, -0.1338, -0.0340,  0.1816,
                       -0.0655,  0.2694,  0.1025, -0.0261,  0.1683],
                      [-0.0852,  0.1490, -0.3265,  0.0026, -0.1440,  0.0172, -0.4110,  0.0871,
                       -0.1492, -0.4246,  0.2714, -0.0912,  0.0300],
                      [ 0.0357, -0.1156,  0.2167,  0.0893, -0.0908,  0.5137, -0.1228, -0.4114,
                       -0.2889, -0.2757, -0.2907,  0.0744, -0.0991]])),
             ('hidden.0.bias',
              tensor([ 0.5015, -0.3119,  0.3757,  0.5223,  0.7213,  0.4269, -0.2002,  0.2302,
                       0.4658,  0.8910])),
             ('hidden.2.weight',
              tensor([[-1.0036e-01,  1.2591e-01, -6.5946e-02,  1.0771e-01,  1.3281e-01,
                       -6.9875e-02, -3.0611e-01,  2.8797e-01, -2.6753e-01, -2.5118e-01],
                      [-2.3740e-01, -5.1535e-02,  2.0969e-01, -1.9276e-01,  1.6560e-01,
                        3.2547e-01, -2.0438e-01,  1.2305e-01, -1.1501e-01,  2.7024e-01],
                      [-1.4445e-01,  3.1008e-01,  1.7482e-01,  2.4565e-01, -1.6996e-01,
                        3.1134e-01,  2.4297e-01, -9.9022e-02, -2.3332e-01,  5.4664e-02],
                      [ 1.1616e+00, -1.6310e-01,  5.3211e-01,  5.8448e-01,  6.6959e-01,
                        1.0986e+00, -2.1371e-01,  1.6244e-01,  7.2628e-01,  9.9944e-01],
                      [-2.9865e-01,  1.1893e-01,  1.6788e-01, -9.2804e-02,  1.0962e-01,
                        7.4962e-02,  1.1354e-02, -2.5429e-01,  2.0920e-01,  6.6796e-02],
                      [-3.1396e-01,  1.9069e-01, -2.8313e-01, -1.5441e-01,  1.7565e-01,
                       -7.0314e-02, -2.9698e-01, -8.1007e-03,  2.7669e-01,  3.7587e-02],
                      [ 5.2378e-01, -9.6923e-03,  4.2255e-01,  5.9688e-01,  4.1674e-01,
                        4.0357e-01, -1.4318e-01, -4.9639e-02,  3.4439e-01,  5.6091e-01],
                      [ 1.8507e-01, -2.8330e-01, -2.9120e-01, -2.3122e-01,  6.0142e-04,
                       -2.4921e-01,  8.9442e-02, -1.2345e-01, -2.5589e-01, -1.2468e-01],
                      [-1.0434e-01, -2.6015e-01, -1.2560e-01, -4.5251e-02, -8.1023e-02,
                       -1.6459e-01,  6.4637e-02, -2.8821e-01, -2.7937e-01,  1.9763e-01],
                      [ 2.0804e-01,  1.5478e-01, -1.6674e-02, -2.9766e-01, -5.3503e-02,
                        2.1896e-01, -1.7699e-01, -6.8683e-02, -6.4342e-02, -3.1080e-01]])),
             ('hidden.2.bias',
              tensor([-0.2832,  0.0673,  0.4857,  1.4254, -0.2284, -0.2674,  0.2271,  0.0914,
                       0.1870, -0.1923])),
             ('regression.weight',
              tensor([[-0.0588,  0.1831,  0.4805,  2.6274, -0.1797, -0.1955,  1.1210, -0.1403,
                       -0.1191, -0.2867]])),
             ('regression.bias', tensor([1.6694]))])


