spring security 会话管理
目录
一、会话管理(Session)
1、获取用户信息身份
2、会话控制
3、会话超时
4、会话并发控制
5、集群 session
二、RememberMe 实现
RememberMe 源码分析
三、退出登录
一、会话管理(Session)
用户认证通过后,为了避免用户的每次操作都进行认证可将用户的信息保存在会话中。spring security 提供会话管理,认证通过后将身份信息放入SecurityContextHolder上下文,SecurityContext与当前线程进行绑定,方便获取用户身份。
1、获取用户信息身份
private String getUsername() {
        // 从 SecurityContext 中获取当前登录的用户信息
        Authentication authentication = SecurityContextHolder.getContext().getAuthentication();
        if (!authentication.isAuthenticated()) {
            return null;
        }
        Object principal = authentication.getPrincipal();
        String username = null;
        if (principal instanceof UserDetails) {
            username = ((UserDetails) principal).getUsername();
        } else {
            username = principal.toString();
        }
        return username;
    }
2、会话控制
我们可以通过以下选项准确控制会话何时创建以及Spring Security如何与之交互:
| 机制 | 描述 |
| always | 如果session不存在总是需要创建 |
| ifRequired | 如果需要就创建一个session(默认)登录时 |
| never | Spring Security 将不会创建session,但是如果应用中其他地方创建了session,那么Spring Security将会使用它 |
| stateless | Spring Security将绝对不会创建session,也不使用session。并且它会暗示不使用 cookie,所以每个请求都需要重新进行身份验证。这种无状态架构适用于REST API 及其无状态认证机制。 |
    @Override
    protected void configure(HttpSecurity http) throws Exception {
        http.formLogin() //表单提交
                .successHandler(new MyAuthenticationSuccessHandler("/main.html"));

        http.sessionManagement() // session 策略
                .sessionCreationPolicy(SessionCreationPolicy.IF_REQUIRED);

        http.authorizeRequests()
                .antMatchers("/error.html","/main.html").permitAll() // 不需要认证
                .anyRequest()
                .authenticated() // 认证拦截
                .and().csrf().disable(); //关闭csrf防护
    }
默认情况下,Spring Security 会为每个登录成功的用户会新建一个Session,就是ifRequired 。在执行认证过程之前,spring security将运行SecurityContextPersistenceFilter过滤器负责存储安全请求上下文,上下文根据策略进行存储,默认为HttpSessionSecurityContextRepository ,其使用http session 作为存储器。
3、会话超时
可以在 sevlet 容器中设置 Session 的超时时间,如下设置 Session 有效期为 600s ;
spring boot配置文件:
server:
  servlet:
    session:
      timeout: 60s
注意:session最低60s,参考源码 TomcatServletWebServerFactory#configureSession:
    private void configureSession(Context context) {
        // 设置超时时间
		long sessionTimeout = getSessionTimeoutInMinutes();
		context.setSessionTimeout((int) sessionTimeout);
		Boolean httpOnly = getSession().getCookie().getHttpOnly();
		if (httpOnly != null) {
			context.setUseHttpOnly(httpOnly);
		}
		if (getSession().isPersistent()) {
			Manager manager = context.getManager();
			if (manager == null) {
				manager = new StandardManager();
				context.setManager(manager);
			}
			configurePersistSession(manager);
		}
		else {
			context.addLifecycleListener(new DisablePersistSessionListener());
		}
	}
设置超时时间,最小超时时间为 1 分钟
    private long getSessionTimeoutInMinutes() {
		Duration sessionTimeout = getSession().getTimeout();
		if (isZeroOrLess(sessionTimeout)) {
			return 0;
		}
        // 比较取最大值
		return Math.max(sessionTimeout.toMinutes(), 1);
	}
session 超时之后,可以通过Spring Security 设置跳转的路径。
    http.sessionManagement()
                .sessionCreationPolicy(SessionCreationPolicy.IF_REQUIRED)
                .invalidSessionUrl("/session/invalid");
对应路径接口的代码
@RestController
@RequestMapping("/session")
public class AdminController {

    @GetMapping("/invalid")
    @ResponseStatus(code = HttpStatus.UNAUTHORIZED)
    public String sessionInvalid() {
        return "session失效";
    }
}
4、会话并发控制
用户在这个手机登录后,他又在另一个手机登录相同账户,对于之前登录的账户是否需要被挤兑,或者说在第二次登录时限制它登录,更或者像腾讯视频 VIP 账号一样,最多只能五个人同时登录,第六个人将限制登录。
- maximumSessions:最大会话数量,设置为1表示一个用户只能有一个会话
- expiredSessionStrategy:会话过期策略
    @Override
    protected void configure(HttpSecurity http) throws Exception {
        http.formLogin() //表单提交
                .successHandler(new MyAuthenticationSuccessHandler("/main.html"));

        http.sessionManagement()
                .sessionCreationPolicy(SessionCreationPolicy.IF_REQUIRED)
                .maximumSessions(1) // 只能有一个session 在线, 最大会话数
                .expiredSessionStrategy(new MyExpiredSessionStrategy()); // session过期策略

        http.authorizeRequests()
                .antMatchers("/error.html","/main.html").permitAll() // 不需要认证
                .anyRequest()
                .authenticated() // 认证拦截
                .and().csrf().disable(); //关闭csrf防护
    }
配置 session 失效拒绝策略
import org.springframework.security.web.session.SessionInformationExpiredEvent;
import org.springframework.security.web.session.SessionInformationExpiredStrategy;

import javax.servlet.http.HttpServletResponse;
import java.io.IOException;

public class MyExpiredSessionStrategy implements SessionInformationExpiredStrategy {
    @Override
    public void onExpiredSessionDetected(SessionInformationExpiredEvent event) throws IOException {
        HttpServletResponse response = event.getResponse();
        response.setContentType("application/json;charset=UTF-8");
        response.getWriter().write("您已被挤兑下线!");
    }
}
1. 使用chrome浏览器,先登录,再访问 http://localhost:8080/admin/test
2. 使用ie浏览器,再登录,再访问 http://localhost:8080/admin/test
3. 使用chrome浏览器,重新访问 http://localhost:8080/admin/test,会执行expiredSessionStrategy,页面上显示”您已被挤兑下线!“
阻止用户第二次登录
sessionManagement 也可以配置 maxSessionsPreventsLogin:boolean值,当达到maximumSessions 设置的最大会话个数时阻止登录。
    http.sessionManagement()
                .sessionCreationPolicy(SessionCreationPolicy.IF_REQUIRED)
                .maximumSessions(1) // 只能有一个session 在线, 最大会话数
                .expiredSessionStrategy(new MyExpiredSessionStrategy()) // session过期策略
                .maxSessionsPreventsLogin(true); // 阻止 会话超过最大值,防止被踢
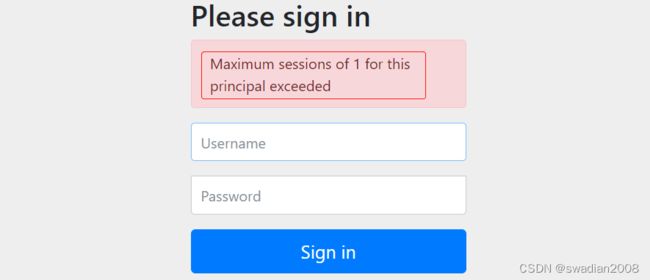
当限制 session 个数为 1 时,同一个账号第二次登陆,将会被阻止
5、集群 session
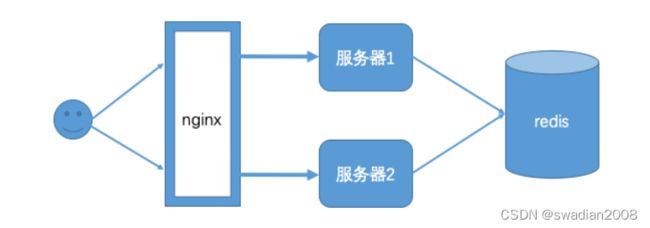
实际场景中一个服务会至少有两台服务器在提供服务,在服务器前面会有一个nginx做负载均衡,用户访问 nginx,nginx 再决定去访问哪一台服务器。当一台服务宕机了之后,另一台服务器也可以继续提供服务,保证服务不中断。此时,用户登录的会话信息就不能再保存到 Web 服务器中,而是保存到一个单独的库(redis、mongodb、mysql等)中,所有服务器都访问同一个库,都从同一个库来获取用户的session信息。
引入spring session依赖
    org.springframework.session
    spring-session-data-redis


    redis.clients
    jedis
修改 application.yaml 配置,spring 就会自动把 session 存入到 redis 当中
spring:
  datasource: # 数据库配置
    driver-class-name: com.mysql.jdbc.Driver
    url: jdbc:mysql://localhost:3306/security?useSSL=false
    password: root
    username: root
  session: # session 配置
    store-type: redis
  redis: # redis 配置
    host: localhost
    port: 6379

server:
  servlet:
    session:
      timeout: 60s # session 过期时间
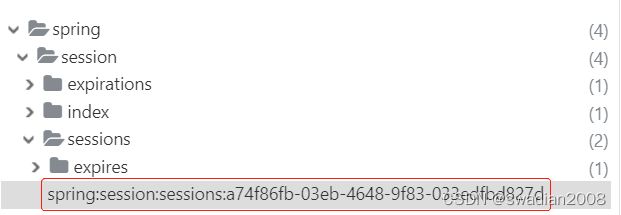
redis 中存放的 session
再次访问时,请求头中会带上 session 信息
session 的自动存储源码
找到 SessionRepositoryFilter.java 这个过滤器,SessionRepositoryFilter#doFilterInternal 方法源码如下
    @Override
	protected void doFilterInternal(HttpServletRequest request,
			HttpServletResponse response, FilterChain filterChain)
			throws ServletException, IOException {
		request.setAttribute(SESSION_REPOSITORY_ATTR, this.sessionRepository);

		SessionRepositoryRequestWrapper wrappedRequest = new SessionRepositoryRequestWrapper(
				request, response, this.servletContext);
		SessionRepositoryResponseWrapper wrappedResponse = new SessionRepositoryResponseWrapper(
				wrappedRequest, response);

		try {
			filterChain.doFilter(wrappedRequest, wrappedResponse);
		}
		finally {
            // 提交session
			wrappedRequest.commitSession();
		}
	}
其中 wrappedRequest.commitSession(); 便执行了 session 存储的逻辑
    private void commitSession() {
			HttpSessionWrapper wrappedSession = getCurrentSession();
			if (wrappedSession == null) {
				if (isInvalidateClientSession()) {
					SessionRepositoryFilter.this.httpSessionIdResolver.expireSession(this,
							this.response);
				}
			}
			else {
				S session = wrappedSession.getSession();
				clearRequestedSessionCache();
                // 存储 session
				SessionRepositoryFilter.this.sessionRepository.save(session);
				String sessionId = session.getId();
				if (!isRequestedSessionIdValid()
						|| !sessionId.equals(getRequestedSessionId())) {
					SessionRepositoryFilter.this.httpSessionIdResolver.setSessionId(this,
							this.response, sessionId);
				}
			}
		}
其中 sessionRepository ,就是类中的以下这个属性
private final SessionRepository sessionRepository;SessionRepository 接口的其中有一个实现就是 redis 的
最终会调用 RedisOperationsSessionRepository#save 进行保存
    public void save(RedisOperationsSessionRepository.RedisSession session) {
        session.saveDelta();
        if (session.isNew()) {
            String sessionCreatedKey = this.getSessionCreatedChannel(session.getId());
            this.sessionRedisOperations.convertAndSend(sessionCreatedKey, session.delta);
            session.setNew(false);
        }
    }
安全会话cookie
我们可以使用 httpOnly 和 secure 标签来保护我们的会话 cookie:
- httpOnly:如果为true,那么浏览器脚本将无法访问 cookie
- secure:如果为true,则cookie将仅通过HTTPS连接发送
spring boot配置文件:
server.servlet.session.cookie.http-only=true
server.servlet.session.cookie.secure=true
二、RememberMe 实现
Spring Security 中 Remember Me 为“记住我”功能,用户只需要在登录时添加 remember-me复选框,取值为true。Spring Security 会自动把用户信息存储到数据源中,以后就可以不登录进行访问。
RememberMe 配置完整版
import com.swadian.userdemo.filter.MyExpiredSessionStrategy;
import com.swadian.userdemo.service.MyUserDetailsService;
import org.springframework.beans.factory.annotation.Autowired;
import org.springframework.context.annotation.Bean;
import org.springframework.context.annotation.Configuration;
import org.springframework.security.config.annotation.authentication.builders.AuthenticationManagerBuilder;
import org.springframework.security.config.annotation.web.builders.HttpSecurity;
import org.springframework.security.config.annotation.web.configuration.WebSecurityConfigurerAdapter;
import org.springframework.security.config.http.SessionCreationPolicy;
import org.springframework.security.crypto.bcrypt.BCryptPasswordEncoder;
import org.springframework.security.crypto.password.PasswordEncoder;
import org.springframework.security.web.authentication.rememberme.JdbcTokenRepositoryImpl;
import org.springframework.security.web.authentication.rememberme.PersistentTokenRepository;

import javax.sql.DataSource;

/**
 * @author swadian
 */
@Configuration // 标记为注解类
public class WebSecurityConfigurer extends WebSecurityConfigurerAdapter {

    @Autowired
    private MyUserDetailsService userService;

    @Bean
    public PasswordEncoder passwordEncoder() {
        return new BCryptPasswordEncoder();
    }

    @Override
    protected void configure(AuthenticationManagerBuilder auth) throws Exception {
        //设置UserDetailsService的实现类
        auth.userDetailsService(userService);
    }

    @Override
    protected void configure(HttpSecurity http) throws Exception {
        http.formLogin() //表单提交
                .loginPage("/login.html") //自定义登录页面
                .loginProcessingUrl("/my-user/login");//登录访问路径,必须和表单提交接口一样

        // 记住我
        http.rememberMe().tokenRepository(persistentTokenRepository())//设置持久化仓库
                .tokenValiditySeconds(3600) //超时时间,单位s 默认两周
                .userDetailsService(userService); //设置自定义登录逻辑

        http.authorizeRequests()
                .antMatchers("/login.html", "/error.html", "/main.html").permitAll() // 不需要认证
                .anyRequest()
                .authenticated() // 认证拦截
                .and().csrf().disable(); //关闭csrf防护
    }

    @Autowired // rememberMe -> 需要引入数据源
    public DataSource dataSource;

    public PersistentTokenRepository persistentTokenRepository() {
        JdbcTokenRepositoryImpl jdbcTokenRepository = new JdbcTokenRepositoryImpl();
        // rememberMe -> 设置数据源
        jdbcTokenRepository.setDataSource(dataSource);
        return jdbcTokenRepository;
    }

}
创建数据库表
CREATE TABLE persistent_logins (
	username VARCHAR ( 64 ) NOT NULL,
	series VARCHAR ( 64 ) PRIMARY KEY,
	token VARCHAR ( 64 ) NOT NULL,
    last_used TIMESTAMP NOT NULL
)
在客户端登录页面 login.html 中添加 remember-me 的复选框,只要用户勾选了复选框下次就不需要进行登录了。
Title
成功登陆后,我们可以看到数据库表中多了一行记录
RememberMe 源码分析
spring security 很多功能都是基于过滤器实现的,因此我们可以去代码中找 RememberMe 过滤器的代码实现。
在源码中可以找到这个方法 RememberMeAuthenticationFilter # doFilter
public void doFilter(ServletRequest req, ServletResponse res, FilterChain chain)
			throws IOException, ServletException {
		HttpServletRequest request = (HttpServletRequest) req;
		HttpServletResponse response = (HttpServletResponse) res;

		if (SecurityContextHolder.getContext().getAuthentication() == null) {
            // 自动登陆
			Authentication rememberMeAuth = rememberMeServices.autoLogin(request,
					response);

			if (rememberMeAuth != null) {
				// Attempt authenticaton via AuthenticationManager
				try {
                    // 认证逻辑
					rememberMeAuth = authenticationManager.authenticate(rememberMeAuth);

					// Store to SecurityContextHolder
					SecurityContextHolder.getContext().setAuthentication(rememberMeAuth);

					onSuccessfulAuthentication(request, response, rememberMeAuth);

					if (logger.isDebugEnabled()) {
						logger.debug("SecurityContextHolder populated with remember-me token: '"
								+ SecurityContextHolder.getContext().getAuthentication()
								+ "'");
					}

					// Fire event
					if (this.eventPublisher != null) {
						eventPublisher
								.publishEvent(new InteractiveAuthenticationSuccessEvent(
										SecurityContextHolder.getContext()
												.getAuthentication(), this.getClass()));
					}

					if (successHandler != null) {
						successHandler.onAuthenticationSuccess(request, response,
								rememberMeAuth);

						return;
					}

				}
				catch (AuthenticationException authenticationException) {
					if (logger.isDebugEnabled()) {
						logger.debug(
								"SecurityContextHolder not populated with remember-me token, as "
										+ "AuthenticationManager rejected Authentication returned by RememberMeServices: '"
										+ rememberMeAuth
										+ "'; invalidating remember-me token",
								authenticationException);
					}

					rememberMeServices.loginFail(request, response);

					onUnsuccessfulAuthentication(request, response,
							authenticationException);
				}
			}

			chain.doFilter(request, response);
		}
		else {
			if (logger.isDebugEnabled()) {
				logger.debug("SecurityContextHolder not populated with remember-me token, as it already contained: '"
						+ SecurityContextHolder.getContext().getAuthentication() + "'");
			}

			chain.doFilter(request, response);
		}
	}
三、退出登录
Spring security默认实现了 logout 退出,用户只需要向 Spring Security 项目中发送 /logout 退出请求即可。
默认的退出 url 为 /logout ,退出成功后跳转到 /login?logout 。进入 LogoutConfigurer.java 可以看到如下配置
自定义退出逻辑
如果不希望使用默认值,可以通过下面的方法进行修改。
    http.logout()
                .logoutUrl("/logout")
                .logoutSuccessUrl("/login.html"); // 退出后跳转到登陆页面
执行 http://localhost:8080/logout 可以看到退出效果
退出登录源码
同样是从过滤器开始,LogoutFilter # doFilter
    public void doFilter(ServletRequest req, ServletResponse res, FilterChain chain)
			throws IOException, ServletException {
		HttpServletRequest request = (HttpServletRequest) req;
		HttpServletResponse response = (HttpServletResponse) res;

		if (requiresLogout(request, response)) {
            // 1-获取用户信息
			Authentication auth = SecurityContextHolder.getContext().getAuthentication();

			if (logger.isDebugEnabled()) {
				logger.debug("Logging out user '" + auth
						+ "' and transferring to logout destination");
			}
            // 2-退出登陆 -> SecurityContextLogoutHandler#logout
			this.handler.logout(request, response, auth);
            // 3-拓展点,成功退出后的操作
			logoutSuccessHandler.onLogoutSuccess(request, response, auth);

			return;
		}

		chain.doFilter(request, response);
	}
SecurityContextLogoutHandler 实现了 LogoutHandler 接口
SecurityContextLogoutHandler # logout 实现了具体的退出逻辑
当退出操作出发时,将发生:
- 销毁 httpSession 对象
- 清除认证状态
- 跳转到 /login.html -> 配置了 logoutSuccessUrl 的处理逻辑
    public void logout(HttpServletRequest request, HttpServletResponse response,
			Authentication authentication) {
		Assert.notNull(request, "HttpServletRequest required");
		if (invalidateHttpSession) {
			HttpSession session = request.getSession(false);
			if (session != null) {
				logger.debug("Invalidating session: " + session.getId());
                // 1-失效 session
				session.invalidate();
			}
		}

		if (clearAuthentication) {
            // 2-清空用户信息
			SecurityContext context = SecurityContextHolder.getContext();
			context.setAuthentication(null);
		}
        // 3-清空Security上下文
		SecurityContextHolder.clearContext();
	}
至此,退出登陆分析结束。


