设置 jupyter notebook 可远程访问
准备事项
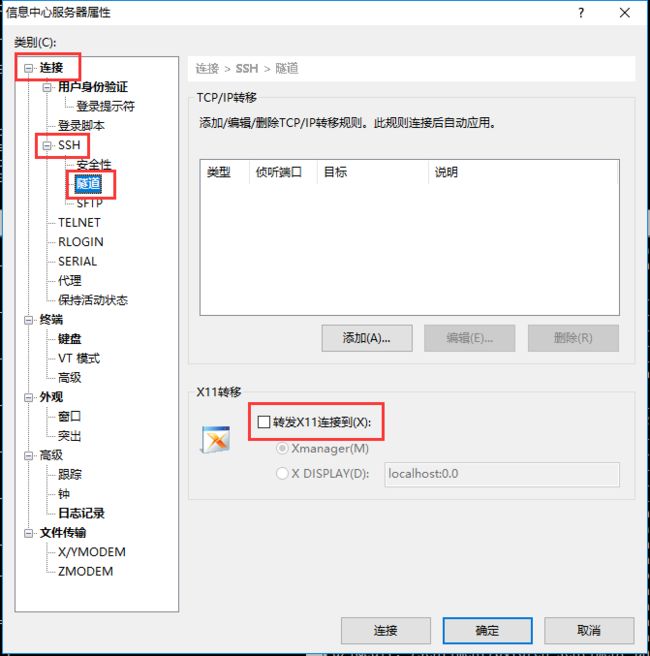
首先,我们都知道运行 jupyter notebook 命令时,系统会自动打开浏览器。我们使用命令行连接服务器的时候并不希望它打开浏览器,只需要它默默地在后端运行就可以了。此时我们只要稍微设置一下就可以了,我们通过 Xshell 连接远端服务器,在命令行运行这条命令时,Xshell 会自动将这条命令转发给 Xmanager,利用 Xmanager 来显示浏览器,那么我们设置不转移就可以了,首先在 Xshell 的窗口选择 文件 - 属性,就可以出现如下图所示的窗口了,点击 连接 - SSH - 隧道 - 取消勾选 转发X11连接到(X):
步入正题
接下来就可以在远端服务器上执行以下操作:
1. 生成一个 notebook 配置文件
默认情况下,配置文件 ~/.jupyter/jupyter_notebook_config.py 并不存在,需要自行创建。使用下列命令生成配置文件:
jupyter notebook --generate-config
如果是 root 用户执行上面的命令,会发生一个问题:
Running as root it not recommended. Use --allow-root to bypass.
提示信息很明显,root 用户执行时需要加上 --allow-root 选项。
jupyter notebook --generate-config --allow-config
执行成功后,会出现下面的信息:
Writing default config to: /root/.jupyter/jupyter_notebook_config.py
2. 生成密码
自动生成
从 jupyter notebook 5.0 版本开始,提供了一个命令来设置密码:jupyter notebook password,生成的密码存储在 jupyter_notebook_config.json。
$ jupyter notebook password
Enter password:  ****
Verify password: ****
[NotebookPasswordApp] Wrote hashed password to /Users/you/.jupyter/jupyter_notebook_config.json
手动生成
除了使用提供的命令,也可以通过手动安装,我是使用的手动安装,因为 jupyter notebook password 出来一堆内容,没耐心看。打开 ipython 执行下面内容:
In [1]: from notebook.auth import passwd
In [2]: passwd()
Enter password:
Verify password:
Out[2]: 'sha1:67c9e60bb8b6:9ffede0825894254b2e042ea597d771089e11aed'
sha1:67c9e60bb8b6:9ffede0825894254b2e042ea597d771089e11aed 这一串就是要在 jupyter_notebook_config.py 添加的密码。
c.NotebookApp.password = u'sha1:67c9e60bb8b6:9ffede0825894254b2e042ea597d771089e11aed'
3. 修改配置文件
在 jupyter_notebook_config.py 中找到下面的行,取消注释并修改。
c.NotebookApp.ip='*'
c.NotebookApp.password = u'sha:ce...刚才复制的那个密文'
c.NotebookApp.open_browser = False
c.NotebookApp.port =8888 #可自行指定一个端口, 访问时使用该端口
以上设置完以后就可以在服务器上启动 jupyter notebook,jupyter notebook, root 用户使用 jupyter notebook --allow-root。打开 IP:指定的端口, 输入密码就可以访问了。
需要注意的是不能在隐藏目录 (以 . 开头的目录)下启动 jupyter notebook, 否则无法正常访问文件。

参考文章
[1] http://jupyter-notebook.readthedocs.io/en/latest/public_server.html#notebook-server-security
[2] https://blog.csdn.net/simple_the_best/article/details/77005400