Java进阶重点分析
文章目录
- 单例模式
-
- 饿汉式三部曲(资源浪费)
- 懒汉式三部曲(线程不安全)
- 异常-Exception
-
- 初识异常代码
- 解决方案-异常捕获( try-catch)
- Error and Exception
- 异常体系图
- 常见的运行时异常
-
- \1)NullPointerException 空指针异常
- \2)ArithmeticException 数学运算异常
- \3) ArrayIndexOutOfBoundsException 数组下标越界异常
- \4) ClassCastException 类型转换异常
- \5) NumberFormatException 数字格式不正确异常
- 编译异常
-
- FileNotFoundException
- try-catch-finally
- try-catch-finally 执行顺序小结
- Integer类:拆箱与装箱
-
- 包装类和基本数据的转换和原理
- 面试题
- 包装类型和 String 类型的相互转换
- Integer 类面试题
- String 类
-
- String 类的理解和创建对象
- 创建 String 对象的两种方式
- 两种创建 String 对象的区别
- 面试题
- String 类的常见方法
- StringBuffer 与 StringBuilder
-
-
- StringBuffer 类.基本介绍
- String VS StringBuffer
- String 和 StringBuffer 相互转换
- StringBuffer 类常见方法
- StringBuffer 类课堂测试题
- StringBuffer 类课堂测试题2
- StringBuilder 类.基本介绍
- StringBuilder 常用方法
- String、StringBuffer 和 StringBuilder 的比较
- String、StringBuffer 和 StringBuilder 的选择
-
- List | ArrayList | Vector
-
- List 接口和常用方法
-
- List 接口基本介绍
- List 接口的常用方法
- List 接口课堂练习
- List 的三种遍历方式 [ArrayList, LinkedList,Vector]
- 实现类的课堂练习 2
- ArrayList 底层结构和源码分析
-
- ArrayList 的注意事项
- ArrayList 的底层操作机制源码分析(重点,难点.)
- Vector 底层结构和源码剖析
-
- Vector 的基本介绍
- Vector 和 ArrayList 的比较
- LinkedList 底层结构
-
- LinkedList 的全面说明
- LinkedList 的底层操作机制
- LinkedList 的增删改查案例
- ArrayList 和 LinkedList 比较
- HashSet 与 LinkedHashSet
-
- Set 接口和常用方法
-
- Set 接口基本介绍
- Set 接口的常用方法
- Set 接口的遍历方式
- Set 接口的常用方法举例
- Set 接口实现类-HashSet
-
- HashSet 的全面说明
- HashSet 案例说明
- HashSet 底层机制说明
- HashSet 课堂练习 1
- HashSet 课后练习 2
- Set 接口实现类-LinkedHashSet
-
- LinkedHashSet 的全面说明
- LinkedHashSet 课后练习题
- HashMap 与 HashTable(超重点)
-
- Map 接口和常用方法
-
- Map 接口实现类的特点 [很实用]
- Map 接口常用方法
- Map 接口遍历方法
- Map 接口课堂练习
- Map 接口实现类-HashMap
-
- HashMap 小结
- HashMap 底层机制及源码剖析
- HashMap 底层机制及源码剖析
- Map 接口实现类-Hashtable
-
- HashTable 的基本介绍
- Hashtable 和 HashMap 对比
- 总结-开发中如何选择集合实现类(记住)
- 多线程详解
-
- 线程相关概念
-
- 程序(program)
- 进程
- 什么是线程
- 其他相关概念
- 线程基本使用
-
- 创建线程的两种方式
- 线程应用案例 1-继承 Thread 类
- 线程应用案例 2-实现 Runnable 接口
- 线程使用应用案例-多线程执行
- 线程如何理解
- 继承 Thread vs 实现 Runnable 的区别
- 线程终止
-
- 基本说明
- 应用案例
- 线程常用方法
-
- 常用方法第一组
- 注意事项和细节
- 应用案例
- 常用方法第二组
- 应用案例
- 课堂练习
- 用户线程和守护线程
- 应用案例
- 线程的生命周期
-
- JDK 中用 Thread.State 枚举表示了线程的几种状态
- 线程状态转换图
- 写程序查看线程状态
- 线程的同步
-
- 先看一个问题
- Synchronized
-
- 线程同步机制
- 同步具体方法-Synchronized
- 分析同步原理
- 互斥锁
-
- 基本介绍
- 使用互斥锁来解决售票问题
- 注意事项和细节
- 线程的死锁
-
- 基本介绍
- 应用案例
- 应用案例
- 释放锁
-
- 下面操作会释放锁
- 下面操作不会释放锁
- 释放锁
-
- 下面操作会释放锁
- 下面操作不会释放锁
单例模式
饿汉式三部曲(资源浪费)
1.将构造器私有化(导致外部不可直接new你这个类的实例)
    private GirlFriend(String name) {
        this.name = name;
    }
2.在类的内部直接创建(在自己的的类中创建一个属于自己的女朋友)
private static GirlFriend gf = new GirlFriend("红红");
3.提供一个static公共方法,返回gf对象(有static关键字是前提)
public static GirlFriend getInstance(){
        return gf;
    }
总代码(外部不可以new也不会创建多个对象,外部只可以通过这个类调用返回女朋友对象的这个方法获取)
public class single {
    public static void main(String[] args) {
        GirlFriend instance = GirlFriend.getInstance();
        System.out.println(instance);
    }
}
//有一个类,GirlFriend
//只能有一个女朋友
class GirlFriend{
    private String name;
    //为了能在静态方法中,返回gf对象,将其修饰成static
    private static GirlFriend gf = new GirlFriend("红红");
    //只能创建一个GirlFriend的对象
    //步骤
    //1.将构造器私有化
    //2.在类的内部直接创建
    //3.提供一个static公共方法,返回gf对象
    private GirlFriend(String name) {
        this.name = name;
    }
    public static GirlFriend getInstance(){
        return gf;
    }
    @Override
    public String toString() {
        return "GirlFriend{" +
                "name='" + name + '\'' +
                '}';
    }
}
懒汉式三部曲(线程不安全)
1.构造器私有化
    private Cat(String name) {
        this.name = name;
    }
2.定义一个static静态属性对象
private static Cat cat;
3.提供一个public的static方法,可以返回一个Cat对象(多线程情况下,多个线程同时new Cat,导致线程不安全,同样可以返回一个对象)
public static Cat getInstance(){
    if (cat == null){//如果没有创建cat对象
        cat = new Cat("小可爱");
    }
    return cat;
}
4.懒汉式,只有用户使用getInstance时,才返回cat对象,再次调用时,会返回上次创建的cat对象(他们会重复使用已有的对象,而懒得去创建)
总代码
public class single2 {
    public static void main(String[] args) {
        Cat instance = Cat.getInstance();
        System.out.println(instance);
    }
}
//希望程序运行过程中,只能创建一个猫
//使用单例模式
class Cat{
    private String name;
    private static Cat cat;
    //步骤
    //1.构造器私有化
    //2.定义一个static静态属性对象
    //3.提供一个public的static方法,可以返回一个Cat对象
    //4.懒汉式,只有用户使用getInstance时,才返回cat对象,再次调用时,会返回上次创建的cat对象
    //保证单调性
    private Cat(String name) {
        this.name = name;
    }
    public static Cat getInstance(){
        if (cat == null){//如果没有创建cat对象
            cat = new Cat("小可爱");
        }
        return cat;
    }
    @Override
    public String toString() {
        return "Cat{" +
                "name='" + name + '\'' +
                '}';
    }
}
异常-Exception
初识异常代码
(数学运算异常)
    public static void main(String[] args) {
        int num1 = 10;
        int num2 = 0;
        int res = num1 / num2;
        System.out.println("程序继续运行....");
    }
解决方案-异常捕获( try-catch)
对异常进行捕获,保证程序可以继续运行. (异常处理机制)
    public static void main(String[] args) {
        int num1 = 10;
        int num2 = 0;
        //1. num1 / num2 => 10 / 0
        //2. 当执行到 num1 / num2 因为 num2 = 0, 程序就会出现抛出异常 ArithmeticException
        //3. 当抛出异常后,程序就退出,崩溃了 , 下面的代码就不在执行
        //4. 大家想想这样的程序好吗? 不好,不应该出现了一个不算致命的问题,就导致整个系统崩溃
        //5. java 设计者,提供了一个叫异常处理机制来解决该问题
        // int res = num1 / num2;
        //如果程序员,认为一段代码可能出现异常问题,可以使用 try-catch 异常处理机制来解决
        //从而保证程序的健壮性
        //将该代码块->选中->快捷键 ctrl + alt + t -> 选中 try-catch
        //6. 如果进行异常处理,那么即使出现了异常,程序可以继续执行
        try {
            int res = num1 / num2;
        } catch (Exception e) {
            //e.printStackTrace();
            System.out.println("出现异常的原因=" + e.getMessage());
            //输出异常信息 }
            System.out.println("程序继续运行....");
        }
    }
Error and Exception

异常体系图


常见的运行时异常
\1) NullPointerException 空指针异常
\2) ArithmeticException 数学运算异常
\3) ArrayIndexOutOfBoundsException 数组下标越界异常
\4) ClassCastException 类型转换异常
\5) NumberFormatException 数字格式不正确异常[]
\1)NullPointerException 空指针异常
    public static void main(String[] args) {
        String name = null;
        System.out.println(name.length());
    }
\2)ArithmeticException 数学运算异常
    public static void main(String[] args) {
        int num1 = 10;
        int num2 = 0;
        int res = num1 / num2;
        System.out.println("程序继续运行....");
    }
\3) ArrayIndexOutOfBoundsException 数组下标越界异常
    public static void main(String[] args) {
        int[] arr = {1, 2, 3};
        for (int i = 0; i <= arr.length; i++) {
            System.out.println(arr[i]);
        }
    }
\4) ClassCastException 类型转换异常
    public static void main(String[] args) {
        A b = new B(); //向上转型
        B b2 = (B) b;//向下转型,这里是 OK
        C c2 = (C) b;//这里抛出 ClassCastException
    }
class A { }
class B extends A { }
class C extends A { }
\5) NumberFormatException 数字格式不正确异常
    public static void main(String[] args) {
        String name = "小王学编程"; //将 String 转成 int
        int num = Integer.parseInt(name);//抛出 NumberFormatException
        System.out.println(num);//1234
    }
编译异常
![]()
FileNotFoundException
public static void main(String[] args) {
    try {
        FileInputStream fis;
        fis = new FileInputStream("d:\\aa.jpg");
        int len;
        while ((len = fis.read()) != -1) {
            System.out.println(len);
        }
        fis.close();
    } catch (IOException e) {
        e.printStackTrace();
    }
}
try-catch-finally
public static void main(String[] args) {
    //ctrl + atl + t
    //1. 如果异常发生了,则异常发生后面的代码不会执行,直接进入到catch 块
    //2. 如果异常没有发生,则顺序执行 try 的代码块,不会进入到 catch
    //3. 如果希望不管是否发生异常,都执行某段代码(比如关闭连接,释放资源等)则使用如下代码- finally
    try {
        String str = "小王";
        int a = Integer.parseInt(str);
        System.out.println("数字:" + a);
    } catch (NumberFormatException e) {
        System.out.println("异常信息=" + e.getMessage());
    } finally {
        System.out.println("finally 代码块被执行...");
    }
    System.out.println("程序继续...");
}
try-catch-finally 执行顺序小结

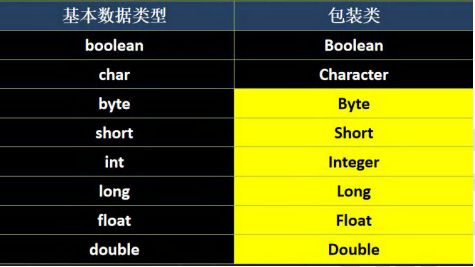
Integer类:拆箱与装箱
包装类和基本数据的转换和原理

    public static void main(String[] args) {
        //演示 int <--> Integer 的装箱和拆箱
        //jdk5 前是手动装箱和拆箱
        //手动装箱 int->Integer
        int n1 = 100;
        Integer integer = new Integer(n1);
        Integer integer1 = Integer.valueOf(n1);
        //手动拆箱
        // Integer -> int
        int i = integer.intValue();
        //jdk5 后,就可以自动装箱和自动拆箱
        int n2 = 200;
        // 自动装箱 int->Integer
        Integer integer2 = n2;
        // 底层使用的是 Integer.valueOf(n2)
        // 自动拆箱Integer->int
        int n3 = integer2;
        // 底层仍然使用的是 intValue()方法
    }
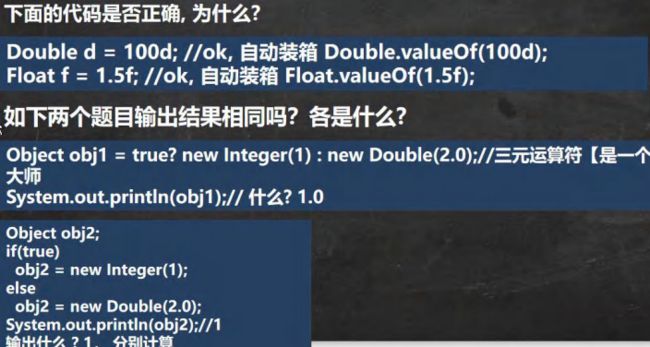
面试题
包装类型和 String 类型的相互转换
public static void main(String[] args) {
        //包装类(Integer)->String
        Integer i = 100;
        //自动装箱
        //方式 1
        String str1 = i + "";
        //方式 2
        String str2 = i.toString();
        //方式 3
        String str3 = String.valueOf(i);
        //String -> 包装类(Integer)
        String str4 = "12345";
        Integer i2 = Integer.parseInt(str4);
        //使用到自动装箱
        Integer i3 = new Integer(str4);
        //构造器
        System.out.println("ok~~");
    }
Integer 类面试题
public static void main(String[] args) {
        Integer i = new Integer(1);
        Integer j = new Integer(1);
        System.out.println(i == j); //False
        //所以,这里主要是看范围 -128 ~ 127 就是直接返回
        /*
        //1. 如果 i 在 IntegerCache.low(-128)~IntegerCache.high(127),就直接从数组返回
        //2. 如果不在 -128~127,就直接 new Integer(i)
        public static Integer valueOf(int i) {
        if (i >= IntegerCache.low && i <= IntegerCache.high)
            return IntegerCache.cache[i + (-IntegerCache.low)];
        return new Integer(i);
        }
        */
        Integer m = 1; //底层 Integer.valueOf(1); -> 阅读源码
        Integer n = 1;//底层 Integer.valueOf(1);
        System.out.println(m == n); //T
        //所以,这里主要是看范围 -128 ~ 127 就是直接返回
        //,否则,就 new Integer(xx);
        Integer x = 128;//底层 Integer.valueOf(1);
        Integer y = 128;//底层 Integer.valueOf(1);
        System.out.println(x == y);//False
    }
public static void main(String[] args) {
    //示例一
    Integer i1 = new Integer(127);
    Integer i2 = new Integer(127);
    System.out.println(i1 == i2);//F
    //示例二
    Integer i3 = new Integer(128);
    Integer i4 = new Integer(128);
    System.out.println(i3 == i4);//F
    //示例三
    Integer i5 = 127;//底层 Integer.valueOf(127)
    Integer i6 = 127;//-128~127
    System.out.println(i5 == i6); //T
    //示例四
    Integer i7 = 128;
    Integer i8 = 128;
    System.out.println(i7 == i8);//F
    //示例五
    Integer i9 = 127; //Integer.valueOf(127)
    Integer i10 = new Integer(127);
    System.out.println(i9 == i10);//F
    //示例六
    Integer i11=127;
    int i12=127;
    //只有有基本数据类型,判断的是
    //值是否相同
    System.out.println(i11==i12); //T
    //示例七
    Integer i13=128;
    int i14=128;
    System.out.println(i13==i14);//T
}
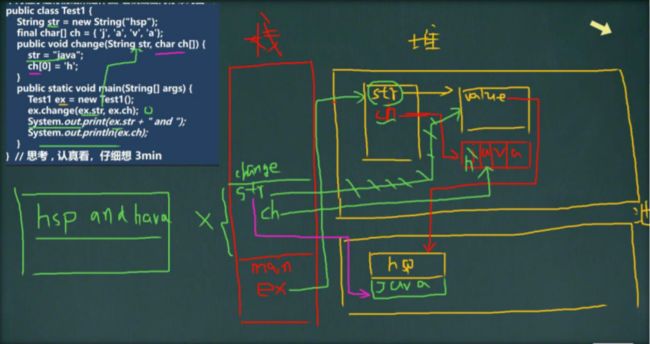
String 类
String 类的理解和创建对象

public static void main(String[] args) {
//1.String 对象用于保存字符串,也就是一组字符序列
//2."jack" 字符串常量, 双引号括起的字符序列
//3.字符串的字符使用 Unicode 字符编码,一个字符(不区分字母还是汉字)占两个字节
//4.String 类有很多构造器,构造器的重载
//常用的有 String s1 = new String();
//String s2 = new String(String original);
//String s3 = new String(char[] a);
//String s4 = new String(char[] a,int startIndex,int count)
//String s5 = new String(byte[] b)
//5. String 类实现了接口 Serializable【String 可以串行化:可以在网络传输】
//接口 Comparable [String 对象可以比较大小]
//6. String 是 final 类,不能被其他的类继承
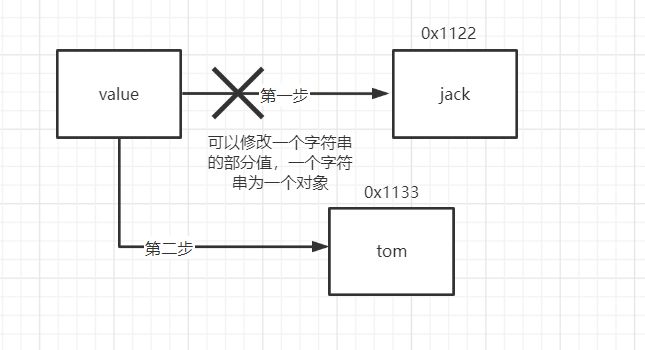
//7. String 有属性 private final char value[]; 用于存放字符串内容
//8. 一定要注意:value 是一个 final 类型, 不可以修改(需要功力):即 value 不能指向
//新的地址,但是单个字符内容是可以变化
String name = "jack";
name = "tom";
System.out.println(name);
final char[] value = {'a','b','c'};
char[] v2 = {'t','o','m'};
value[0] = 'H';
//value = v2; 不可以修改 value 地址
}
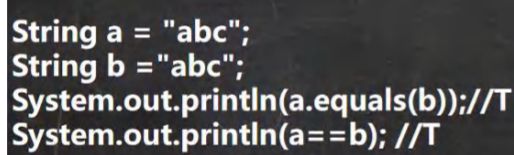
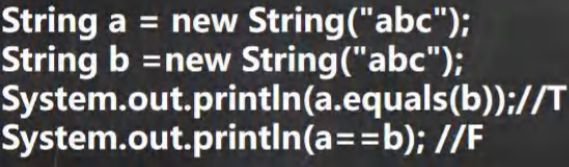
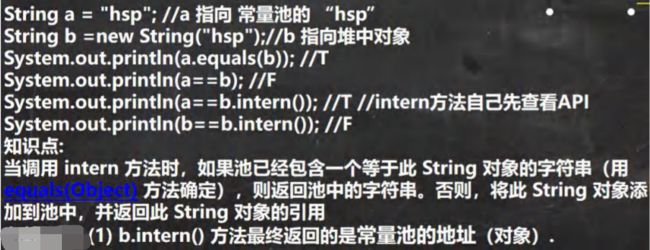
创建 String 对象的两种方式

两种创建 String 对象的区别


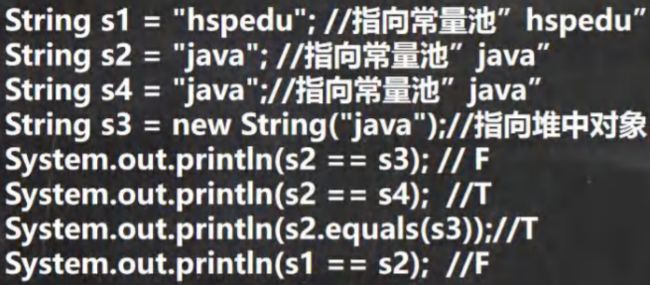
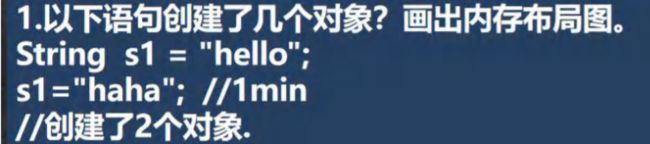
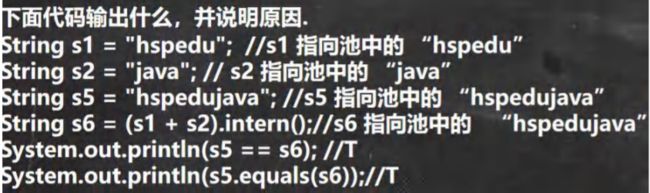
面试题


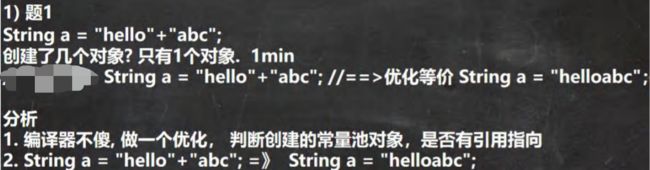

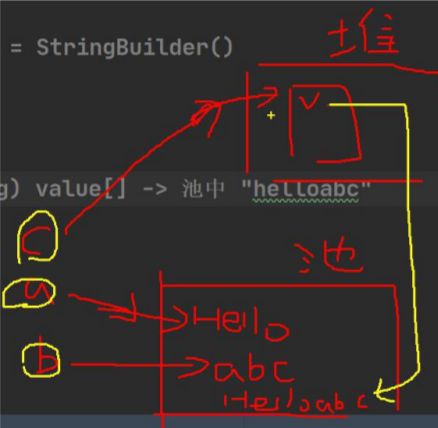
String 类的常见方法


public static void main(String[] args) {
    //1. equals 前面已经讲过了. 比较内容是否相同,区分大小写
    String str1 = "hello";
    String str2 = "Hello";
    System.out.println(str1.equals(str2));//F
    // 2.equalsIgnoreCase 忽略大小写的判断内容是否相等
    String username = "johN";
    if ("john".equalsIgnoreCase(username)) {
        System.out.println("Success!");
    } else {
        System.out.println("Failure!");
    }
    // 3.length 获取字符的个数,字符串的长度
    System.out.println("小王".length());
    // 4.indexOf 获取字符在字符串对象中第一次出现的索引,索引从 0 开始,如果找不到,返回-1
    String s1 = "wer@terwe@g";
    int index = s1.indexOf('@');
    System.out.println(index);// 3
    System.out.println("weIndex=" + s1.indexOf("we"));//0
    // 5.lastIndexOf 获取字符在字符串中最后一次出现的索引,索引从 0 开始,如果找不到,返回-1
    s1 = "wer@terwe@g@";
    index = s1.lastIndexOf('@');
    System.out.println(index);//11
    System.out.println("ter 的位置=" + s1.lastIndexOf("ter"));//4
    // 6.substring 截取指定范围的子串
    String name = "hello,张三";
    //下面 name.substring(6) 从索引 6 开始截取后面所有的内容
    System.out.println(name.substring(6));//截取后面的字符
    //name.substring(0,5)表示从索引 0 开始截取,截取到索引 5-1=4 位置
    System.out.println(name.substring(2,5));//llo
}

public static void main(String[] args) {
    // 1.toUpperCase 转换成大写
    String s = "heLLo";
    System.out.println(s.toUpperCase());//HELLO
    // 2.toLowerCase
    System.out.println(s.toLowerCase());//hello
    // 3.concat 拼接字符串
    String s1 = "宝玉";
    s1 = s1.concat("林黛玉").concat("薛宝钗").concat("together");
    System.out.println(s1);//宝玉林黛玉薛宝钗 together
    // 4.replace 替换字符串中的字符
    s1 = "宝玉 and 林黛玉 林黛玉 林黛玉";
    //在 s1 中,将 所有的 林黛玉 替换成薛宝钗
    // 老韩解读: s1.replace() 方法执行后,返回的结果才是替换过的. // 注意对 s1 没有任何影响
    String s11 = s1.replace("宝玉", "jack");
    System.out.println(s1);//宝玉 and 林黛玉 林黛玉 林黛玉
    System.out.println(s11);//jack and 林黛玉 林黛玉 林黛玉
    // 5.split 分割字符串, 对于某些分割字符,我们需要 转义比如 | \\等
    String poem = "锄禾日当午,汗滴禾下土,谁知盘中餐,粒粒皆辛苦";
    // 1. 以 , 为标准对 poem 进行分割 , 返回一个数组
    // 2. 在对字符串进行分割时,如果有特殊字符,需要加入 转义符 \
    String[] split = poem.split(",");
    poem = "E:\\aaa\\bbb";
    split = poem.split("\\\\");
    System.out.println("==分割后内容===");
    for (int i = 0; i < split.length; i++) {
        System.out.println(split[i]);
    }
    // 6.toCharArray 转换成字符数组
    s = "happy";
    char[] chs = s.toCharArray();
    for (int i = 0; i < chs.length; i++) {
        System.out.println(chs[i]);
    }
    // 7.compareTo 比较两个字符串的大小,如果前者大,
    // 则返回正数,后者大,则返回负数,如果相等,返回 0
    // (1) 如果长度相同,并且每个字符也相同,就返回 0
    // (2) 如果长度相同或者不相同,但是在进行比较时,可以区分大小
    // 就返回 if (c1 != c2) {
    // return c1 - c2;
    // }
    // (3) 如果前面的部分都相同,就返回 str1.len - str2.len
    String a = "jcck";// len = 3
    String b = "jack";// len = 4
    System.out.println(a.compareTo(b)); // 返回值是 'c' - 'a' = 2 的值
    // 8.format 格式字符串
    /* 占位符有:
     * %s 字符串 %c 字符 %d 整型 %.2f 浮点型
     */
    String name = "john";
    int age = 10;
    double score = 56.857;
    char gender = '男';
    //将所有的信息都拼接在一个字符串.
    String info = "我的姓名是" + name + "年龄是" + age + ",成绩是" + score + "性别是" + gender + "。希望大家喜欢我!";

    System.out.println(info);
    //1. %s , %d , %.2f %c 称为占位符
    //2. 这些占位符由后面变量来替换
    //3. %s 表示后面由 字符串来替换
    //4. %d 是整数来替换
    //5. %.2f 表示使用小数来替换,替换后,只会保留小数点两位, 并且进行四舍五入的处理
    //6. %c 使用 char 类型来替换
    String formatStr = "我的姓名是%s 年龄是%d,成绩是%.2f 性别是%c.希望大家喜欢我!";
    String info2 = String.format(formatStr, name, age, score, gender);
    System.out.println("info2=" + info2);
}
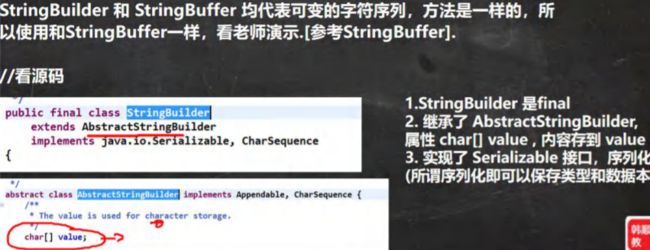
StringBuffer 与 StringBuilder
StringBuffer 类.基本介绍
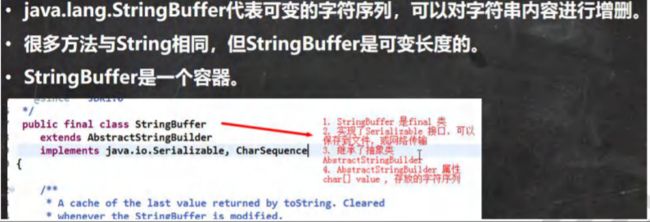
public static void main(String[] args) {
        //1. StringBuffer 的直接父类 是 AbstractStringBuilder
        //2. StringBuffer 实现了 Serializable, 即 StringBuffer 的对象可以串行化
        //3. 在父类中 AbstractStringBuilder 有属性 char[] value,不是 final
        // 该 value 数组存放 字符串内容,引出存放在堆中的
        //4. StringBuffer 是一个 final 类,不能被继承
        //5. 因为 StringBuffer 字符内容是存在 char[] value, 所有在变化(增加/删除)
        // 不用每次都更换地址(即不是每次创建新对象), 所以效率高于 String
        StringBuffer stringBuffer = new StringBuffer("hello");
    }
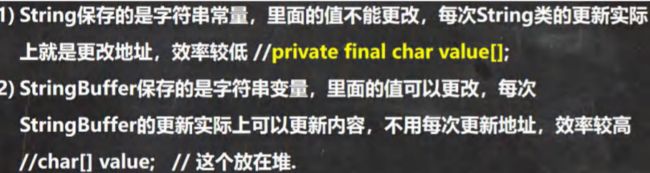
String VS StringBuffer
String 和 StringBuffer 相互转换
    public static void main(String[] args) {
        //看 String——>StringBuffer
        String str = "hello tom";
        //方式 1 使用构造器
        //注意: 返回的才是 StringBuffer 对象,对 str 本身没有影响
        StringBuffer stringBuffer = new StringBuffer(str);
        //方式 2 使用的是 append 方法
        StringBuffer stringBuffer1 = new StringBuffer();
        stringBuffer1 = stringBuffer1.append(str);
        //看看 StringBuffer ->String
        StringBuffer stringBuffer3 = new StringBuffer("小王学编程");
        //方式 1 使用 StringBuffer 提供的 toString 方法
        String s = stringBuffer3.toString();
        //方式 2: 使用构造器来搞定
        String s1 = new String(stringBuffer3);
    }
StringBuffer 类常见方法
public static void main(String[] args) {
        StringBuffer s = new StringBuffer("hello");
        //增
        s.append(',');// "hello,"
        s.append("张三丰");//"hello,张三丰"
        s.append("赵敏").append(100).append(true).append(10.5);//"hello,张三丰赵敏 100true10.5" System.out.println(s);//"hello,张三丰赵敏 100true10.5"
        //删
        /*
         * 删除索引为>=start &&
        s.delete(11, 14);
        System.out.println(s);//"hello,张三丰赵敏 true10.5"
        //改
        //解读,使用 周芷若 替换 索引 9-11 的字符 [9,11)
        s.replace(9, 11, "周芷若");
        System.out.println(s);//"hello,张三丰周芷若 true10.5"
        //查找指定的子串在字符串第一次出现的索引,如果找不到返回-1
        int indexOf = s.indexOf("张三丰");
        System.out.println(indexOf);//6
        //插
        //老韩解读,在索引为 9 的位置插入 "赵敏",原来索引为 9 的内容自动后移
        s.insert(9, "赵敏");
        System.out.println(s);//"hello,张三丰赵敏周芷若 true10.5"
        //长度
        System.out.println(s.length());//22
        System.out.println(s);
    }
StringBuffer 类课堂测试题
public static void main(String[] args) {
    String str = null;// ok
    StringBuffer sb = new StringBuffer(); //ok
    sb.append(str);//需要看源码 , 底层调用的是 AbstractStringBuilder 的 appendNull
    System.out.println(sb.length());//4
    System.out.println(sb);//null
    //下面的构造器,会抛出 NullpointerException
    StringBuffer sb1 = new StringBuffer(str);//看底层源码 super(str.length() + 16);
    System.out.println(sb1);
}
StringBuffer 类课堂测试题2

public static void main(String[] args) {
    /*
    输入商品名称和商品价格,要求打印效果示例, 使用前面学习的方法完成:
    商品名 商品价格手机 123,564.59 //比如 价格 3,456,789.88
    要求:价格的小数点前面每三位用逗号隔开, 在输出。
    思路分析
    1. 定义一个 Scanner 对象,接收用户输入的 价格(String)
    2. 希望使用到 StringBuffer 的 insert ,需要将 String 转成 StringBuffer
    3. 然后使用相关方法进行字符串的处理
    代码实现
    */
    //new Scanner(System.in)
    String price = "8123564.59";
    StringBuffer sb = new StringBuffer(price);
    //先完成一个最简单的实现 123,564.59
    //找到小数点的索引,然后在该位置的前 3 位,插入,即可
    // int i = sb.lastIndexOf(".");
    // sb = sb.insert(i - 3, ",");
    //上面的两步需要做一个循环处理,才是正确的
    for (int i = sb.lastIndexOf(".") - 3; i > 0; i -= 3) {
        sb = sb.insert(i, ",");
    }
    System.out.println(sb);//8,123,564.59
}
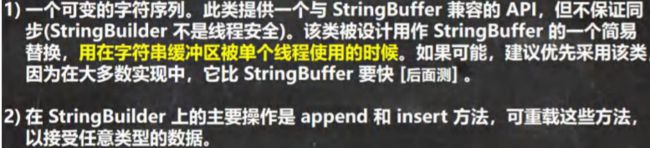
StringBuilder 类.基本介绍
public static void main(String[] args) {
    //1. StringBuffer 的直接父类 是 AbstractStringBuilder
    //2. StringBuffer 实现了 Serializable, 即 StringBuffer 的对象可以串行化
    //3. 在父类中 AbstractStringBuilder 有属性 char[] value,不是 final
    // 该 value 数组存放 字符串内容,引出存放在堆中的
    //4. StringBuffer 是一个 final 类,不能被继承
    //5. 因为 StringBuffer 字符内容是存在 char[] value, 所有在变化(增加/删除)
    // 不用每次都更换地址(即不是每次创建新对象), 所以效率高于 String
    StringBuffer stringBuffer = new StringBuffer("hello");
}
StringBuilder 常用方法
public static void main(String[] args) {
    //1. StringBuilder 继承 AbstractStringBuilder 类
    //2. 实现了 Serializable ,说明 StringBuilder 对象是可以串行化(对象可以网络传输,可以保存到文件)
    //3. StringBuilder 是 final 类, 不能被继承
    //4. StringBuilder 对象字符序列仍然是存放在其父类 AbstractStringBuilder 的 char[] value;
    // 因此,字符序列是堆中
    //5. StringBuilder 的方法,没有做互斥的处理,即没有 synchronized 关键字,因此在单线程的情况下使用
    // StringBuilder
    StringBuilder stringBuilder = new StringBuilder();
}
String、StringBuffer 和 StringBuilder 的比较
StringVsStringBufferVsStringBuilder.java 效率 : StringBuilder > StringBuffer > String
public static void main(String[] args) {
    long startTime = 0L;
    long endTime = 0L;
    StringBuffer buffer = new StringBuffer("");
    startTime = System.currentTimeMillis();
    for (int i = 0; i < 80000; i++) {//StringBuffer 拼接 20000 次
        buffer.append(String.valueOf(i));
    }
    endTime = System.currentTimeMillis();
    System.out.println("StringBuffer 的执行时间:" + (endTime - startTime));
    StringBuilder builder = new StringBuilder("");
    startTime = System.currentTimeMillis();
    for (int i = 0; i < 80000; i++) {//StringBuilder 拼接 20000 次
        builder.append(String.valueOf(i));
    }
    endTime = System.currentTimeMillis();
    System.out.println("StringBuilder 的执行时间:" + (endTime - startTime));
    String text = "";
    startTime = System.currentTimeMillis();
    for (int i = 0; i < 80000; i++) {//String 拼接 20000
        text = text + i;
    }
    endTime = System.currentTimeMillis();
    System.out.println("String 的执行时间:" + (endTime - startTime));
}
String、StringBuffer 和 StringBuilder 的选择

List | ArrayList | Vector
List 接口和常用方法
List 接口基本介绍
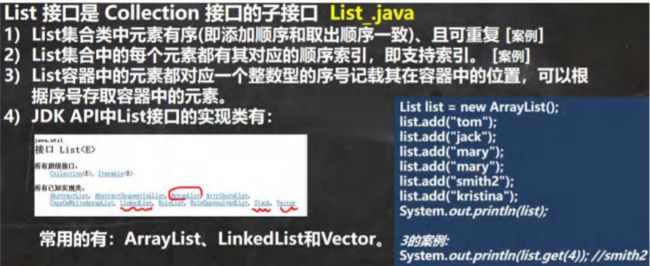
@SuppressWarnings({"all"})
public static void main(String[] args) {
    //1. List 集合类中元素有序(即添加顺序和取出顺序一致)、且可重复 [案例]
    List list = new ArrayList();
    list.add("jack");
    list.add("tom");
    list.add("mary");
    list.add("hsp");
    list.add("tom");
    System.out.println("list=" + list);
    //2. List 集合中的每个元素都有其对应的顺序索引,即支持索引
    // 索引是从 0 开始的
    System.out.println(list.get(3));//hsp
}
List 接口的常用方法
@SuppressWarnings({"all"})
public static void main(String[] args) {
    List list = new ArrayList();
    list.add("张三丰");
    list.add("贾宝玉");
    // void add(int index, Object ele):在 index 位置插入 ele 元素
    //在 index = 1 的位置插入一个对象
    list.add(1, "韩顺平");
    System.out.println("list=" + list);
    // boolean addAll(int index, Collection eles):从 index 位置开始将 eles 中的所有元素添加进来
    List list2 = new ArrayList();
    list2.add("jack");
    list2.add("tom");
    list.addAll(1, list2);
    System.out.println("list=" + list);
    // Object get(int index):获取指定 index 位置的元素
    //说过
    // int indexOf(Object obj):返回 obj 在集合中首次出现的位置
    System.out.println(list.indexOf("tom"));//2
    // int lastIndexOf(Object obj):返回 obj 在当前集合中末次出现的位置
    list.add("韩顺平");
    System.out.println("list=" + list);
    System.out.println(list.lastIndexOf("韩顺平"));
    // Object remove(int index):移除指定 index 位置的元素,并返回此元素
    list.remove(0);
    System.out.println("list=" + list);
    // Object set(int index, Object ele):设置指定 index 位置的元素为 ele , 相当于是替换. list.set(1, "玛丽");
    System.out.println("list=" + list);
    // List subList(int fromIndex, int toIndex):返回从 fromIndex 到 toIndex 位置的子集合
    // 注意返回的子集合 fromIndex <= subList < toIndex
    List returnlist = list.subList(0, 2);
    System.out.println("returnlist=" + returnlist);
}
List 接口课堂练习

@SuppressWarnings({"all"})
public static void main(String[] args) {
    /*
    添加 10 个以上的元素(比如 String "hello" ),在 2 号位插入一个元素"韩顺平教育",
    获得第 5 个元素,删除第 6 个元素,修改第 7 个元素,在使用迭代器遍历集合,
    要求:使用 List 的实现类 ArrayList 完成。
     */
    List list = new ArrayList();
    for (int i = 0; i < 12; i++) {
        list.add("hello" + i);
    }
    System.out.println("list=" + list);
    //在 2 号位插入一个元素"韩顺平教育"
    list.add(1, "韩顺平教育");
    System.out.println("list=" + list);
    //获得第 5 个元素
    System.out.println("第五个元素=" + list.get(4));
    //删除第 6 个元素
    list.remove(5);
    System.out.println("list=" + list);
    //修改第 7 个元素
    list.set(6, "三国演义");
    System.out.println("list=" + list);
    //在使用迭代器遍历集合
    Iterator iterator = list.iterator();
    while (iterator.hasNext()) {
        Object obj = iterator.next();
        System.out.println("obj=" + obj);
    }
}
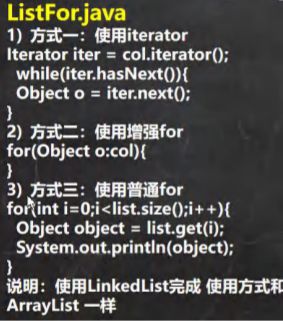
List 的三种遍历方式 [ArrayList, LinkedList,Vector]
@SuppressWarnings({"all"})
public static void main(String[] args) {
    //List 接口的实现子类 Vector LinkedList
    //List list = new ArrayList();
    //List list = new Vector();
    List list = new LinkedList();
    list.add("jack");
    list.add("tom");
    list.add("鱼香肉丝");
    list.add("北京烤鸭子");
    //遍历
    //1. 迭代器
    Iterator iterator = list.iterator();
    while (iterator.hasNext()) {
        Object obj = iterator.next();
        System.out.println(obj);
    }
    System.out.println("=====增强 for=====");
    //2. 增强 for
    for (Object o : list) {
        System.out.println("o=" + o);
    }
    System.out.println("=====普通 for====");
    //3. 使用普通 for
    for (int i = 0; i < list.size(); i++) {
        System.out.println("对象=" + list.get(i));
    }
}
实现类的课堂练习 2
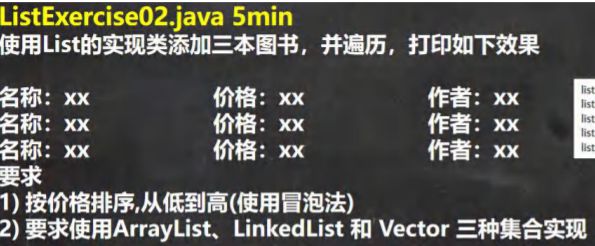
public static void main(String[] args) {
    //List list = new ArrayList();
    List list = new LinkedList();
    //List list = new Vector();
    list.add(new Book("红楼梦", "曹雪芹", 100));
    list.add(new Book("西游记", "吴承恩", 10));
    list.add(new Book("水浒传", "施耐庵", 19));
    list.add(new Book("三国", "罗贯中", 80));
    //list.add(new Book("西游记", "吴承恩", 10));
    //如何对集合进行排序
    //遍历
    for (Object o : list) {
        System.out.println(o);
    }
    //冒泡排序
    sort(list);
    System.out.println("==排序后==");
    for (Object o : list) {
        System.out.println(o);
    }
}

//静态方法
//价格要求是从小到大
public static void sort(List list) {
    int listSize = list.size();
    for (int i = 0; i < listSize - 1; i++) {
        for (int j = 0; j < listSize - 1 - i; j++) {
            //取出对象 Book
            Book book1 = (Book) list.get(j);
            Book book2 = (Book) list.get(j + 1);
            if (book1.getPrice() > book2.getPrice()) {//交换
                list.set(j, book2);
                list.set(j + 1, book1);
            }
        }
    }
}
ArrayList 底层结构和源码分析
ArrayList 的注意事项

ArrayList 的底层操作机制源码分析(重点,难点.)

public static void main(String[] args) {
    //老韩解读源码
    //注意,注意,注意,Idea 默认情况下,Debug 显示的数据是简化后的,如果希望看到完整的数据
    //需要做设置. //使用无参构造器创建 ArrayList 对象
    //ArrayList list = new ArrayList();
    ArrayList list = new ArrayList(8);
    //使用 for 给 list 集合添加 1-10 数据
    for (int i = 1; i <= 10; i++) {
        list.add(i);
    }
    //使用 for 给 list 集合添加 11-15 数据
    for (int i = 11; i <= 15; i++) {
        list.add(i);
    }
    list.add(100);
    list.add(200);
    list.add(null);
}
[外链图片转存失败,源站可能有防盗链机制,建议将图片保存下来直接上传(img-joZNBM1j-1640872377264)(https://gitee.com/wanghanhao/haostudent/raw/master/image-20211230214353275.png)]
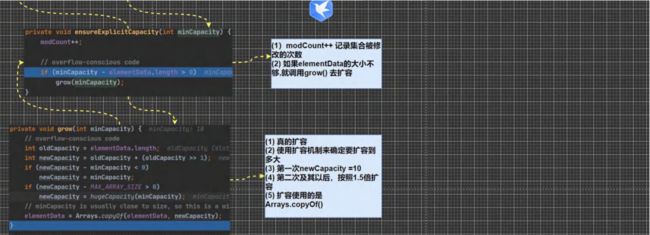
Vector 底层结构和源码剖析
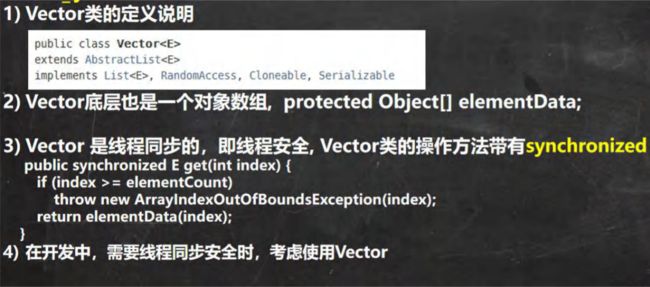
Vector 的基本介绍
public static void main(String[] args) {
    //无参构造器
    //有参数的构造
    Vector vector = new Vector(8);
    for (int i = 0; i < 10; i++) {
        vector.add(i);
    }
    vector.add(100);
    System.out.println("vector=" + vector);
    //老韩解读源码
    //1. new Vector() 底层
    /*
    public Vector() {
        this(10);
    }
    补充:如果是 Vector vector = new Vector(8);
    走的方法:
    public Vector(int initialCapacity) {
        this(initialCapacity, 0);
    }
    2. vector.add(i)
    2.1 //下面这个方法就添加数据到 vector 集合
    public synchronized boolean add(E e) {
        modCount++;
        ensureCapacityHelper(elementCount + 1);
        elementData[elementCount++] = e;
        return true;
    }
    2.2 //确定是否需要扩容 条件 : minCapacity - elementData.length>0
    private void ensureCapacityHelper(int minCapacity) {
        // overflow-conscious code
        if (minCapacity - elementData.length > 0)
        grow(minCapacity);
    }
    2.3 //如果 需要的数组大小 不够用,就扩容 , 扩容的算法
    //newCapacity = oldCapacity + ((capacityIncrement > 0) ?
    // capacityIncrement : oldCapacity);
    //就是扩容两倍. private void grow(int minCapacity) {
    // overflow-conscious code
    int oldCapacity = elementData.length;
    int newCapacity = oldCapacity + ((capacityIncrement > 0) ?
    capacityIncrement : oldCapacity);
    if (newCapacity - minCapacity < 0)
    newCapacity = minCapacity;
    if (newCapacity - MAX_ARRAY_SIZE > 0)
    newCapacity = hugeCapacity(minCapacity);
    elementData = Arrays.copyOf(elementData, newCapacity);
    }
    */
}
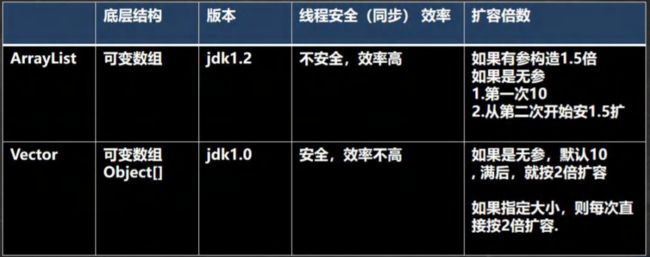
Vector 和 ArrayList 的比较
LinkedList 底层结构
LinkedList 的全面说明

LinkedList 的底层操作机制

public static void main(String[] args) {
    //模拟一个简单的双向链表
    Node jack = new Node("jack");
    Node tom = new Node("tom");
    Node hsp = new Node("老韩");
    //连接三个结点,形成双向链表
    //jack -> tom -> hsp
    jack.next = tom;
    tom.next = hsp;
    //hsp -> tom -> jack
    hsp.pre = tom;
    tom.pre = jack;
    Node first = jack;//让 first 引用指向 jack,就是双向链表的头结点
    Node last = hsp; //让 last 引用指向 hsp,就是双向链表的尾结点
    //演示,从头到尾进行遍历
    System.out.println("===从头到尾进行遍历===");
    while (true) {
        if (first == null) {
            break;
        }
        //输出 first 信息
        System.out.println(first);
        first = first.next;
    }
    //演示,从尾到头的遍历
    System.out.println("====从尾到头的遍历====");
    while (true) {
        if (last == null) {
            break;
        }
        //输出 last 信息
        System.out.println(last);
        last = last.pre;
    }
    //演示链表的添加对象/数据,是多么的方便
    //要求,是在 tom --------- 老韩直接,插入一个对象 smith
    //1. 先创建一个 Node 结点,name 就是 smith
    Node smith = new Node("smith");
    //下面就把 smith 加入到双向链表了
    smith.next = hsp;
    smith.pre = tom;
    hsp.pre = smith;
    tom.next = smith;
    //让 first 再次指向 jack
    first = jack;//让 first 引用指向 jack,就是双向链表的头结点
    System.out.println("===从头到尾进行遍历===");
    while (true) {
        if (first == null) {
            break;
        }
        //输出 first 信息
        System.out.println(first);
        first = first.next;
    }
    last = hsp; //让 last 重新指向最后一个结点
    //演示,从尾到头的遍历
    System.out.println("====从尾到头的遍历====");
    while (true) {
        if (last == null) {
            break;
        }
        //输出 last 信息
        System.out.println(last);
        last = last.pre;
    }
}
//定义一个 Node 类,Node 对象 表示双向链表的一个结点
class Node {
    public Object item; //真正存放数据
    public Node next; //指向后一个结点
    public Node pre; //指向前一个结点
    public Node(Object name) {
        this.item = name;
    }
    public String toString() {
        return "Node name=" + item;
    }
}
LinkedList 的增删改查案例
public static void main(String[] args) {
    LinkedList linkedList = new LinkedList();
    linkedList.add(1);
    linkedList.add(2);
    linkedList.add(3);
    System.out.println("linkedList=" + linkedList);
    //演示一个删除结点的
    linkedList.remove(); // 这里默认删除的是第一个结点
    //linkedList.remove(2);
    System.out.println("linkedList=" + linkedList);
    //修改某个结点对象
    linkedList.set(1, 999);
    System.out.println("linkedList=" + linkedList);
    //得到某个结点对象
    //get(1) 是得到双向链表的第二个对象
    Object o = linkedList.get(1);
    System.out.println(o);//999
    //因为 LinkedList 是 实现了 List 接口, 遍历方式
    System.out.println("===LinkeList 遍历迭代器====");
    Iterator iterator = linkedList.iterator();
    while (iterator.hasNext()) {
        Object next = iterator.next();
        System.out.println("next=" + next);
    }
    System.out.println("===LinkeList 遍历增强 for====");
    for (Object o1 : linkedList) {
        System.out.println("o1=" + o1);
    }
    System.out.println("===LinkeList 遍历普通 for====");
    for (int i = 0; i < linkedList.size(); i++) {
        System.out.println(linkedList.get(i));
    }
    //老韩源码阅读.
    /* 1. LinkedList linkedList = new LinkedList();
    public LinkedList() {}
    2. 这时 linkeList 的属性 first = null last = null
    3. 执行 添加
    public boolean add(E e) {
        linkLast(e);
        return true;
    }
    4.将新的结点,加入到双向链表的最后
    void linkLast(E e) {
        final Node l = last;
        final Node newNode = new Node<>(l, e, null);
        last = newNode;
        if (l == null)
            first = newNode;
        else
            l.next = newNode;
        size++;
        modCount++;
    }
    */
    /*
    老韩读源码 linkedList.remove(); // 这里默认删除的是第一个结点
    1. 执行 removeFirst
    public E remove() {
    return removeFirst();
    }
    2. 执行
    public E removeFirst() {
    final Node f = first;
    if (f == null)
    throw new NoSuchElementException();
    return unlinkFirst(f);
    }
    3. 执行 unlinkFirst, 将 f 指向的双向链表的第一个结点拿掉
    private E unlinkFirst(Node f) {
    // assert f == first && f != null;
    final E element = f.item;
    final Node next = f.next;
    f.item = null;
    f.next = null; // help GC
    first = next;
    if (next == null)
    last = null;
    else
    next.prev = null;
    size--;
    modCount++;
    return element;
    }
    */
}

ArrayList 和 LinkedList 比较
vv
HashSet 与 LinkedHashSet
Set 接口和常用方法
Set 接口基本介绍
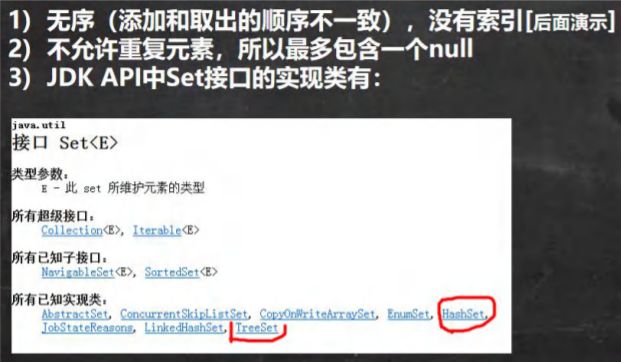
Set 接口的常用方法
和 List 接口一样, Set 接口也是 Collection 的子接口,因此,常用方法和 Collection 接口一样.
Set 接口的遍历方式

Set 接口的常用方法举例
public static void main(String[] args) {
    //老韩解读
    //1. 以 Set 接口的实现类 HashSet 来讲解 Set 接口的方法
    //2. set 接口的实现类的对象(Set 接口对象), 不能存放重复的元素, 可以添加一个 null
    //3. set 接口对象存放数据是无序(即添加的顺序和取出的顺序不一致)
    //4. 注意:取出的顺序的顺序虽然不是添加的顺序,但是他的固定.
    Set set = new HashSet();
    set.add("john");
    set.add("lucy");
    set.add("john");//重复
    set.add("jack");
    set.add("hsp");
    set.add("mary");
    set.add(null);//
    set.add(null);//再次添加 null
    for (int i = 0; i < 10; i++) {
        System.out.println("set=" + set);
    }
    //遍历
    //方式 1: 使用迭代器
    System.out.println("=====使用迭代器====");
    Iterator iterator = set.iterator();
    while (iterator.hasNext()) {
        Object obj = iterator.next();
        System.out.println("obj=" + obj);
    }
    set.remove(null);
    //方式 2: 增强 for
    System.out.println("=====增强 for====");
    for (Object o : set) {
        System.out.println("o=" + o);
    }
    //set 接口对象,不能通过索引来获取
}
Set 接口实现类-HashSet
HashSet 的全面说明
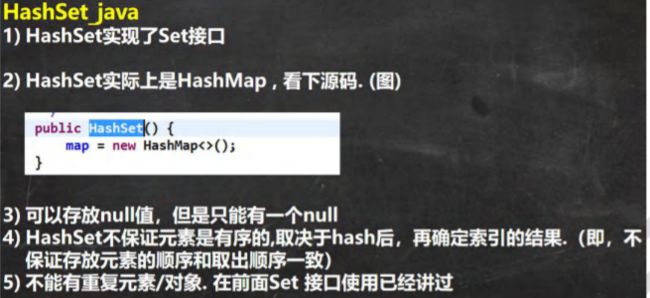
public static void main(String[] args) {
    //老韩解读
    //1. 构造器走的源码
    /*
    public HashSet() {
        map = new HashMap<>();
    }
    2. HashSet 可以存放 null ,但是只能有一个 null,即元素不能重复
    */
    Set hashSet = new HashSet();
    hashSet.add(null);
    hashSet.add(null);
    System.out.println("hashSet=" + hashSet);
}
HashSet 案例说明
public static void main(String[] args) {
    HashSet set = new HashSet();
    //说明
    //1. 在执行 add 方法后,会返回一个 boolean 值
    //2. 如果添加成功,返回 true, 否则返回 false
    //3. 可以通过 remove 指定删除哪个对象
    System.out.println(set.add("john"));//T
    System.out.println(set.add("lucy"));//T
    System.out.println(set.add("john"));//F
    System.out.println(set.add("jack"));//T
    System.out.println(set.add("Rose"));//T
    set.remove("john");
    System.out.println("set=" + set);//3 个
    set = new HashSet();
    System.out.println("set=" + set);//0
    //4 Hashset 不能添加相同的元素/数据?
    set.add("lucy");//添加成功
    set.add("lucy");//加入不了
    set.add(new Dog("tom"));//OK
    set.add(new Dog("tom"));//Ok
    System.out.println("set=" + set);
    //在加深一下. 非常经典的面试题.
    //看源码,做分析, 先给小伙伴留一个坑,以后讲完源码,你就了然
    //去看他的源码,即 add 到底发生了什么?=> 底层机制. set.add(new String("hsp"));//ok
    set.add(new String("hsp"));//加入不了. System.out.println("set=" + set);
}
class Dog { //定义了 Dog 类
    private String name;

    public Dog(String name) {
        this.name = name;
    }

    @Override
    public String toString() {
        return "Dog{" +
                "name='" + name + '\'' +
                '}';
    }
}
HashSet 底层机制说明

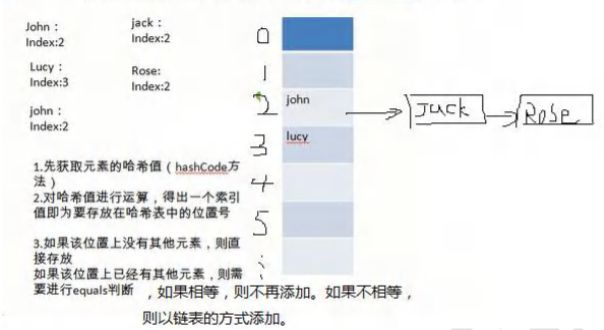
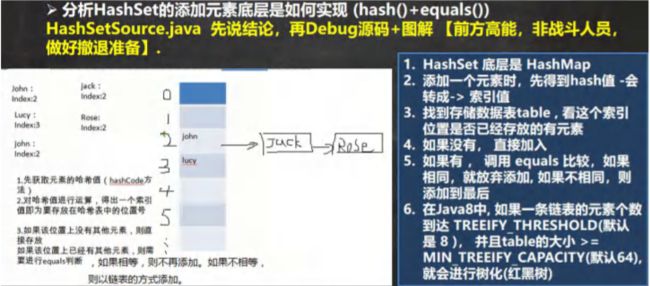
public static void main(String[] args) {
    HashSet hashSet = new HashSet();
    hashSet.add("java");//到此位置,第 1 次 add 分析完毕. hashSet.add("php");//到此位置,第 2 次 add 分析完毕
    hashSet.add("java");
    System.out.println("set=" + hashSet);
    /*
    老韩对 HashSet 的源码解读
    1. 执行 HashSet()
    public HashSet() {
        map = new HashMap<>();
    }
    2. 执行 add()
    public boolean add(E e) {//e = "java"
        return map.put(e, PRESENT)==null;//(static) PRESENT = new Object();
    }
    3.执行 put() , 该方法会执行 hash(key) 得到 key 对应的 hash 值 算法 h = key.hashCode()) ^ (h >>> 16)
    public V put(K key, V value) {//key = "java" value = PRESENT 共享
        return putVal(hash(key), key, value, false, true);
    }
    4.执行 putVal
    final V putVal(int hash, K key, V value, boolean onlyIfAbsent, boolean evict) {
        Node[] tab; Node p; int n, i; //定义了辅助变量
        //table 就是 HashMap 的一个数组,类型是 Node[]
        //if 语句表示如果当前 table 是 null, 或者 大小=0
        //就是第一次扩容,到 16 个空间.
        if ((tab = table) == null || (n = tab.length) == 0)
            n = (tab = resize()).length;
        //(1)根据 key,得到 hash 去计算该 key 应该存放到 table 表的哪个索引位置
        //并把这个位置的对象,赋给 p
        //(2)判断 p 是否为 null
        //(2.1) 如果 p 为 null, 表示还没有存放元素, 就创建一个 Node (key="java",value=PRESENT)
        //(2.2) 就放在该位置 tab[i] = newNode(hash, key, value, null)
        if ((p = tab[i = (n - 1) & hash]) == null)
            tab[i] = newNode(hash, key, value, null);
        else {
            //一个开发技巧提示: 在需要局部变量(辅助变量)时候,在创建
            Node e; K k; //
            //如果当前索引位置对应的链表的第一个元素和准备添加的 key 的 hash 值一样
            //并且满足 下面两个条件之一:
            //(1) 准备加入的 key 和 p 指向的 Node 结点的 key 是同一个对象
            //(2) p 指向的 Node 结点的 key 的 equals() 和准备加入的 key 比较后相同
            //就不能加入
     if (p.hash == hash &&((k = p.key) == key || (key != null && key.equals(k))))
            e = p;
    //再判断 p 是不是一颗红黑树, //如果是一颗红黑树,就调用 putTreeVal , 来进行添加
    else if (p instanceof TreeNode)
        e = ((TreeNode)p).putTreeVal(this, tab, hash, key, value);
    else {//如果 table 对应索引位置,已经是一个链表, 就使用 for 循环比较
        //(1) 依次和该链表的每一个元素比较后,都不相同, 则加入到该链表的最后
        // 注意在把元素添加到链表后,立即判断 该链表是否已经达到 8 个结点
        // , 就调用 treeifyBin() 对当前这个链表进行树化(转成红黑树)
        // 注意,在转成红黑树时,要进行判断, 判断条件
        // if (tab == null || (n = tab.length) < MIN_TREEIFY_CAPACITY(64))
        // resize();
        // 如果上面条件成立,先 table 扩容. // 只有上面条件不成立时,才进行转成红黑树
        //(2) 依次和该链表的每一个元素比较过程中,如果有相同情况,就直接 break
    for (int binCount = 0; ; ++binCount) {
        if ((e = p.next) == null) {
            p.next = newNode(hash, key, value, null);
            if (binCount >= TREEIFY_THRESHOLD(8) - 1) // -1 for 1st
                treeifyBin(tab, hash);
            break;
    }
    if (e.hash == hash &&
    ((k = e.key) == key || (key != null && key.equals(k))))
            break;
        p = e;
        }
    }
    if (e != null) { // existing mapping for key
        V oldValue = e.value;
    if (!onlyIfAbsent || oldValue == null)
        e.value = value;
        afterNodeAccess(e);
        return oldValue;
        }
    }
    ++modCount;
    //size 就是我们每加入一个结点 Node(k,v,h,next), size++
    if (++size > threshold)
        resize();//扩容
        afterNodeInsertion(evict);
        return null;
    }
    */
}
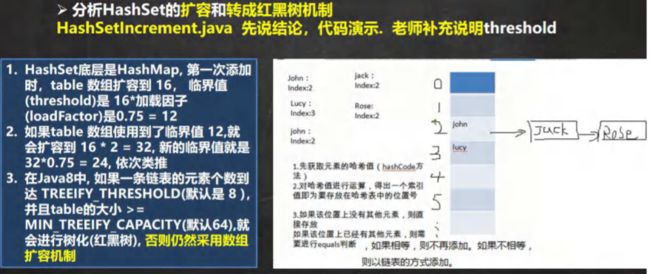
public static void main(String[] args) {
    /*
    HashSet 底层是 HashMap, 第一次添加时,table 数组扩容到 16,
    临界值(threshold)是 16*加载因子(loadFactor)是 0.75 = 12
    如果 table 数组使用到了临界值 12,就会扩容到 16 * 2 = 32,
    新的临界值就是 32*0.75 = 24, 依次类推
    */
    HashSet hashSet = new HashSet();
    // for(int i = 1; i <= 100; i++) {
    // hashSet.add(i);//1,2,3,4,5...100
    // }
    /*
    在 Java8 中, 如果一条链表的元素个数到达 TREEIFY_THRESHOLD(默认是 8 ),
    并且 table 的大小 >= MIN_TREEIFY_CAPACITY(默认 64),就会进行树化(红黑树), 否则仍然采用数组扩容机制
    */
    // for(int i = 1; i <= 12; i++) {
    //      hashSet.add(new A(i));//
    // }
    /*
    当我们向 hashset 增加一个元素,-> Node -> 加入 table , 就算是增加了一个 size++
    */
    for (int i = 1; i <= 7; i++) {//在 table 的某一条链表上添加了 7 个 A 对象
        hashSet.add(new A(i));//
    }
    for (int i = 1; i <= 7; i++) {//在 table 的另外一条链表上添加了 7 个 B 对象
        hashSet.add(new B(i));//
    }
}
class B {
    private int n;

    public B(int n) {
        this.n = n;
    }

    @Override
    public int hashCode() {
        return 200;
    }
}

class A {
    private int n;

    public A(int n) {
        this.n = n;
    }

    @Override
    public int hashCode() {
        return 100;
    }
}
HashSet 课堂练习 1
public static void main(String[] args) {
/**
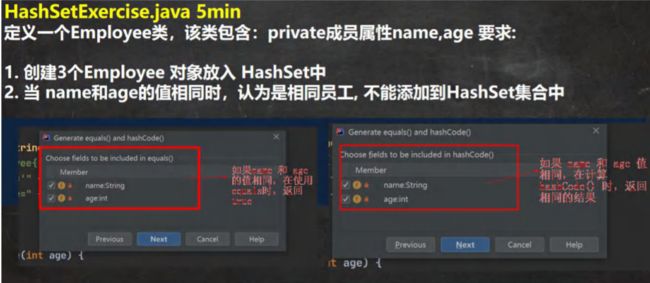
定义一个 Employee 类,该类包含:private 成员属性 name,age 要求:
创建 3 个 Employee 对象放入 HashSet 中
当 name 和 age 的值相同时,认为是相同员工, 不能添加到 HashSet 集合中
*/
HashSet hashSet = new HashSet();
hashSet.add(new Employee("milan", 18));//ok
hashSet.add(new Employee("smith", 28));//ok
hashSet.add(new Employee("milan", 18));//加入不成功. //回答,加入了几个? 3 个
System.out.println("hashSet=" + hashSet);
}
//创建 Employee
class Employee {
    private String name;
    private int age;

    public Employee(String name, int age) {
        this.name = name;
        this.age = age;
    }

    public String getName() {
        return name;
    }

    public void setName(String name) {
        this.name = name;
    }

    public int getAge() {
        return age;
    }

    @Override
    public String toString() {
        return "Employee{" +
                "name='" + name + '\'' +
                ", age=" + age +
                '}';
    }

    public void setAge(int age) {
        this.age = age;
    }

    //如果 name 和 age 值相同,则返回相同的 hash 值
    @Override
    public boolean equals(Object o) {
        if (this == o) return true;
        if (o == null || getClass() != o.getClass()) return false;
        Employee employee = (Employee) o;
        return age == employee.age &&
                Objects.equals(name, employee.name);
    }

    @Override
    public int hashCode() {
        return Objects.hash(name, age);
    }
}
HashSet 课后练习 2

Set 接口实现类-LinkedHashSet
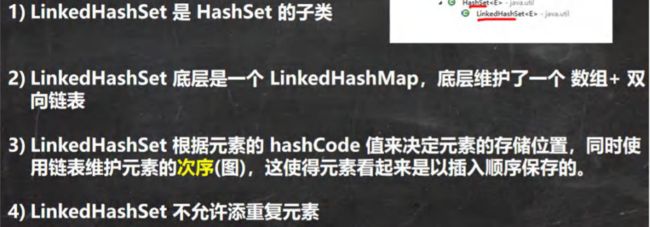
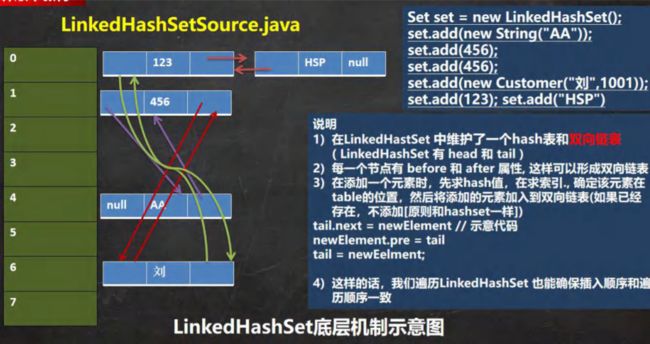
LinkedHashSet 的全面说明
LinkedHashSet 课后练习题

public static void main(String[] args) {
    LinkedHashSet linkedHashSet = new LinkedHashSet();
    linkedHashSet.add(new Car("奥拓", 1000));//OK
    linkedHashSet.add(new Car("奥迪", 300000));//OK
    linkedHashSet.add(new Car("法拉利", 10000000));//OK
    linkedHashSet.add(new Car("奥迪", 300000));//加入不了
    linkedHashSet.add(new Car("保时捷", 70000000));//OK
    linkedHashSet.add(new Car("奥迪", 300000));//加入不了
    System.out.println("linkedHashSet=" + linkedHashSet);
}
/**
 * Car 类(属性:name,price), 如果 name 和 price 一样,
 * 则认为是相同元素,就不能添加。 5min
 */
class Car {
    private String name;
    private double price;

    public Car(String name, double price) {
        this.name = name;
        this.price = price;
    }

    public String getName() {
        return name;
    }

    public void setName(String name) {
        this.name = name;
    }

    public double getPrice() {
        return price;
    }

    public void setPrice(double price) {
        this.price = price;
    }

    @Override
    public String toString() {
        return "\nCar{" +
                "name='" + name + '\'' +
                ", price=" + price +
                '}';
    }

    //重写 equals 方法 和 hashCode
    //当 name 和 price 相同时, 就返回相同的 hashCode 值, equals 返回 t
    @Override
    public boolean equals(Object o) {
        if (this == o) return true;
        if (o == null || getClass() != o.getClass()) return false;
        Car car = (Car) o;
        return Double.compare(car.price, price) == 0 &&
                Objects.equals(name, car.name);
    }

    @Override
    public int hashCode() {
        return Objects.hash(name, price);
    }
}
HashMap 与 HashTable(超重点)
Map 接口和常用方法
Map 接口实现类的特点 [很实用]
public static void main(String[] args) {
//老韩解读 Map 接口实现类的特点, 使用实现类 HashMap
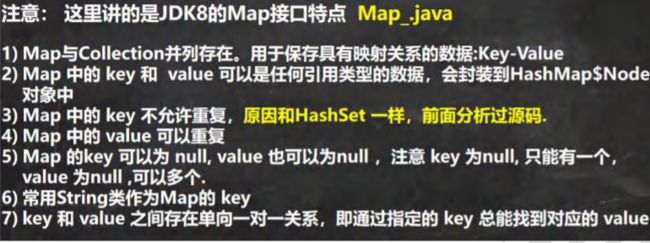
//1. Map 与 Collection 并列存在。用于保存具有映射关系的数据:Key-Value(双列元素)
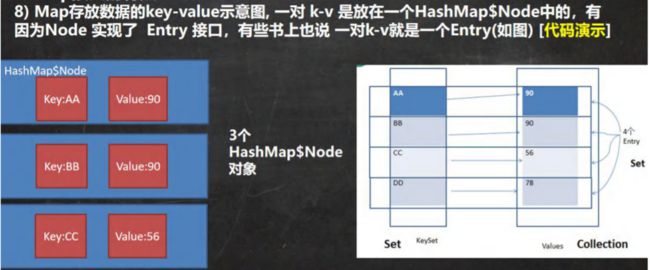
//2. Map 中的 key 和 value 可以是任何引用类型的数据,会封装到 HashMap$Node 对象中
//3. Map 中的 key 不允许重复,原因和 HashSet 一样,前面分析过源码. //4. Map 中的 value 可以重复
//5. Map 的 key 可以为 null, value 也可以为 null ,注意 key 为 null
// 只能有一个,value 为 null ,可以多个
//6. 常用 String 类作为 Map 的 key
//7. key 和 value 之间存在单向一对一关系,即通过指定的 key 总能找到对应的 value
Map map = new HashMap();
map.put("no1", "韩顺平");//k-v
map.put("no2", "张无忌");//k-v
map.put("no1", "张三丰");//当有相同的 k , 就等价于替换. map.put("no3", "张三丰");//k-v
map.put(null, null); //k-v
map.put(null, "abc"); //等价替换
map.put("no4", null); //k-v
map.put("no5", null); //k-v
map.put(1, "赵敏");//k-v
map.put(new Object(), "金毛狮王");//k-v
// 通过 get 方法,传入 key ,会返回对应的 value
System.out.println(map.get("no2"));//张无忌
System.out.println("map=" + map);
}
Map 接口常用方法
public static void main(String[] args) {
//演示 map 接口常用方法
Map map = new HashMap();
map.put("邓超", new Book("", 100));//OK
map.put("邓超", "孙俪");//替换-> 一会分析源码
map.put("王宝强", "马蓉");//OK
map.put("宋喆", "马蓉");//OK
map.put("刘令博", null);//OK
map.put(null, "刘亦菲");//OK
map.put("鹿晗", "关晓彤");//OK
map.put("hsp", "hsp 的老婆");
System.out.println("map=" + map);
// remove:根据键删除映射关系
map.remove(null);
System.out.println("map=" + map);
// get:根据键获取值
Object val = map.get("鹿晗");
System.out.println("val=" + val);
// size:获取元素个数
System.out.println("k-v=" + map.size());
// isEmpty:判断个数是否为 0
System.out.println(map.isEmpty());//F
// clear:清除 k-v
//map.clear();
System.out.println("map=" + map);
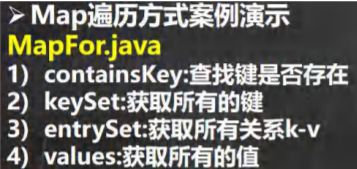
// containsKey:查找键是否存在
System.out.println("结果=" + map.containsKey("hsp"));//T
}
class Book {
    private String name;
    private int num;

    public Book(String name, int num) {
        this.name = name;
        this.num = num;
    }
}
Map 接口遍历方法

public static void main(String[] args) {
    Map map = new HashMap();
    map.put("邓超", "孙俪");
    map.put("王宝强", "马蓉");
    map.put("宋喆", "马蓉");
    map.put("刘令博", null);
    map.put(null, "刘亦菲");
    map.put("鹿晗", "关晓彤");
    //第一组: 先取出 所有的 Key , 通过 Key 取出对应的 Value
    Set keyset = map.keySet();
    //(1) 增强 for
    System.out.println("-----第一种方式-------");
    for (Object key : keyset) {
        System.out.println(key + "-" + map.get(key));
    }
    //(2) 迭代器
    System.out.println("----第二种方式--------");
    Iterator iterator = keyset.iterator();
    while (iterator.hasNext()) {
        Object key = iterator.next();
        System.out.println(key + "-" + map.get(key));
    }
    //第二组: 把所有的 values 取出
    Collection values = map.values();
    //这里可以使用所有的 Collections 使用的遍历方法
    //(1) 增强 for
    System.out.println("---取出所有的 value 增强 for----");
    for (Object value : values) {
        System.out.println(value);
    }
    //(2) 迭代器
    System.out.println("---取出所有的 value 迭代器----");
    Iterator iterator2 = values.iterator();
    while (iterator2.hasNext()) {
        Object value = iterator2.next();
        System.out.println(value);
    }
    //第三组: 通过 EntrySet 来获取 k-v
    Set entrySet = map.entrySet();// EntrySet>
    //(1) 增强 for
    System.out.println("----使用 EntrySet 的 for 增强(第 3 种)----");
    for (Object entry : entrySet) {
        //将 entry 转成 Map.Entry
        Map.Entry m = (Map.Entry) entry;
        System.out.println(m.getKey() + "-" + m.getValue());
    }
    //(2) 迭代器
    System.out.println("----使用 EntrySet 的 迭代器(第 4 种)----");
    Iterator iterator3 = entrySet.iterator();
    while (iterator3.hasNext()) {
        Object entry = iterator3.next();
        //System.out.println(next.getClass());//HashMap$Node -实现-> Map.Entry (getKey,getValue)
        //向下转型 Map.Entry
        Map.Entry m = (Map.Entry) entry;
        System.out.println(m.getKey() + "-" + m.getValue());
    }
}
Map 接口课堂练习

public static void main(String[] args) {
    //完成代码
    Map hashMap = new HashMap();
    //添加对象
    hashMap.put(1, new Emp("jack", 300000, 1));
    hashMap.put(2, new Emp("tom", 21000, 2));
    hashMap.put(3, new Emp("milan", 12000, 3));
    //遍历 2 种方式
    //并遍历显示工资>18000 的员工(遍历方式最少两种)
    //1. 使用 keySet -> 增强 for
    Set keySet = hashMap.keySet();
    System.out.println("====第一种遍历方式====");
    for (Object key : keySet) {
    //先获取 value
        Emp emp = (Emp) hashMap.get(key);
        if (emp.getSal() > 18000) {
            System.out.println(emp);
        }
    }
    //2. 使用 EntrySet -> 迭代器
    // 体现比较难的知识点
    // 慢慢品,越品越有味道.
    Set entrySet = hashMap.entrySet();
    System.out.println("======迭代器======");
    Iterator iterator = entrySet.iterator();
    while (iterator.hasNext()) {
        Map.Entry entry = (Map.Entry) iterator.next();
        //通过 entry 取得 key 和 value
        Emp emp = (Emp) entry.getValue();
        if (emp.getSal() > 18000) {
            System.out.println(emp);
        }
    }
}
/**
 * 使用 HashMap 添加 3 个员工对象,要求
 * 键:员工 id
 * 值:员工对象
 *
 * 并遍历显示工资>18000 的员工(遍历方式最少两种)
 * 员工类:姓名、工资、员工 id
 */
class Emp {
    private String name;
    private double sal;
    private int id;

    public Emp(String name, double sal, int id) {
        this.name = name;
        this.sal = sal;
        this.id = id;
    }

    public String getName() {
        return name;
    }

    public void setName(String name) {
        this.name = name;
    }

    public double getSal() {
        return sal;
    }

    public void setSal(double sal) {
        this.sal = sal;
    }

    public int getId() {
        return id;
    }

    public void setId(int id) {
        this.id = id;
    }

    @Override
    public String toString() {
        return "Emp{" +
                "name='" + name + '\'' +
                ", sal=" + sal +
                ", id=" + id +
                '}';
    }
}
Map 接口实现类-HashMap
HashMap 小结

HashMap 底层机制及源码剖析
HashMap 底层机制及源码剖析

public static void main(String[] args) {
HashMap map = new HashMap();
map.put("java", 10);//ok
map.put("php", 10);//ok
map.put("java", 20);//替换 value
System.out.println("map=" + map);//
/*老韩解读 HashMap 的源码+图解
1. 执行构造器 new HashMap()
初始化加载因子 loadfactor = 0.75
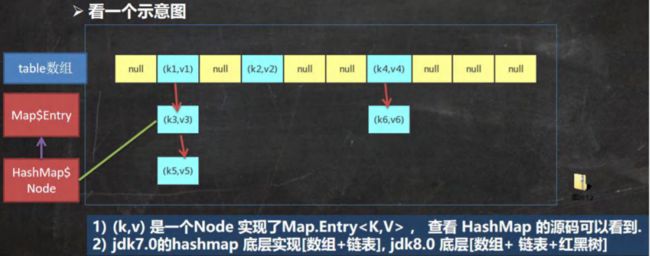
HashMap$Node[] table = null
2. 执行 put 调用 hash 方法,计算 key 的 hash 值 (h = key.hashCode()) ^ (h >>> 16)
public V put(K key, V value) {//K = "java" value = 10
return putVal(hash(key), key, value, false, true);
}
3. 执行 putVal
final V putVal(int hash, K key, V value, boolean onlyIfAbsent, boolean evict) {
Node[] tab; Node p; int n, i;//辅助变量
//如果底层的 table 数组为 null, 或者 length =0 , 就扩容到 16
if ((tab = table) == null || (n = tab.length) == 0)
n = (tab = resize()).length;
//取出 hash 值对应的 table 的索引位置的 Node, 如果为 null, 就直接把加入的 k-v
//, 创建成一个 Node ,加入该位置即可
if ((p = tab[i = (n - 1) & hash]) == null)
tab[i] = newNode(hash, key, value, null);
else {
Node e; K k;//辅助变量
// 如果 table 的索引位置的 key 的 hash 相同和新的 key 的 hash 值相同,
// 并 满足(table 现有的结点的 key 和准备添加的 key 是同一个对象 || equals 返回真)
// 就认为不能加入新的 k-v
if (p.hash == hash &&
((k = p.key) == key || (key != null && key.equals(k))))
e = p;
else if (p instanceof TreeNode)//如果当前的 table 的已有的 Node 是红黑树,就按照红黑树的方式处理
e = ((TreeNode)p).putTreeVal(this, tab, hash, key, value);
else {
//如果找到的结点,后面是链表,就循环比较
for (int binCount = 0; ; ++binCount) {//死循环
if ((e = p.next) == null) {//如果整个链表,没有和他相同,就加到该链表的最后
p.next = newNode(hash, key, value, null);
//加入后,判断当前链表的个数,是否已经到 8 个,到 8 个,后
//就调用 treeifyBin 方法进行红黑树的转换
if (binCount >= TREEIFY_THRESHOLD - 1) // -1 for 1st
treeifyBin(tab, hash);
break;
}
if (e.hash == hash && //如果在循环比较过程中,发现有相同,就 break,就只是替换 value
((k = e.key) == key || (key != null && key.equals(k))))
break;
p = e;
}
}
if (e != null) { // existing mapping for key
V oldValue = e.value;
if (!onlyIfAbsent || oldValue == null)
e.value = value; //替换,key 对应 value
afterNodeAccess(e);
return oldValue;
}
}
++modCount;//每增加一个 Node ,就 size++
if (++size > threshold[12-24-48])//如 size > 临界值,就扩容
resize();
afterNodeInsertion(evict);
return null;
}
5. 关于树化(转成红黑树)
//如果 table 为 null ,或者大小还没有到 64,暂时不树化,而是进行扩容. //否则才会真正的树化 -> 剪枝
final void treeifyBin(Node[] tab, int hash) {
int n, index; Node e;
if (tab == null || (n = tab.length) < MIN_TREEIFY_CAPACITY)
resize();
}
*/
}

public static void main(String[] args) {
HashMap hashMap = new HashMap();
for (int i = 1; i <= 12; i++) {
hashMap.put(i, "hello");
}
hashMap.put("aaa", "bbb");
System.out.println("hashMap=" + hashMap);//12 个 k-v
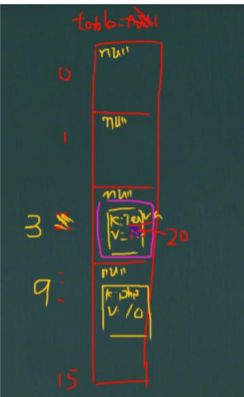
//布置一个任务,自己设计代码去验证,table 的扩容
//0 -> 16(12) -> 32(24) -> 64(64*0.75=48)-> 128 (96) ->
//自己设计程序,验证-》 增强自己阅读源码能力. 看别人代码. }
}
class A {
private int num;
public A(int num) {
this.num = num;
}
//所有的 A 对象的 hashCode 都是 100
// @Override
// public int hashCode() {
// return 100;
// }
@Override
public String toString() {
return "\nA{" +
"num=" + num +
'}';
}
}
Map 接口实现类-Hashtable
HashTable 的基本介绍
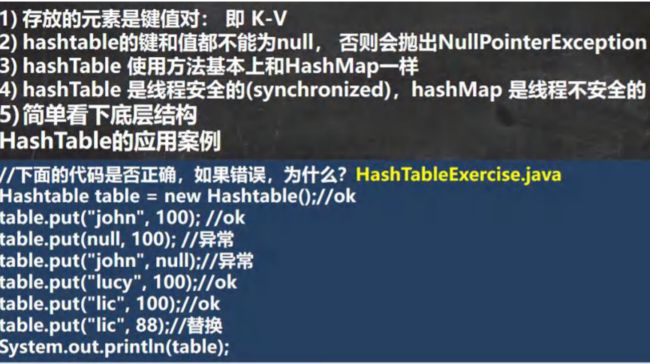
Hashtable 和 HashMap 对比

总结-开发中如何选择集合实现类(记住)

多线程详解
线程相关概念
程序(program)

进程

什么是线程


其他相关概念


线程基本使用
创建线程的两种方式
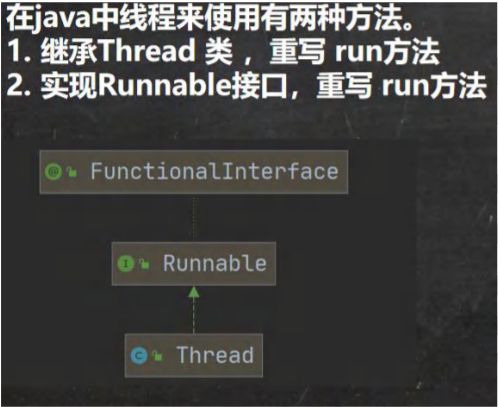
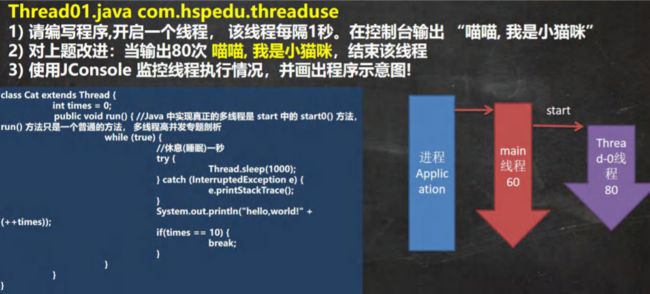
线程应用案例 1-继承 Thread 类
public static void main(String[] args) throws InterruptedException {
//创建 Cat 对象,可以当做线程使用
Cat cat = new Cat();
//老韩读源码
/*
(1)
public synchronized void start() {
start0();
}
(2)
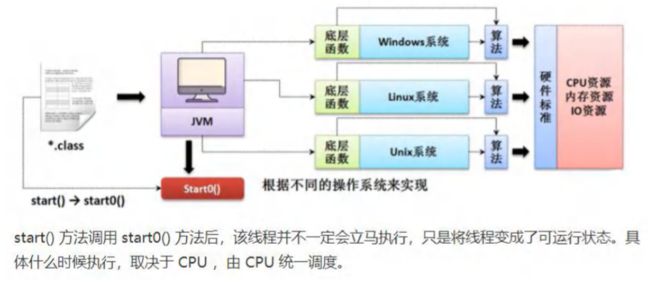
//start0() 是本地方法,是 JVM 调用, 底层是 c/c++实现
//真正实现多线程的效果, 是 start0(), 而不是 run
private native void start0();
*/
cat.start();//启动线程-> 最终会执行 cat 的 run 方法
//cat.run();//run 方法就是一个普通的方法, 没有真正的启动一个线程,就会把 run 方法执行完毕,才向下执行
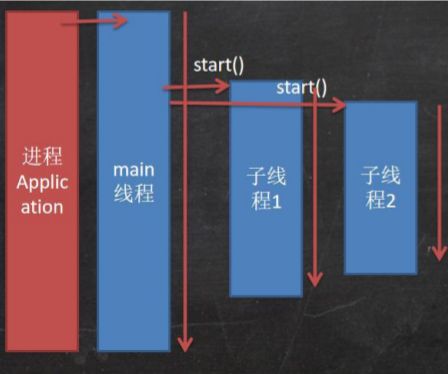
//说明: 当 main 线程启动一个子线程 Thread-0, 主线程不会阻塞, 会继续执行
//这时 主线程和子线程是交替执行.. System.out.println("主线程继续执行" + Thread.currentThread().getName());//名字 main
for (int i = 0; i < 60; i++) {
System.out.println("主线程 i=" + i);
//让主线程休眠
Thread.sleep(1000);
}
}
//老韩说明
//1. 当一个类继承了 Thread 类, 该类就可以当做线程使用
//2. 我们会重写 run 方法,写上自己的业务代码
//3. run Thread 类 实现了 Runnable 接口的 run 方法
        /*
        @Override
        public void run() {
        if (target != null) {
            target.run();
            }
        }
        */
class Cat extends Thread {
    int times = 0;

    @Override
    public void run() {//重写 run 方法,写上自己的业务逻辑
        while (true) {
            //该线程每隔 1 秒。在控制台输出 “喵喵, 我是小猫咪”
            System.out.println("喵喵, 我是小猫咪" + (++times) + " 线程名=" + Thread.currentThread().getName());
            //让该线程休眠 1 秒 ctrl+alt+t
            try {
                Thread.sleep(1000);
            } catch (InterruptedException e) {
                e.printStackTrace();
            }
            if (times == 80) {
                break;//当 times 到 80, 退出 while, 这时线程也就退出.. }
            }
        }
    }
}
线程应用案例 2-实现 Runnable 接口


public static void main(String[] args) {
    Dog dog = new Dog();
    //dog.start(); 这里不能调用 start
    //创建了 Thread 对象,把 dog 对象(实现 Runnable),放入 Thread
    Thread thread = new Thread(dog);
    thread.start();
    // Tiger tiger = new Tiger();//实现了 Runnable
    // ThreadProxy threadProxy = new ThreadProxy(tiger);
    // threadProxy.start();
}
class Animal {
}

class Tiger extends Animal implements Runnable {
    @Override
    public void run() {
        System.out.println("老虎嗷嗷叫....");
    }
}

//线程代理类 , 模拟了一个极简的 Thread 类
class ThreadProxy implements Runnable {//你可以把 Proxy 类当做 ThreadProxy
    private Runnable target = null;//属性,类型是 Runnable

    @Override
    public void run() {
        if (target != null) {
            target.run();//动态绑定(运行类型 Tiger)
        }
    }

    public ThreadProxy(Runnable target) {
        this.target = target;
    }

    public void start() {
        start0();//这个方法时真正实现多线程方法
    }

    public void start0() {
        run();
    }
}

class Dog implements Runnable { //通过实现 Runnable 接口,开发线程
    int count = 0;

    @Override
    public void run() { //普通方法
        while (true) {
            System.out.println("小狗汪汪叫..hi" + (++count) + Thread.currentThread().getName());
            //休眠 1 秒
            try {
                Thread.sleep(1000);
            } catch (InterruptedException e) {
                e.printStackTrace();
            }
            if (count == 10) {
                break;
            }
        }
    }
}
线程使用应用案例-多线程执行

    public static void main(String[] args) {
        T1 t1 = new T1();
        T2 t2 = new T2();
        Thread thread1 = new Thread(t1);
        Thread thread2 = new Thread(t2);
        thread1.start();//启动第 1 个线程
        thread2.start();//启动第 2 个线程
//... }
    }
class T1 implements Runnable {
    int count = 0;

    @Override
    public void run() {
        while (true) {
//每隔 1 秒输出 “hello,world”,输出 10 次
            System.out.println("hello,world " + (++count));
            try {
                Thread.sleep(1000);
            } catch (InterruptedException e) {
                e.printStackTrace();
            }
            if (count == 60) {
                break;
            }
        }
    }
}

class T2 implements Runnable {
    int count = 0;

    @Override
    public void run() {
//每隔 1 秒输出 “hi”,输出 5 次
        while (true) {
            System.out.println("hi " + (++count));
            try {
                Thread.sleep(1000);
            } catch (InterruptedException e) {
                e.printStackTrace();
            }
            if (count == 50) {
                break;
            }
        }
    }
}
线程如何理解

继承 Thread vs 实现 Runnable 的区别

public static void main(String[] args) {
    //测试
    // SellTicket01 sellTicket01 = new SellTicket01();
    // SellTicket01 sellTicket02 = new SellTicket01();
    // SellTicket01 sellTicket03 = new SellTicket01();
    //
    // //这里我们会出现超卖.. // sellTicket01.start();//启动售票线程
    // sellTicket02.start();//启动售票线程
    // sellTicket03.start();//启动售票线程
    System.out.println("===使用实现接口方式来售票=====");
    SellTicket02 sellTicket02 = new SellTicket02();
    new Thread(sellTicket02).start();//第 1 个线程-窗口
    new Thread(sellTicket02).start();//第 2 个线程-窗口
    new Thread(sellTicket02).start();//第 3 个线程-窗口
}
//使用 Thread 方式
class SellTicket01 extends Thread {
    private static int ticketNum = 100;//让多个线程共享 ticketNum

    @Override
    public void run() {
        while (true) {
            if (ticketNum <= 0) {
                System.out.println("售票结束...");
                break;
            }
            //休眠 50 毫秒, 模拟
            try {
                Thread.sleep(50);
            } catch (InterruptedException e) {
                e.printStackTrace();
            }
            System.out.println("窗口 " + Thread.currentThread().getName() + " 售出一张票" + " 剩余票数=" + (--ticketNum));
        }
    }
}

//实现接口方式
class SellTicket02 implements Runnable {
    private int ticketNum = 100;//让多个线程共享 ticketNum

    @Override
    public void run() {
        while (true) {
            if (ticketNum <= 0) {
                System.out.println("售票结束...");
                break;
            }
            //休眠 50 毫秒, 模拟
            try {
                Thread.sleep(50);
            } catch (InterruptedException e) {
                e.printStackTrace();
            }
            System.out.println("窗口 " + Thread.currentThread().getName() + " 售出一张票" + " 剩余票数=" + (--ticketNum));//1 - 0 - -1 - -2
        }
    }
}
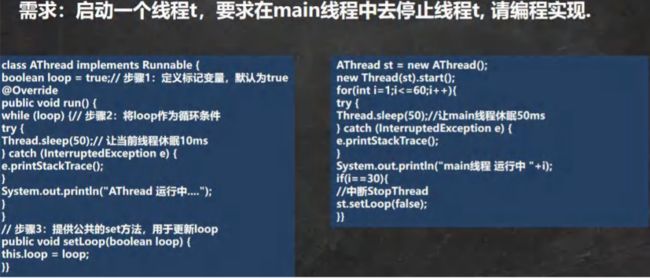
线程终止
基本说明

应用案例
线程常用方法
常用方法第一组

注意事项和细节

应用案例

常用方法第二组


应用案例
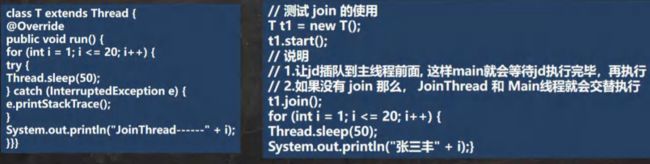
测试 yield 和 join 方法 ,注意体会方法的特点,看老师代码演示
课堂练习
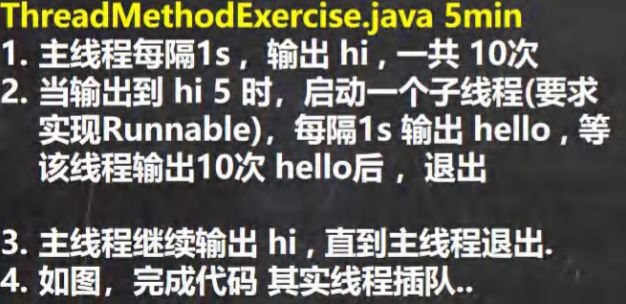
public static void main(String[] args) throws InterruptedException {
    Thread t3 = new Thread(new T3());//创建子线程
    for (int i = 1; i <= 10; i++) {
        System.out.println("hi " + i);
        if (i == 5) {//说明主线程输出了 5 次 hi
            t3.start();//启动子线程 输出 hello... t3.join();//立即将 t3 子线程,插入到 main 线程,让 t3 先执行
        }
        Thread.sleep(1000);//输出一次 hi, 让 main 线程也休眠 1s
    }
}
class T3 implements Runnable {
    private int count = 0;

    @Override
    public void run() {
        while (true) {
            System.out.println("hello " + (++count));
            try {
                Thread.sleep(1000);
            } catch (InterruptedException e) {
                e.printStackTrace();
            }
            if (count == 10) {
                break;
            }
        }
    }
}
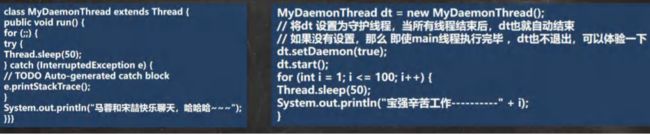
用户线程和守护线程

应用案例
下面我们测试如何将一个线程设置成守护线程
线程的生命周期
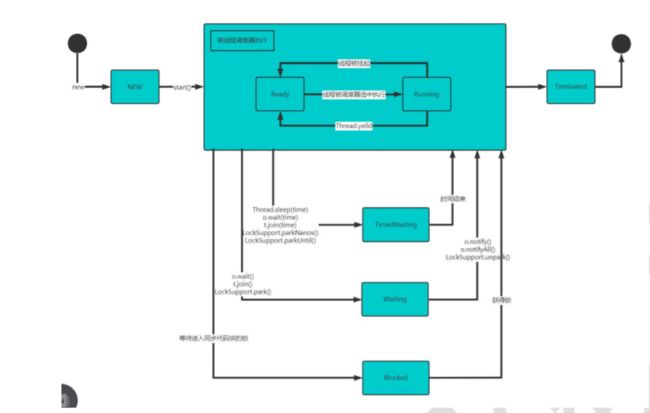
JDK 中用 Thread.State 枚举表示了线程的几种状态
[外链图片转存失败,源站可能有防盗链机制,建议将图片保存下来直接上传(img-bELQvTsI-1640872377285)(C:\Users\wang\AppData\Roaming\Typora\typora-user-images\image-20211230180943404.png)]
线程状态转换图
写程序查看线程状态
public static void main(String[] args) throws InterruptedException {
    T t = new T();
    System.out.println(t.getName() + " 状态 " + t.getState());
    t.start();
    while (Thread.State.TERMINATED != t.getState()) {
        System.out.println(t.getName() + " 状态 " + t.getState());
        Thread.sleep(500);
    }
    System.out.println(t.getName() + " 状态 " + t.getState());
}
class T extends Thread {
    @Override
    public void run() {
        while (true) {
            for (int i = 0; i < 10; i++) {
                System.out.println("hi " + i);
                try {
                    Thread.sleep(1000);
                } catch (InterruptedException e) {
                    e.printStackTrace();
                }
            }
            break;
        }
    }
}
线程的同步
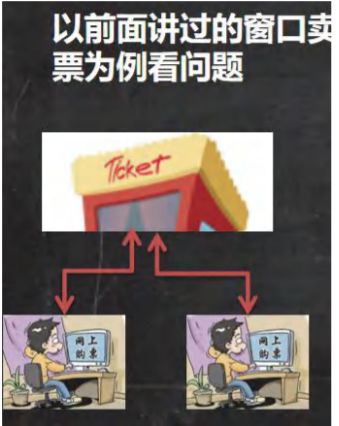
先看一个问题
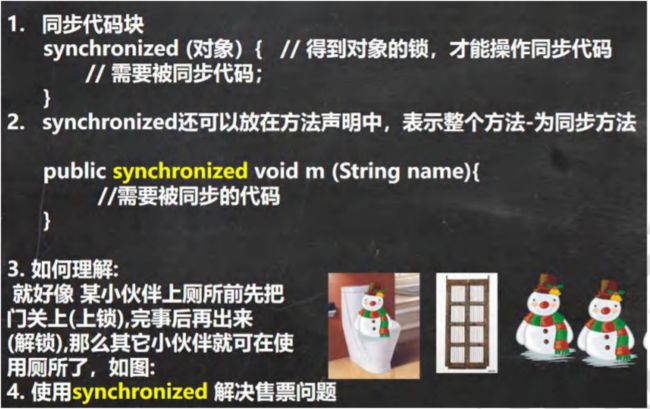
Synchronized
线程同步机制

同步具体方法-Synchronized
分析同步原理
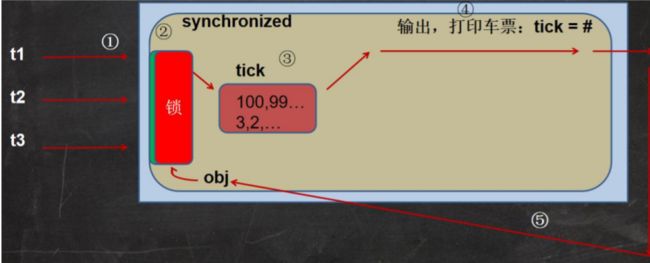
互斥锁
基本介绍

使用互斥锁来解决售票问题
public static void main(String[] args) {
    //测试
    // SellTicket01 sellTicket01 = new SellTicket01();
    // SellTicket01 sellTicket02 = new SellTicket01();
    // SellTicket01 sellTicket03 = new SellTicket01();
    //
    // //这里我们会出现超卖.. // sellTicket01.start();//启动售票线程
    // sellTicket02.start();//启动售票线程
    // sellTicket03.start();//启动售票线程
    // System.out.println("===使用实现接口方式来售票=====");
    // SellTicket02 sellTicket02 = new SellTicket02();
    //
    // new Thread(sellTicket02).start();//第 1 个线程-窗口
    // new Thread(sellTicket02).start();//第 2 个线程-窗口
    // new Thread(sellTicket02).start();//第 3 个线程-窗口
    //测试一把
    SellTicket03 sellTicket03 = new SellTicket03();
    new Thread(sellTicket03).start();//第 1 个线程-窗口
    new Thread(sellTicket03).start();//第 2 个线程-窗口
    new Thread(sellTicket03).start();//第 3 个线程-窗口
}
//实现接口方式, 使用 synchronized 实现线程同步
class SellTicket03 implements Runnable {
    private int ticketNum = 100;//让多个线程共享 ticketNum
    private boolean loop = true;//控制 run 方法变量
    Object object = new Object();
    //同步方法(静态的)的锁为当前类本身
    //老韩解读
    //1. public synchronized static void m1() {} 锁是加在 SellTicket03.class
    //2. 如果在静态方法中,实现一个同步代码块.
    /*
        synchronized (SellTicket03 .class)

        {
            System.out.println("m2");
        }
    */

    public synchronized static void m1() {
    }

    public static void m2() {
        synchronized (SellTicket03.class) {
            System.out.println("m2");
        }
    }

    //老韩说明
    //1. public synchronized void sell() {} 就是一个同步方法
    //2. 这时锁在 this 对象
    //3. 也可以在代码块上写 synchronize ,同步代码块, 互斥锁还是在 this 对象
    public /*synchronized*/ void sell() { //同步方法, 在同一时刻, 只能有一个线程来执行 sell 方法
        synchronized (/*this*/ object) {
            if (ticketNum <= 0) {
                System.out.println("售票结束...");
                loop = false;
                return;
            }
    //休眠 50 毫秒, 模拟
            try {
                Thread.sleep(50);
            } catch (InterruptedException e) {
                e.printStackTrace();
            }
            System.out.println("窗口 " + Thread.currentThread().getName() + " 售出一张票" + " 剩余票数=" + (--ticketNum));//1 - 0 - -1 - -2
        }
    }

    @Override
    public void run() {
        while (loop) {
            sell();//sell 方法是一共同步方法
        }
    }
}

//使用 Thread 方式
// new SellTicket01().start()
// new SellTicket01().start();
class SellTicket01 extends Thread {
    private static int ticketNum = 100;//让多个线程共享 ticketNum

    // public void m1() {
    // synchronized (this) {
    // System.out.println("hello");
    // }
    // }
    @Override
    public void run() {
        while (true) {
            if (ticketNum <= 0) {
                System.out.println("售票结束...");
                break;
            }
            //休眠 50 毫秒, 模拟
            try {
                Thread.sleep(50);
            } catch (InterruptedException e) {
                e.printStackTrace();
            }
            System.out.println("窗口 " + Thread.currentThread().getName() + " 售出一张票" + " 剩余票数=" + (--ticketNum));
        }
    }
}

//实现接口方式
class SellTicket02 implements Runnable {
    private int ticketNum = 100;//让多个线程共享 ticketNum

    @Override
    public void run() {
        while (true) {
            if (ticketNum <= 0) {
                System.out.println("售票结束...");
                break;
            }
            //休眠 50 毫秒, 模拟
            try {
                Thread.sleep(50);
            } catch (InterruptedException e) {
                e.printStackTrace();
            }
            System.out.println("窗口 " + Thread.currentThread().getName() + " 售出一张票" + " 剩余票数=" + (--ticketNum));//1 - 0 - -1 - -2
        }
    }
}
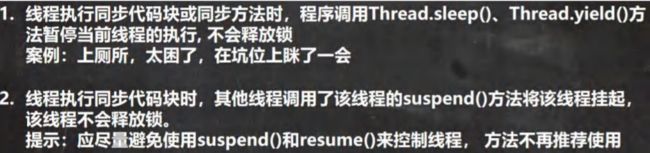
注意事项和细节

线程的死锁
基本介绍

应用案例

应用案例
public static void main(String[] args) {
    //模拟死锁现象
    DeadLockDemo A = new DeadLockDemo(true);
    A.setName("A 线程");
    DeadLockDemo B = new DeadLockDemo(false);
    B.setName("B 线程");
    A.start();
    B.start();
}
//线程
class DeadLockDemo extends Thread {
    static Object o1 = new Object();// 保证多线程,共享一个对象,这里使用 static
    static Object o2 = new Object();
    boolean flag;

    public DeadLockDemo(boolean flag) {//构造器
        this.flag = flag;
    }

    @Override
    public void run() {
    //下面业务逻辑的分析
    //1. 如果 flag 为 T, 线程 A 就会先得到/持有 o1 对象锁, 然后尝试去获取 o2 对象锁
    //2. 如果线程 A 得不到 o2 对象锁,就会 Blocked
    //3. 如果 flag 为 F, 线程 B 就会先得到/持有 o2 对象锁, 然后尝试去获取 o1 对象锁
    //4. 如果线程 B 得不到 o1 对象锁,就会 Blocked
        if (flag) {
            synchronized (o1) {//对象互斥锁, 下面就是同步代码
                System.out.println(Thread.currentThread().getName() + " 进入 1");
                synchronized (o2) { // 这里获得 li 对象的监视权
                    System.out.println(Thread.currentThread().getName() + " 进入 2");
                }
            }
        } else {
            synchronized (o2) {
                System.out.println(Thread.currentThread().getName() + " 进入 3");
                synchronized (o1) { // 这里获得 li 对象的监视权
                    System.out.println(Thread.currentThread().getName() + " 进入 4");
                }
            }
        }
    }
}
释放锁
下面操作会释放锁

下面操作不会释放锁
rintln(“售票结束…”);
break;
}
//休眠 50 毫秒, 模拟
try {
Thread.sleep(50);
} catch (InterruptedException e) {
e.printStackTrace();
}
System.out.println(“窗口 " + Thread.currentThread().getName() + " 售出一张票” + " 剩余票数=" + (–ticketNum));
}
}
}
//实现接口方式
class SellTicket02 implements Runnable {
private int ticketNum = 100;//让多个线程共享 ticketNum
@Override
public void run() {
    while (true) {
        if (ticketNum <= 0) {
            System.out.println("售票结束...");
            break;
        }
        //休眠 50 毫秒, 模拟
        try {
            Thread.sleep(50);
        } catch (InterruptedException e) {
            e.printStackTrace();
        }
        System.out.println("窗口 " + Thread.currentThread().getName() + " 售出一张票" + " 剩余票数=" + (--ticketNum));//1 - 0 - -1 - -2
    }
}
}
### 注意事项和细节

[外链图片转存中...(img-2MDjHzIn-1640872377287)]

## 线程的死锁

### 基本介绍

[外链图片转存中...(img-mlqWXWub-1640872377287)]

### 应用案例

[外链图片转存中...(img-KtH2e7q0-1640872377287)]

### 应用案例

```java
public static void main(String[] args) {
    //模拟死锁现象
    DeadLockDemo A = new DeadLockDemo(true);
    A.setName("A 线程");
    DeadLockDemo B = new DeadLockDemo(false);
    B.setName("B 线程");
    A.start();
    B.start();
}
//线程
class DeadLockDemo extends Thread {
    static Object o1 = new Object();// 保证多线程,共享一个对象,这里使用 static
    static Object o2 = new Object();
    boolean flag;

    public DeadLockDemo(boolean flag) {//构造器
        this.flag = flag;
    }

    @Override
    public void run() {
    //下面业务逻辑的分析
    //1. 如果 flag 为 T, 线程 A 就会先得到/持有 o1 对象锁, 然后尝试去获取 o2 对象锁
    //2. 如果线程 A 得不到 o2 对象锁,就会 Blocked
    //3. 如果 flag 为 F, 线程 B 就会先得到/持有 o2 对象锁, 然后尝试去获取 o1 对象锁
    //4. 如果线程 B 得不到 o1 对象锁,就会 Blocked
        if (flag) {
            synchronized (o1) {//对象互斥锁, 下面就是同步代码
                System.out.println(Thread.currentThread().getName() + " 进入 1");
                synchronized (o2) { // 这里获得 li 对象的监视权
                    System.out.println(Thread.currentThread().getName() + " 进入 2");
                }
            }
        } else {
            synchronized (o2) {
                System.out.println(Thread.currentThread().getName() + " 进入 3");
                synchronized (o1) { // 这里获得 li 对象的监视权
                    System.out.println(Thread.currentThread().getName() + " 进入 4");
                }
            }
        }
    }
}
释放锁
下面操作会释放锁
[外链图片转存中…(img-ELbjksTj-1640872377288)]
下面操作不会释放锁
[外链图片转存中…(img-3UlKXnUV-1640872377288)]