JavaWeb三大组件之一——Filter过滤器源码解析(全面手撕Filter源码,需要耐心看完)
什么是Filter?
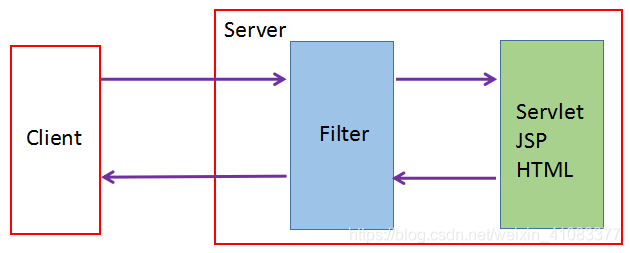
本文所说的Filter是JavaWeb中常见常使用的过滤器。Filter的作用是拦截前端发送给后端的请求,一般是用于权限过滤、日志记录、图片转换、加密、数据压缩等操作。
大致流程如下图所示:
初步了解Filter接口
Filter是过滤器的核心接口,其中定义了初始化方法、拦截请求后的要做的具体任务方法、销毁方法。
public interface Filter {
    //初始化方法,整个生命周期中只执行一次。
    //在init方法成功(失败如抛异常等)执行完前,不能提供过滤服务。
    //参数FilterConfig用于获取初始化参数
    public void init(FilterConfig filterConfig) throws ServletException;

    //执行过滤任务的方法,参数FilterChain表示过滤器链,doFilter方法中只有执行chain.doFilter()后才能调用下一个过滤器的doFilter方法
    //才能将请求交经下一个Filter或Servlet执行
    public void doFilter(ServletRequest request, ServletResponse response, FilterChain chain) throws IOException, ServletException;

    //销毁方法,当移出服务时由web容器调用。整个生命周期中destroy方法只会执行一次
    //destroy方法可用于释放持有的资源,如内存、文件句柄等
    public void destroy();
}
拦截器使用例子
@WebFilter(urlPatterns = "/my")
public class MyFilter implements Filter {

    @Override
    public void init(FilterConfig filterConfig) {
        System.out.println("filter init...");
    }

    @Override
    public void doFilter(ServletRequest request, ServletResponse response, FilterChain chain) throws IOException, ServletException {
        System.out.println("在这个方法里面完成权限认证、信息加密等操作");
        chain.doFilter(request, response); // 执行下一个过滤器doFilter方法。如果在执行此句之前就return返回,则请求到此结束。
    }

    @Override
    public void destroy() {
        System.out.println("filter destroy...");
    }
}
Filter拦截器使用起来十分简单,只要我们自定义的过滤器类实现Filter接口,覆盖其中的init、doFilter、destroy方法即可。
使用上来说,过滤器的实现可以说是有手就行了。但是其中的具体实现逻辑,比如说Filter是在什么时候起作用的?为什么可以不断的层级调用?等等问题。作为Java工程师来说,在工作中运用如此频繁的组件,是时候应该详细了解一番了。
Filter的执行流程
详细的说,Filter的执行流程主要分为两个部分:
-
初始化部分:对于定义好的Filter过滤器(例如上面自定义的MyFilter),会首先创建过滤器对象,并保存到过容器中,并调用其init方法进行初始化。
-
执行部分:当匹配到相应的请求路径时,首先会对该请求进行拦截,执行doFilter中的逻辑,若不通过则该请求则到此为止,不会继续往下执行(此时通常会进行重定向或者转发到其他地方进行处理);若通过则继续执行下一个拦截器的doFilter方法,直到指定的过滤器都执行完doFilter后,便执行Servlet中的业务逻辑。
1. 初始化部分
首先来了解下Filter的初始化流程,就拿上面自定义的MyFilter类来作为例子讲解(为了讲解源码时候排除不必要的干扰,此后的源码解析内容只针对关键部分代码进行讲解)。
当我们定义好MyFilter类后,便开启Tomcat服务器,开始启动程序。
通过调试发现初始化Filter的入口是:StandardContext类的startInternal方法
@Override
protected synchronized void startInternal() throws LifecycleException {
	... // 省略不必要代码
    fireLifecycleEvent(Lifecycle.CONFIGURE_START_EVENT, null); // 读取web.xml配置文件或者注解配置信息,创建并添加Filter
	...
    if (ok) {
        if (!filterStart()) { // 初始化Filter。若初始化成功则继续往下执行;若初始化失败则抛出异常,终止程序
            log.error(sm.getString("standardContext.filterFail"));
            ok = false;
        }
    }
    ...
}
可以看到,原来filterStart方法才是真正初始化Filter的方法。
那么在看filterStart方法源码之前,我们先来了解下一些相关的重点属性(有助于之后的源码阅读):
// filterConfigs是一个HashMap,以键值对的形式保存数据(key :value = 过滤器名 :过滤器配置信息对象)
private HashMap<String, ApplicationFilterConfig> filterConfigs = new HashMap<>();
// filterDefs同时也是一个HashMap,其中保存的数据是(过滤器名 :过滤器定义对象)
private HashMap<String, FilterDef> filterDefs = new HashMap<>();
看下其中的FilterDef、ApplicationFilterConfig这两个类,再进一步了解上面的两个属性:
FilterDef:
/**
* 来看下官方解释:
* Web应用程序的过滤器定义的表示形式,如部署描述符中元素中的所示。
* 例如:
*
* 	MyFilter
*   com.filter.MyFilter
*
*
* 说白了,这个FilterDef其实就是封装了配置信息中标签当中的元素
* 其中就有三个重点属性:filterName、filterClass、filter
*/
public class FilterDef implements Serializable {
	...
    private String filterName = null; // 过滤器名,对应的是中的内容

    private String filterClass = null; // 过滤器全限定类名,对应的是中的内容(用于反射创建过滤器对象)

	private transient Filter filter = null; // 真正的过滤器对象(如:MyFilter实例对象)
	...
}
ApplicationFilterConfig:
/**
* ApplicationFilterConfig类主要用于保存自定义Filter的一些配置信息,例如过滤器名、初始化参数、过滤器定义对象等等
*/
public final class ApplicationFilterConfig implements FilterConfig, Serializable {
	...
	/**
	* 构造方法
	*/
	ApplicationFilterConfig(Context context, FilterDef filterDef)
	        throws ClassCastException, ClassNotFoundException, IllegalAccessException,
	        InstantiationException, ServletException, InvocationTargetException, NamingException,
	        IllegalArgumentException, NoSuchMethodException, SecurityException {
	    super();
	    this.context = context;
	    this.filterDef = filterDef; // 由此可知,ApplicationFilterConfig类中其实定义了过滤器定义对象
		// 初始化真正的过滤器对象
	    if (filterDef.getFilter() == null) {
	        getFilter();
	    } else {
	        this.filter = filterDef.getFilter();
	        getInstanceManager().newInstance(filter);
	        initFilter();
	    }
	}
	...
}
了解完上面的属性,我们再来研究filterStart方法到底做了什么:
public boolean filterStart() {
    if (getLogger().isDebugEnabled()) { // 日志相关
        getLogger().debug("Starting filters");
    }

    boolean ok = true;
    synchronized (filterConfigs) { // 初始化过滤器属于同步操作
        filterConfigs.clear(); // 在初始化前,先清空
        for (Entry<String,FilterDef> entry : filterDefs.entrySet()) { // 循环遍历过滤器定义对象集合(filterDefs初始化在哪?)
            String name = entry.getKey(); // 获取过滤器名
            if (getLogger().isDebugEnabled()) { // 日志相关
                getLogger().debug(" Starting filter '" + name + "'");
            }
            try {
                ApplicationFilterConfig filterConfig = new ApplicationFilterConfig(this, entry.getValue()); // 创建过滤器配置对象
                filterConfigs.put(name, filterConfig); // 添加配置对象
            } catch (Throwable t) {
                t = ExceptionUtils.unwrapInvocationTargetException(t);
                ExceptionUtils.handleThrowable(t);
                getLogger().error(sm.getString("standardContext.filterStart", name), t);
                ok = false;
            }
        }
    }
    return ok;
}
此处,如果细心的朋友就会发现,filterStart方法中直接就拿filterDefs进行循环遍历获取过滤器名了。但是filterDefs是在哪里进行添加元素的呢?
回想一下,我们发现初始化过滤器的入口是StandardContext类中的startInternal方法,而在其中执行真正过滤器初始化方法前,还有一步:
fireLifecycleEvent(Lifecycle.CONFIGURE_START_EVENT, null); // 读取web.xml配置文件或者注解配置信息,创建并添加FilterDef过滤器定义对象

// 通过调试代码,可以找到其实是调用了ContextConfig类中configureContext方法,以下部分是该方法中的关键代码
for (FilterDef filter : webxml.getFilters().values()) { // 循环配置信息中的过滤器定义对象
    if (filter.getAsyncSupported() == null) {
        filter.setAsyncSupported("false");
    }
    context.addFilterDef(filter); // 将过滤器定义对象添加到容器中
}

/**
* 最后发现fireLifecycleEvent方法最终调用的是StandardContext类中的addFilterDef方法
* 而参数filterDef正是容器context经过解析web.xml文件或者注解配置后创建的过滤器定义对象
* 但此时filterDef中的真正过滤器对象filter还未初始化,因此才会有之后的初始化过滤器方法
*/
public void addFilterDef(FilterDef filterDef) {
    synchronized (filterDefs) { // 同步添加过滤器定义对象
        filterDefs.put(filterDef.getFilterName(), filterDef);
    }
    fireContainerEvent("addFilterDef", filterDef);
}
明白了filterDefs的初始化,我们再回到filterStart方法,而此时执行到创建ApplicationFilterConfig过滤器配置对象:
/**
* 没错,就是调用这个构造方法创建的filterConfig
**/
ApplicationFilterConfig(Context context, FilterDef filterDef)
        throws ClassCastException, ClassNotFoundException, IllegalAccessException,
        InstantiationException, ServletException, InvocationTargetException, NamingException,
        IllegalArgumentException, NoSuchMethodException, SecurityException {
    super();
    this.context = context;
    this.filterDef = filterDef;
	// 现在重点来关注以下部分的代码
	// 从过滤器定义对象中获取真正的过滤器对象(正常来说,应该都是空。因为从之前filterDefs的添加元素逻辑来看,添加的过滤器定义对象中的过滤器对象都是空的)
    if (filterDef.getFilter() == null) { // 过滤器对象为空
        getFilter(); // 获取并初始化过滤器(此处没有进行接收结果,说明此处只是进行初始化)
    } else {
        this.filter = filterDef.getFilter(); // 绑定过滤器对象
        getInstanceManager().newInstance(filter);
        initFilter(); // 调用过滤器的init方法,初始化过滤器
    }
}
获取并初始化过滤器
Filter getFilter() throws ClassCastException, ClassNotFoundException, IllegalAccessException,
        InstantiationException, ServletException, InvocationTargetException, NamingException,
        IllegalArgumentException, NoSuchMethodException, SecurityException {
    if (this.filter != null) // 若ApplicationFilterConfig类中已存在过滤器对象,则直接返回
        return (this.filter);

	// 通过反射的方式创建过滤器对象,并绑定到配置对象的filter上
    String filterClass = filterDef.getFilterClass();
    this.filter = (Filter) getInstanceManager().newInstance(filterClass);

    initFilter(); // 调用过滤器对象的init方法,初始化过滤器

    return (this.filter);
}
到此,过滤器对象也已经创建了,就差调用它的init方法初始化了:
private void initFilter() throws ServletException {
    if (context instanceof StandardContext && context.getSwallowOutput()) {
        try {
            SystemLogHandler.startCapture();
            filter.init(this);
        } finally {
            String capturedlog = SystemLogHandler.stopCapture();
            if (capturedlog != null && capturedlog.length() > 0) {
                getServletContext().log(capturedlog);
            }
        }
    } else {
        filter.init(this); // 终于看到了,调用了filter对象的init方法
    }
    // Expose filter via JMX
    registerJMX();
}

@WebFilter(urlPatterns = "/my")
public class MyFilter implements Filter {

    @Override
    public void init(FilterConfig filterConfig) { // 其实就是调用了这个我们自己实现的init方法
        System.out.println("filter init...");
    }
	...
}
那么过滤器的初始化部分就到此结束了。
我们来整理下逻辑,如果你的逻辑清晰的话,就可以明白过滤器初始化的这个部分,做了各种各样的事情,其实都是为了根据配置信息去创建filterConfig对象,并为它的filterDef和filter属性进行赋值,最后将其添加到filterConfigs中去。
换句话说,其实就是为了根据配置信息去创建过滤器配置对象,并初始化它的过滤器定义对象和真正的过滤器对象,最后将它加入到容器的过滤器配置映射表中去。
为了加深对Filter初始化部分的源码理解,送出下图:

2. 执行部分
了解完Filter的初始化,说明在后端程序中已经存在有相应的过滤器了(Tomcat自带的,我们自定义的)。那么当请求访问到达后端的时候,Filter是如何工作的?
下面再来看调用Filter的方法入口StandardWrapperValve类中的invoke:
public final void invoke(Request request, Response response) throws IOException, ServletException {
	...
    ApplicationFilterChain filterChain = ApplicationFilterFactory.createFilterChain(request, wrapper, servlet); // 创建并初始化过滤器链

    try {
        if ((servlet != null) && (filterChain != null)) { // 此处需要判断servlet和过滤器不为空。因为在执行完过滤器链中所有的过滤器doFilter方法后,就会轮到真正处理请求的servlet来处理
            if (context.getSwallowOutput()) {
                try {
                    SystemLogHandler.startCapture();
                    if (request.isAsyncDispatching()) {
                        request.getAsyncContextInternal().doInternalDispatch();
                    } else {
                        filterChain.doFilter(request.getRequest(),
                                response.getResponse());
                    }
                } finally {
                    String log = SystemLogHandler.stopCapture();
                    if (log != null && log.length() > 0) {
                        context.getLogger().info(log);
                    }
                }
            } else {
                if (request.isAsyncDispatching()) {
                    request.getAsyncContextInternal().doInternalDispatch();
                } else {
                    filterChain.doFilter(request.getRequest(), response.getResponse()); // 执行过滤器链中的所有过滤器的doFilter方法
                }
            }
        }
	} catch(...){...}
	...
}
通过上面的源码,可以看到直接就通过创建的过滤器链执行其中过滤器的doFilter方法了。因此重点就在于这个过滤器链filterChain是如何创建的?
来看下ApplicationFilterFactory类的createFilterChain方法:
public static ApplicationFilterChain createFilterChain(ServletRequest request, Wrapper wrapper, Servlet servlet) {
    if (servlet == null) // 如果没有之后处理请求的servlet,那么即使有过滤器也是白搭,直接返回空
        return null;
    // 创建过滤器链
    ApplicationFilterChain filterChain = null;
    if (request instanceof Request) {
        Request req = (Request) request;
        if (Globals.IS_SECURITY_ENABLED) {
            filterChain = new ApplicationFilterChain(); // 安全启用的过滤器链,直接新建,不复用request请求中的过滤器链
        } else {
            filterChain = (ApplicationFilterChain) req.getFilterChain(); // 获取请求中的过滤器链(若是第一次访问,获取的过滤器链为空)
            if (filterChain == null) { // 过滤器链为空
                filterChain = new ApplicationFilterChain(); // 新建过滤器链
                req.setFilterChain(filterChain); // 加入request请求中,在之后可以进行复用
            }
        }
    } else {
        // Request dispatcher in use
        filterChain = new ApplicationFilterChain();
    }

    filterChain.setServlet(servlet); // 在过滤器链中设置最后处理请求的servlet
    filterChain.setServletSupportsAsync(wrapper.isAsyncSupported());

    StandardContext context = (StandardContext) wrapper.getParent(); // 获取StandardContext容器
    // 这里又冒出来一个filterMaps,它又是怎么来的?
    FilterMap filterMaps[] = context.findFilterMaps(); // 获取过滤器映射对象

    if ((filterMaps == null) || (filterMaps.length == 0)) // 如果过滤器映射对象都不存在,或者没有映射信息,则说明没有自定义过滤器,则直接返回过滤器链
        return (filterChain);

    DispatcherType dispatcher = (DispatcherType) request.getAttribute(Globals.DISPATCHER_TYPE_ATTR); // 获取当前request请求的类型

    String requestPath = null;
    Object attribute = request.getAttribute(Globals.DISPATCHER_REQUEST_PATH_ATTR);
    if (attribute != null){
        requestPath = attribute.toString(); // 请求地址(例如:/my)
    }

    String servletName = wrapper.getName(); // 获取最终处理请求的servlet名

    // 循环遍历过滤器映射对象数组,为过滤器链添加符合条件的过滤器
    for (int i = 0; i < filterMaps.length; i++) {
        if (!matchDispatcher(filterMaps[i] ,dispatcher)) { // 匹配请求类型,不匹配则跳过
            continue;
        }
        if (!matchFiltersURL(filterMaps[i], requestPath)) // 匹配请求地址,不匹配则跳过
            continue;
        ApplicationFilterConfig filterConfig = (ApplicationFilterConfig) context.findFilterConfig(filterMaps[i].getFilterName()); // 符合前两个匹配条件,则根据过滤器名在StandardContext容器中获取对应的过滤器配置对象
        if (filterConfig == null) {
            continue;
        }
        filterChain.addFilter(filterConfig); // 到这步终于明白,过滤器链中添加的并不是过滤器对象,而是过滤器配置对象
    }

    // 循环遍历过滤器映射对象数组,再次为过滤器链添加符合条件的过滤器
    for (int i = 0; i < filterMaps.length; i++) {
        if (!matchDispatcher(filterMaps[i] ,dispatcher)) { // 匹配请求类型,不匹配则跳过
            continue;
        }
        if (!matchFiltersServlet(filterMaps[i], servletName)) // 匹配过滤器对应的servlet名,不匹配则跳过
            continue;
        ApplicationFilterConfig filterConfig = (ApplicationFilterConfig) context.findFilterConfig(filterMaps[i].getFilterName()); // 符合前两个匹配条件,则根据过滤器名在StandardContext容器中获取对应的过滤器配置对象
        if (filterConfig == null) {
            continue;
        }
        filterChain.addFilter(filterConfig); // 添加对应的过滤器配置对象
    }

	// 到此,filterChain过滤器链已经将匹配的请求类型、请求路径、请求最终处理的servlet这三个条件的过滤器配置对象添加完毕,返回
    return filterChain;
}
当createFilterChain方法执行完后,一个完整的过滤器链filterChain就有了。
但是在过滤器链生成的过程中有个非常重要的角色:filterMap,以及createFilterChain方法中还有很多其他的看似不起眼的方法,听我接下来慢慢分析:
首先,我们先来看看这个filterMap是个什么东西:
FilterMap filterMaps[] = context.findFilterMaps(); // 从createFilterChain方法中的这句就可以知道,filterMap是从context容器来的

/**
* 这个context容器其实就是我们一直说的StandardContext
* 然后点进来到findFilterMaps方法,发现它只是返回了filterMaps属性对象的asArray方法的结果
*/
@Override
public FilterMap[] findFilterMaps() {
    return filterMaps.asArray();
}

// 因此,再来看这个filterMaps属性是个什么东西
// 原来又是ContextFilterMaps类的对象
private final ContextFilterMaps filterMaps = new ContextFilterMaps();

/**
* 再点进来这个ContextFilterMaps类,发现原来它是StandardContext类中的一个静态final内部类
* 重点是其内部维护了一个FilterMap[]类型的数组,而且它的asArray方法也只是返回了这个数组
*/
private static final class ContextFilterMaps {
		...
        private FilterMap[] array = new FilterMap[0];
        ...
        public FilterMap[] asArray() {
            synchronized (lock) {
                return array;
            }
        }
        ...
	}
}
到此,可以知道StandardContext类的findFilterMaps方法返回的是,其内部类ContextFilterMaps中维护的一个FilterMap[]类型的数组。
但是对于filterMap的探索仍未结束,因为我们只知道它是一个FilterMap[]类型的数组,但是这个FilterMap是个什么类我们不知道,那还是继续看下吧:
/**
 * 来看下这个类的官方解释:
 * Web应用程序的过滤器映射的表示形式,如部署描述符中元素中的所示
 * 每个过滤器映射都必须包含过滤器名称以及URL模式或servlet名称
 * 例如以下配置:
 *
 *    MyFilter
 *    /my
 *
 *
 * 说白了,这个FilterMap就是封装了配置信息中标签中的元素
 * 其中还包含了两个重点属性:过滤器名、过滤器对应过滤的url
 */
public class FilterMap extends XmlEncodingBase implements Serializable {
	...
    private String filterName = null; // 过滤器名,对应的是中的内容

    private String[] urlPatterns = new String[0]; // 过滤url,对应的是中的内容(可配置多个匹配不同的url,因此是数组形式)
    ...
}
终于,这个filterMap是个什么东西可以说是研究明白了。filterMap它其实就是个封装了配置映射信息中 过滤器名 和 对应过滤url 参数的对象数组。
filterMap的定义搞清楚了,但是还不够。因为我们还不知道它是怎么初始化的?是在哪里把配置映射对象FilterMap加进去的?
接下来,给大家来说下这个filterMap是如何初始化的。(通过代码调试就ok了)在这里直接就和大家说了,大家应该还记得过滤器的第一阶段吧。是的,就是初始化阶段:
// 大家对这个方法还有印象吧,它就是初始化过滤器的入口方法(StandardContext类中的startInterval中调用)
// 针对于以下代码,我们之前的说法是:读取web.xml配置文件或者注解配置信息,创建并添加FilterDef过滤器定义对象
// 那么到了现在,其实全面一点的说法应该是:
// 1. 读取web.xml配置文件或者注解配置信息,创建并添加FilterDef过滤器定义对象
// 2. 同时也创建并添加FilterMap过滤器映射对象
fireLifecycleEvent(Lifecycle.CONFIGURE_START_EVENT, null);

// 以下同样是调用了ContextConfig类的configureContext方法,以下是关键代码
for (FilterMap filterMap : webxml.getFilterMappings()) { // 循环配置信息中的过滤器映射对象
    context.addFilterMap(filterMap); // 将过滤器映射对象添加到容器中
}

/**
* 最终调用了StandardContext类中的addFilterMap方法
*/
@Override
public void addFilterMap(FilterMap filterMap) {
    validateFilterMap(filterMap); // 验证过滤器映射对象中的信息是否正确
    filterMaps.add(filterMap); // 添加到filterMaps中去
    fireContainerEvent("addFilterMap", filterMap);
}
到此,才可以说把filterMap这个东西的定义到初始化整个过程给研究明白了。
费了一番功夫,终于把这个filterMap给搞明白了。那么,再回头看下createFilterChain方法中被我们忽视的一些细节:
- 获取过滤器配置对象:
ApplicationFilterConfig filterConfig = (ApplicationFilterConfig) context.findFilterConfig(filterMaps[i].getFilterName()); // 说到底,还是根据过滤器名从容器中获取

/**
 * findFilterConfig方法一看,其实就是从容器的filterConfigs中根据过滤器名获取到对应的配置对象
 * (忘记filterConfigs怎么来的话,回头去看初始化阶段)
*/
public FilterConfig findFilterConfig(String name) {
    return (filterConfigs.get(name));
}
- 添加过滤器配置对象到过滤器链中:
filterChain.addFilter(filterConfig); // 添加过滤器配置对象

/**
* 在此先介绍下ApplicationFilterChain过滤器链类的两个重要属性
*/
public final class ApplicationFilterChain implements FilterChain {
	...
	// filters数组,用于保存过滤器配置对象
	private ApplicationFilterConfig[] filters = new ApplicationFilterConfig[0];
    // 表示filters中获取过滤器配置对象的索引位置,初始值为0。说明从头开始获取
    private int pos = 0;
	// filters中元素个数
    private int n = 0;
    // 扩容范围
    public static final int INCREMENT = 10;
    ...
}

/**
* 添加过滤器配置对象到filters中去
*/
void addFilter(ApplicationFilterConfig filterConfig) {
    for(ApplicationFilterConfig filter : filters) // 避免重复添加相同的过滤器配合对象
        if(filter==filterConfig)
            return;
    if (n == filters.length) { // 过滤器达到数组最大值
        ApplicationFilterConfig[] newFilters = new ApplicationFilterConfig[n + INCREMENT]; // 扩容(扩大10个长度)
        System.arraycopy(filters, 0, newFilters, 0, n);
        filters = newFilters;
    }
    filters[n++] = filterConfig; // 将filterConfig添加到filters末尾
}
到此,过滤器链filterChain的创建和初始化已经完成了。
那么终于来到过滤器的最后一步,执行过滤器链中的过滤器。让我们重新回到StandardWrapperValve类中的invoke方法:
filterChain.doFilter(request.getRequest(), response.getResponse()); // 执行过滤器链中的所有过滤器的doFilter方法(注意,这里调用的是过滤器链的doFilter方法,而不是过滤器的)

@Override
public void doFilter(ServletRequest request, ServletResponse response) throws IOException, ServletException {
    if( Globals.IS_SECURITY_ENABLED ) {
		...
    } else {
        internalDoFilter(request,response); // 重点关注这个方法
    }
}

/**
* 终于来真正执行过滤器doFilter的方法
*/
private void internalDoFilter(ServletRequest request, ServletResponse response) throws IOException, ServletException {
    if (pos < n) { // 获取位置 < 过滤器个数,说明还有过滤器未执行,继续获取
        ApplicationFilterConfig filterConfig = filters[pos++]; // 从filters头开始往后获取当中的过滤器配置对象
        try {
            Filter filter = filterConfig.getFilter(); // 获取真正的过滤器对象
            if (request.isAsyncSupported() && "false".equalsIgnoreCase(filterConfig.getFilterDef().getAsyncSupported())) {
                request.setAttribute(Globals.ASYNC_SUPPORTED_ATTR, Boolean.FALSE);
            }
            if( Globals.IS_SECURITY_ENABLED ) {
                final ServletRequest req = request;
                final ServletResponse res = response;
                Principal principal = ((HttpServletRequest) req).getUserPrincipal();
                Object[] args = new Object[]{req, res, this};
                SecurityUtil.doAsPrivilege ("doFilter", filter, classType, args, principal);
            } else {
                filter.doFilter(request, response, this); // 执行过滤器的doFilter方法
            }
        } catch (IOException | ServletException | RuntimeException e) {
            throw e;
        } catch (Throwable e) {
            e = ExceptionUtils.unwrapInvocationTargetException(e);
            ExceptionUtils.handleThrowable(e);
            throw new ServletException(sm.getString("filterChain.filter"), e);
        }
        return; // 注意这里,直接返回,不执行下面的代码
    }

	// 如果代码执行到此,说明过滤器链中的所有过滤器已经执行完毕,并都通过
	// 开始执行相应servlet中的service方法
    try {
        if (ApplicationDispatcher.WRAP_SAME_OBJECT) {
            lastServicedRequest.set(request);
            lastServicedResponse.set(response);
        }
        if (request.isAsyncSupported() && !servletSupportsAsync) {
            request.setAttribute(Globals.ASYNC_SUPPORTED_ATTR,
                    Boolean.FALSE);
        }
        // Use potentially wrapped request from this point
        if ((request instanceof HttpServletRequest) && (response instanceof HttpServletResponse) && Globals.IS_SECURITY_ENABLED ) {
            final ServletRequest req = request;
            final ServletResponse res = response;
            Principal principal = ((HttpServletRequest) req).getUserPrincipal();
            Object[] args = new Object[]{req, res};
            SecurityUtil.doAsPrivilege("service",
                                       servlet,
                                       classTypeUsedInService,
                                       args,
                                       principal);
        } else {
            servlet.service(request, response); // 执行serlvet中的service方法
        }
    } catch (IOException | ServletException | RuntimeException e) {
        throw e;
    } catch (Throwable e) {
        e = ExceptionUtils.unwrapInvocationTargetException(e);
        ExceptionUtils.handleThrowable(e);
        throw new ServletException(sm.getString("filterChain.servlet"), e);
    } finally {
        if (ApplicationDispatcher.WRAP_SAME_OBJECT) {
            lastServicedRequest.set(null);
            lastServicedResponse.set(null);
        }
    }
}

@WebFilter(urlPatterns = "/my")
public class MyFilter implements Filter {
	...
	/**
	* 经历了这么多,终于调用到这个doFilter方法了
	*/
    @Override
    public void doFilter(ServletRequest request, ServletResponse response, FilterChain chain) throws IOException, ServletException {
        System.out.println("doFilter...");
        chain.doFilter(request, response); // 在此处重新调用过滤器链的doFilter,执行下一个过滤器的doFilter方法
    }
    ...
}
最后的最后,终于执行到过滤器的doFilter方法了!!!
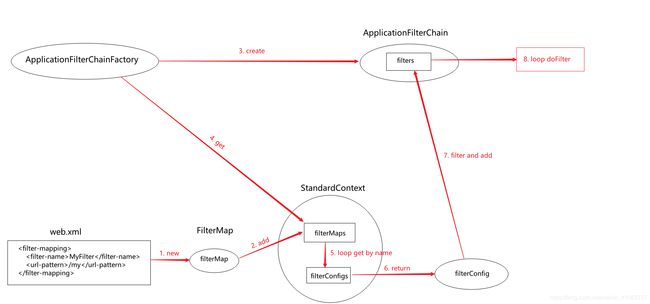
说到底,其实这个过滤器执行阶段的话,就是首先通过过滤器链工厂创建过滤器链对象。然后根据配置信息的过滤器名和过滤路径,从容器中获取对应的过滤器配置对象,并将其加入到过滤器链对象中的过滤器数组中,最后将执行数组中包含的所有过滤器对象的doFilter方法。
最后为了加深理解,再基于第二阶段的源码分析,送出一图:
那么本文的再最后说一个细节,就是在过滤器的doFilter方法如果需要执行下一个过滤器的话,必须要调用 chain.doFilter(request, response) 。
正是基于以上的逻辑,我们通常会在Filter中做请求校验的业务。当校验通过,则继续执行下一个Filter,或者执行servlet处理请求;否则,就停止传递请求,返回错误信息给前端。