【k8s】ingress-nginx 启用 geoip2 全流程部署
文章目录
- ingress-nginx启用geoip2用来获取客户端的国家代码
-
- 1、k8s部署ingress-nginx
-
- 介绍
- 部署
- 2、ingress-nginx启用geoip2
-
- 下载geoip2的数据库
- 启用geoip2
- 安装部署nfs
- 挂载geoip2数据库文件
- ingress-nginx自定义header
- ingress-nginx中添加proxy_set_header和add_header
- 3、测试
-
- 修改ingress-nginx Custom NGINX template
- 4、利用公网ip进行测试
ingress-nginx启用geoip2用来获取客户端的国家代码
1、k8s部署ingress-nginx
介绍
Ingress(以nginx为例)的工作原理如下:
1、用户编写Ingress规则,说明那个域名对应kubernetes集群中的那个Service
2、Ingress Controller动态感知Ingress服务规则的变化,然后生成一段对应的Nginx反向代理配置
3、Ingress Controller会将生成的nginx配置写入到一个运行着的Nginx服务中,并动态更新
4、到此为止,其实真正在工作的就是一个Nginx了,内部配置了用户定义的请求转发规则
部署
应用ingress controller定义文件
kubectl apply -f https://raw.githubusercontent.com/kubernetes/ingress-nginx/nginx-0.30.0/deploy/static/mandatory.yaml
应用ingress-service定义文件
kubectl apply -f https://raw.githubusercontent.com/kubernetes/ingress-nginx/nginx-0.30.0/deploy/static/provider/baremetal/service-nodeport.yaml
部署结果
# kubectl get pod -n ingress-nginx
NAME                                        READY   STATUS    RESTARTS   AGE
nginx-ingress-controller-5c5c5cc759-76wjh   1/1     Running   0          16h
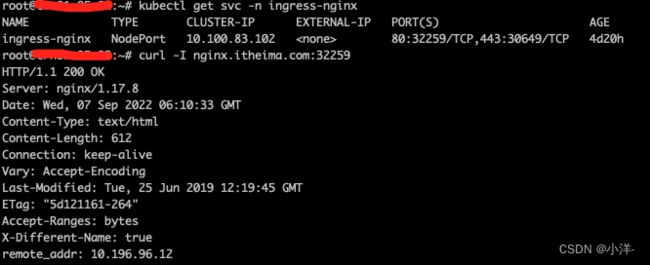
# kubectl get svc -n ingress-nginx
NAME            TYPE       CLUSTER-IP      EXTERNAL-IP   PORT(S)                      AGE
ingress-nginx   NodePort   10.100.83.102   <none>        80:32259/TCP,443:30649/TCP   4d18h
现在部署nginx的deployment以及service用来后面的验证以及展示
# cat deployment-nginx.yaml
apiVersion: apps/v1
kind: Deployment
metadata:
  name: nginx-deployment
  namespace: sysadmin
spec:
  replicas: 3
  selector:
    matchLabels:
      app: nginx-pod
  template:
    metadata:
      labels:
        app: nginx-pod
    spec:
      containers:
      - name: nginx
        image: nginx:1.17.1
        ports:
        - containerPort: 80

---
apiVersion: v1
kind: Service
metadata:
  name: nginx-service
  namespace: sysadmin
spec:
  ports:
    - port: 80
      name: nginx
  clusterIP: None
  selector:
    app: nginx-pod

# kubectl apply -f deployment-nginx.yaml
deployment.apps/nginx-deployment created
service/nginx-service created
# kubectl get deployment -n sysadmin
NAME               READY   UP-TO-DATE   AVAILABLE   AGE
nginx-deployment   3/3     3            3           2m47s
# kubectl get svc -n sysadmin
NAME            TYPE        CLUSTER-IP       EXTERNAL-IP   PORT(S)          AGE
nginx-service   ClusterIP   None             <none>        80/TCP           3m11s
现在开始创建ingress
# cat ingress.yaml
apiVersion: extensions/v1beta1
kind: Ingress
metadata:
  name: ingress-http
  namespace: sysadmin
spec:
  rules:
  - host: nginx.itheima.com
    http:
      paths:
      - path: /
        backend:
          serviceName: nginx-service
          servicePort: 80
# kubectl apply -f ingress.yaml
# kubectl get ingress -n sysadmin
NAME                CLASS    HOSTS                           ADDRESS         PORTS   AGE
ingress-http        <none>   nginx.itheima.com                               80      10s
# kubectl get svc -n sysadmin
NAME            TYPE        CLUSTER-IP       EXTERNAL-IP   PORT(S)          AGE
nginx-service   ClusterIP   None             <none>        80/TCP           12m
测试部署是否成功,添加本地域名解析,修改/etc/hosts文件,将域名解析到任意一个工作节点

结果可以正确访问到nginx!说明ingress-nginx部署成功
2、ingress-nginx启用geoip2
下载geoip2的数据库
官方注册地址:注册
下载以下三个数据库,我们这里下载的是mmdb格式的数据库,是国家数据库
GeoLite2 ASN
GeoLite2 City
GeoLite2 Country
由于数据库每两周更新一次,所以需要及时更新数据库文件
启用geoip2
ingress-nginx configmap官方文档:链接
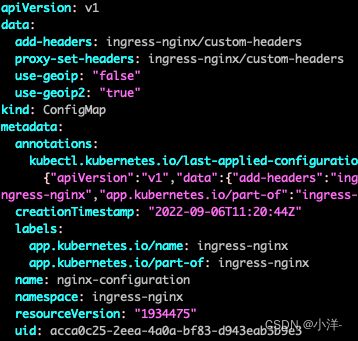
由于geoip在2019年已经停止维护并更新,所以需要修改配置configmap nginx-configuration禁用geoip并启用geoip2
use-geoip: "false"
use-geoip2: "true"
安装部署nfs
Unbuntu 安装 nfs
sudo apt-get install nfs-kernel-server  # 安装 NFS服务器端
sudo apt-get install nfs-common         # 安装 NFS客户端
添加 NFS 共享目录
sudo vim /etc/exports
若需要把 “/data01/nfs/geoip” 目录设置为 NFS 共享目录,请在该文件末尾添加下面的一行:
/data01/nfs/geoip *(rw,sync,no_root_squash,no_subtree_check)
# * 表示允许任何网段 IP 的系统访问该 NFS 目录
# rw:读/写权限
# sync:数据同步写入内存和硬盘
# no_root_squash:服务器允许远程系统以root特权存取该目录
# no_subtree_check:关闭子树检查
创建目录并赋予权限,将数据库文件移动到目录 /data01/nfs/geoip 中
mkdir -p /data01/nfs/geoip
chmod +777 /data01/nfs/geoip
重启nfs服务
sudo /etc/init.d/nfs-kernel-server restart
测试挂载nfs服务器,可以看到数据库文件
mount -t nfs <ip>:/data01/nfs/geoip /mnt
cd /mnt
# ls
GeoLite2-ASN.mmdb  GeoLite2-City.mmdb  GeoLite2-Country.mmdb
挂载geoip2数据库文件
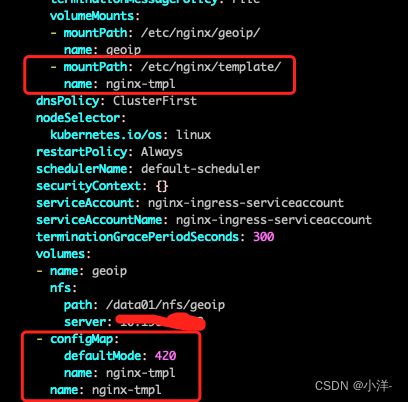
我们在这里使用nfs的形式挂载进ingress-nginx,yaml示例
kubectl edit deployment -n ingress-nginx nginx-ingress-controller
ingress-nginx自定义header
ingress-nginx custom-headers官网文档:链接
自定义 header 的custom-headers.yaml:
apiVersion: v1
data:
  X-Different-Name: "true"
  GeoIP-Country-Code: $geoip2_city_country_code
  http_x_forwarded_for: $http_x_forwarded_for
  remote_addr: $remote_addr
kind: ConfigMap
metadata:
  name: custom-headers
  namespace: ingress-nginx
kubectl apply -f custom-headers.yaml
ingress-nginx中添加proxy_set_header和add_header
官方文档
kubectl edit cm -n ingress-nginx nginx-configuration
配置示例:

由于nginx-ingress-controller不会自动加载config-map,所以需要手动重启
kubectl rollout restart deployment nginx-ingress-controller -n ingress-nginx
3、测试
此时发现通过curl -I nginx.itheima.com:32259仍然无法获得GeoIP-Country-Code(国家代码)
主要是因为geoip默认根据 $remote_addr 该参数来进行国家代码的计算,而这里获得的ip是某个k8s工作节点的ip,私网ip无法计算。
我们可以看到 X-Different-Name: true 这条header,说明我们的custom headers(自定义header)生效了!

修改ingress-nginx Custom NGINX template
Custom NGINX template:官方文档
由于$remote_addr 参数是私网ip,且无法修改,在这里需要将 $remote_addr 改为 $http_x_forwarded_for,根据需求只改个别参数或者全部改都可以。并将配置做成configmap的形式挂载进nginx-ingress-controller的/etc/nginx/template目录

配置configmap
# cat nginx-tmpl-cm.yaml

apiVersion: v1
kind: ConfigMap
metadata:
  name: nginx-tmpl
  namespace: ingress-nginx
data:
  nginx.tmpl: |
    {{ $all := . }}
    {{ $servers := .Servers }}
    {{ $cfg := .Cfg }}
    {{ $IsIPV6Enabled := .IsIPV6Enabled }}
    {{ $healthzURI := .HealthzURI }}
    {{ $backends := .Backends }}
    {{ $proxyHeaders := .ProxySetHeaders }}
    {{ $addHeaders := .AddHeaders }}

    # Configuration checksum: {{ $all.Cfg.Checksum }}

    # setup custom paths that do not require root access
    pid {{ .PID }};

    {{ if $cfg.UseGeoIP2 }}
    load_module /etc/nginx/modules/ngx_http_geoip2_module.so;
    {{ end }}

    {{ if (shouldLoadModSecurityModule $cfg $servers) }}
    load_module /etc/nginx/modules/ngx_http_modsecurity_module.so;
    {{ end }}

    {{ if (shouldLoadOpentracingModule $cfg $servers) }}
    load_module /etc/nginx/modules/ngx_http_opentracing_module.so;
    {{ end }}

    daemon off;

    worker_processes {{ $cfg.WorkerProcesses }};
    {{ if gt (len $cfg.WorkerCPUAffinity) 0 }}
    worker_cpu_affinity {{ $cfg.WorkerCPUAffinity }};
    {{ end }}
    ............
    本文只截取部分内容
应用configmap
kubectl apply -f nginx-tmpl-cm.yaml
配置到nginx-ingress-controller中
kubectl edit deployment -n ingress-nginx nginx-ingress-controller
# 修改后保存文件,自动生效
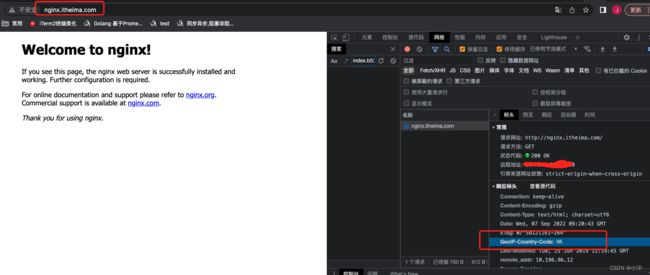
4、利用公网ip进行测试
找一台有公网ip且和k8s工作节点在同一个内网段的的服务器,部署nginx,本文截取一段配置供参考:
server {
    listen 80;
    server_name flask.trn.op-mobile.opera.com;
    root html;

    location ~ / {
        proxy_set_header Host $http_host;
        proxy_set_header Upgrade $http_upgrade;
        proxy_set_header Connection $connection_upgrade;
        proxy_set_header X-Forwarded-Proto $scheme;
        proxy_set_header X-Forwarded-Port $server_port;
        proxy_set_header X-Real-IP $remote_addr;
        proxy_set_header X-Forwarded-For $proxy_add_x_forwarded_for;
        proxy_pass http://<k8s工作节点ip>:32259;
    }
}
修改pc的本地解析,添加
vim /etc/hosts
# 添加
<公网ip> nginx.itheima.com


