HBU-NNDL 实验二 pytorch入门

一. 概念:张量、算子
1.张量
定义:
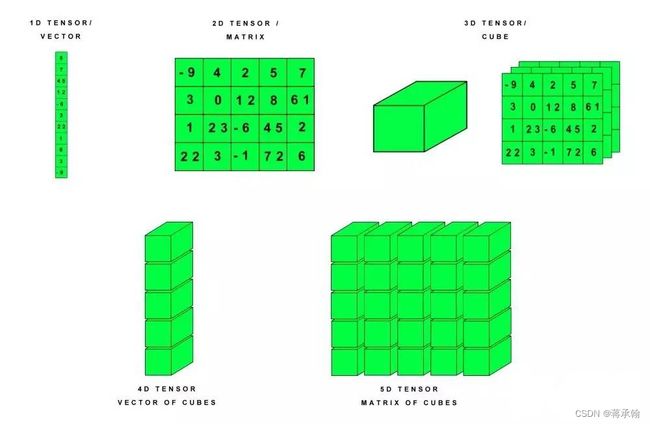
- 张量是多维数组
- 张量是一种不随坐标系的改变而改变的几何对象
- 张量是向量和余向量,不会随着坐标系的改变而改变
- 张量是多重线性映射,即
张量通俗来说是一个多维数组,我们可以把标量视为零阶张量,矢量视为一阶张量,那么矩阵就是二阶张量。高阶张量是由多个低一阶的张量组成的。
2.算子
定义:是一个函数空间到函数空间上的映射O:X→X。广义上的算子可以推广到任何空间,如内积空间等。
对任何函数进行的任何一项操作都可以认为是一个算子。
在深度学习中,算子对应每一层中的计算逻辑。
例如:
卷积层(Convolution Layer)中的卷积算法,可以认为是一个算子;
全连接层(Fully connected Layer)中的权值求和过程也可以认为是一个算子。
对于构建一个Deep Learning 模型来说,算子提升了效率。
二. 使用pytorch实现张量运算
1.2 张量
1.2.1 创建张量
1.2.1.1 指定数据创建张量
#导入torch
import torch
#创建一维张量
data = torch.tensor([2.0,3.0,4.0])
print(data)
tensor([2., 3., 4.])
该函数是直接把传入的列表变成张量,输入和输出的数值是不变的,输入参数的不是张量的shape
#创建二维张量
data = torch.tensor([[2.0,3.0,4.0],
                     [5.0,6.0,7.0]])
print(data)
tensor([[2., 3., 4.],
[5., 6., 7.]])
#创建三维张量
data = torch.tensor([[[2.0,3.0,4.0],
                     [5.0,6.0,7.0]],
                     [[8.0, 9.0, 10.0],
                      [11.0, 12.0, 13.0]]])
print(data)
tensor([[[ 2., 3., 4.],
[ 5., 6., 7.]],
[[ 8., 9., 10.],
[11., 12., 13.]]])
每增加一维张量就多一个[ ]
1.2.1.2 指定形状创建
#两个数m,n代表二维张量的长度
m,n=2,3
# 使用torch.zeros创建数据全为0,形状为[m, n]的Tensor
data0=torch.zeros([m,n])
# 使用torch.ones创建数据全为1,形状为[m, n]的Tensor
data1=torch.ones([m,n])
# 使用torch.full创建数据全为指定值(我设置为6),形状为[m, n]的Tensor
data6=torch.full([m,n],6)
print('zeros Tensor: ', data0)
print('ones Tensor: ', data1)
print('full Tensor: ', data6)
zeros Tensor: tensor([[0., 0., 0.],
[0., 0., 0.]])
ones Tensor: tensor([[1., 1., 1.],
[1., 1., 1.]])
full Tensor: tensor([[6, 6, 6],
[6, 6, 6]])
1.2.1.3 指定区间创建
# 使用torch.arange创建以步长step均匀分隔数值区间[start, end)的一维Tensor
arange_Tensor = torch.arange(start=1, end=5, step=1)

# 使用torch.arange创建以步长step均匀分隔数值区间[start, end]的一维Tensor
range_Tensor = torch.range(start=1, end=5, step=1)

# 使用torch.linspace创建以元素个数step均匀分隔数值区间[start, stop]的Tensor
linspace_Tensor = torch.linspace(start=1, end=10, steps=5)

print('arange Tensor: ', arange_Tensor)
print('range Tensor: ', range_Tensor)
print('linspace Tensor: ', linspace_Tensor)
arange Tensor: tensor([1, 2, 3, 4])
range Tensor: tensor([1., 2., 3., 4., 5.])
linspace Tensor: tensor([ 1.0000, 3.2500, 5.5000, 7.7500, 10.0000])
·torch.arange()为左闭右开,即[start, end)
·torch.range()为左闭右闭,即[start, end]
由于这个方法是左右都闭合,与python中自带的range(左闭右开)不同,所以此方法已经过时了,并且会在以后的版本删除。
·torch.linspace(),这个方法也是左闭右闭的,但是这个方法和前面的不太一样,它这里的步长其实和前面的不是一个意思,它的计算步骤如下

linspace中的steps与咱们上面两个理解的step不同,steps就是将(start, end)分成包含start和end的多少个数,steps是多少,返回的tensor中就有多少个元素
1.2.2 张量的属性
1.2.2.1 张量的形状
ndim_4_Tensor=torch.tensor(  #第一个3行4列深度为2的三维张量
                            [[[[1,2],[3,4],[5,6],[7,8]],
                            [[11, 12], [13, 14], [15, 16], [17, 18]],
                            [[21, 22], [23, 24], [25, 26], [27, 28]]],
                            #第二个3行4列深度为2的三维张量
                            [[[1,2],[3,4],[5,6],[7,8]],
                            [[11, 12], [13, 14], [15, 16], [17, 18]],
                            [[21, 22], [23, 24], [25, 26], [27, 28]]]])
print("Number of dimensions:", ndim_4_Tensor.ndim)
print("Shape of Tensor:", ndim_4_Tensor.shape)
print("Elements number along axis 0 of Tensor:", ndim_4_Tensor.shape[0])
print("Elements number along the last axis of Tensor:", ndim_4_Tensor.shape[-1])
print('Number of elements in Tensor: ', ndim_4_Tensor.size)
Number of dimensions: 4
Shape of Tensor: torch.Size([2, 3, 4, 2])
Elements number along axis 0 of Tensor: 2
Elements number along the last axis of Tensor: 2
Number of elements in Tensor:
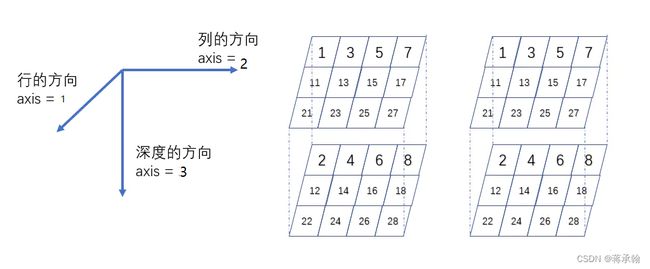
shape属性中的元素大于等于3时,可以用3维空间来理解。
shape=(3, 4, 2)时,表示3行4列深度为2的张量
shape=(2, 3, 4, 2)时,表示有2个 3行4列深度为2的张量
shape=(6, 2, 3, 4, 2)时,表示有6个四维张量,这个四维张量又可以表示为2个 3行4列深度为2的张量。
1.2.2.2 形状的改变
# 定义一个shape为[3,2,5]的三维Tensor
ndim_3_Tensor = torch.tensor([[[1, 2, 3, 4, 5],
                                   [6, 7, 8, 9, 10]],
                                  [[11, 12, 13, 14, 15],
                                   [16, 17, 18, 19, 20]],
                                  [[21, 22, 23, 24, 25],
                                   [26, 27, 28, 29, 30]]])
print("the shape of ndim_3_Tensor:", ndim_3_Tensor.shape)
reshape_Tensor = torch.reshape(ndim_3_Tensor, [-1, 5, 3])
print('shape:',reshape_Tensor.shape)
print("After reshape:", reshape_Tensor)
he shape of ndim_3_Tensor: torch.Size([3, 2, 5])
shape: torch.Size([2, 5, 3])
After reshape: tensor([[[ 1, 2, 3],
[ 4, 5, 6],
[ 7, 8, 9],
[10, 11, 12],
[13, 14, 15]],
[[16, 17, 18],
[19, 20, 21],
[22, 23, 24],
[25, 26, 27],
[28, 29, 30]]])
修改的shape必须满足原来的tensor和reshape的tensor元素个数相等
-1的值为总元素个数除以(其他维度值相乘)
比如原始tensor维度为(3,2,5),reshape为(-1,5,3),-1的值就为30/(5×3)=2,即reshape后的tensor的shape为(2,5,3)
1.2.2.3 张量的数据类型
# 使用torch.tensor()通过已知数据来创建一个Tensor
int_tensor=torch.tensor(1)
float_tensor=torch.tensor(1.0)
print("Tensor dtype from Python integers:", int_tensor.dtype)
print("Tensor dtype from Python floating point:", float_tensor.dtype)
print("Tensor type from Python integers:", int_tensor.type())
print("Tensor type from Python floating point:", float_tensor.type())
Tensor dtype from Python integers: torch.int64
Tensor dtype from Python floating point: torch.float32
Tensor type from Python integers: torch.LongTensor
Tensor type from Python floating point: torch.FloatTensor
torch.dtype是表示torch.Tensor的数据类型的对象。PyTorch有八种不同的数据类型:
| Data type | dtype | Tensor types |
|---|---|---|
| 32-bit floating point | torch.float32 or torch.float | torch.*.FloatTensor |
| 64-bit floating point | torch.float64 or torch.double | torch.*.DoubleTensor |
| 16-bit floating point | torch.float16 or torch.half | torch.*.HalfTensor |
| 8-bit integer (unsigned) | torch.uint8 | torch.*.ByteTensor |
| 8-bit integer (signed) | torch.int8 | torch.*.CharTensor |
| 16-bit integer (signed) | torch.int16 or torch.short | torch.*.ShortTensor |
| 32-bit integer (signed) | torch.int32 or torch.int | torch.*.IntTensor |
| 64-bit integer (signed) | torch.int64 or torch.long | torch.*.LongTensor |
1.2.2.4 张量的设备位置
Tensor=torch.tensor(1)
# 创建CPU上的Tensor
cpu_Tensor = Tensor.to("cpu")
# 通过Tensor.place查看张量所在设备位置
print('cpu Tensor: ', cpu_Tensor)
# 创建GPU上的Tensor
gpu_Tensor = Tensor.to("cuda")
print('gpu Tensor: ', gpu_Tensor)
# 创建固定内存上的Tensor
pin_memory_Tensor = torch.tensor(1, pin_memory=True)
print('pin memory Tensor: ', pin_memory_Tensor)
pin_memory就是锁页内存,创建Tensor时,设置pin_memory=True, 则意味着生成的Tensor数据最开始是属于内存中的锁页内存, 这样将内存的Tensor转义到GPU的显存就会更快一些。
主机中的内存,有两种存在方式,一是锁页,二是不锁页, 锁页内存存放的内容在任何情况下都不会与主机的虚拟内存进行交换(注:虚拟内存就是硬盘),而不锁页内存在主机内存不足时, 数据会存放在虚拟内存中。
1.2.3 张量与Numpy数组转换
ndim_1_Tensor = torch.tensor([1., 2.])
# 将当前 Tensor 转化为 numpy.ndarray
ndim_1_numpy=ndim_1_Tensor.numpy()
print('Tensor to convert: ', ndim_1_numpy)
print('type:',type(ndim_1_numpy))
Tensor to convert: [1. 2.]
type:
Tensor和numpy.ndarray之间可以互相转换
1.2.4 张量的访问
1.2.4.1 索引和切片
一般索引值表达形式是[index, index,...]
假设我们定义这样一个tensor,torch.rand(4, 3, 28, 28) 这个tensor表示包含了4张图片,每张图片3个通道(RGB),每张图片的大小是28(行)*28(列)
a = torch.rand(4, 3, 28, 28)
print(a[0].shape)     #取第一张图片的Shape
print(a[0, 0].shape)  #取第一张图片的第一个通道(R通道)的Shape
print(a[0, 0, 2, 4])  #取第一张图片,R通道,第三行,第五列的像素值,是一个标量
torch.Size([3, 28, 28])
torch.Size([28, 28])
tensor(0.6839)
切片表达式:[start:end:step]
表达式的意义是,从start开始到end结束,每隔step个进行采样。根据start,end,step以及:选项可以分为:
·通过[start:end] 形式索引,注意这种方式是左闭右开的方式[start:end),左边默认是从0开始索引.
·注意负值的索引即表示倒数第几个元素,例如-2就是倒数第二个元素。
·[start:end:step] 从start开始到end结束,每隔step个进行采样,普通的切片索引对应的step是1
a = torch.rand(4, 3, 28, 28)
print(a[:2].shape)  # 在第一个维度上取后0和1
print(a[:2, :1, :, :].shape)  # 在第一个维度上取0和1,在第二个维度上取0
print(a[:2, 1:, :, :].shape)  # 在第一个维度上取0和1,在第二个维度上取1,2
print(a[:2, -2:, :, :].shape)  # 在第一个维度上取0和1,在第二个维度上取1,2
print(a[:, :, 0:28:2, 0:28:2].shape)  # step=2隔行采样
print(a[:, :, ::2, ::2].shape)  # 等同于这个
torch.Size([2, 3, 28, 28])
torch.Size([2, 1, 28, 28])
torch.Size([2, 2, 28, 28])
torch.Size([2, 2, 28, 28])
torch.Size([4, 3, 14, 14])
torch.Size([4, 3, 14, 14])
1.2.4.2 访问张量
一维张量:
# 定义1个一维Tensor
ndim_1_Tensor = torch.tensor([0, 1, 2, 3, 4, 5, 6, 7, 8])

print("Origin Tensor:", ndim_1_Tensor)
print("First element:", ndim_1_Tensor[0])
print("Last element:", ndim_1_Tensor[-1])
print("All element:", ndim_1_Tensor[:])
print("Before 3:", ndim_1_Tensor[:3])
print("Interval of 3:", ndim_1_Tensor[::3])
print("Reverse:", torch.tensor(list(ndim_1_Tensor.numpy()[::-1])))
Origin Tensor: tensor([0, 1, 2, 3, 4, 5, 6, 7, 8])
First element: tensor(0)
Last element: tensor(8)
All element: tensor([0, 1, 2, 3, 4, 5, 6, 7, 8])
Before 3: tensor([0, 1, 2])
Interval of 3: tensor([0, 3, 6])
Reverse: tensor([8, 7, 6, 5, 4, 3, 2, 1, 0])
tensor无法直接[::-1]进行反转,会出现如下报错:
ValueError: step must be greater than zero
如果将tensor转换为numpy反转后再转换为tensor
torch.from_numpy(ndim_1_Tensor.numpy()[::-1])
会出现如下报错:
ValueError: At least one stride in the given numpy array is negative, and tensors with negative strides are not currently supported. (You can probably work around this by making a copy of your array with array.copy().)
所以我将tensor转换为numpy反转后改为list类型,再通过torch.tensor()创建张量
torch.tensor(list(ndim_1_Tensor.numpy()[::-1]))
二位张量:
# 定义1个二维Tensor
ndim_2_Tensor = torch.tensor([[0, 1, 2, 3],
                              [4, 5, 6, 7],
                              [8, 9, 10, 11]])
print("Origin Tensor:", ndim_2_Tensor)
print("First row:", ndim_2_Tensor[0])
print("First row:", ndim_2_Tensor[0, :])
print("First column:", ndim_2_Tensor[:, 0])
print("Last column:", ndim_2_Tensor[:, -1])
print("All element:", ndim_2_Tensor[:])
print("First row and second column:", ndim_2_Tensor[0, 1])
Origin Tensor: tensor([[ 0, 1, 2, 3],
[ 4, 5, 6, 7],
[ 8, 9, 10, 11]])
First row: tensor([0, 1, 2, 3])
First row: tensor([0, 1, 2, 3])
First column: tensor([0, 4, 8])
Last column: tensor([ 3, 7, 11])
All element: tensor([[ 0, 1, 2, 3],
[ 4, 5, 6, 7],
[ 8, 9, 10, 11]])
First row and second column: tensor(1)
1.2.4.3 修改张量
# 定义1个二维Tensor
ndim_2_Tensor = torch.ones([2, 3], dtype=torch.float32)
print('Origin Tensor: ', ndim_2_Tensor)
# 修改第1维为0
ndim_2_Tensor[0] = 0
print('change Tensor: ', ndim_2_Tensor)
# 修改第1维为2.1
ndim_2_Tensor[0:1] = 2.1
print('change Tensor: ', ndim_2_Tensor)
# 修改全部Tensor
ndim_2_Tensor[...] = 3
print('change Tensor: ', ndim_2_Tensor)
Origin Tensor: tensor([[1., 1., 1.],
[1., 1., 1.]])
change Tensor: tensor([[0., 0., 0.],
[1., 1., 1.]])
change Tensor: tensor([[2.1000, 2.1000, 2.1000],
[1.0000, 1.0000, 1.0000]])
change Tensor: tensor([[3., 3., 3.],
[3., 3., 3.]])
创建tensor时,dtype不能='float32',正确的是dtype='torch.float32'
修改全部tensor需要使用[...]
1.2.5 张量的运算
# 定义两个Tensor
x = torch.tensor([[1.1, 2.2], [3.3, 4.4]], dtype=torch.float64)
y = torch.tensor([[5.5, 6.6], [7.7, 8.8]], dtype=torch.float64)
# 第一种调用方法,torch.add逐元素相加算子,并将各个位置的输出元素保存到返回结果中
print('Method 1: ', torch.add(x, y))
# 第二种调用方法
print('Method 2: ', x.add(y))
Method 1: tensor([[ 6.6000, 8.8000],
[11.0000, 13.2000]], dtype=torch.float64)
Method 2: tensor([[ 6.6000, 8.8000],
[11.0000, 13.2000]], dtype=torch.float64)
1.2.5.1 数学运算
1.加减乘除
torch.add(input, alpha=1, other, out=None)
torch.sub(input, other, out=None)
torch.mul(input, other, out=None)
torch.div(input, other, out=None)
2.对数,指数,幂函数
torch.log(input, out=None) ——以e为底
torch.log10(input, out=None)
torch.log2(input, out=None)
torch.exp(input, out=None)
torch.pow(input, exponent, out=None)
3.三角函数
torch.acos(input, out=None)
torch.cosh(input, out=None)
torch.cos(input, out=None)
torch.asin(input, out=None)
torch.sinh(input, out=None)
torch.sin(input, out=None)
torch.atan(input, out=None)
torch.tanh(input, out=None)
torch.tan(input, out=None)
torch.atan2(input, other, out=None)
4.绝对值
torch.abs(input, out=None)
1.2.5.2 逻辑运算
x.isfinite()                  # 判断Tensor中元素是否是有限的数字,即不包括inf与nan
x.eq(y)                # 判断两个Tensor的全部元素是否相等,并返回形状为[1]的布尔类Tensor
x.equal(y)                    # 判断两个Tensor的每个元素是否相等,并返回形状相同的布尔类Tensor
x.ne(y)                # 判断两个Tensor的每个元素是否不相等
x.lt(y)                # 判断Tensor x的元素是否小于Tensor y的对应元素
x.le(y)               # 判断Tensor x的元素是否小于或等于Tensor y的对应元素
x.gt(y)             # 判断Tensor x的元素是否大于Tensor y的对应元素
x.ge(y)            # 判断Tensor x的元素是否大于或等于Tensor y的对应元素
x.allclose(y)      # 判断两个Tensor的全部元素是否接近
1.2.5.3 矩阵运算
x.t()                         # 矩阵转置
x.transpose(1,0)           # 交换第 0 维与第 1 维的顺序
x.norm('fro')                 # 矩阵的弗罗贝尼乌斯范数
x.dist(y, p=2)                # 矩阵(x-y)的2范数
x.matmul(y)                   # 矩阵乘法
transpose()参数是两个整数,而不是一个列表
dist()需要x和y相同
matmul()需要x的列数与y的行数相同
1.2.5.4 广播机制
如果Pytorch运算支持广播的话,那么就意味着传给这个运算的参数会被自动扩张成相同的size,在不复制数据的情况下就能进行运算,整个过程可以做到避免无用的复制,达到更高效的运算。
广播机制实际上是在运算过程中,去处理两个形状不同向量的一种手段。
pytorch中的广播机制和numpy中的广播机制一样, 因为都是数组的广播机制。
# 当两个Tensor的形状一致时,可以广播
x = torch.ones((2, 3, 4))
y = torch.ones((2, 3, 4))
z = x + y
print('broadcasting with two same shape tensor: ', z.shape)

x = torch.ones((2, 3, 1, 5))
y = torch.ones((3, 4, 1))
# 从后往前依次比较:
# 第一次:y的维度大小是1
# 第二次:x的维度大小是1
# 第三次:x和y的维度大小相等,都为3
# 第四次:y的维度不存在
# 所以x和y是可以广播的
z = x + y
print('broadcasting with two different shape tensor:', z.shape)
broadcasting with two same shape tensor: torch.Size([2, 3, 4])
broadcasting with two different shape tensor: torch.Size([2, 3, 4, 5])
以张量x和张量y的相加为例, 其余数学运算同理
核心:如果相加的两个数组的shape不同, 就会触发广播机制:
1)程序会自动执行操作使得x.shape==y.shape;
2)对应位置进行相加运算,结果的shape是:x.shape和y.shape对应位置的最大值,比如:x.shape=(2,3,1,5),y.shape=(3,4,1),那么A+B的shape是(2,3,4,5)
三. 使用pytorch实现数据预处理
1. 读取数据集 house_tiny.csv、boston_house_prices.csv、Iris.csv
pandas库可用于读取xls,csv,txt多种文件,在此用于读取csv文件导入pandas
import pandas as pd使用pd.read_csv()读取文件,读取后的类型为DataFrame类型(df)
df_ht=pd.read_csv('house_tiny.csv')
df_bhp=pd.read_csv('boston_house_prices.csv')
df_iris=pd.read_csv('Iris.csv')
使用df.head()可以查看df的前几行数据
print(df_ht.head())
print(df_bhp.head())
print(df_iris.head())
NumRooms Alley Price
0 NaN Pave 127500
1 2.0 NaN 106000
2 4.0 NaN 178100
3 NaN NaN 140000
CRIM ZN INDUS CHAS NOX ... RAD TAX PTRATIO LSTAT MEDV
0 0.00632 18.0 2.31 0 0.538 ... 1 296 15.3 4.98 24.0
1 0.02731 0.0 7.07 0 0.469 ... 2 242 17.8 9.14 21.6
2 0.02729 0.0 7.07 0 0.469 ... 2 242 17.8 4.03 34.7
3 0.03237 0.0 2.18 0 0.458 ... 3 222 18.7 2.94 33.4
4 0.06905 0.0 2.18 0 0.458 ... 3 222 18.7 5.33 36.2
[5 rows x 13 columns]
Id SepalLengthCm SepalWidthCm PetalLengthCm PetalWidthCm Species
0 1 5.1 3.5 1.4 0.2 Iris-setosa
1 2 4.9 3.0 1.4 0.2 Iris-setosa
2 3 4.7 3.2 1.3 0.2 Iris-setosa
3 4 4.6 3.1 1.5 0.2 Iris-setosa
4 5 5.0 3.6 1.4 0.2 Iris-setosa
NaN表示数据缺失
2. 处理缺失值
常用函数
- df.isnull()、df.notnull():两个函数互为取反
- df.isna():等同于df.isnull()
- df.dropna():删除缺失值
- df.fillna():填充缺失值
df.isnull():是缺失值为True,反之为False
print(df_ht.isnull()) NumRooms Alley Price
0 True False False
1 False True False
2 False True False
3 True True False
阅读数据发现只有house_tiny.csv存在缺失值
df.dropna():删除至少缺少一个元素的行
df_ht=df_ht.dropna()
print(df_ht)
Empty DataFrame
Columns: [NumRooms, Alley, Price]
Index: []
由于house_tiny.csv所有行都存在空元素,所以全删光咯。
df.fillna():补充缺失值
# 将房间数目,有无路径作为输入,价格作为输出,进行缺失值处理
inputs, outputs = df_ht.iloc[:, 0:2], df_ht.iloc[:, 2]
inputs = inputs.fillna(inputs.mean())  # 用输入的平均值填充NA
# Alley作为string没有均值,使用one hot编码
inputs = pd.get_dummies(inputs, dummy_na=True)
inputs['Price']=df_ht['Price']
print(inputs)
NumRooms Alley_Pave Alley_nan Price
0 3.0 1 0 127500
1 2.0 0 1 106000
2 4.0 0 1 178100
3 3.0 0 1 140000
3. 转换为张量格式
tensor_ht=torch.tensor(inputs.values)
tensor_bhp=torch.tensor(df_bhp.values)
df_iris.replace({"Species":{'Iris-setosa':0,'Iris-versicolor':1,'Iris-virginica':2}},inplace=True)
tensor_iris=torch.tensor(df_iris.values)
print(tensor_ht)
print(tensor_bhp)
print(tensor_iris)
tensor([[3.0000e+00, 1.0000e+00, 0.0000e+00, 1.2750e+05],
[2.0000e+00, 0.0000e+00, 1.0000e+00, 1.0600e+05],
[4.0000e+00, 0.0000e+00, 1.0000e+00, 1.7810e+05],
[3.0000e+00, 0.0000e+00, 1.0000e+00, 1.4000e+05]], dtype=torch.float64)
tensor([[6.3200e-03, 1.8000e+01, 2.3100e+00, ..., 1.5300e+01, 4.9800e+00,
2.4000e+01],
[2.7310e-02, 0.0000e+00, 7.0700e+00, ..., 1.7800e+01, 9.1400e+00,
2.1600e+01],
[2.7290e-02, 0.0000e+00, 7.0700e+00, ..., 1.7800e+01, 4.0300e+00,
3.4700e+01],
...,
[6.0760e-02, 0.0000e+00, 1.1930e+01, ..., 2.1000e+01, 5.6400e+00,
2.3900e+01],
[1.0959e-01, 0.0000e+00, 1.1930e+01, ..., 2.1000e+01, 6.4800e+00,
2.2000e+01],
[4.7410e-02, 0.0000e+00, 1.1930e+01, ..., 2.1000e+01, 7.8800e+00,
1.1900e+01]], dtype=torch.float64)
tensor([[1.0000e+00, 5.1000e+00, 3.5000e+00, 1.4000e+00, 2.0000e-01, 0.0000e+00],
[2.0000e+00, 4.9000e+00, 3.0000e+00, 1.4000e+00, 2.0000e-01, 0.0000e+00],
[3.0000e+00, 4.7000e+00, 3.2000e+00, 1.3000e+00, 2.0000e-01, 0.0000e+00],
[4.0000e+00, 4.6000e+00, 3.1000e+00, 1.5000e+00, 2.0000e-01, 0.0000e+00],
[5.0000e+00, 5.0000e+00, 3.6000e+00, 1.4000e+00, 2.0000e-01, 0.0000e+00],
[6.0000e+00, 5.4000e+00, 3.9000e+00, 1.7000e+00, 4.0000e-01, 0.0000e+00],
[7.0000e+00, 4.6000e+00, 3.4000e+00, 1.4000e+00, 3.0000e-01, 0.0000e+00],
[8.0000e+00, 5.0000e+00, 3.4000e+00, 1.5000e+00, 2.0000e-01, 0.0000e+00],
[9.0000e+00, 4.4000e+00, 2.9000e+00, 1.4000e+00, 2.0000e-01, 0.0000e+00],
[1.0000e+01, 4.9000e+00, 3.1000e+00, 1.5000e+00, 1.0000e-01, 0.0000e+00],
鸢尾花数据按照{'Iris-setosa':0,'Iris-versicolor':1,'Iris-virginica':2}替换Species列
鸢尾花数据太多,省略了......
实验体会:
第一部分张量和算子的概念中,我重新回顾了张量的概念,为本次实验奠定了良好的基础;对于算子,我是第一次了解,虽然本次实验没用到,但是写完这个实验我就会好好了解,不至于下次实验看到算子我就两眼一黑晕过去了。
第二部分中,对照着paddlepaddle的代码改写成pytorch的代码,熟悉了pytorch中tensor的基本用法,了解了paddlepaddle和pytorch的差异,但是在张量的设备位置的代码,查阅了很多资料,我还是没弄明白张量的CPU、GPU和固定内存位置原理和torch代码,希望老师能讲讲。同时,广播机制我也是第一次听说,拓宽了眼界。
第三部分数据预处理,对于Alley的处理,本来是想把空值改为Unknown,后来发现无法转换为张量格式,就借鉴了别人使用get_dummies()用0,1表示。对于NumRooms的处理,本来想把空值替换为0,但在借鉴get_dummies()的同时,发现别人使用means()均值替换空值,瞬间觉得用0替换很不妥,就也用均值替换了。