快速构建你的Web项目
简介
项目早期,不希望引入Vue、React等来增加复杂度,更不希望将大量时间花在CSS、JS实现页面布局和交互上,那如何快速构建一个Demo级用例呢?
你可以试试streamlit,经过我一段时间的使用,感觉是个不错的工具,嗯,开源的:https://github.com/streamlit/streamlit
而且,商业化感觉做的不错,社区比较活跃,可用组件比较丰富。

本文先会介绍Streamlit的基础用法,然后会讨论如何实现登录、注册,并在最后提一下我眼中它的缺点。
run streamlit
streamlit自己的定位是给数据科学家使用的web原型开发工具,通过streamlit,你可以快速上线你的模型或各种数据分析报告。
这里,基于streamlit教程文档,了解streamlit的基础用法,其实这块,不是本文的重点,但为了文章完整性,还是补一下。
首先,你需要安装一下streamlit。
pip install streamlit因为streamlit依赖比较多,建议你在虚拟环境中搞。
安装完后,可以先来个hello world,创建hello.py文件,代码如下:
import streamlit as st

st.title('Hello World!')
run起来:
streamlit run hello.py效果如下:

streamlit提供了很多组件,供你开发美观的页面,关于如何使用,streamlit的文档写的已经很好了,这里不费过多笔墨去讨论这个,大家看见文档就好了:https://docs.streamlit.io/library/get-started/create-an-app。
本文主要聊点文档中没有的。
streamlit如何启动的?
streamlit运行方式是使用streamlit run xxx.py的形式,阅读文档,发现,它也支持python -m streamlit run xxx.py 的形式。
感觉控制感不强,streamlit run命令是怎么运行的?
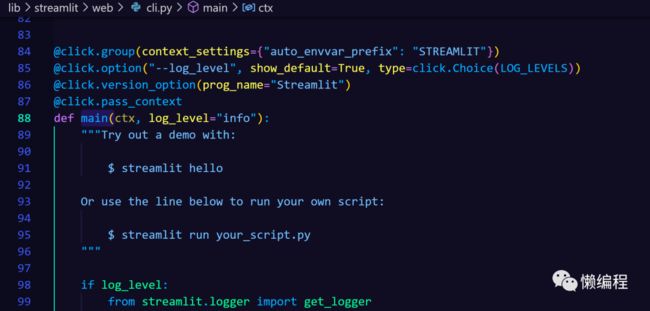
拉下streamlit源码,看其setup.py文件中的entry_points配置。

由上图可知,streamlit命令的功能来自streamlit/web/cli.py的main()方法。

嗯,使用click库来接收命令参数,提一嘴,我感觉click库接收命令行参数的方式比Python原生的argparse优雅多了。
简单阅读cli.py的代码,可以发现streamlit基于tornado开发,使用了tornado.httpserve作为Web后端。

Tornado是Python中比较老的Web框架了,当时python的asyncio还不成熟,为了获得高性能的web框架,tornado基于Linux的epoll和BSD的kqueue实现了其高性能的异步io,其源码比较复杂难懂。
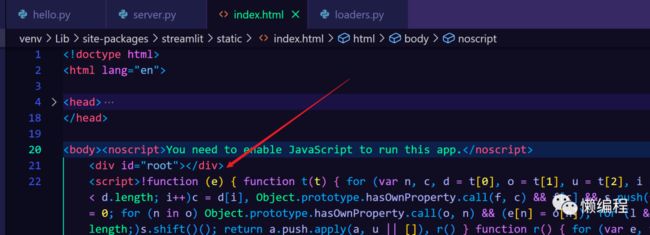
经过代码阅读,可以发现,streamlit会先载入index.html,然后再在index.html中嵌入你的页面逻辑(即使用streamlit提供组件创建的页面),具体的嵌入位置是id为root的div元素。

这便是streamlit的基本流程。
消除streamlit标识
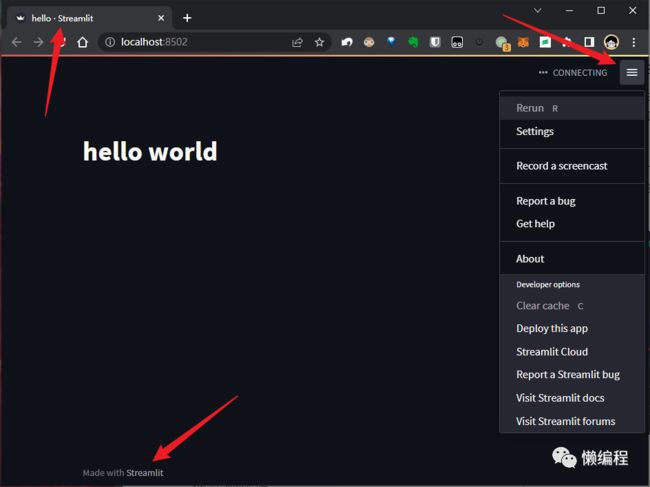
在我们实现hello.py并运行起来时,会发现多处都有streamlit的特征,如下图所示:

从上图可知,streamlit提供了设置、重新加载、访问streamlit官网的操作,此外streamlit在title、footer上,都加上了自己的streamlit的标识。
当我们需要上线自己的web app时,当然不希望用户可以有那么多操作,也不希望竞争对手一眼看出我使用了streamlit。
解决方法便是隐藏掉这些内容,我们搜索【streamlit hiddle xxx】时,会搜到如下解决方案:https://discuss.streamlit.io/t/remove-made-with-streamlit-from-bottom-of-app/1370/2,相关代码如下:
hide_streamlit_style = """
"""
st.markdown(hide_streamlit_style, unsafe_allow_html=True)原理很简单,通过st的markdown方法执行html代码,利用css来隐藏这些东西。
很遗憾,这效果并不好,streamlit在加载时,会优先加载自己的html和js,然后再载入你的逻辑,当网络比较差时,menu和footer会显示一段时间,再被你的css隐藏。
此外,streamlit在用户每次操作时,比如点击页面中的按钮,都会重新加载一次页面,依旧是老流程,优先加载自己的html、css、js,再加载你的,当比较卡时,用户每次操作,页面中都会出现menu和footer,这就很掩耳盗铃。
最好的方式,当然是直接修改streamlit源码,将不需要的部分,全部删除。
阅读streamlit源码,可知,streamlit的前端是React实现的,发布成python库时,React实现的代码都被webpack打包了,如果要修改源码,就需要修改React代码,然后自己搞一遍打包发布流程。
嗯,成本有点高,且自己改后,后面streamlit新功能,就很难兼容了,简单思索后,采用硬替换的方式来搞。
创建init_streamlit.py,写入如下代码:
import pathlib
import os
from bs4 import BeautifulSoup
from shutil import copyfile

from configs import ROOT_PATH


def modify_title_str(soup, title):
    """
    修改 index.html 的 title
    """
    soup.title.string = title
    return soup


def add_js_code(soup, js_code):
    """
    添加 js code 到 index.html 中
    """
    script_tag = soup.find(id='custom-js')
    if not script_tag:
        script_tag = soup.new_tag("script", id='custom-js')
    # custom-js script 中的 js code
    script_tag.string = js_code
    # 向 body 节点中添加内容
    soup.body.append(script_tag)
    return soup


def replace_favicon(streamlit_model_path):
    """替换streamlit的icon"""
    logo_path = os.path.join(streamlit_model_path, 'static', 'favicon.png')
    # 删除 logo
    pathlib.Path(logo_path).unlink()
    copyfile(os.path.join(os.path.abspath(os.path.dirname(__file__)), 'favicon.png'), logo_path)


def init_streamlit(streamlit_model_path, title, footer):
    index_path = pathlib.Path(streamlit_model_path) / "static" / "index.html"

    soup = BeautifulSoup(index_path.read_text(encoding='utf-8'), features="lxml")

    soup = modify_title_str(soup, title)
    js_code = f'''
    document.querySelector("#MainMenu").style.visibility = 'hidden'
    document.querySelector('footer').innerHTML = '{footer}'
    '''
    soup = add_js_code(soup, js_code)
    index_path.write_text(str(soup), encoding='utf-8')


streamlit_model_path = os.path.join(ROOT_PATH, 'venv\\lib\\site-packages\\streamlit')
init_streamlit(streamlit_model_path=streamlit_model_path, title='懒编程', footer='Copyright © 2022, ayuliao Inc.')
上述代码主要就是替换streamlit中index.html的相关元素,比如title、footer之类的,通过直接修改index.html的方式,达到隐藏streamlit相关信息的效果,这样就不会因为streamlit先加载自身html、js而出现无法很好隐藏这些元素的问题了。
此外,单纯的修改index.html的title没有效果,原因是,index.html中的title后续也会被streamlit自身的js方法修改,要解决这个问题,可以修改一下hello.py文件,代码如下:
import init_streamlit
import streamlit as st

st.set_page_config(page_title='懒编程',
                   page_icon='logo.jpg')

st.title('hello world')
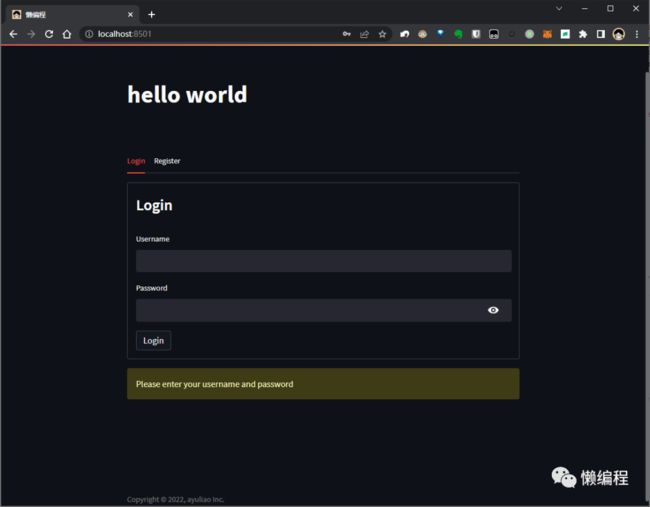
运行hello.py,效果如下图所示:

实现登录、注册
如何实现登录、注册,也是文档里看不到的内容。
streamlit本身没有提供登录注册等功能,这可能跟streamlit自身定位有关,要实现登录与注册,我们需要自己写,通过streamlit插件的形式来实现。
streamlit有个插件页面,里面给出了比较优秀的streamlit插件,多数streamlit插件的前端都是自己利用React去实现,只是React中使用了streamlit提供的方法,从而达到实现streamlit插件的目的。
当然,一些简单的插件并不一定需要通过React开发页面交互,登录、注册类的插件便是如此。
经过查找,发现了Streamlit-Authenticator插件(https://github.com/mkhorasani/Streamlit-Authenticator),通过pip便可以安装使用:
pip install streamlit-authenticator因为streamlit-authenticator提供的功能过于简单,它没有通过数据库来记录用户信息,在多数情况下,都不能满足我们,所以我们需要对它进行魔改。
要正常运行起streamlit-authenticator的源码,需要安装相关的依赖,但streamlit-authenticator并没有提供requirements.txt文件,其setup.py中却给出了依赖关系,你可以基于setup.py中的信息自己安装或者跟我一样使用偷懒方法,先安装streamlit-authenticator,然后再单独删除它,这样相关的依赖就安装好了。
我将streamlit-authenticator相关的代码放在libs文件夹中。
streamlit-authenticator原本是通过yaml配置文件来实现登录、注册的,我将其改成使用sqllite的形式,当然,你可以将其改成MySQL等等。此外,我添加了邀请码的逻辑,这里我写死了一些邀请码,只有拥有这些邀请码的用户才能注册,而注册后的用户,才能登陆。
为了配合修改后的streamlit-authenticator使用,我创建了models目录,在其中写相关的sql逻辑。
嗯,这块不复杂,但改动的逻辑比较多,就不通过文字描述了,翻到文末,看项目代码则可。
因streamlit的刷新机制(每操作页面中的一个按钮便会刷新页面),如何合理的组织登陆、注册和登陆后的页面也有坑。
如果你看streamlit官方文档中多页面app的内容,会发现布局很刻板,比较丑,经过简单实验与研究,我使用了tabs组件来实现最终布局,相关代码如下:
import os
import yaml
import init_streamlit
import streamlit as st
import libs.streamlit_authenticator as stauth

st.set_page_config(page_title='懒编程',
                   page_icon='logo.jpg')

st.title('hello world')


def init_authenticator():
    filepath = os.path.abspath(os.path.dirname(__file__))
    with open(os.path.join(filepath, 'auth.yaml')) as file:
        config = yaml.load(file, Loader=stauth.SafeLoader)

    authenticator = stauth.Authenticate(
        config['credentials'],
        config['cookie']['name'],
        config['cookie']['key'],
        config['cookie']['expiry_days'],
    )
    return authenticator


def register_user(authenticator):
    try:
        if authenticator.register_user('Register user', preauthorization=False):
            st.success('User registered successfully')
    except Exception as e:
        st.error(e)


def my_logics():
    st.markdown('login success')


def start_web():
    authenticator = init_authenticator()
    # check cookie not login again
    authenticator._check_cookie()
    if st.session_state["authentication_status"]:
        authenticator.logout('Logout', 'sidebar')
        my_logics()
    else:

        tab1, tab2 = st.tabs(["Login", "Register"])
        with tab1:
            name, authentication_status, username = authenticator.login(
                'Login', 'main')
            if st.session_state["authentication_status"] == False:
                st.error('Username/password is incorrect')
            elif st.session_state["authentication_status"] == None:
                st.warning('Please enter your username and password')
        with tab2:
            register_user(authenticator)

start_web()
登录页:

注册页:

登录成功后的主页:

结尾
使用streamlit我们可以快速构建出可以拿出去给别人看的web demo,但streamlit在我眼中也有个比较大的缺陷,那便是没有区分请求的功能,比如Flask、Fastapi等框架,你可以区分出不同的请求,而streamlit不行,在多人使用时,就会出现,他人在操作页面时,你当前的页面也可能会被影响的情况。
嗯,这便是streamlit相关的实践了,本文相关代码github:https://github.com/ayuLiao/learn-streamlit
我是二两,下篇文章见。