iOS——MVC设计模式
什么是MVC
MVC是Model-View-Controller的简写,它表示的是一种常见的客户端软件开发框架。可见他是由三个部分组成的。
下面解释一下这三个部分:
Model:即为模型,用来存储业务数据, 具有很好的复用性,我们也可以在这个模型中完成对数据库中数据的增删查改。
View:即为视图,用来显示业务需要的UI控件,以实现人机交互。
Controller:控制器,这里可以将其理解为一个CPU,负责处理View和Mode的事件,应用程序中所有的工作都由控制器统一调控。比如用户的操作就是由控制器实现的。
MVC模式能够完成各司其职的任务模式,由于降低了各个环节的耦合性,大大优化Controller的代码量,当程序调试时,如果某一个功能没有按照既定的模式工作,可以很方便的定位到到底是Controller还是View还是Model出了问题,而且还利于程序的可复用性
MVC的原理
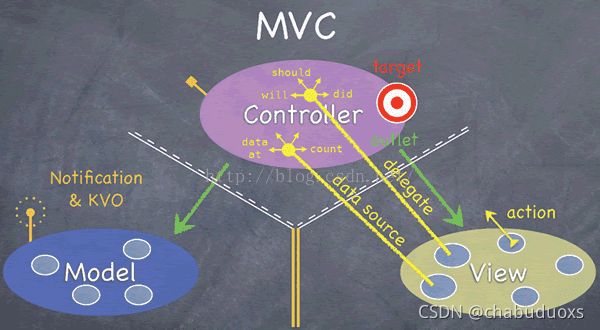
上面大概介绍了MVC的组成,下面具体介绍一下MVC三个组成之间的逻辑关系,下图生动形象的描述了这个关系:

1、 Controller和View之间可以通信,Controllor通过outlet(输出口)控制View,View可以通过target-action、delegate或者data source(想想UITableVeiwDatasource)来和Controller通信;
2、 Controller在接收到View传过来的交互事件(View就是完成让人和程序的交互的呀,比如按B1按钮)之后,经过一些判断和处理,把需要Model处理的事件递交给Model处理(比如刚才的例子中的保存到数据库),Controller对Model使用的是API;
3、 Model在处理完数据之后,如果有需要,会通过Notification或者KVO的方式告知Controller,事件已经处理完,Controller再经过判断和处理之后,考虑下一步要怎么办(是默默无闻的在后台操作,还是需要更新View,这得看Controller的“脸色”行事)。这里的无线天线很有意思,Model只负责发送通知,具体谁接收这个通知并处理它,Model并不关心,这一点非常重要,是理解Notification模式的关键。
4、 Model和View之间不直接通信!
上面部分摘自:
实际案例讲解iOS——MVC设计模式
如何使用MVC设计模式
下面举了一个登录注册的小Demo。
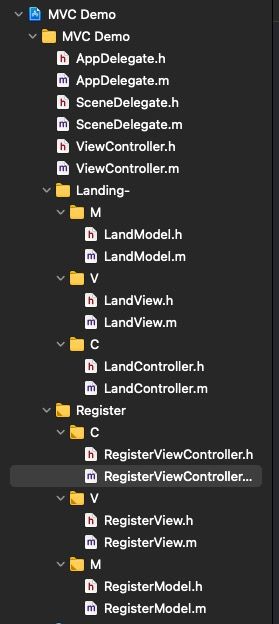
首先我们得将项目的文件根据MVC创建,如下所示:

一般来说创建几个视图就得创建几套MVC文件,
这里的LandModel继承于NSObject,
LandView继承于UIView。
LandController继承于VIewController。
下面将介绍在三个文件中都应该写什么。
Model文件
在上面已经介绍过,Model主要用来存储业务数据,这里用来存储登录时的初始密码。
//  LandModel.h
//  MVC Demo
//
//  Created by 差不多先生 on 2021/9/7.
//

#import <Foundation/Foundation.h>

NS_ASSUME_NONNULL_BEGIN

@interface LandModel : NSObject
@property (nonatomic, strong) NSString* idString;
@property (nonatomic, strong) NSString* passwordString;
- (void) landModelInit;
@end

NS_ASSUME_NONNULL_END
//  LandModel.m
//  MVC Demo
//
//  Created by 差不多先生 on 2021/9/7.
//

#import "LandModel.h"

@implementation LandModel
- (void) landModelInit {
    _idString = [[NSString alloc] init];
    _passwordString = [[NSString alloc] init];
    _idString = @"123";
    _passwordString = @"123";
}
@end
View文件
上面介绍过,View文件是控制UI控件的文件。
//  Created by 差不多先生 on 2021/9/7.
//

#import <UIKit/UIKit.h>

NS_ASSUME_NONNULL_BEGIN

@interface LandView : UIView
@property (nonatomic, strong) UITextField* idTextField;
@property (nonatomic, strong) UITextField* passwordTextField;
@property (nonatomic, strong) UIButton* landButton;
@property (nonatomic, strong) UIButton* registerButton;

@end

NS_ASSUME_NONNULL_END
//  LandView.m
//  MVC Demo
//
//  Created by 差不多先生 on 2021/9/7.
//

#import "LandView.h"

@implementation LandView
- (id)initWithFrame:(CGRect)frame {
    self = [super initWithFrame:frame];
    self.backgroundColor = [UIColor orangeColor];
    _idTextField = [[UITextField alloc] init];
    _idTextField.frame = CGRectMake(80, 150, 250, 40);
    _idTextField.backgroundColor = [UIColor whiteColor];
    [self addSubview:_idTextField];
    _idTextField.placeholder = @"please input your id";
    _passwordTextField = [[UITextField alloc] init];
    _passwordTextField.frame = CGRectMake(80, 250, 250, 40);
    _passwordTextField.placeholder = @"please input your password";
    _passwordTextField.backgroundColor = [UIColor whiteColor];
    _passwordTextField.secureTextEntry = YES;
    [self addSubview:_passwordTextField];
    _landButton = [UIButton buttonWithType:UIButtonTypeRoundedRect];
    [_landButton setTitle:@"Land" forState:UIControlStateNormal];
    _landButton.frame = CGRectMake(120, 350, 70, 30);
    _registerButton = [UIButton buttonWithType:UIButtonTypeRoundedRect];
    [_registerButton setTitle:@"register" forState:UIControlStateNormal];
    _registerButton.frame = CGRectMake(210, 350, 70, 30);
    [self addSubview:_landButton];
    [self addSubview:_registerButton];
    return self;
}
注意这里我们重写了initWithFrame方法,这是因为我们创建了一个UIView的子类,这时候将调用这个方法来实例化对象。
特别注意,如果在子类中重载initWithFrame方法,必须先调用父类的initWithFrame方法。在对自定义的UIView子类进行初始化操作。)
我们重写完方法后,只需在Controller文件中直接创建UIView对象即可。
Controller文件
控制器主要控制各种事件操作,例如我们点击登录时进行的逻辑操作,是在Controller文件中书写的,同样一些代理方法也可以在此文件中实现。
//
//  LandController.m
//  MVC Demo
//
//  Created by 差不多先生 on 2021/9/7.
//

#import "LandController.h"
#import "LandView.h"
#import "LandModel.h"
#import "RegisterViewController.h"
@interface LandController ()
@property (nonatomic, strong) LandView* landView;
@property (nonatomic, strong) LandModel* landModel;
@end

@implementation LandController

- (void)viewDidLoad {
    [super viewDidLoad];
    // Do any additional setup after loading the view.
    _landView = [[LandView alloc] initWithFrame:CGRectMake(0, 0, self.view.frame.size.width, self.view.frame.size.height)];
    [self.view addSubview:_landView];
    _landModel = [[LandModel alloc] init];
    [_landModel landModelInit];
    [_landView.landButton addTarget:self action:@selector(SignButtonPress) forControlEvents:UIControlEventTouchUpInside];
    [_landView.registerButton addTarget:self action:@selector(registerPress) forControlEvents:UIControlEventTouchUpInside];
}
- (void) SignButtonPress {
    if ([_landView.idTextField.text isEqualToString:@""] || [_landView.passwordTextField.text isEqualToString:@""]) {
        UIAlertController *alertController = [UIAlertController alertControllerWithTitle:@"提示" message:@"请完整输入" preferredStyle:UIAlertControllerStyleAlert];
        UIAlertAction *sureAction = [UIAlertAction actionWithTitle:@"确认"  style:UIAlertActionStyleDefault handler:nil];
        [alertController addAction:sureAction];
        [self presentViewController:alertController animated:YES completion:nil];
    } else if ([_landView.idTextField.text isEqual:_landModel.idString] && [_landView.passwordTextField.text isEqual:_landModel.passwordString]) {
        UIAlertController *alertController = [UIAlertController alertControllerWithTitle:@"提示" message:@"登录成功" preferredStyle:UIAlertControllerStyleAlert];
        UIAlertAction *sureAction = [UIAlertAction actionWithTitle:@"确认"  style:UIAlertActionStyleDefault handler:nil];
        [alertController addAction:sureAction];
        [self presentViewController:alertController animated:YES completion:nil];
    } else {
        UIAlertController *alertController = [UIAlertController alertControllerWithTitle:@"提示" message:@"账号或密码错误" preferredStyle:UIAlertControllerStyleAlert];
        UIAlertAction *sureAction = [UIAlertAction actionWithTitle:@"确认"  style:UIAlertActionStyleDefault handler:nil];
        [alertController addAction:sureAction];
        [self presentViewController:alertController animated:YES completion:nil];
    }
}
- (void)touchesBegan:(NSSet<UITouch *> *)touches withEvent:(UIEvent *)event {
    [_landView.idTextField resignFirstResponder];
    [_landView.passwordTextField resignFirstResponder];

}
- (void)registerPress {
    RegisterViewController* viewController = [[RegisterViewController alloc] init];
    viewController.modalPresentationStyle = UIModalPresentationFullScreen;
    viewController.delegate = self;
    [self presentViewController:viewController animated:YES completion:nil];
}
- (void)returnId:(NSString *)ida andPass:(NSString *)password {
    _landModel.idString = ida;
    _landModel.passwordString = password;
}
/*
#pragma mark - Navigation

// In a storyboard-based application, you will often want to do a little preparation before navigation
- (void)prepareForSegue:(UIStoryboardSegue *)segue sender:(id)sender {
    // Get the new view controller using [segue destinationViewController].
    // Pass the selected object to the new view controller.
}
*/

@end