Silverlight + RIA Service的SUID的实例。
WCF RIA Service网上也有一些例子,不过都比较简单,我把我的一个比较接近实际的例子跟大家分享分享。
1准备工作
    <

    membership

    >


    <

    providers

    >


    <

    clear

    />


    <

    add

    name

    ="AspNetSqlMembershipProvider"

     type

    ="System.Web.Security.SqlMembershipProvider"

     connectionStringName

    ="ApplicationServices"

     enablePasswordRetrieval

    ="false"

     enablePasswordReset

    ="true"

     requiresQuestionAndAnswer

    ="false"

     requiresUniqueEmail

    ="false"

     maxInvalidPasswordAttempts

    ="5"

     minRequiredPasswordLength

    ="6"

     minRequiredNonalphanumericCharacters

    ="0"

     passwordAttemptWindow

    ="10"

     applicationName

    ="/Vega"


    />


    </

    providers

    >


    </

    membership

    >


    <

    profile

    >


    <

    providers

    >


    <

    clear

    />


    <

    add

    name

    ="AspNetSqlProfileProvider"

     type

    ="System.Web.Profile.SqlProfileProvider"

     connectionStringName

    ="ApplicationServices"

     applicationName

    ="/"


    />


    </

    providers

    >


    <

    properties

    >


    <

    add

    name

    ="FriendlyName"


    />


    </

    properties

    >


    </

    profile

    >


    <

    roleManager

    enabled

    ="true"

    >


    <

    providers

    >


    <

    clear

    />


    <

    add

    name

    ="AspNetSqlRoleProvider"

     type

    ="System.Web.Security.SqlRoleProvider"

     connectionStringName

    ="ApplicationServices"

     applicationName

    ="/Vega"


    />


    <

    add

    name

    ="AspNetWindowsTokenRoleProvider"

     type

    ="System.Web.Security.WindowsTokenRoleProvider"

     applicationName

    ="/"


    />


    </

    providers

    >


    </

    roleManager

    >
我用的连接字符串名字是ApplicationServices
如果没安装ASP.NET的SQL数据,可以用Visual Studio 命令提示(2010) (在开始菜单的Visual Studio Tools里)调出命令提示符输入aspnet_regsql,调出“ASP.NET SQL SERVER安装向导”,而在运行-cmd里因为没有相关环境变量,是调不出安装向导的。
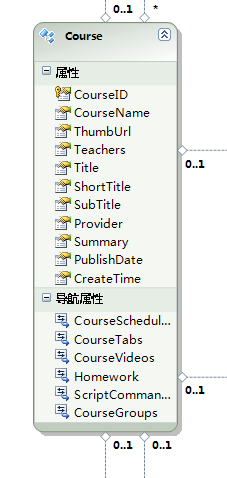
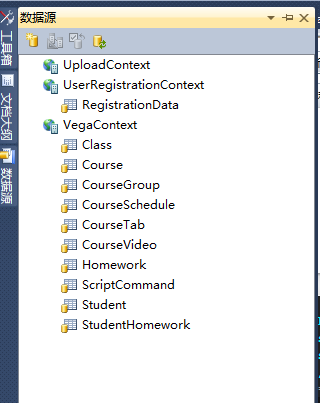
新建一个ADO.NET实体数据模型。
编译一下,然后新建Domain Service Class,勾上Course,如果不编译,那么数据实体模型是找不到的。
我们需要Microsoft Silverlight 4 Toolkit,http://silverlight.codeplex.com/,没安装的话要先安装。
2用户登录和角色
     <

     StackPanel

     x:Name

     ="adminControls"

      Style

     ="

     {StaticResource LoginPanelStyle}

     "

     >


     <!--

      welcomeText.Text property's binding is setup in code-behind

     -->


     <

     TextBlock

     x:Name

     ="welcomeAdminText"

      Style

     ="

     {StaticResource WelcomeTextStyle}

     "

      VerticalAlignment

     ="Center"

     />


     <!--

      welcomeText.Text property's binding is setup in code-behind

     -->


     <

     TextBlock

     Text

     =" | "

      Style

     ="

     {StaticResource SpacerStyle}

     "

     />


     <

     HyperlinkButton

     TargetName

     ="ContentFrame"

      Content

     ="课程"

      VerticalAlignment

     ="Center"

      Foreground

     ="White"

      NavigateUri

     ="/Courses"

     />


     <

     TextBlock

     Text

     =" | "

      Style

     ="

     {StaticResource SpacerStyle}

     "

     />


     <

     HyperlinkButton

     TargetName

     ="ContentFrame"

      Content

     ="学员"

      VerticalAlignment

     ="Center"

      Foreground

     ="White"

      NavigateUri

     ="/Students"

     />


     <

     TextBlock

     Text

     =" | "

      Style

     ="

     {StaticResource SpacerStyle}

     "

     />


     <

     HyperlinkButton

     TargetName

     ="ContentFrame"

      Content

     ="排课"

      VerticalAlignment

     ="Center"

      Foreground

     ="White"

      NavigateUri

     ="/Schedules"

     />


     <

     TextBlock

     Text

     =" | "

      Style

     ="

     {StaticResource SpacerStyle}

     "

     />


     <

     Button

     x:Name

     ="adminLogoutButton"

      Content

     ="

     {Binding ApplicationStrings.LogOffButton, Source={StaticResource ResourceWrapper}}

     "


 Click

     ="LogoutButton_Click"


 Style

     ="

     {StaticResource LoginRegisterLinkStyle}

     "


 IsEnabled

     ="

     {Binding Authentication.IsLoggingOut, Converter={StaticResource NotOperatorValueConverter}}

     "


     />


     </

     StackPanel

     >
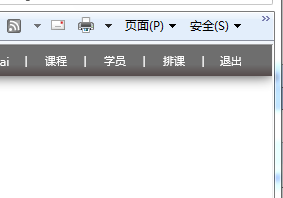
然后增加一个状态,叫做adminLoggedIn,在<vsm:VisualStateGroup x:Name="loginStates">代码短里加上adminLoggedIn的代码
     <

     vsm:VisualState

     x:Name

     ="adminLoggedIn"

     >


     <

     Storyboard

     >


     <

     ObjectAnimationUsingKeyFrames

     BeginTime

     ="00:00:00"

      Storyboard.TargetName

     ="logoutControls"

      Storyboard.TargetProperty

     ="(UIElement.Visibility)"

     >


     <

     DiscreteObjectKeyFrame

     KeyTime

     ="00:00:00.0000000"

     >


     <

     DiscreteObjectKeyFrame.Value

     >


     <

     Visibility

     >

     Collapsed

     </

     Visibility

     >


     </

     DiscreteObjectKeyFrame.Value

     >


     </

     DiscreteObjectKeyFrame

     >


     </

     ObjectAnimationUsingKeyFrames

     >


     <

     ObjectAnimationUsingKeyFrames

     BeginTime

     ="00:00:00"

      Storyboard.TargetName

     ="loginControls"

      Storyboard.TargetProperty

     ="(UIElement.Visibility)"

     >


     <

     DiscreteObjectKeyFrame

     KeyTime

     ="00:00:00.0000000"

     >


     <

     DiscreteObjectKeyFrame.Value

     >


     <

     Visibility

     >

     Collapsed

     </

     Visibility

     >


     </

     DiscreteObjectKeyFrame.Value

     >


     </

     DiscreteObjectKeyFrame

     >


     </

     ObjectAnimationUsingKeyFrames

     >


     </

     Storyboard

     >


     </

     vsm:VisualState

     >
不要忘了在其他的状态里加上把adminControls设置为不显示,只有在adminLoggedIn才显示管理员的功能导航。
在构造器函数里加上welcomeAdminText的绑定
     public

      LoginStatus()
 {


     this

     .InitializeComponent();


     this

     .welcomeText.SetBinding(TextBlock.TextProperty, WebContext.Current.CreateOneWayBinding(

     "

     User.DisplayName

     "

     ,

     new

      StringFormatValueConverter(ApplicationStrings.WelcomeMessage)));


     this

     .welcomeAdminText.SetBinding(TextBlock.TextProperty, WebContext.Current.CreateOneWayBinding(

     "

     User.DisplayName

     "

     ,

     new

      StringFormatValueConverter(ApplicationStrings.WelcomeMessage)));


     this

     .authService.LoggedIn

     +=


     this

     .Authentication_LoggedIn;


     this

     .authService.LoggedOut

     +=


     this

     .Authentication_LoggedOut;


     this

     .UpdateLoginState();
 }
修改UpdateLoginState函数,判断如果当前用户角色有admin,就显示admin的功能导航按钮
     private


     void

      UpdateLoginState()
 {


     if

      (WebContext.Current.User.IsAuthenticated)
 {
 VisualStateManager.GoToState(

     this

     , (WebContext.Current.Authentication

     is

      WindowsAuthentication)

     ?


     "

     windowsAuth

     "

      :


     this

     .authService.User.IsInRole(

     "

     admin

     "

     )

     ?


     "

     adminLoggedIn

     "

      :

     "

     loggedIn

     "

     ,

     true

     );
 }


     else


 {
 VisualStateManager.GoToState(

     this

     ,

     "

     loggedOut

     "

     ,

     true

     );
 }
 }
通过ASP.NET 网站配置加上个admin角色和用户。
好了,用户程序登录之后判断有admin角色,登录后就显示管理员的功能导航了。
3绑定数据源
     <

     TextBlock

     Margin

     ="0,18,137,0"

      Text

     ="课程名称"

      FontSize

     ="12"

      HorizontalAlignment

     ="Right"

      Width

     ="48"

      Height

     ="23"

      VerticalAlignment

     ="Top"


     />


     <

     TextBox

     Margin

     ="0,15,0,0"

      x:Name

     ="tbFilterCourseName"

      Height

     ="23"

      VerticalAlignment

     ="Top"

      HorizontalAlignment

     ="Right"

      Width

     ="120"


     />
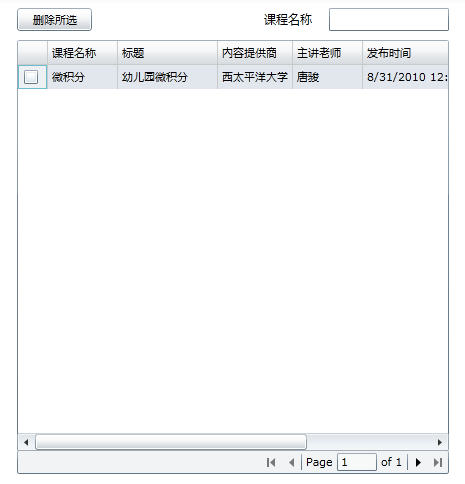
好了,然后拖一个DataPaper上去实现分页,也和DomainDataSource绑定上 Source="{Binding Data, ElementName=courseDomainDataSource}"。
我们还要加上一排CheckBox用于多选,跟ASP.NET的GridView差不多,有一种DataGridTemplateColumn。CheckBox直接绑定实体对象,加上Tag="{Binding}",然后给CheckBox加上事件,在选中的把绑定的对象加入到一个List里,取消选中的时候在取出来,维护一个要删除对象的列表。
         private

      IList

     <

     Course

     >

      deletedCourses

     =


     new

      List

     <

     Course

     >

     ();


     private


     void

      CheckBox_Checked(

     object

      sender, RoutedEventArgs e)
 {
 var checkBox

     =

      sender

     as

      CheckBox;


     this

     .deletedCourses.Add(checkBox.Tag

     as

      Course);
 }


     private


     void

      CheckBox_Unchecked(

     object

      sender, RoutedEventArgs e)
 {
 var checkBox

     =

      sender

     as

      CheckBox;


     this

     .deletedCourses.Remove(checkBox.Tag

     as

      Course);
 }
另外加一个删除全部的按钮。
下面是BusyIndicator的全部代码
     <

     toolkit:BusyIndicator

     x:Name

     ="dataBusyIndicator"

      BusyContent

     ="载入课程数据"

      IsBusy

     ="

     {Binding IsBusy, ElementName=courseDomainDataSource}

     "

     >


     <

     Grid

     >


     <

     sdk:DataGrid

     AutoGenerateColumns

     ="False"

      ItemsSource

     ="

     {Binding Data, ElementName=courseDomainDataSource}

     "

      x:Name

     ="courseDataGrid"

      RowDetailsVisibilityMode

     ="VisibleWhenSelected"

      Margin

     ="30,47,0,33"

      IsReadOnly

     ="True"

     >


     <

     sdk:DataGrid.Resources

     >


     <

     DataTemplate

     x:Name

     ="CheckBoxCellTemplate"

     >


     <

     CheckBox

     VerticalAlignment

     ="Center"

      HorizontalAlignment

     ="Center"

      Tag

     ="

     {Binding}

     "

      Checked

     ="CheckBox_Checked"

      Unchecked

     ="CheckBox_Unchecked"


     />


     </

     DataTemplate

     >


     </

     sdk:DataGrid.Resources

     >


     <

     sdk:DataGrid.Columns

     >


     <

     sdk:DataGridTemplateColumn

     CanUserReorder

     ="True"

      CanUserResize

     ="True"

      CanUserSort

     ="True"

      Width

     ="30"

     >


     <

     sdk:DataGridTemplateColumn.CellEditingTemplate

     >


     <

     StaticResource

     ResourceKey

     ="CheckBoxCellTemplate"

     />


     </

     sdk:DataGridTemplateColumn.CellEditingTemplate

     >


     </

     sdk:DataGridTemplateColumn

     >


     <

     sdk:DataGridTextColumn

     x:Name

     ="courseNameColumn"

      Binding

     ="

     {Binding CourseName}

     "

      Header

     ="课程名称"

      Width

     ="SizeToCells"

      MinWidth

     ="70"


     />


     <

     sdk:DataGridTextColumn

     x:Name

     ="titleColumn"

      Binding

     ="

     {Binding Title}

     "

      Header

     ="标题"

      Width

     ="SizeToCells"

      MinWidth

     ="100"


     />


     <

     sdk:DataGridTextColumn

     x:Name

     ="providerColumn"

      Binding

     ="

     {Binding Provider}

     "

      Header

     ="内容提供商"

      Width

     ="SizeToCells"

      MinWidth

     ="70"


     />


     <

     sdk:DataGridTextColumn

     x:Name

     ="teachersColumn"

      Binding

     ="

     {Binding Teachers}

     "

      Header

     ="主讲老师"

      Width

     ="SizeToCells"

      MinWidth

     ="70"


     />


     <

     sdk:DataGridTextColumn

     x:Name

     ="publishDateColumn"

      Binding

     ="

     {Binding PublishDate}

     "

      Header

     ="发布时间"

      Width

     ="SizeToCells"

      MinWidth

     ="70"


     />


     <

     sdk:DataGridTextColumn

     x:Name

     ="createTimeColumn"

      Binding

     ="

     {Binding CreateTime}

     "

      Header

     ="创建时间"

      Width

     ="SizeToCells"

      MinWidth

     ="70"


     />


     </

     sdk:DataGrid.Columns

     >


     </

     sdk:DataGrid

     >


     <

     sdk:DataPager

     Margin

     ="30,444,0,10"

      x:Name

     ="dataPager1"

      PageSize

     ="10"

      Source

     ="

     {Binding Data, ElementName=courseDomainDataSource}

     "


     />


     <

     TextBlock

     Margin

     ="0,18,137,0"

      Text

     ="课程名称"

      FontSize

     ="12"

      HorizontalAlignment

     ="Right"

      Width

     ="48"

      Height

     ="23"

      VerticalAlignment

     ="Top"


     />


     <

     TextBox

     Margin

     ="0,15,0,0"

      x:Name

     ="tbFilterCourseName"

      Height

     ="23"

      VerticalAlignment

     ="Top"

      HorizontalAlignment

     ="Right"

      Width

     ="120"


     />


     <

     Button

     Content

     ="删除所选"

      Height

     ="23"

      HorizontalAlignment

     ="Left"

      Margin

     ="30,15,0,0"

      Name

     ="button1"

      VerticalAlignment

     ="Top"

      Width

     ="75"

      Click

     ="button1_Click"


     />


     </

     Grid

     >


     </

     toolkit:BusyIndicator

     >
然后,要把DomainDataSource.FilterDescriptors的筛选和我刚才加的TextBox绑定起来,这样就自动搜索了。
     <

     riaControls:DomainDataSource

     AutoLoad

     ="True"

      Height

     ="0"

      LoadedData

     ="courseDomainDataSource_LoadedData"

      x:Name

     ="courseDomainDataSource"

      QueryName

     ="GetCoursesQuery"

      Width

     ="0"

     >


     <

     riaControls:DomainDataSource.SortDescriptors

     >


     <

     riaControls:SortDescriptor

     Direction

     ="Descending"

      PropertyPath

     ="CourseID"


     />


     </

     riaControls:DomainDataSource.SortDescriptors

     >


     <

     riaControls:DomainDataSource.FilterDescriptors

     >


     <

     riaControls:FilterDescriptor

     Operator

     ="Contains"

      PropertyPath

     ="CourseName"

      IgnoredValue

     =""

      Value

     ="

     {Binding Text, ElementName=tbFilterCourseName}

     "


     />


     </

     riaControls:DomainDataSource.FilterDescriptors

     >


     <

     riaControls:DomainDataSource.DomainContext

     >


     <

     my1:VegaContext

     />


     </

     riaControls:DomainDataSource.DomainContext

     >


     </

     riaControls:DomainDataSource

     >
如果不加FilterDescriptors,那么分页的时候报错,因为分页前必须Order,也可以在后台加一个默认排序
     public

      IQueryable

     <

     Course

     >

      GetCourses()
 {


     return


     this

     .ObjectContext.Courses.OrderByDescending

     <

     Course,

     int

     >

     (c

     =>

      c.CourseID);
 }
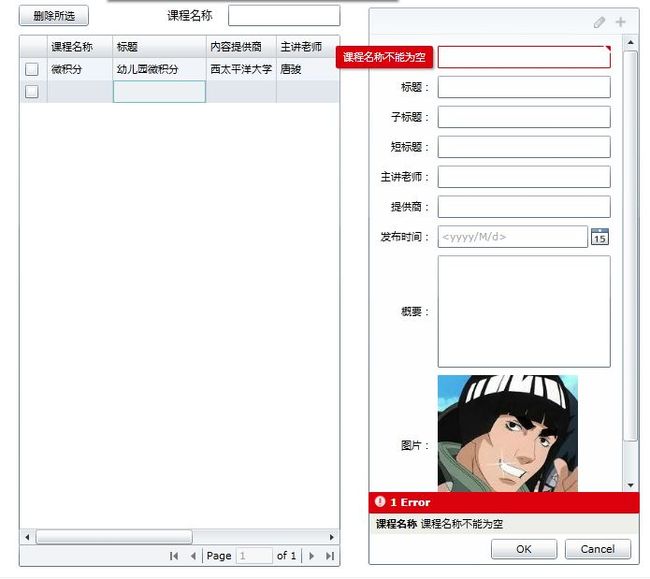
效果如下
4删除全部选择的项目。
     private


     void

      button1_Click(

     object

      sender, RoutedEventArgs e)
 {
 var result

     =

      MessageBox.Show(

     "

     确定删除该课程?删除后不可恢复!

     "

     ,

     "

     提示

     "

     , MessageBoxButton.OKCancel);


     if

      (result

     ==

      MessageBoxResult.OK)
 {


     foreach

      (var course

     in


     this

     .deletedCourses)
 {


     this

     .courseDomainDataSource.DataView.Remove(course);
 }


     this

     .deletedCourses.Clear();


     this

     .courseDomainDataSource.SubmitChanges();
 }
 }
{
var result = MessageBox.Show( " 确定删除该课程?删除后不可恢复! " , " 提示 " , MessageBoxButton.OKCancel);
if (result == MessageBoxResult.OK)
{
foreach (var course in this .deletedCourses)
{
this .courseDomainDataSource.DataView.Remove(course);
}
this .deletedCourses.Clear();
this .courseDomainDataSource.SubmitChanges();
}
}
5上传图片
       [EnableClientAccess()]


      public


      class

       UploadService : DomainService
 {


      public


      string

       Upload(

      byte

      [] stream,

      string

       extension)
 {
 var rootPath

      =

       HttpContext.Current.Server.MapPath(

      "

      /Uploads

      "

      );
 var datePath

      =

       DateTime.Now.ToString(

      "

      yyyyMMdd

      "

      );
 var dirPath

      =

       Path.Combine(rootPath, datePath);


      if

       (

      !

      Directory.Exists(dirPath))
 {
 Directory.CreateDirectory(dirPath);
 }

 var fileName

      =

       Guid.NewGuid().ToString()

      +

       extension;


      using

       (var fileStream

      =


      new

       FileStream(
 Path.Combine(dirPath, fileName), FileMode.Create, FileAccess.Write))
 {
 fileStream.Write(stream,

      0

      , stream.Length);
 fileStream.Flush();
 fileStream.Close();
 }


      return


      "

      /Uploads/

      "


      +

       datePath

      +


      "

      /

      "


      +

       fileName;
 }
 }
代码很简单,就一个方法,将传过来的字节流保存到服务器上,然后返回为这个文件自动生成的路径。
      <

      UserControl

      xmlns:toolkit

      ="http://schemas.microsoft.com/winfx/2006/xaml/presentation/toolkit"

       x:Class

      ="Vega.Controls.SelecteImage"


 xmlns

      ="http://schemas.microsoft.com/winfx/2006/xaml/presentation"


 xmlns:x

      ="http://schemas.microsoft.com/winfx/2006/xaml"


 xmlns:d

      ="http://schemas.microsoft.com/expression/blend/2008"


 xmlns:mc

      ="http://schemas.openxmlformats.org/markup-compatibility/2006"


 mc:Ignorable

      ="d"


 d:DesignHeight

      ="300"

       d:DesignWidth

      ="400"

      >


      <

      toolkit:BusyIndicator

      Name

      ="busyIndicator"

      >


      <

      StackPanel

      Margin

      ="0"

       Orientation

      ="Horizontal"

      >


      <

      Image

      HorizontalAlignment

      ="Left"

       VerticalAlignment

      ="Top"

       Source

      ="/Vega;component/Assets/Icons/picture2.png"

       MaxWidth

      ="150"

       MaxHeight

      ="150"

       Name

      ="image"


      />


      <

      Button

      x:Name

      ="btnSelected"

       Content

      ="选择"

       Margin

      ="8,0,0,0"

       HorizontalAlignment

      ="Left"

       VerticalAlignment

      ="Bottom"

       Click

      ="btnSelected_Click"


      />


      </

      StackPanel

      >


      </

      toolkit:BusyIndicator

      >


      </

      UserControl

      >
     private


     void

      btnSelected_Click(

     object

      sender, RoutedEventArgs e)
 {
 var fileDialog

     =


     new

      OpenFileDialog()
 {
 Filter

     =


     "

     图片(.jpg)|*.jpg|图片(.jpeg)|*.jpeg|图片(.png)|*.png

     "

     ,
 Multiselect

     =


     false


 };

 var result

     =

      fileDialog.ShowDialog();


     if

      (result.HasValue

     &&

      result.Value)
 {
 var stream

     =

      fileDialog.File.OpenRead();
 var bytes

     =


     new


     byte

     [stream.Length];
 stream.Read(bytes,

     0

     , bytes.Length);


     this

     .busyIndicator.IsBusy

     =


     true

     ;
 var op

     =


     this

     .uploadContext.Upload(bytes, fileDialog.File.Extension);
 op.Completed

     +=

      (opSender, opE)

     =>

      {


     this

     .ImageUri

     =


     new

      Uri(op.Value, UriKind.Relative);


     this

     .busyIndicator.IsBusy

     =


     false

     ;
 };
 }
 }
然后,我为控件加了一个属性,ImageUrl暴露给外面,提供绑定什么的功能。
     public


     static


     readonly

      DependencyProperty ImageUriProperty

     =

      DependencyProperty.Register(


     "

     ImageUri

     "

     ,


     typeof

     (Uri),


     typeof

     (SelecteImage),


     new

      PropertyMetadata(

     null

      ,

     new

      PropertyChangedCallback(OnImageUriChanged)));


     private


     static


     void

      OnImageUriChanged(DependencyObject d, DependencyPropertyChangedEventArgs e)
 {
 ((SelecteImage)d).OnImageUriChanged(e);
 }


     protected


     virtual


     void

      OnImageUriChanged(DependencyPropertyChangedEventArgs e)
 {


     if

      (e.NewValue

     ==


     null

     )
 {


     return

     ;
 }
 var uri

     =

      (Uri)e.NewValue;


     if

      (

     !

     uri.IsAbsoluteUri)
 {


     //

     Application.Current.Host.Source


      var source

     =

      Application.Current.Host.Source;
 uri

     =


     new

      Uri(String.Format(

     "

     {0}://{1}:{2}{3}

     "

     ,source.Scheme,source.Host,source.Port,uri.OriginalString), UriKind.Absolute);
 }


     this

     .image.Source

     =


     new

      BitmapImage(uri);
 }


     public

      Uri ImageUri
 {


     get

      {

     return

      (Uri)GetValue(ImageUriProperty); }


     set

      { SetValue(ImageUriProperty, value); }
 }
由于Silverlight中的相对Uri并不是只服务器上的资源,而是指XAP文件中的资源,所以我吧相对地址改为绝对地址。
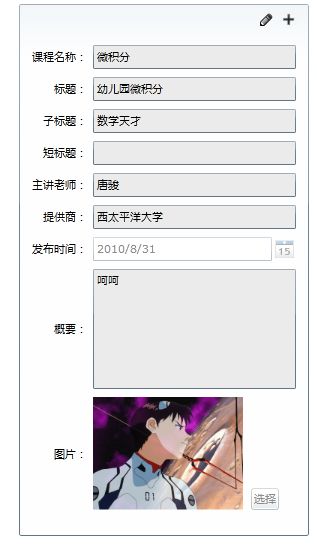
6DataForm,实现新增和编辑
     <

     toolkit:BusyIndicator

     Grid.Column

     ="1"

      x:Name

     ="formBusyIndicator"

      IsBusy

     ="

     {Binding IsBusy, ElementName=courseDomainDataSource}

     "


     />


     <

     toolkit:DataForm

     Grid.Column

     ="1"

      Margin

     ="30,18,30,12"

      x:Name

     ="dfCourse"

      AutoEdit

     ="False"

      ItemsSource

     ="

     {Binding ElementName=courseDomainDataSource, Path=Data}

     "

      CurrentItem

     ="

     {Binding CurrentItem}

     "

      AutoGenerateFields

     ="False"

      AutoCommit

     ="False"

      EditEnded

     ="dfCourse_EditEnded"

      CommandButtonsVisibility

     ="Add, Edit, Commit, Cancel"

     >


     <

     toolkit:DataForm.Resources

     >


     <

     DataTemplate

     x:Key

     ="EditDataTemplate"

     >


     <

     StackPanel

     >


     <

     toolkit:DataField

     Label

     ="课程名称:"

      Margin

     ="0,0,0,8"

     >


     <

     TextBox

     Text

     ="

     {Binding CourseName, Mode=TwoWay}

     "


     />


     </

     toolkit:DataField

     >


     <

     toolkit:DataField

     Label

     ="标题:"

      Margin

     ="0,0,0,8"

     >


     <

     TextBox

     Text

     ="

     {Binding Title, Mode=TwoWay}

     "


     />


     </

     toolkit:DataField

     >


     <

     toolkit:DataField

     Label

     ="子标题:"

      Margin

     ="0,0,0,8"

     >


     <

     TextBox

     Text

     ="

     {Binding SubTitle, Mode=TwoWay}

     "


     />


     </

     toolkit:DataField

     >


     <

     toolkit:DataField

     Label

     ="短标题:"

      Margin

     ="0,0,0,8"

     >


     <

     TextBox

     Text

     ="

     {Binding ShortTitle, Mode=TwoWay}

     "


     />


     </

     toolkit:DataField

     >


     <

     toolkit:DataField

     Label

     ="主讲老师:"

      Margin

     ="0,0,0,8"

     >


     <

     TextBox

     Text

     ="

     {Binding Teachers, Mode=TwoWay}

     "


     />


     </

     toolkit:DataField

     >


     <

     toolkit:DataField

     Label

     ="提供商:"

      Margin

     ="0,0,0,8"

     >


     <

     TextBox

     Text

     ="

     {Binding Provider, Mode=TwoWay}

     "


     />


     </

     toolkit:DataField

     >


     <

     toolkit:DataField

     Label

     ="发布时间:"

      Margin

     ="0,0,0,8"

     >


     <

     sdk:DatePicker

     SelectedDate

     ="

     {Binding PublishDate, Mode=TwoWay}

     "


     />


     </

     toolkit:DataField

     >


     <

     toolkit:DataField

     Label

     ="概要:"

      Margin

     ="0,0,0,8"

     >


     <

     TextBox

     Text

     ="

     {Binding Summary, Mode=TwoWay}

     "

      Height

     ="120"

      HorizontalScrollBarVisibility

     ="Auto"

      VerticalScrollBarVisibility

     ="Auto"

      AcceptsReturn

     ="True"


     />


     </

     toolkit:DataField

     >


     <

     toolkit:DataField

     Label

     ="图片:"

      Margin

     ="0,0,0,8"

     >


     <

     Vega_Controls:SelecteImage

     ImageUri

     ="

     {Binding ThumbUrl, Mode=TwoWay}

     "

      Margin

     ="0"

      d:LayoutOverrides

     ="Width, Height"

     />


     </

     toolkit:DataField

     >


     </

     StackPanel

     >


     </

     DataTemplate

     >


     </

     toolkit:DataForm.Resources

     >


     <

     toolkit:DataForm.EditTemplate

     >


     <

     StaticResource

     ResourceKey

     ="EditDataTemplate"

     />


     </

     toolkit:DataForm.EditTemplate

     >


     </

     toolkit:DataForm

     >
把SelectImage的ImageUrl属性和实体的属性绑定起来。
     private


     void

      dfCourse_EditEnded(

     object

      sender, DataFormEditEndedEventArgs e)
 {


     if

      (e.EditAction

     ==

      DataFormEditAction.Commit)
 {
 var course

     =

      (Course)

     this

     .courseDataGrid.SelectedItem;


     if

      (course.CourseID

     ==


     0

     )
 {
 course.CreateTime

     =

      DateTime.Now;
 }


     this

     .courseDomainDataSource.SubmitChanges();
 }
 }
       [Display(Name

      =

      "

      课程名称

      "

      )]
 [Required(ErrorMessage

      =

      "

      课程名称不能为空

      "

      )]


      public


      string

       CourseName {

      get

      ;

      set

      ; }
