【JAVASE】程序异常处理
向未来张望的时光,或许孤独而漫长,希望努力过后,都是晴朗

大家好,这里是新一,请多关照。在本篇博客中,新一将会为大家介绍JAVASE中的程序异常处理,干货满满哟。(以下结果均在IDEA中编译)希望在方便自己复习的同时也能帮助到大家。
废话不多说,直接进入我们的文章。
文章目录
- 一. 异常的背景
-
- 1.1 初识异常
- 1.2 防御式编程
- 1.3 异常的好处
- 二. 异常的基本用法
-
- 2.1 捕获异常
- 2.2 异常处理流程
- 2.3 抛出异常
- 三. Java 异常体系
- 四. 自定义异常类
- 想对大家说的话
一. 异常的背景
1.1 初识异常
我们肯定在写JAVA代码时,都或多或少碰到过异常,例如:
1.除以0
System.out.println(10 / 0);
// 执行结果
//Exception in thread "main" java.lang.ArithmeticException: / by zero
2.数组下标越界
int[] arr = {1, 2, 3};
System.out.println(arr[100]);
// 执行结果
//Exception in thread "main" java.lang.ArrayIndexOutOfBoundsException: 100
3.访问 null 对象
public class Test {
    public int num = 10;
    public static void main(String[] args) {
        Test t = null;
        System.out.println(t.num);
   }
}
// 执行结果
//Exception in thread "main" java.lang.NullPointerException
所谓异常指的就是程序在 运行时 出现错误时通知调用者的一种机制.
关键字 “运行时”
有些错误是这样的, 例如将 System.out.println 拼写错了, 写成了 system.out.println. 此时编译过程中就会出错, 这是 “编译期” 出错.
而运行时指的是程序已经编译通过得到 class 文件了, 再由 JVM 执行过程中出现的错误.
异常的种类有很多, 不同种类的异常具有不同的含义, 也有不同的处理方式.
1.2 防御式编程
错误在代码中是客观存在的. 因此我们要让程序出现问题的时候及时通知程序猿. 我们有两种主要的方式:
LBYL: Look Before You Leap. 在操作之前就做充分的检查.
EAFP: It’s Easier to Ask Forgiveness than Permission. “事后获取原谅比事前获取许可更容易”. 也就是先操作, 遇到问题再处理
我们采用第二种更为妥当
1.3 异常的好处
例如, 我们用伪代码演示一下开始一局王者荣耀的过程.
LBYL风格(不使用异常)
boolean ret = false;
ret = 登陆游戏();
if (!ret) {
 处理登陆游戏错误;
    return; }
ret = 开始匹配();
if (!ret) {
 处理匹配错误;
    return; }
ret = 游戏确认();
if (!ret) {
 处理游戏确认错误;
    return;
}
ret = 选择英雄();
if (!ret) {
    处理选择英雄错误;
    return; }
ret = 载入游戏画面();
if (!ret) {
 处理载入游戏错误;
    return; }
......
EAFP风格(使用异常)
try {
    登陆游戏();
    开始匹配();
    游戏确认();
    选择英雄();
    载入游戏画面();
   ...
} catch (登陆游戏异常) {
    处理登陆游戏异常;
} catch (开始匹配异常) {
 处理开始匹配异常;
} catch (游戏确认异常) {
 处理游戏确认异常;
} catch (选择英雄异常) {
 处理选择英雄异常;
} catch (载入游戏画面异常) {
 处理载入游戏画面异常; }
......
对比两种不同风格的代码, 我们可以发现, 使用第一种方式, 正常流程和错误处理流程代码混在一起, 代码整体显的比较混乱. 而第二种方式正常流程和错误流程是分离开的, 更容易理解代码,所以说我们更推荐采用第二种
二. 异常的基本用法
2.1 捕获异常
我们先来看看它的基本结构:
try{
 有可能出现异常的语句 ;
}[catch (异常类型 异常对象) {
} ... ]
[finally {
 异常的出口
}]
● try 代码块中放的是可能出现异常的代码.
● catch 代码块中放的是出现异常后的处理行为.
● finally 代码块中的代码用于处理善后工作, 会在最后执行.
● 其中 finally 可以根据情况选择加或者不加,但catch必须加入
我们先来对比几组异常处理方式:
♦ 不处理异常
int[] arr = {1, 2, 3};
System.out.println("before");
System.out.println(arr[100]);
System.out.println("after");
// 执行结果
//before
//Exception in thread "main" java.lang.ArrayIndexOutOfBoundsException: 100
我们发现一旦出现异常, 程序就终止了. after 没有正确输出.
♦ 处理异常使用try…catch
int[] arr = {1, 2, 3};
try {
    System.out.println("before");
    System.out.println(arr[100]);
    System.out.println("after");
} catch (ArrayIndexOutOfBoundsException e) {
    // 打印出现异常的调用栈
    e.printStackTrace();
}
System.out.println("after try catch");
// 执行结果
//before
//java.lang.ArrayIndexOutOfBoundsException: 100 at demo02.Test.main(Test.java:10)
//after try catch
我们发现, 一旦 try 中出现异常, 那么 try 代码块中的程序就不会继续执行, 而是交给 catch 中的代码来执行. catch 执行完毕会继续往下执行
关于异常的处理方式
异常的种类有很多, 我们要根据不同的业务场景来决定.
- 对于比较严重的问题(例如和算钱相关的场景), 应该让程序直接崩溃, 防止造成更严重的后果
- 对于不太严重的问题(大多数场景), 可以记录错误日志, 并通过监控报警程序及时通知程序猿
- 对于可能会恢复的问题(和网络相关的场景), 可以尝试进行重试.
在我们当前的代码中采取的是经过简化的第二种方式. 我们记录的错误日志是出现异常的方法调用信息, 能很快速的让我们找到出现异常的位置. 以后在实际工作中我们会采取更完备的方式来记录异常信息
关于 “调用栈”
方法之间是存在相互调用关系的, 这种调用关系我们可以用 “调用栈” 来描述. 在 JVM 中有一块内存空间称为 “虚拟机栈” 专门存储方法之间的调用关系. 当代码中出现异常的时候, 我们就可以使用 e.printStackTrace(); 的方式查看出现异常代码的调用栈.
♦ catch只能处理对应的异常
int[] arr = {1, 2, 3};
try {
    System.out.println("before");
    arr = null;
    System.out.println(arr[100]);
    System.out.println("after");
} catch (ArrayIndexOutOfBoundsException e) {
    e.printStackTrace();
}
System.out.println("after try catch");
// 执行结果
//before
//Exception in thread "main" java.lang.NullPointerException at demo02.Test.main(Test.java:11)
此时, catch 语句不能捕获到刚才的空指针异常. 因为异常类型不匹配.
♦ 多个catch
int[] arr = {1, 2, 3};
try {
    System.out.println("before");
    arr = null;
    System.out.println(arr[100]);
    System.out.println("after");
} catch (ArrayIndexOutOfBoundsException e) {
 System.out.println("这是个数组下标越界异常");
    e.printStackTrace();
} catch (NullPointerException e) {
    System.out.println("这是个空指针异常");
    e.printStackTrace();
}
System.out.println("after try catch");
// 执行结果
//before
//这是个空指针异常
//java.lang.NullPointerException
 //at demo02.Test.main(Test.java:12)
//after try catch
当一段代码有多种错误时,不同的错误有不同的处理方式,因此可以搭配多个 catch 代码块,如果多个异常的处理方式是完全相同, 也可以写成这样
catch (ArrayIndexOutOfBoundsException | NullPointerException e) {
 ...
}
♦ 一个catch捕获所有异常
int[] arr = {1, 2, 3};
try {
    System.out.println("before");
    arr = null;
    System.out.println(arr[100]);
    System.out.println("after");
} catch (Exception e) {
    e.printStackTrace();
}
System.out.println("after try catch");
// 执行结果
//before
//java.lang.NullPointerException
 //at demo02.Test.main(Test.java:12)
//after try catch
由于 Exception 类是所有异常类的父类. 因此可以用这个类型表示捕捉所有异常.
注意: catch 进行类型匹配的时候, 不光会匹配相同类型的异常对象, 也会捕捉目标异常类型的子类对象.如刚才的代码, NullPointerException 和ArrayIndexOutOfBoundsException 都是 Exception 的子类, 因此都能被捕获到
♦ finally:善后工作,释放资源等
int[] arr = {1, 2, 3};
try {
    System.out.println("before");
    arr = null;
    System.out.println(arr[100]);
    System.out.println("after");
} catch (Exception e) {
    e.printStackTrace();
} finally {
    System.out.println("finally code");
}
// 执行结果
//before
//java.lang.NullPointerException
 //at demo02.Test.main(Test.java:12)
//finally code
无论是否存在异常, finally 中的代码一定都会执行到. 保证最终一定会执行到 Scanner 的 close 方法,同时,应避免在finally中使用return
public static int func3(){
        int a = 10;
        try {
            return a;
        }catch (ArithmeticException e){
            e.printStackTrace();
        } finally {
            return 120;
        }
    }
    public static void main(String[] args) {
        System.out.println(func3());//120
    }
打印结果依然为120,此处就造成了问题,其中的finally像无视一切规则的亚子,直接不管return,我信我素
♦ 使用try释放资源
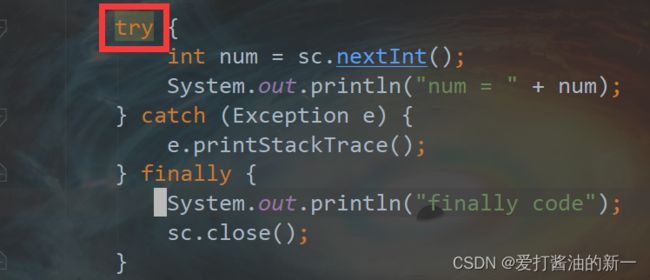
刚才的代码可以有一种等价写法, 将 Scanner 对象在 try 的 ( ) 中创建, 就能保证在 try 执行完毕后自动调用 Scanner的 close 方法.
try (Scanner sc = new Scanner(System.in)) {
    int num = sc.nextInt();
    System.out.println("num = " + num);
} catch (Exception e) {
    e.printStackTrace();
}
小科普
IDEA 能自动检查我们的代码风格, 并给出一些更好的建议.如我们之前写的代码, 在 try 上有一个 “加深底色” , 这时 IDEA 针对我们的代码提出了一些更好的建议
此时把光标放在 try 上悬停, 会给出原因. 按下 alt + enter, 会弹出一个改进方案的弹窗. 我们选择其中的
此时我们的代码就自动被 IDEA 调整成上面的Scanner示例的模样
♦ 异常沿着调用栈向上传递
public static void main(String[] args) {
    try {
        func();
   } catch (ArrayIndexOutOfBoundsException e) {
        e.printStackTrace();
   }
    System.out.println("after try catch");
}
public static void func() {
    int[] arr = {1, 2, 3};
    System.out.println(arr[100]);
}
// 直接结果
//java.lang.ArrayIndexOutOfBoundsException: 100
 //at demo02.Test.func(Test.java:18)
 //at demo02.Test.main(Test.java:9)
//after try catch
此处异常在函数中未被处理,则传递到main函数时被处理,如果没有手动处理,那么我们的程序就会交给JVM来处理,直至终止程序如下:
public static void main(String[] args) {
    func();
      System.out.println("after try catch");
}
public static void func() {
    int[] arr = {1, 2, 3};
    System.out.println(arr[100]);
}
// 执行结果
//Exception in thread "main" java.lang.ArrayIndexOutOfBoundsException: 100
 //at demo02.Test.func(Test.java:14)
 //at demo02.Test.main(Test.java:8)
可以看到, 程序已经异常终止了, 没有执行到 System.out.println(“after try catch”); 这一行
2.2 异常处理流程
● 程序先执行 try 中的代码
● 如果 try 中的代码出现异常, 就会结束 try 中的代码, 看和 catch 中的异常类型是否匹配.
● 如果找到匹配的异常类型, 就会执行 catch 中的代码
● 如果没有找到匹配的异常类型, 就会将异常向上传递到上层调用者.
● 无论是否找到匹配的异常类型, finally 中的代码都会被执行到(在该方法结束之前执行).
● 如果上层调用者也没有处理的了异常, 就继续向上传递.
● 一直到 main 方法也没有合适的代码处理异常, 就会交给 JVM 来进行处理, 此时程序就会异常终止.
2.3 抛出异常
我们再处理异常之前可以添加一个声明:throws,用来告诉程序员,此处可能会出现此种异常
public static void func2(int n) throws ArithmeticException{
        System.out.println(10/n);
    }
    public static void main(String[] args) {
        try {
            func2(0);
        } catch (ArithmeticException e){
            e.printStackTrace();
        }
        func2(0);
        System.out.println("gawei");
    }
注意:throws仅仅只起一个声明的作用,它并不能代替try…catch处理异常
,此外,我们还可以用throw来抛出我们自定义的异常:
public static void func4(int x) throws RuntimeException{
        if (x == 0){
            throw new ArithmeticException("/ 等于0");
            //抛出自定义的异常 - 非系统异常 - bug等
        }
    }
    public static void main14(String[] args) {
        try {
            func4(0);
        } catch (ArithmeticException e){
            e.printStackTrace();
        }
        //func4(0);
    }
这样的设定为我们的调试程序bug等起了至关重要的作用。
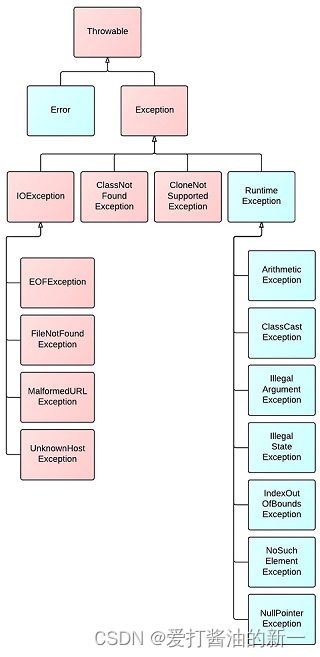
三. Java 异常体系
既然我们前面说了这么多异常类型,那么JAVA中所有的异常类型有多少,又存在着怎样的关系呢?

● 顶层类 Throwable 派生出两个重要的子类, Error 和 Exception
● 其中 Error 指的是 Java 运行时内部错误和资源耗尽错误. 应用程序不抛出此类异常. 这种内部错误一旦出现,除了告知用户并使程序终止之外, 再无能无力. 这种情况很少出现.
● Exception 是我们程序猿所使用的异常类的父类.
● 其中 Exception 有一个子类称为 RuntimeException , 这里面又派生出很多我们常见的异常类NullPointerException , IndexOutOfBoundsException 等.
♦ 受查异常与非受查异常
Java语言规范将派生于 Error 类或 RuntimeException 类的所有异常称为 非受查异常, 所有的其他异常称为 受查异常
如果一段代码可能抛出 受查异常, 那么必须显式进行处理…
public static void main(String[] args) {
 System.out.println(readFile());
}
public static String readFile() {
 // 尝试打开文件, 并读其中的一行.
 File file = new File("d:/test.txt");
 // 使用文件对象构造 Scanner 对象.
 Scanner sc = new Scanner(file);
 return sc.nextLine();
}
// 编译出错
//Error:(13, 22) java: 未报告的异常错误java.io.FileNotFoundException; 必须对其进行捕获或声明以便抛出
如 FileNotFoundException 这样的异常就是受查异常. 如果不显式处理, 编译无法通过. 显式处理的方式有两种:
♦ 使用 try catch 包裹起来
public static void main(String[] args) {
 System.out.println(readFile());
}
public static String readFile() {
 File file = new File("d:/test.txt");
 Scanner sc = null;
 try {
 sc = new Scanner(file);
 } catch (FileNotFoundException e) {
 e.printStackTrace();
 }
 return sc.nextLine();
}
♦ 在方法上加上异常说明, 相当于将处理动作交给上级调用者
public static void main(String[] args) {
 try {
 System.out.println(readFile());
 } catch (FileNotFoundException e) {
 e.printStackTrace();
 }
}
public static String readFile() throws FileNotFoundException {
 File file = new File("d:/test.txt");
 Scanner sc = new Scanner(file);
 return sc.nextLine();
}
别忘了 IDEA 神奇的 alt + enter, 能够快速修正代码.
四. 自定义异常类
Java 中虽然已经内置了丰富的异常类, 但是我们实际场景中可能还有一些情况需要我们对异常类进行扩展, 创建符合我们实际情况的异常.
例如, 我们实现一个用户登陆功能
public class Test {
 private static String userName = "admin";
 private static String Mypassword = "123456";
 public static void main(String[] args) {
 login("admin", "123456");
 }
 public static void login(String userName, String password) {
 if (!Test.userName.equals(userName)) {
 // TODO 处理用户名错误
 }
 if (!Test.password.equals(password)) {
 // TODO 处理密码错误
 }
 System.out.println("登陆成功");
 }
}
此时我们在处理用户名密码错误的时候可能就需要抛出两种异常. 我们可以基于已有的异常类进行扩展(继承), 创建和我们业务相关的异常类.
class UserError extends Exception {
 public UserError(String message) {
 super(message);
 }
}
class PasswordError extends Exception {
 public PasswordError(String message) {
 super(message);
 }
}
此时我们的 login 代码可以改成
public static void main(String[] args) {
 try {
 login("admin", "123456");
 } catch (UserError userError) {
 userError.printStackTrace();
 } catch (PasswordError passwordError) {
 passwordError.printStackTrace();
 }
}
public static void login(String userName, String password) throws UserError,
PasswordError {
 if (!Test.userName.equals(userName)) {
 throw new UserError("用户名错误");
 }
 if (!Test.password.equals(password)) {
 throw new PasswordError("密码错误");
 }
 System.out.println("登陆成功");
}
注意事项
● 自定义异常通常会继承自 Exception 或者 RuntimeException
● 继承自 Exception 的异常默认是受查异常
● 继承自 RuntimeException 的异常默认是非受查异常
想对大家说的话
家人们,学到这里我们已经学会了JAVA异常的处理方式了,下一篇我们将正式进入数据结构的学习,后续新一会持续更JAVA的有关内容,学习永无止境,技术宅,拯救世界!

