Vue学习(vue框架-大纲-知识要点)
VUE
一. 开发工具
VUE开发环境推荐使用VS code, 然后安装特定的插件即可开发,可用插件如下:
- Vetur —— 语法高亮、智能感知、Emmet等
- EsLint—— 语法纠错
- Auto Close Tag —— 自动闭合HTML/XML标签
- Auto Rename Tag —— 自动完成另一侧标签的同步修改
- Path Intellisense —— 自动路劲补全
- HTML CSS Support —— 让 html 标签上写class 智能提示当前项目所支持的样式
- Vue 2 Snippets ——vue的语法提示
二. 第一个VUE程序
2.1 引入js
2.2 给dom元素定义id
{{msg}}
2.3 vue代码编写
new Vue({
	 el: "#app",
     data() {
     	return {
            msg: "Hello World"
     	}
	 }
});
二. 基本指令
v-text: v-text是用于操作纯文本,它会替代显示对应的数据对象上的值,可以简写为{{}}, 即插值表达式。
v-html: 将内容以html的形式呈现在页面。
v-model: 双向数据绑定。
v-if: 值如果为true的情况下,显示标签,如果为false会移除标签。
v-else-if: 与v-if配合使用。
v-else: 与v-if配合使用。
v-show: 如果为true,显示信息,如果为false则隐藏标签。
v-for: 循环遍历。语法形式为 v-for=“item in list”
v-bind: 将值绑定到标签的自定义属性上,形式为 v-bind:title=“mytitle”,可以简写为 :属性名
v-on:click: 点击事件,可以简写为@click。
如下代码为v-bind的演示:
这是一段话
这是一段话
这是一段话
案例:1. 通过表单添加数据,渲染到列表中。
2. 遍历数组和对象,并能删除和更新。
三. 计算属性与监视器
3.1 计算属性
计算属性是用来存储数据,而且数据可以进行逻辑操作,是基于其依赖的进行更新,只有在相关依赖发生变化的时候才会更新变化,计算属性是缓存的,只要相关依赖不发生变化,多次访问属性值是之前I计算得到的值,并不会多次执行。计算属性的属性名不需要纳入到Vue的数据对象中。
3.2 监视器
所谓的监视器就是可以通过watch的方式观察某个属性的变化,然后做出相应的处理。
3.3 案例
FirstName:

LastName:


FullName1(单向):

FullName2(单向):

FullName3(双向):
对应的js代码如下:
案例二:串联过滤器,将数字四舍五入成两位有效数字,然后转换为美元表达方式
{{price | fix(2) | toUSD}}
5.2 局部过滤器
局部过滤器是定义在Vue实例中,只能在指定的实例中才能使用。
案例:我们创建博客的时候,都会有文章列表,每篇博客将会有一个文章摘要,然后提供一个“阅读更多”的功能。我们这个示例就是来创建一个名为readMore的过滤器,它将把字符串的长度限制为给定的字符数,并将其附加到你的选择的后缀中。
{{article | articleDisplay(20, '...')}}
练习:定义日期转换的过滤器。
六. vue-cli构建项目与打包部署
使用vue-cli能够快速的帮助我们构建项目,它就如同一个脚手架,提供了可选的模板。在使用vue-cli之前需要先安装nodejs。
6.1 使用npm构建项目
npm install -g @vue/cli             #安装vue-cli,该步骤需要等一段时间
vue -V                              #查看vue-cli的版本
vue create my-app                   #创建名为my-app的项目
6.2 项目的结构介绍
- public: 存放静态文件。
- src: 源码文件,开发就在此目录下。
- .gitignore: git的配置文件。
- babel.config.js: babel的配置文件,在创建项目的时候才用的脚手架为bable。
- package-lock.json:定义了依赖库的下载位置,保证了在项目迁移部署环境的一致性。
- package.json: 定义了该项目依赖的类库。
6.3 项目的打包部署
执行命令:
npm run build
将生成的dist目录下的文件放入到tomcat或者nginx下,启动服务器,即可访问。
七. 组件化开发
组件化开发是在ES6中提出的,可以提高页面的复用率,提高开发效率,便于团队协作,是一套模板化的代码,要有、
App.vue
{{article}}
7.2 定义入口JS文件
import Vue from 'vue'        //引入vue
import App from './App.vue'  //引入自己定义的App.vue,使用变量App来接收

new Vue({
    render: h => h(App),  //将App组件渲染到index.html中。
}).$mount("#app")
render是Vue中的一个方法,方法的定义形式如下:
// render最原始的,而传入的参数createElement又是一个函数,用来生成dom结构
render: function(createElement){

}
// 按照ES6的箭头函数的写法,进行第一次演变
render: createElement => createElement(模板)
// 将上面的createElement变为h,那么就得到最终的形式
render: h => h(App)
$mount(“#id”)该方法的作用是先实例化Vue对象,接着在挂载到指定Id的节点上,和在**new Vue**的时候使用el指定要渲染的节点的形式是一样的,只是换了种形式而已。
八. 案例演示
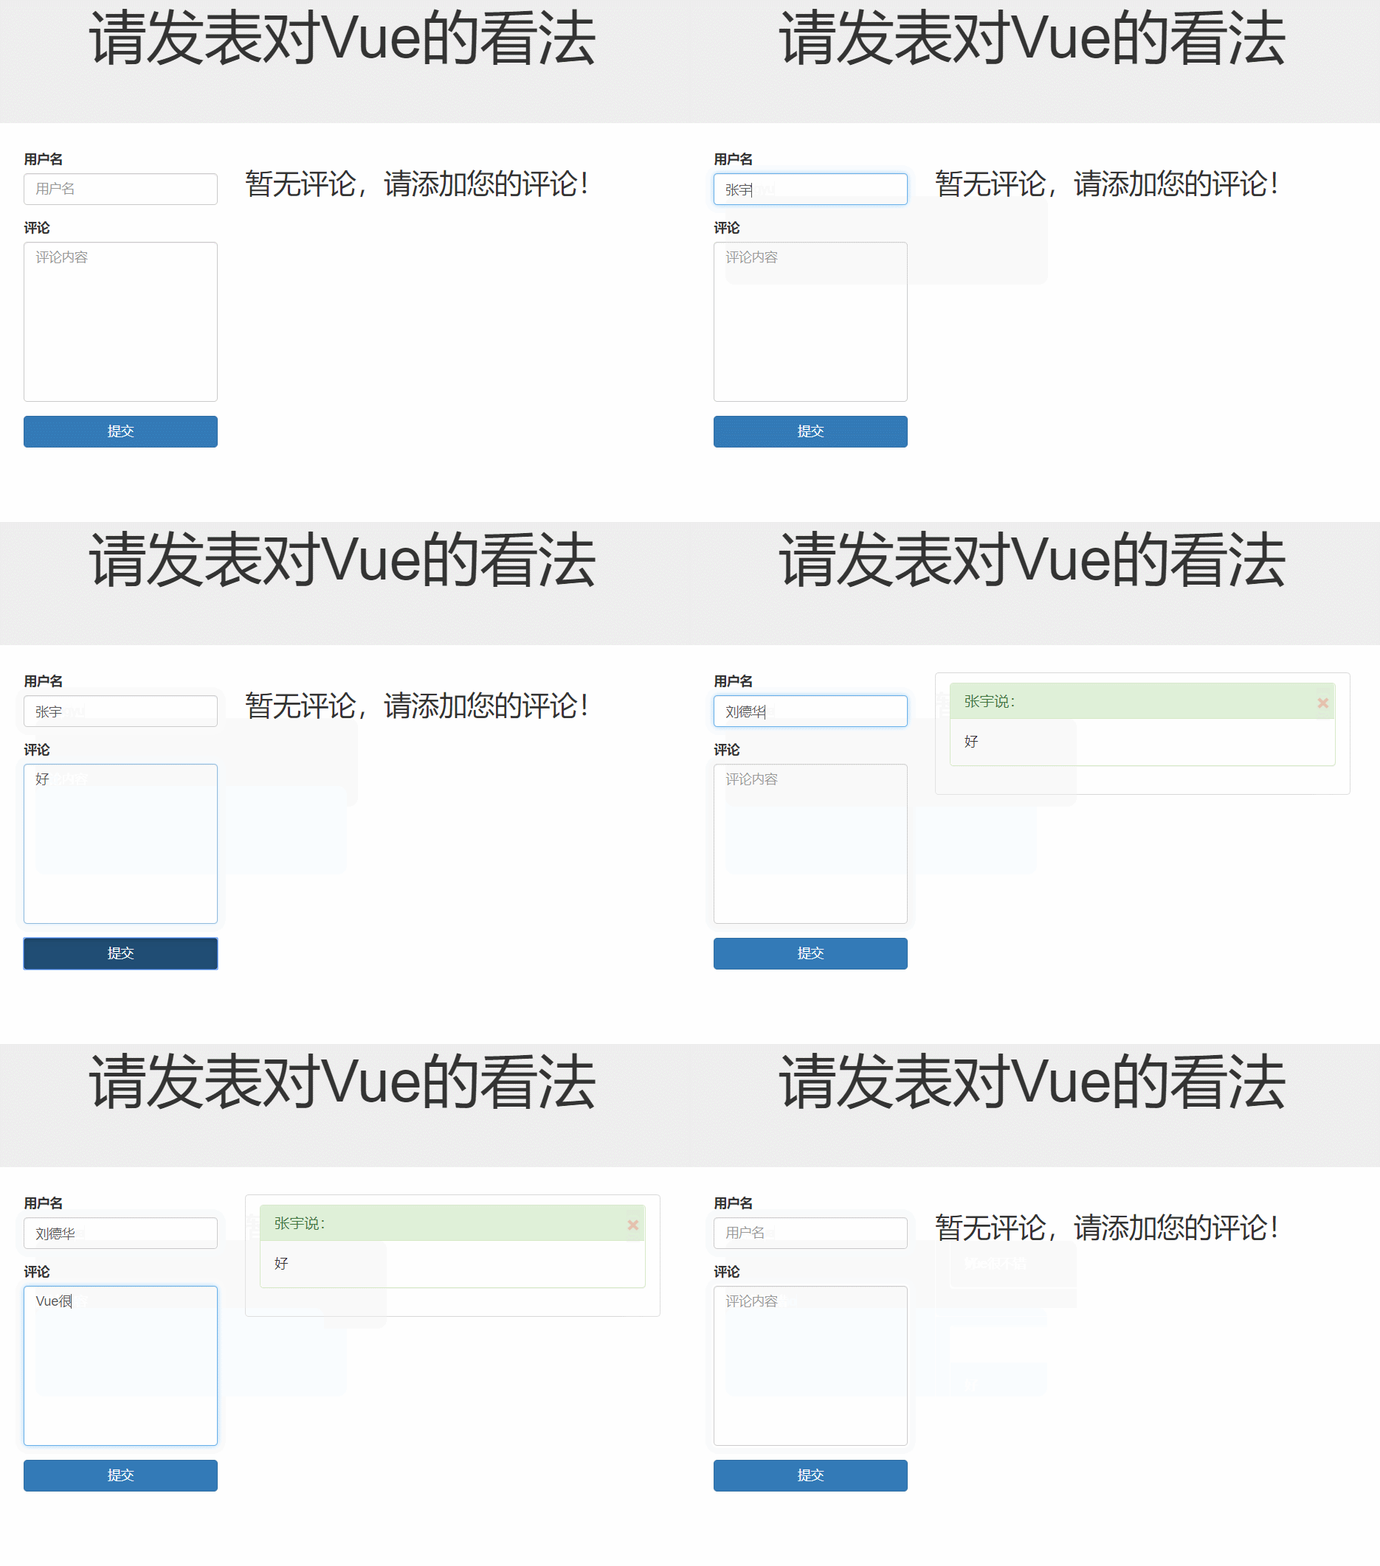
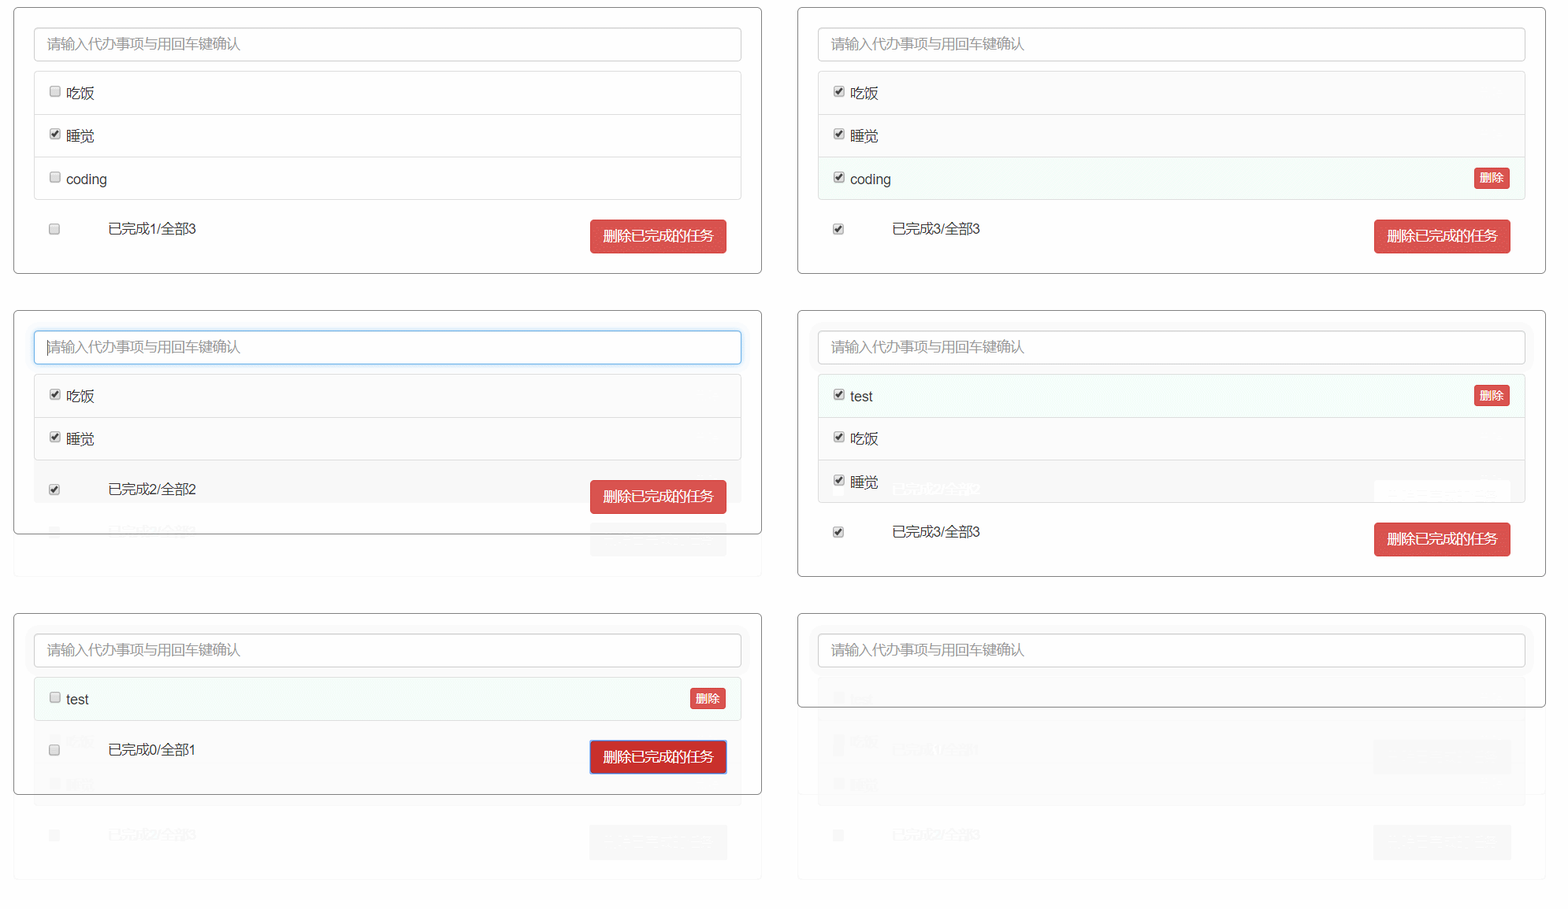
案例一:利用组件化编程实现如下图示案例:
当你能够独立的完成如上两个案例,表示你已经比较深入的理解VUE了 _
九. 组件通信
9.1 props
父组件 App.vue
<template>
	<div>
		<h1>Hello World</h1>
		<!-- 前面一个msg标识子组件用于接收的变量名, 引号中的msg是当前组件的值
			 第一个add是子组件用于接收的变量名,第二个add是当前组件的方法名
		-->
		<child :msg="msg"/>
	</div>
</template>
<script>
import child from './Child.vue'
export default {
    components: {
        child
    },
	data() {
        return {
            msg: '这个信息来源于父组件'
        };
	}
}
</script>
<style></style>
子组件 Child.vue
<template>
	<div>
		<p>{{msg}}</p>
		<button @click="addItem" />
	</div>
</template>
<script>
export default {
	// 使用props接收父组件传递过来的值
	props: ['msg']
}
</script>
<style></style>
9.2 事件绑定
9.2.1 子组件操作父组件
父组件 App.vue
<template>
  <div>
     <input type="text" v-model="value">
     <hr>
     <Child @dosomething="changeValue"/>
  </div>
</template>

<script>
import Child from './components/Child.vue'

export default {
  components: {
    Child
  },
  data() {
    return {
      value: ''
    }
  },
  methods: {
    changeValue(value) {
      this.value = value;
    }
  }
}
</script>
<style>
</style>
子组件 Child.vue
<template>
    <div>
        <button @click="dosomething">子组件按钮</button>
    </div>
</template>

<script>
export default {
    methods: {
        dosomething() {
        	// 调用父组件绑定的事件 dosomething,然后调用changeValue方法,并传值
            this.$emit('dosomething', '张某人');
        }
    }
}
</script>
<style>
</style>
9.2.3 父组件取子组件中的值
父组件 App.vue
<template>
<div>
<input type="text" v-model="value">
<button @click="changeValue">取子组件的值</button>
<hr>
<Child ref="child"/>
</div>
</template>
<script>
import Child from './components/Child.vue'
export default {
components: {
Child
},
data() {
return {
value: ''
}
},
methods: {
changeValue() {
this.value = this.$refs.child.value;
}
}
}
</script>
<style>
</style>
子组件 Child.vue
<template>
    <div>
        <p>我是子组件,我中间定义了一个value='张某人'的数据</p>
    </div>
</template>

<script>
export default {
    data() {
        return {
            value: '张某人'
        }
    }
}
</script>
<style>
</style>
9.4 插槽(slot)
插槽的作用说白了就是一个占位的作用。
父组件 App.vue
<template>
    <List>
    	<!--
    	  可以简写为这种形式
    	  <template #title>
    	-->
        <template v-slot:title>
            <h2>插槽案例</h2>
            <button class="btn btn-danger btn-sm">点击</button>
        </template>
        <!--
    	  可以简写为这种形式
    	  <template #title="props">
    	-->
        <template v-slot:item="props">
            <h3>插槽属性</h3>
            <p>属性值:{{props}}</p>
        </template>
    </List>
</template>

<script>
import List from './components/List.vue'

export default {
    components: {
        List
    }
}
</script>

<style>
    .site-header {
        text-align: center;
    }
</style>
子组件 Child.vue
<template>
    <div>
        <slot name="title"></slot>
        <slot name="item" v-bind="person"></slot> <!-- 组件属性 -->
    </div>
</template>
<script>
export default {
    data() {
        return {
            person: {age: 10, name: 'zhangsan'}
        }
    }
}
</script>
<style>
</style>
十. 网络请求
vue2.X版本中,官方推荐的网络请求的工具是axios。
npm install axios vue-axios --save
10.1 配置全局请求地址
新建Base.vue文件,文件内容如下:
<script>
const BASE_URL = "http://localhost:8081"
export default {
BASE_URL
}
</script>
10.2 main.js配置
import Vue from 'vue'
import App from './App.vue'
import axios from 'axios'
import VueAxios from 'vue-axios'
import Base from './Base.vue'

Vue.use(VueAxios, axios);  //顺序有关系
axios.defaults.baseURL = Base.BASE_URL  //配置基本地址

new Vue({
  render: h => h(App),
}).$mount('#app')
10.3 发送GET请求
this.axios.get('/user'
    /**  可以通过如下方式,添加请求头信息
    ,{
         headers: {
             'token': 'hyfetrrabcpo'
         }
      }
    */
    )
    .then((resp) => {  // 请求成功
      this.users = resp.data;
    }, (error) => { //请求失败
       window.console.log(error);  //不能直接用console
    })
10.4 发送POST请求
this.axios.post('/user', {name:'zhangsan', id: 10})  //后台必须要用json接收
	.then((resp) => {
			this.users = resp.data;
	}, (error) => {
			window.console.log(error);  //不能直接用console
	})
10.5 发送DELELE请求
this.axios.delete('/user/56')
	.then((resp) => {
			this.users = resp.data;
	}, (error) => {
			window.console.log(error);  //不能直接用console
	})
十一. VueRouter
Vue Router 是 Vue.js 官方的路由管理器。它和 Vue.js 的核心深度集成,让构建单页面应用变得易如反掌。
11.1 安装
npm install vue-router --save
11.2 配置路由信息
新建一个文件夹叫做router,然后在里面定义一个index.js文件,在该文件中配置路由信息:
import Vue from 'vue'
import Router from 'vue-router'
import Home from '../views/Home.vue'
import About from '../views/About.vue'


Vue.use(Router)   //使用插件

export default new Router({
    linkActiveClass: 'active',   //选中状态下默认添加的样式
    routes: [
        {
            path: '/home',
            component: Home
        },
        {
            path: '/about',
            component: About
        },
        {
            path: '/',
            redirect: '/about'   //根路径默认会重定向到/about路径

        }
    ]
})
11.3 main.js文件中的配置
import Vue from 'vue'
import App from './App.vue'
import axios from 'axios'
import VueAxios from 'vue-axios'
import Base from './Base.vue'
import router from './router'

Vue.use(VueAxios, axios);  //顺序有关系
axios.defaults.baseURL = Base.BASE_URL

new Vue({
  render: h => h(App),
  router
}).$mount('#app')
11.4 访问与渲染
使用
<router-link to="/home" class="list-group-item">Homerouter-link>
<router-link to="/about" class="list-group-item">Aboutrouter-link>
使用
<router-view>router-view>
11.5 子路由
在路由的配置中使用children来配置子路由。
children: [
	{
		path: '/home/game',
		component: Games
	}
]
11.6 参数的传递
在使用路由的过程中,经常会碰到路由参数的传递,那么传递方式大概有三种。
方式一:
路由配置:
{path:'/user/:id', component:userDetail, props:true}
路由请求:
<router-link :to="'/user/' + user.id">{{user.name}}router-link>
取值:
在userDetail中使用 props: {id: String} 来接收数据
方式三:
路由配置:
{path:'/user', name:'userDetail', component:userDetail}
路由请求:
<router-link :to="{path:'/user', query:{id:user.id}}">{{user.name}}</router-link>
取值:
mounted() {
    this.id = this.$route.query.id;   //用户刷新的时候有用
},
watch:{ //监听路由的变化
    $route: {
        handler(val) {
            this.id = val.query.id;
        }
     }
}
11.7 编程式路由
方式一:
实现跳转:
this.$router.push({
          path: '/user',
          query: {id:id}
       });
取值:
mounted() {
        this.id = this.$route.query.id;
    },

watch:{
    $route: {
    	handler(val) {
    		this.id = val.query.id;
    	}
    }
}
方式二:
实现跳转:
this.$router.push({
          path: '/user',
          query: {id:id}
       });
取值:
props: {
    id: String
}
11.8 路由守卫
11.8.1全局路由守卫
router.beforeEach((to,from,next) =>{
    next();
});
十二. vuex
12.1 vuex是什么
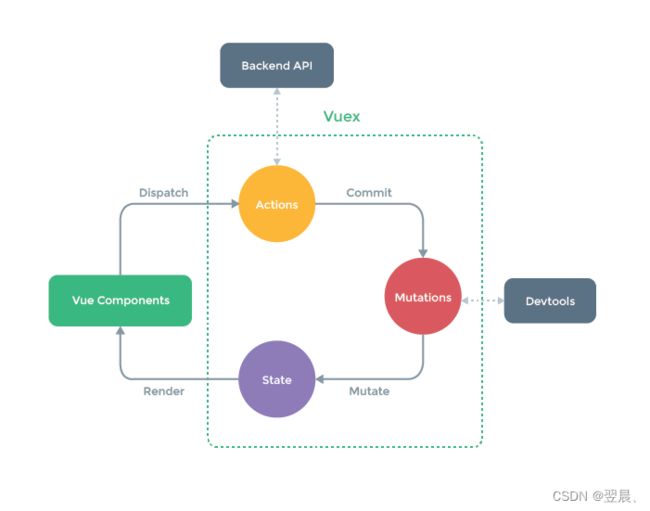
vuex是对vue项目进行状态管理的js库,对于所有的组件来说,它是一个中央存储,这种模式就保证了只能按照特定的模式来更改状态。
12.2 vuex的五大核心
state
说的直白点就是存储数据的地方。
actions
通过异步的方式更改状态值,但是不能直接更改,需要借助于mutations来更改。
mutations
通过直接同步的方式更改状态。
getters
类似于计算属性,通常是需要通过state来间接计算得到的值。
modules
一个项目中因为模块的原因,存在着各种不同的状态,需要按照模块来划分。
12.3 安装vuex
npm install vuex --save
12.4 建立store
新建一个文件夹,名字叫store,在文件夹中新建一个文件,文件名叫index.js,文件内容如下:
import Vue from 'vue'
import Vuex from 'vuex'

Vue.use(Vuex);

//state
const state = {
    todos:[{title:'工作一', complete:true}]
}
// actions
const actions = {
	// 第一个参数必须是context, 第二个参数是需要的业务数据
    addTodo(context, todo){
    	// 通过commit的方式提交个mutations, 真正实现对状态修改的其实是mutations
        context.commit('addTodo', todo)
    }
}
// getter,类似于计算属性,需要根据state来计算出其他想要的属性
const getters = {
    completedTodoNumber: state => {
        return state.todos.reduce((preTotal, current) => preTotal + (current.complete ? 1 : 0), 0)
    }
}
//操作
const mutations = {
    //添加待办事项,第一个参数必须是state, 第二个参数是传递过来的数据
    addTodo(state, todo) {
        state.todos.unshift(todo)
    }
}
// 对外暴露Vuex.Store的对象,在其他任何组件中都可以使用 $store来进行操作
export default new Vuex.Store({
    state,
    mutations,
    actions,
    getters
})
12.5 main.js配置
import Vue from 'vue'
import App from './App.vue'
import store from './store'

new Vue({
    store,   //引入store
    render: h => h(App)
}).$mount("#app");
12.6 组件中使用
this.$store.state.todos    //获取状态值
this.$store.commit('addTodo', todo);  //通过mutations中的方法更新状态
this.$store.dispatch('addTodo', todo); //通过actions中的方法异步更新状态
this.$store.getters.completedTodoNumber;  //获取getters中的属性
12.7 映射函数调用
import {mapState, mapActions, mapGetters, mapMutations} from 'vuex'

computed: {
    ...mapState(['todos']),  //扩展运算符, 在当前组件中直接使用this的方式调用
    ...mapGetters(['completedTodoNumber'])
},
methods: {
	//引号中的内容为actions中定义的方法名, 可以直接使用this.addTodo来调用。
    ...mapActions(['addTodo']),
    ...mapMutations(['addTodo'])
}
12.8 Modules
A. 新建一个shopping目录,目录下新建index.js文件,文件内容如下:
const state = {
    todos:[{title:'工作一', complete:true}]
}

const actions = {
    addTodo(context, todo){
        context.commit('addTodo', todo)
    },
    delDone(context) {
        context.commit('delDone')
    },
    delByIndex(context, index) {
        context.commit('delByIndex', index);
    }
}
const getters = {
    completedTodoNumber: state => {
        return state.todos.reduce((preTotal, current) => preTotal + (current.complete ? 1 : 0), 0)
    }
}
//操作
const mutations = {
    //添加待办事项
    addTodo(state, todo) {
        state.todos.unshift(todo)
    },
    delDone(state) {
        state.todos = state.todos.filter(todo => !todo.complete)
    },
    delByIndex(state, index) {
        state.todos.splice(index, 1);
    }
}

export default {
    state,
    actions,
    getters,
    mutations
}
B. 在store下的index.js文件中写入如下内容:
import Vue from 'vue'
import Vuex from 'vuex'
import shopping from 'shopping'

Vue.use(Vuex);

export default new Vuex.Store({
    modules: {
        shopping
    }
})
C. 使用
获取对应模块的state值方式一:
...mapState({todos: state=>state.shopping.todos})
获取对应模块的state值方式二:
todos: function() {
      return this.$store.state.shopping.todos;
}
至于getters、actions、mutations都被注册到全局上,和之前的使用方式一样。
附录:
1.spring boot跨域支持
A. 在controller或者对应的方法上加上如下代码
@CrossOrigin(origins = {"http://localhost:8080"})
B. 基于过滤器的跨域支持
@Configuration
public class MyConfiguration {

    @Bean
    public FilterRegistrationBean corsFilter() {
        UrlBasedCorsConfigurationSource source = new UrlBasedCorsConfigurationSource();
        CorsConfiguration config = new CorsConfiguration();
        config.setAllowCredentials(true);
        config.addAllowedOrigin("http://domain1.com");
        config.addAllowedHeader("*");
        config.addAllowedMethod("*");
        source.registerCorsConfiguration("/**", config);
        FilterRegistrationBean bean = new FilterRegistrationBean(new CorsFilter(source));
        bean.setOrder(0);
        return bean;
    }
}


