第2周学习:卷积神经网络基础
一、当前任务
(一)视频学习专知课程-卷积神经网络
(二)MNIST 数据集分类、CIFAR10 数据集分类、使用 VGG16 对 CIFAR10 分类代码练习
(三)问题简答
二、本周工作
(一)视频学习内容
深度学习三部曲: Step1搭建神经网络结构、Step2找到一个合适的损失函数(交叉熵损失、均方误差等)、Step3找到一个合适的优化函数,更新参数(反向传播BP、随机梯度下降SGD)
传统神经网络VS卷积神经网络:
全连接网络处理图像问题:权重矩阵参数太多->过拟合
卷积神经网络解决方式:局部关联、参数共享
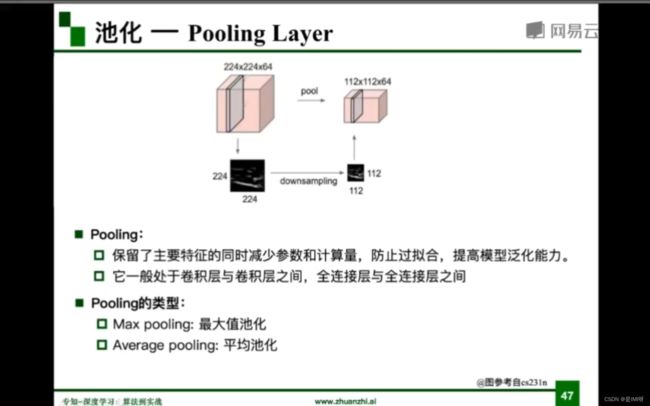
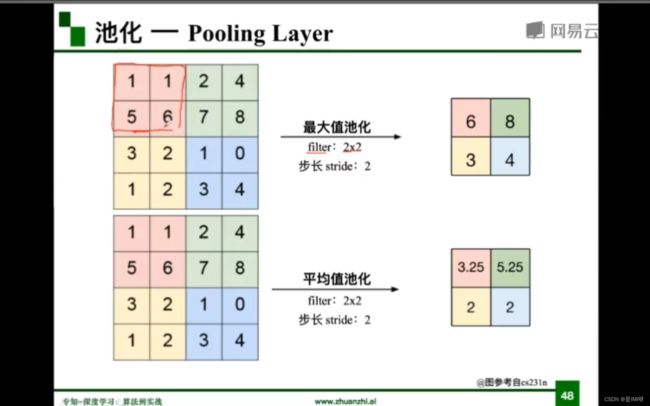
CNN的基本结构:卷积、池化、全连接
卷积Convolutional Layer:

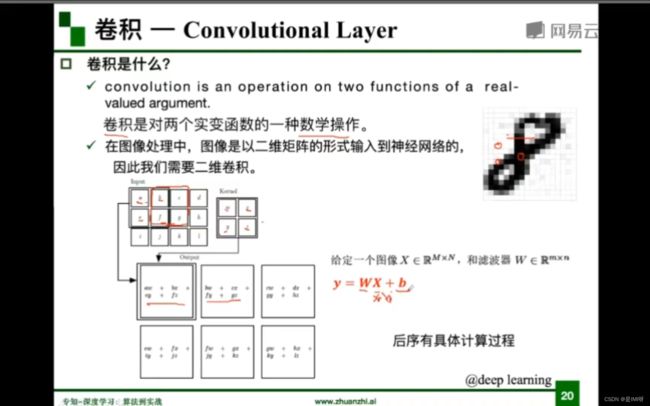
基本概念:input:输入、kernel/filter:卷积核/滤波器、weights:权重、receptive field:感受野、activation map/feature map:特征图、padding填充像素、depth/channel:深度、output:输出


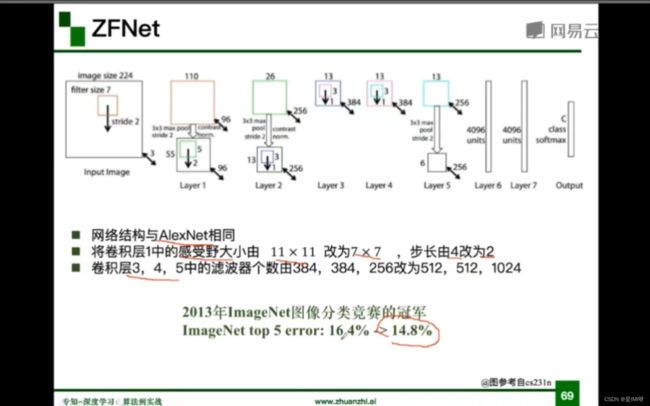
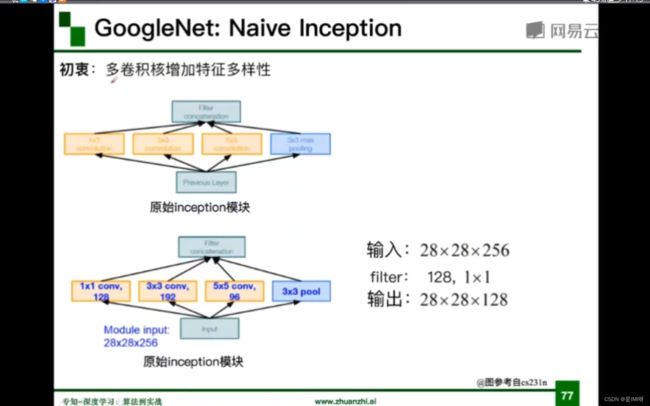
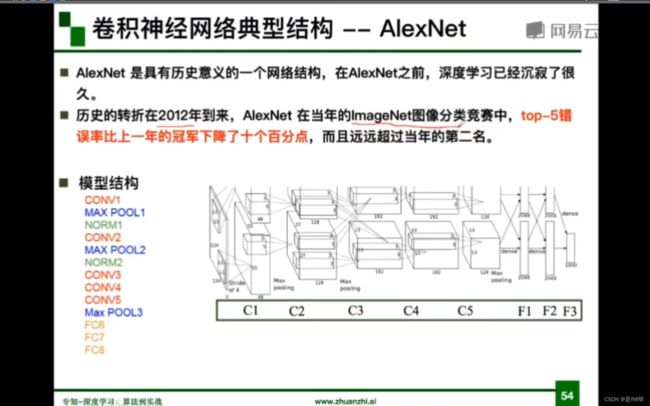
典型的网络结构:AlexNet、VGG、GoogleNet、ResNet

AlexNet:
成功原因:(1)大数据训练(百万级ImageNet图像处理)
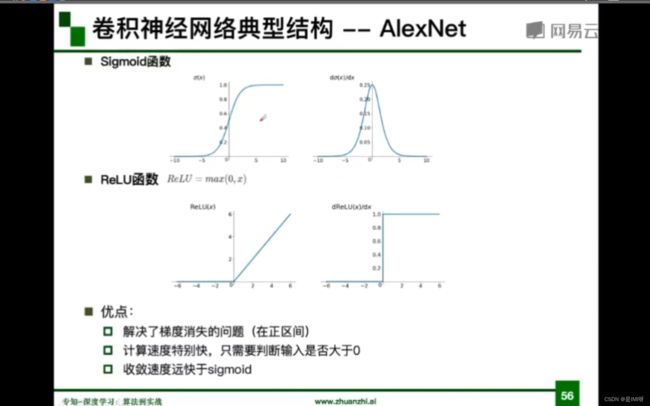
(2)非线性激活函数(ReLU->求导好计算)
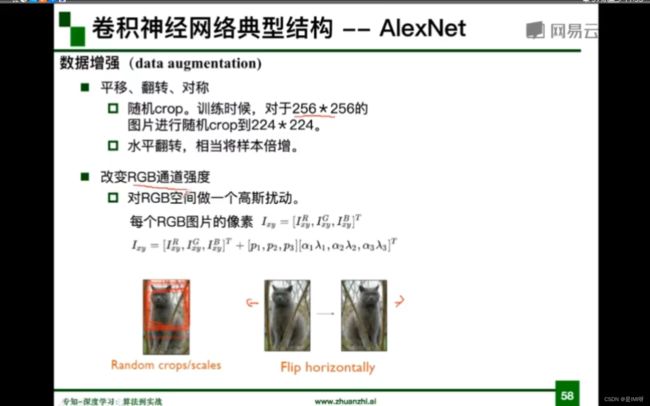
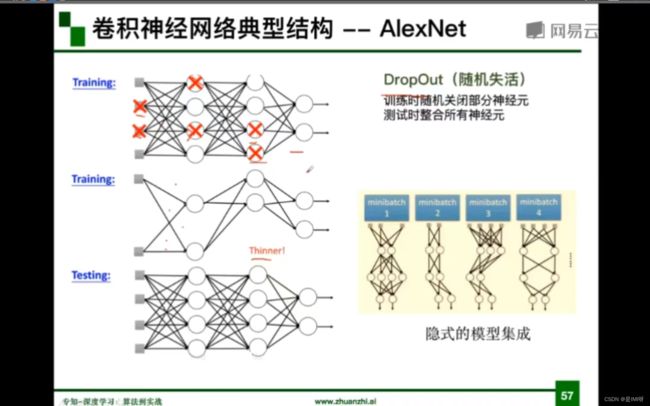
(3)防止过拟合(Dropout、Data augmentation)
(4)其他(双GPU实现)
DropOut->解决过拟合
VGG:
ResNet:
加残差解决梯度消失
计算复杂度过高->插入1*1卷积核进行降维


(二)代码练习
1.MNIST 数据集分类: 构建简单的CNN对 mnist 数据集进行分类。同时,还会在实验中学习池化与卷积操作的基本作用。
数据集介绍:
MNIST数据集来自美国国家标准与技术研究所, National Institute of Standards and Technology (NIST)。训练集(training set)由来自250个不同人手写的数字构成,其中50%是高中学生,50%来自人口普查局(the Census Bureau)的工作人员。测试集(test set)也是同样比例的手写数字数据,但保证了测试集和训练集的作者集不相交。
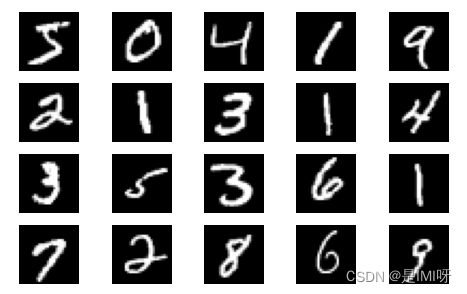
MNIST数据集一共有7万张图片,其中6万张是训练集,1万张是测试集。每张图片是28 × 28的0−9的手写数字图片组成。每个图片是黑底白字的形式,黑底用0表示,白字用0-1之间的浮点数表示,越接近1,颜色越白。
import torch
import torch.nn as nn
import torch.nn.functional as F
import torch.optim as optim
from torchvision import datasets, transforms
import matplotlib.pyplot as plt
import numpy

# 一个函数,用来计算模型中有多少参数
def get_n_params(model):
    np=0
    for p in list(model.parameters()):
        np += p.nelement() //统计tensor张量的元素个数
    return np

# 使用GPU训练,可以在菜单 "代码执行工具" -> "更改运行时类型" 里进行设置
device = torch.device("cuda:0" if torch.cuda.is_available() else "cpu")
(1)加载数据集
PyTorch里包含了 MNIST, CIFAR10 等常用数据集,调用 torchvision.datasets 即可把这些数据由远程下载到本地,下面给出MNIST的使用方法:
torchvision.datasets.MNIST(root, train=True, transform=None, target_transform=None, download=False)
root 为数据集下载到本地后的根目录,包括 training.pt 和 test.pt 文件
train,如果设置为True,从training.pt创建数据集,否则从test.pt创建。
download,如果设置为True, 从互联网下载数据并放到root文件夹下
transform, 一种函数或变换,输入PIL图片,返回变换之后的数据。
target_transform 一种函数或变换,输入目标,进行变换。
另外值得注意的是,DataLoader是一个比较重要的类,提供的常用操作有:batch_size(每个batch的大小), shuffle(是否进行随机打乱顺序的操作), num_workers(加载数据的时候使用几个子进程)
input_size  = 28*28   # MNIST上的图像尺寸是 28x28
output_size = 10      # 类别为 0 到 9 的数字,因此为十类

train_loader = torch.utils.data.DataLoader(#从dataset数据库中每次抽出batch_size个数据
    datasets.MNIST('./data', train=True, download=True, #训练集
        transform=transforms.Compose(
            [transforms.ToTensor(),
             transforms.Normalize((0.1307,), (0.3081,))])),
    batch_size=64, shuffle=True)

test_loader = torch.utils.data.DataLoader(#测试集
    datasets.MNIST('./data', train=False, transform=transforms.Compose([
             transforms.ToTensor(),
             transforms.Normalize((0.1307,), (0.3081,))])),
    batch_size=1000, shuffle=True)
plt.figure(figsize=(8, 5)) #显示部分图像 figsize图像宽、高
for i in range(20):
    plt.subplot(4, 5, i + 1) #4行5列 i+1关键字
    image, _ = train_loader.dataset.__getitem__(i)
    plt.imshow(image.squeeze().numpy(),'gray')
    plt.axis('off');
(2)创建网络:
定义网络时,需要继承nn.Module,并实现它的forward方法,把网络中具有可学习参数的层放在构造函数init中。只要在nn.Module的子类中定义了forward函数,backward函数就会自动被实现(利用autograd)。
class FC2Layer(nn.Module):
    def __init__(self, input_size, n_hidden, output_size):
        # nn.Module子类的函数必须在构造函数中执行父类的构造函数
        # 下式等价于nn.Module.__init__(self)
        super(FC2Layer, self).__init__()
        self.input_size = input_size
        # 这里直接用 Sequential 就定义了网络,注意要和下面 CNN 的代码区分开
        self.network = nn.Sequential(
            nn.Linear(input_size, n_hidden),
            nn.ReLU(),
            nn.Linear(n_hidden, n_hidden),
            nn.ReLU(),
            nn.Linear(n_hidden, output_size),
            nn.LogSoftmax(dim=1)
        )
    def forward(self, x):
        # view一般出现在model类的forward函数中,用于改变输入或输出的形状
        # x.view(-1, self.input_size) 的意思是多维的数据展成二维
        # 代码指定二维数据的列数为 input_size=784,行数 -1 表示我们不想算,电脑会自己计算对应的数字
        # 在 DataLoader 部分,我们可以看到 batch_size 是64,所以得到 x 的行数是64
        # 大家可以加一行代码:print(x.cpu().numpy().shape)
        # 训练过程中,就会看到 (64, 784) 的输出,和我们的预期是一致的

        # forward 函数的作用是,指定网络的运行过程,这个全连接网络可能看不啥意义,
        # 下面的CNN网络可以看出 forward 的作用。
        #Convolution Layer输出了多个feature map,每个feature map都是二维的。而Fully Connected Layer的输入是一维向量。那Convolution Layer和Fully Connected Layer是怎么对接到一起的?关键看下面这行代码:通过这个view()函数我们把二维数据变成了一维向量。
        x = x.view(-1, self.input_size)
        return self.network(x)


class CNN(nn.Module):
    def __init__(self, input_size, n_feature, output_size):
        # 执行父类的构造函数,所有的网络都要这么写
        super(CNN, self).__init__()
        # 下面是网络里典型结构的一些定义,一般就是卷积和全连接
        # 池化、ReLU一类的不用在这里定义
        self.n_feature = n_feature
        #定义卷积层 eg.输入1通道(1个二维数组),输出n_feature通道(n_feature个feature map),卷积核5*5
        #原数据是二维的,所以是Conv2d。
        self.conv1 = nn.Conv2d(in_channels=1, out_channels=n_feature, kernel_size=5)
        self.conv2 = nn.Conv2d(n_feature, n_feature, kernel_size=5)
        #这个例子是个线性模型,全连接层定义了三层线性转换
        #n_feature个4*4的feature map 第一个参数即为把二维数组拍扁后一维向量的size
        #经过第一层全连接转换后得到50个神经元
        self.fc1 = nn.Linear(n_feature*4*4, 50)
        self.fc2 = nn.Linear(50, 10)

    # 下面的 forward 函数,定义了网络的结构,按照一定顺序,把上面构建的一些结构组织起来
    # 意思就是,conv1, conv2 等等的,可以多次重用
    def forward(self, x, verbose=False):
        x = self.conv1(x)
        x = F.relu(x)
        x = F.max_pool2d(x, kernel_size=2)
        x = self.conv2(x)
        x = F.relu(x)
        x = F.max_pool2d(x, kernel_size=2)
        x = x.view(-1, self.n_feature*4*4)
        x = self.fc1(x)
        x = F.relu(x)
        x = self.fc2(x)
        x = F.log_softmax(x, dim=1)
        return x
(3)定义训练和测试函数
# 训练函数
def train(model):
    model.train()
    # 主里从train_loader里,64个样本一个batch为单位提取样本进行训练
    for batch_idx, (data, target) in enumerate(train_loader):
        # 把数据送到GPU中
        data, target = data.to(device), target.to(device)
        #把梯度置零,也就是把loss关于weight的导数变成0
        optimizer.zero_grad()
        #前向传播求出预测的值
        output = model(data)
        #损失函数
        loss = F.nll_loss(output, target)
        #误差反向传播, 计算参数更新值
        loss.backward()
        #将参数更新值施加到 net 的 parameters 上
        optimizer.step()
        if batch_idx % 100 == 0:
            print('Train: [{}/{} ({:.0f}%)]\tLoss: {:.6f}'.format(
                batch_idx * len(data), len(train_loader.dataset),
                100. * batch_idx / len(train_loader), loss.item()))


def test(model):
    model.eval()
    test_loss = 0
    correct = 0
    for data, target in test_loader:
        # 把数据送到GPU中
        data, target = data.to(device), target.to(device)
        # 把数据送入模型,得到预测结果
        output = model(data)
        # 计算本次batch的损失,并加到 test_loss 中
        test_loss += F.nll_loss(output, target, reduction='sum').item()
        # get the index of the max log-probability,最后一层输出10个数,
        # 值最大的那个即对应着分类结果,然后把分类结果保存在 pred 里
        pred = output.data.max(1, keepdim=True)[1]
        # 将 pred 与 target 相比,得到正确预测结果的数量,并加到 correct 中
        # 这里需要注意一下 view_as ,意思是把 target 变成维度和 pred 一样的意思
        correct += pred.eq(target.data.view_as(pred)).cpu().sum().item()

    test_loss /= len(test_loader.dataset)
    accuracy = 100. * correct / len(test_loader.dataset)
    print('\nTest set: Average loss: {:.4f}, Accuracy: {}/{} ({:.0f}%)\n'.format(
        test_loss, correct, len(test_loader.dataset),
        accuracy))
(4)在小型全连接网络上训练(Fully-connected network)
n_hidden = 8 # number of hidden units

model_fnn = FC2Layer(input_size, n_hidden, output_size)
model_fnn.to(device)
#随机梯度下降
optimizer = optim.SGD(model_fnn.parameters(), lr=0.01, momentum=0.5)
print('Number of parameters: {}'.format(get_n_params(model_fnn)))

train(model_fnn)
test(model_fnn)
Number of parameters: 6442
Train: [0/60000 (0%)] Loss: 2.361910
Train: [6400/60000 (11%)] Loss: 1.670959
Train: [12800/60000 (21%)] Loss: 1.009040
Train: [19200/60000 (32%)] Loss: 0.723094
Train: [25600/60000 (43%)] Loss: 0.664030
Train: [32000/60000 (53%)] Loss: 0.719703
Train: [38400/60000 (64%)] Loss: 0.480824
Train: [44800/60000 (75%)] Loss: 0.601254
Train: [51200/60000 (85%)] Loss: 0.431859
Train: [57600/60000 (96%)] Loss: 0.574840
Test set: Average loss: 0.4452, Accuracy: 8743/10000 (87%)
(5)在卷积神经网络上训练
需要注意的是,在定义的CNN和全连接网络,拥有相同数量的模型参数
# Training settings
n_features = 6 # number of feature maps

model_cnn = CNN(input_size, n_features, output_size)
model_cnn.to(device)
optimizer = optim.SGD(model_cnn.parameters(), lr=0.01, momentum=0.5)
print('Number of parameters: {}'.format(get_n_params(model_cnn)))

train(model_cnn)
test(model_cnn)
Number of parameters: 6422
Train: [0/60000 (0%)] Loss: 2.311527
Train: [6400/60000 (11%)] Loss: 1.724726
Train: [12800/60000 (21%)] Loss: 0.314967
Train: [19200/60000 (32%)] Loss: 0.317637
Train: [25600/60000 (43%)] Loss: 0.473964
Train: [32000/60000 (53%)] Loss: 0.223107
Train: [38400/60000 (64%)] Loss: 0.274975
Train: [44800/60000 (75%)] Loss: 0.308884
Train: [51200/60000 (85%)] Loss: 0.193655
Train: [57600/60000 (96%)] Loss: 0.099048
Test set: Average loss: 0.1784, Accuracy: 9409/10000 (94%)
通过上面的测试结果,可以发现含有相同参数的 CNN 效果要明显优于简单的全连接网络,是因为 CNN 能够更好的挖掘图像中的信息,主要通过两个手段:卷积Locality and stationarity in images 和 池化Builds in some translation invariance。
(6) 打乱像素顺序再次在两个网络上训练与测试
考虑到CNN在卷积与池化上的优良特性,如果我们把图像中的像素打乱顺序,这样 卷积 和 池化 就难以发挥作用了,为了验证这个想法,我们把图像中的像素打乱顺序再试试。
首先下面代码展示随机打乱像素顺序后,图像的形态:
#torch.randperm 函数,给定参数n,返回一个从0到n-1的随机整数排列
perm = torch.randperm(784)
plt.figure(figsize=(8, 4))
for i in range(10):
    image, _ = train_loader.dataset.__getitem__(i)
    # permute pixels
    image_perm = image.view(-1, 28*28).clone()
    image_perm = image_perm[:, perm]
    image_perm = image_perm.view(-1, 1, 28, 28)
    plt.subplot(4, 5, i + 1)
    plt.imshow(image.squeeze().numpy(), 'gray')
    plt.axis('off')
    plt.subplot(4, 5, i + 11)
    plt.imshow(image_perm.squeeze().numpy(), 'gray')
    plt.axis('off')

重新定义训练与测试函数, 我们写了两个函数 train_perm 和 test_perm,分别对应着加入像素打乱顺序的训练函数与测试函数。
与之前的训练与测试函数基本上完全相同,只是对 data 加入了打乱顺序操作。
# 对每个 batch 里的数据,打乱像素顺序的函数
def perm_pixel(data, perm):
    # 转化为二维矩阵
    data_new = data.view(-1, 28*28)
    # 打乱像素顺序
    data_new = data_new[:, perm]
    # 恢复为原来4维的 tensor
    data_new = data_new.view(-1, 1, 28, 28)
    return data_new

# 训练函数
def train_perm(model, perm):
    model.train()
    for batch_idx, (data, target) in enumerate(train_loader):
        data, target = data.to(device), target.to(device)
        # 像素打乱顺序
        data = perm_pixel(data, perm)

        optimizer.zero_grad()
        output = model(data)
        loss = F.nll_loss(output, target)
        loss.backward()
        optimizer.step()
        if batch_idx % 100 == 0:
            print('Train: [{}/{} ({:.0f}%)]\tLoss: {:.6f}'.format(
                batch_idx * len(data), len(train_loader.dataset),
                100. * batch_idx / len(train_loader), loss.item()))

# 测试函数
def test_perm(model, perm):
    model.eval()
    test_loss = 0
    correct = 0
    for data, target in test_loader:
        data, target = data.to(device), target.to(device)

        # 像素打乱顺序
        data = perm_pixel(data, perm)

        output = model(data)
        test_loss += F.nll_loss(output, target, reduction='sum').item()
        pred = output.data.max(1, keepdim=True)[1]
        correct += pred.eq(target.data.view_as(pred)).cpu().sum().item()

    test_loss /= len(test_loader.dataset)
    accuracy = 100. * correct / len(test_loader.dataset)
    print('\nTest set: Average loss: {:.4f}, Accuracy: {}/{} ({:.0f}%)\n'.format(
        test_loss, correct, len(test_loader.dataset),
        accuracy))
在全连接网络上训练与测试:
perm = torch.randperm(784)
n_hidden = 8 # number of hidden units

model_fnn = FC2Layer(input_size, n_hidden, output_size)
model_fnn.to(device)
optimizer = optim.SGD(model_fnn.parameters(), lr=0.01, momentum=0.5)
print('Number of parameters: {}'.format(get_n_params(model_fnn)))

train_perm(model_fnn, perm)
test_perm(model_fnn, perm)
Number of parameters: 6442
Train: [0/60000 (0%)] Loss: 2.320112
Train: [6400/60000 (11%)] Loss: 2.094979
Train: [12800/60000 (21%)] Loss: 1.561303
Train: [19200/60000 (32%)] Loss: 0.955282
Train: [25600/60000 (43%)] Loss: 0.701542
Train: [32000/60000 (53%)] Loss: 0.785813
Train: [38400/60000 (64%)] Loss: 0.463977
Train: [44800/60000 (75%)] Loss: 0.481896
Train: [51200/60000 (85%)] Loss: 0.342905
Train: [57600/60000 (96%)] Loss: 0.194269
Test set: Average loss: 0.4399, Accuracy: 8724/10000 (87%)
在卷积神经网络上训练与测试:
perm = torch.randperm(784)
n_features = 6 # number of feature maps

model_cnn = CNN(input_size, n_features, output_size)
model_cnn.to(device)
optimizer = optim.SGD(model_cnn.parameters(), lr=0.01, momentum=0.5)
print('Number of parameters: {}'.format(get_n_params(model_cnn)))

train_perm(model_cnn, perm)
test_perm(model_cnn, perm)
Number of parameters: 6422
Train: [0/60000 (0%)] Loss: 2.295205
Train: [6400/60000 (11%)] Loss: 2.271478
Train: [12800/60000 (21%)] Loss: 2.197363
Train: [19200/60000 (32%)] Loss: 1.960880
Train: [25600/60000 (43%)] Loss: 1.488041
Train: [32000/60000 (53%)] Loss: 1.182666
Train: [38400/60000 (64%)] Loss: 0.871932
Train: [44800/60000 (75%)] Loss: 0.877621
Train: [51200/60000 (85%)] Loss: 0.646875
Train: [57600/60000 (96%)] Loss: 0.668140
Test set: Average loss: 0.6216, Accuracy: 7989/10000 (80%)
从打乱像素顺序的实验结果来看,全连接网络的性能基本上没有发生变化,但是 卷积神经网络的性能明显下降。
这是因为对于卷积神经网络,会利用像素的局部关系,但是打乱顺序以后,这些像素间的关系将无法得到利用。
2.CIFAR10 数据集分类:使用 CNN 对 CIFAR10 数据集进行分类
对于视觉数据,PyTorch 创建了一个叫做 totchvision 的包,该包含有支持加载类似Imagenet,CIFAR10,MNIST 等公共数据集的数据加载模块 torchvision.datasets 和支持加载图像数据数据转换模块 torch.utils.data.DataLoader。
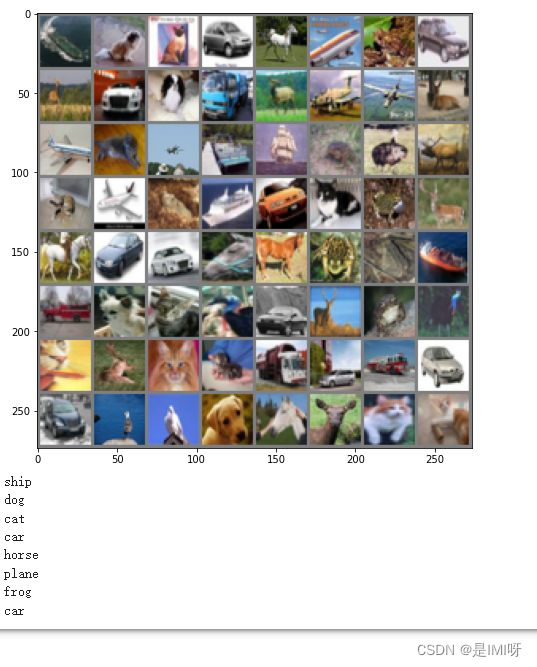
下面将使用CIFAR10数据集,它包含十个类别:‘airplane’, ‘automobile’, ‘bird’, ‘cat’, ‘deer’, ‘dog’, ‘frog’, ‘horse’, ‘ship’, ‘truck’。CIFAR-10 中的图像尺寸为3x32x32,也就是RGB的3层颜色通道,每层通道内的尺寸为32*32。
首先,加载并归一化 CIFAR10 使用 torchvision 。torchvision 数据集的输出是范围在[0,1]之间的 PILImage,我们将他们转换成归一化范围为[-1,1]之间的张量 Tensors。、PyTorch源码中这样表现变化:
input[channel] = (input[channel] - mean[channel]) / std[channel]
这样就是:((0,1)-0.5)/0.5=(-1,1)。
import torch
import torchvision
import torchvision.transforms as transforms
import matplotlib.pyplot as plt
import numpy as np
import torch.nn as nn
import torch.nn.functional as F
import torch.optim as optim

# 使用GPU训练,可以在菜单 "代码执行工具" -> "更改运行时类型" 里进行设置
device = torch.device("cuda:0" if torch.cuda.is_available() else "cpu")

#torchvision.transforms是pytorch中的图像预处理包。一般用Compose把多个步骤整合到一起
#ToTensor()将shape为(H, W, C)的nump.ndarray或img转为shape为(C, H, W)的tensor,其将每一个数值归一化到[0,1]
#ToTensor()能够把灰度范围从0-255变换到0-1之间,而后面的transform.Normalize()则把0-1变换到(-1,1).
transform = transforms.Compose(
    [transforms.ToTensor(),
     transforms.Normalize((0.5, 0.5, 0.5), (0.5, 0.5, 0.5))])

# 注意下面代码中:训练的 shuffle 是 True,测试的 shuffle 是 false
# 训练时可以打乱顺序增加多样性,测试是没有必要
trainset = torchvision.datasets.CIFAR10(root='./data', train=True,
                                        download=True, transform=transform)
trainloader = torch.utils.data.DataLoader(trainset, batch_size=64,
                                          shuffle=True, num_workers=2)

testset = torchvision.datasets.CIFAR10(root='./data', train=False,
                                       download=True, transform=transform)
testloader = torch.utils.data.DataLoader(testset, batch_size=8,
                                         shuffle=False, num_workers=2)

classes = ('plane', 'car', 'bird', 'cat',
           'deer', 'dog', 'frog', 'horse', 'ship', 'truck')
def imshow(img):
    plt.figure(figsize=(8,8))
    img = img / 2 + 0.5     # 转换到 [0,1] 之间
    npimg = img.numpy()
    plt.imshow(np.transpose(npimg, (1, 2, 0)))
    plt.show()

# 得到一组图像
images, labels = iter(trainloader).next()
# 展示图像
imshow(torchvision.utils.make_grid(images))
# 展示第一行图像的标签
for j in range(8):
    print(classes[labels[j]])
class Net(nn.Module):
    def __init__(self):
        super(Net, self).__init__()
        self.conv1 = nn.Conv2d(3, 6, 5)
        self.pool = nn.MaxPool2d(2, 2)
        self.conv2 = nn.Conv2d(6, 16, 5)
        self.fc1 = nn.Linear(16 * 5 * 5, 120)
        self.fc2 = nn.Linear(120, 84)
        self.fc3 = nn.Linear(84, 10)

    def forward(self, x):
        x = self.pool(F.relu(self.conv1(x)))
        x = self.pool(F.relu(self.conv2(x)))
        x = x.view(-1, 16 * 5 * 5)
        x = F.relu(self.fc1(x))
        x = F.relu(self.fc2(x))
        x = self.fc3(x)
        return x

# 网络放到GPU上
net = Net().to(device)
#交叉熵损失
criterion = nn.CrossEntropyLoss()
#优化算法
optimizer = optim.Adam(net.parameters(), lr=0.001)
for epoch in range(10):  # 重复多轮训练
    for i, (inputs, labels) in enumerate(trainloader):
        inputs = inputs.to(device)
        labels = labels.to(device)
        # 优化器梯度归零
        optimizer.zero_grad()
        # 正向传播 + 反向传播 + 优化
        outputs = net(inputs)
        loss = criterion(outputs, labels)
        loss.backward()
        optimizer.step()
        # 输出统计信息
        if i % 100 == 0:
            print('Epoch: %d Minibatch: %5d loss: %.3f' %(epoch + 1, i + 1, loss.item()))

print('Finished Training')
# 得到一组图像
images, labels = iter(testloader).next()
# 展示图像
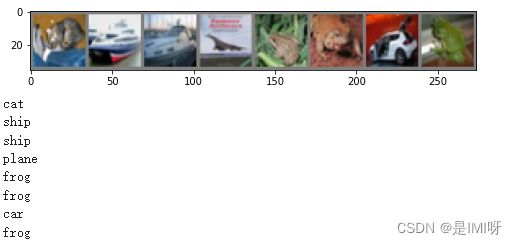
imshow(torchvision.utils.make_grid(images))
# 展示图像的标签
for j in range(8):
    print(classes[labels[j]])
outputs = net(images.to(device))
_, predicted = torch.max(outputs, 1)

# 展示预测的结果
for j in range(8):
    print(classes[predicted[j]])
cat
ship
car
plane
deer
frog
cat
frog
可以看到3ship-car、5frog-deer、7car-cat都出现了识别错误。查看网络在整个数据集上的表现:
correct = 0
total = 0

for data in testloader:
    images, labels = data
    images, labels = images.to(device), labels.to(device)
    outputs = net(images)
    _, predicted = torch.max(outputs.data, 1)
    total += labels.size(0)
    correct += (predicted == labels).sum().item()

print('Accuracy of the network on the 10000 test images: %d %%' % (
    100 * correct / total))
Accuracy of the network on the 10000 test images: 63 %
准确率63%,通过改进网络结构,性能还可以进一步提升。在 Kaggle 的LeaderBoard上,准确率高的达到95%以上。
3.使用 VGG16 对 CIFAR10 分类
VGG是由Simonyan 和Zisserman在文献《Very Deep Convolutional Networks for Large Scale Image Recognition》中提出卷积神经网络模型,其名称来源于作者所在的牛津大学视觉几何组(Visual Geometry Group)的缩写。
该模型参加2014年的 ImageNet图像分类与定位挑战赛,取得了优异成绩:在分类任务上排名第二,在定位任务上排名第一。
VGG16的网络结构如下图所示:

16层网络的结节信息如下:
01:Convolution using 64 filters
02: Convolution using 64 filters + Max pooling
03: Convolution using 128 filters
04: Convolution using 128 filters + Max pooling
05: Convolution using 256 filters
06: Convolution using 256 filters
07: Convolution using 256 filters + Max pooling
08: Convolution using 512 filters
09: Convolution using 512 filters
10: Convolution using 512 filters + Max pooling
11: Convolution using 512 filters
12: Convolution using 512 filters
13: Convolution using 512 filters + Max pooling
14: Fully connected with 4096 nodes
15: Fully connected with 4096 nodes
16: Softmax
定义 dataloader:
transform,dataloader 和之前定义的有所不同,不同之处在于训练部分的数据集增加了数据的增强,利用随机裁剪以及随机翻转,以期待增强模型的泛化能力
import torch
import torchvision
import torchvision.transforms as transforms
import matplotlib.pyplot as plt
import numpy as np
import torch.nn as nn
import torch.nn.functional as F
import torch.optim as optim

# 使用GPU训练,可以在菜单 "代码执行工具" -> "更改运行时类型" 里进行设置
device = torch.device("cuda:0" if torch.cuda.is_available() else "cpu")

transform_train = transforms.Compose([
    transforms.RandomCrop(32, padding=4), #在一个随机的位置进行裁剪
    transforms.RandomHorizontalFlip(),  #以0.5的概率水平翻转给定的PIL图像
    transforms.ToTensor(),
    transforms.Normalize((0.4914, 0.4822, 0.4465), (0.2023, 0.1994, 0.2010))])

transform_test = transforms.Compose([
    transforms.ToTensor(),
    transforms.Normalize((0.4914, 0.4822, 0.4465), (0.2023, 0.1994, 0.2010))])

trainset = torchvision.datasets.CIFAR10(root='./data', train=True,  download=True, transform=transform_train)
testset  = torchvision.datasets.CIFAR10(root='./data', train=False, download=True, transform=transform_test)

trainloader = torch.utils.data.DataLoader(trainset, batch_size=128, shuffle=True, num_workers=2)
testloader = torch.utils.data.DataLoader(testset, batch_size=128, shuffle=False, num_workers=2)

classes = ('plane', 'car', 'bird', 'cat',
           'deer', 'dog', 'frog', 'horse', 'ship', 'truck')
VGG 网络定义:
64 conv, maxpooling,
128 conv, maxpooling,
256 conv, 256 conv, maxpooling,
512 conv, 512 conv, maxpooling,
512 conv, 512 conv, maxpooling,
softmax
class VGG(nn.Module):
    def __init__(self):
        super(VGG, self).__init__()
        self.cfg = [64, 'M', 128, 'M', 256, 256, 'M', 512, 512, 'M', 512, 512, 'M']
        self.features = self._make_layers(cfg)
        #self.features = self._make_layers(self.cfg)
        self.classifier = nn.Linear(2048, 10)
        #self.classifier = nn.Linear(512, 10)

    def forward(self, x):
        out = self.features(x)
        out = out.view(out.size(0), -1)
        out = self.classifier(out)
        return out

    def _make_layers(self, cfg):
        layers = []
        in_channels = 3
        for x in cfg:
            if x == 'M':
                layers += [nn.MaxPool2d(kernel_size=2, stride=2)]
            else:
                layers += [nn.Conv2d(in_channels, x, kernel_size=3, padding=1),
                           nn.BatchNorm2d(x),
                           nn.ReLU(inplace=True)]
                in_channels = x
        layers += [nn.AvgPool2d(kernel_size=1, stride=1)]
        return nn.Sequential(*layers)
初始化网络,根据实际需要,修改分类层。因为 tiny-imagenet 是对200类图像分类,这里把输出修改为200。
# 网络放到GPU上
net = VGG().to(device)
criterion = nn.CrossEntropyLoss()
optimizer = optim.Adam(net.parameters(), lr=0.001)
网络训练:
for epoch in range(10):  # 重复多轮训练
    for i, (inputs, labels) in enumerate(trainloader):
        inputs = inputs.to(device)
        labels = labels.to(device)
        # 优化器梯度归零
        optimizer.zero_grad()
        # 正向传播 + 反向传播 + 优化
        outputs = net(inputs)
        loss = criterion(outputs, labels)
        loss.backward()
        optimizer.step()
        # 输出统计信息
        if i % 100 == 0:
            print('Epoch: %d Minibatch: %5d loss: %.3f' %(epoch + 1, i + 1, loss.item()))

print('Finished Training')
Epoch: 1 Minibatch: 1 loss: 2.453
Epoch: 1 Minibatch: 101 loss: 1.819
Epoch: 1 Minibatch: 201 loss: 1.383
Epoch: 1 Minibatch: 301 loss: 1.208
Epoch: 2 Minibatch: 1 loss: 1.025
Epoch: 2 Minibatch: 101 loss: 0.965
Epoch: 2 Minibatch: 201 loss: 0.808
Epoch: 2 Minibatch: 301 loss: 0.728
Epoch: 3 Minibatch: 1 loss: 0.737
Epoch: 3 Minibatch: 101 loss: 0.820
Epoch: 3 Minibatch: 201 loss: 0.909
Epoch: 3 Minibatch: 301 loss: 0.711
Epoch: 4 Minibatch: 1 loss: 0.604
Epoch: 4 Minibatch: 101 loss: 0.603
Epoch: 4 Minibatch: 201 loss: 0.640
Epoch: 4 Minibatch: 301 loss: 0.740
Epoch: 5 Minibatch: 1 loss: 0.526
Epoch: 5 Minibatch: 101 loss: 0.620
Epoch: 5 Minibatch: 201 loss: 0.335
Epoch: 5 Minibatch: 301 loss: 0.620
Epoch: 6 Minibatch: 1 loss: 0.589
Epoch: 6 Minibatch: 101 loss: 0.631
Epoch: 6 Minibatch: 201 loss: 0.375
Epoch: 6 Minibatch: 301 loss: 0.489
Epoch: 7 Minibatch: 1 loss: 0.463
Epoch: 7 Minibatch: 101 loss: 0.352
Epoch: 7 Minibatch: 201 loss: 0.376
Epoch: 7 Minibatch: 301 loss: 0.299
Epoch: 8 Minibatch: 1 loss: 0.423
Epoch: 8 Minibatch: 101 loss: 0.281
Epoch: 8 Minibatch: 201 loss: 0.380
Epoch: 8 Minibatch: 301 loss: 0.399
Epoch: 9 Minibatch: 1 loss: 0.271
Epoch: 9 Minibatch: 101 loss: 0.331
Epoch: 9 Minibatch: 201 loss: 0.281
Epoch: 9 Minibatch: 301 loss: 0.401
Epoch: 10 Minibatch: 1 loss: 0.264
Epoch: 10 Minibatch: 101 loss: 0.330
Epoch: 10 Minibatch: 201 loss: 0.343
Epoch: 10 Minibatch: 301 loss: 0.388
Finished Training
测试验证准确率:
correct = 0
total = 0

for data in testloader:
    images, labels = data
    images, labels = images.to(device), labels.to(device)
    outputs = net(images)
    _, predicted = torch.max(outputs.data, 1)
    total += labels.size(0)
    correct += (predicted == labels).sum().item()

print('Accuracy of the network on the 10000 test images: %.2f %%' % (
    100 * correct / total))
Accuracy of the network on the 10000 test images: 84.92 %
可以看到,使用一个简化版的 VGG 网络,就能够显著地将准确率由 63%提升到 84.92%。
(三)问题简答
1.dataloader 里面 shuffle 取不同值有什么区别?
pytorch里的dataloader是数据迭代器,参数shuffle(bool, optional)表示 在每个epoch开始的时候,对数据进行重新排序。True则乱序取数据,false则固定顺序取数据。
2、transform 里,取了不同值,这个有什么区别?
transforms在计算机视觉工具包torchvision下,torchvision.transforms是常用的图像预处理方法,可以提高泛化能力,transforms包含二十二个方法。 torchvision.datasets是常用数据集的dataset实现,MNIST,CIFAR-10,ImageNet等。torchvision.model是常用的模型预训练,有AlexNet,VGG, ResNet,GoogLeNet等。
3、epoch 和 batch 的区别?
Batch大小是在更新模型之前处理的多个样本。Epoch数是通过训练数据集的完整传递次数。批处理的大小必须大于或等于1且小于或等于训练数据集中的样本数。可以将epoch设置为1和无穷大之间的整数值。
eg.假设有一个包含200个样本(数据行)的数据集,并且选择的Batch大小为5和1,000个Epoch。这意味着数据集将分为40个Batch,每个Batch有5个样本。每批五个样品后,模型权重将更新。这也意味着一个epoch将涉及40个Batch或40个模型更新。有1000个Epoch,模型将暴露或传递整个数据集1,000次。在整个培训过程中,总共有40,000Batch。
4、1x1的卷积和 FC 有什么区别?主要起什么作用?
数学本质上一样,都是特征图中的元素乘以权重再求和。全连接是把特征图拆开组成一个一维向量,再乘以一个权重向量,这两个向量中的元素一一对应所以输出结果是一个值。而1 * 1卷积,我们知道卷积核实质上就是权重,1 * 1的卷积核那就是表明只由一个权重组成,如果特征图尺寸也是1 * 1的话,那输出就是一个值,此时与全连斜体样式接完全一样。但是如果特征图尺寸不是1 * 1,而是w * h的话,那么1 * 1的卷积输出就不是一个值而是w * h的一个矩阵。
用1 * 1卷积代替全连接是基于输入尺寸的考虑,全连接的输入是特征图所有元素乘以权重再求和,但是这个权重向量是在设计网络的时候就需要固定的,所以全连接没办法适应输入尺寸的变化只能固定。但是1 * 1卷积的输出与输入尺寸是一样大的,输出尺寸可以随着输入尺寸的变化而变化,所以1 * 1卷积无需固定输出尺寸。通俗来说就是卷积是权值共享,所以所学参数只跟卷积核有关,跟特征图无关。
5、residual leanring 为什么能够提升准确率?
通过实验,ResNet随着网络层不断的加深,模型的准确率先是不断的提高,达到最大值(准确率饱和),然后随着网络深度的继续增加,模型准确率毫无征兆的出现大幅度的降低。退化现象归因为深层神经网络难以实现“恒等变换(y=x)”。因此如果把网络设计为H(x) = F(x) + x,就可以转换为学习一个残差函数F(x) = H(x) - x. 只要F(x)=0,就构成了一个恒等映射H(x) = x,拟合残差肯定更加容易。
6、代码练习二里,网络和1989年 Lecun 提出的 LeNet 有什么区别?
代码练习二中使用的是最大池化和ReLU激活函数,而LeNet使用的是平均池化和sigmoid激活函数。
7、代码练习二里,卷积以后feature map 尺寸会变小,如何应用 Residual Learning?
可以设置一个1* 1的卷积调整维度。
8、有什么方法可以进一步提升准确率?
(1)通过数据正则化、Dropout、早停等方法避免过拟合
(2)调整神经网络架构
(3)选择合适的优化器和损失函数
(4)调整批大小和 epoch 次数
(5)选择合适的激活函数
(6)尝试初始化权重
