如何利用 CM 实现多视图切换
一直以来,都在大屏幕(相对于小屏的笔记本而言,21.5'')上做开发,写的东西搬到小屏幕上有点不适应。功能太密集,视图太紧凑,操作感不强。
如果针对小屏幕调整视图,那势必会影响大屏幕的体验。
Caliburn.Micro (简称CM) 有个功能:多个VIEW使用同一MODEL. 网上很少有相关文章对它进行描述,官方文档里有一小段对它进行描述,但只是一笔带过,在加上是英文的,看的似懂非懂。
上两张图,看一下效果:
一个是普通视图,一个是紧凑视图。可能你会说,没什么差别啊?是的,因为我缩小了窗口,紧凑视图是针对 1280*800的分辨率做了简单优化了的。
切换视图的时候,不需要重新加载数据,因为这两个视图用的是同一个MODEL。
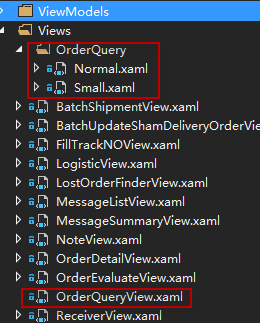
看一下视图的命名规则:
OrderQueryView -> OrderQuery 文件夹(命名空间)-> Normal, Small
原来OrderQueryView.xaml 的内容就是普通视图。现在改了:
1     <Grid>
2         <ContentControl cal:View.Model="{Binding}" cal:View.Context="{Binding Source={x:Static s:GlobalData.Instance}, Path=ViewMode, Mode=TwoWay}" />
3     </Grid>
只有这一段,其它的都挪到 Normal.xaml 和 Small.xaml 里了。至于怎么切换,都在 View.Context 上.
ViewContext 绑定到一个静态对象 的 静态属性 的 属性上。这样当这个属性的属性改变时,所有绑定在它上的视图都会跟着切换。
为了能绑定静态属性上(作用就是全局),而且还支持 INotifyPropertyChanged, 我绕了一个大圈子和很多弯路。
 1     public static class GlobalData {
 2
 3         public static CompositionContainer MefContainer = null;
 4
 5         public static T GetInstance<T>() {
 6             return MefContainer.GetExportedValue<T>();
 7         }
 8
 9         private static GlobalDataHolder instance;
10         public static GlobalDataHolder Instance {
11             get {
12                 if (instance == null)
13                     instance = new GlobalDataHolder();
14                 return instance;
15             }
16         }
17
18
19
20
21         public class GlobalDataHolder : INotifyPropertyChanged {
22
23             internal GlobalDataHolder() { }
24
25             public event PropertyChangedEventHandler PropertyChanged;
26             public void NotifyPropertyChanged(string propertyName) {
27                 if (PropertyChanged != null) {
28                     PropertyChanged(this, new PropertyChangedEventArgs(propertyName));
29                 }
30             }
31
32             private ViewModes viewMode;
33             public ViewModes ViewMode {
34                 get {
35                     return this.viewMode;
36                 }
37                 set {
38                     if (this.viewMode != value) {
39                         this.viewMode = value;
40                         this.NotifyPropertyChanged("ViewMode");
41                     }
42                 }
43             }
44         }
45     }
虽然不是很美观,但是目的达到了。
来看一下 ViewModes 的定义
1     public enum ViewModes {
2         [Description("普通视图")]
3         Normal,
4         [Description("紧凑视图")]
5         Small
6     }
同样是 Normal 和 Small ,对应 Normal.xaml 和 Small.xaml
另外,有人问我,插件化开发,将 View 和 ViewMode 放到 DLL里去,提示找不到 View ,该怎么办?
我用的是 MEF,我的解决办法是在 Bootstrapper 里重写:
 1         protected override void StartRuntime() {
 2             base.StartRuntime();
 3
 4             //用 Assembly.Instance.Add 可以用于解决加载不同DLL内的View
 5             var dllFiles = Directory.GetFiles(AppDomain.CurrentDomain.BaseDirectory, "*.dll", SearchOption.AllDirectories);
 6             foreach (var dll in dllFiles) {
 7                 try {
 8                     var asm = Assembly.LoadFrom(dll);
 9                     if (asm.GetTypes().Any(t =>
10                         t.GetInterfaces().Contains(typeof(IViewAware))
11                         || t.GetInterfaces().Contains(typeof(IScreen))
12                         )) {
13                         AssemblySource.Instance.Add(asm);
14                     }
15                 } catch {
16                 }
17             }
18         }
19
20         ////主屏幕启动后才会执行这个方法,所以 AssemblySource 的操作不能放到这里
21         //protected override void OnStartup(object sender, System.Windows.StartupEventArgs e) {
22         //    base.OnStartup(sender, e);
23         //}
即扫描DLL内 IScreen 和 IViewAware 的实现,将相关的 Assembly 加入到 AssemblySource 内,这样就不用强引用了!


