Jar包加密,防止反编译
Jar包加密,防止反编译方法
- XJar加密工具
-
- XJar功能特性
- 使用方法(手动执行方式)
- 使用方法(Maven插件方式)
- exe4j加密工具
-
- 使用方法
- jvmti加密工具
-
- 使用方法
- 参考
XJar加密工具
XJar功能特性
- 基于对JAR包内资源的加密以及拓展ClassLoader来构建的一套程序加密启动,动态解密运行的方案,避免源码泄露以及反编译。
- 支持Maven插件
- 加密过程需要Go环境;加密后生成Go启动器,保护密码不泄露
- GitHub: https://github.com/core-lib/xjar
使用方法(手动执行方式)
- 添加Maven依赖
<repositories>
    <repository>
        <id>jitpack.ioid>
        <url>https://jitpack.iourl>
    repository>
repositories>


<dependencies>
	<dependency>
        <groupId>com.github.core-libgroupId>
        <artifactId>xjarartifactId>
        <version>4.0.0version>
    dependency>
dependencies>
- 对jar包进行加密的代码
XCryptos.encryption()
        .from("D:/jars/original.jar")
        .use("1@3$qWeR")
        .include("/io/xjar/**/*.class")
        .include("/mapper/**/*Mapper.xml")
        .exclude("/static/**/*")
        .exclude("/conf/*")
        .to("D:/files/encrypted.jar");
- 方法说明
| 方法 | 参数 | 说明 |
|---|---|---|
| from | (String jar) | 指定待加密jar包路径 |
| from | (File jar) | 指定待加密jar包路径 |
| use | (String password) | 设置加密密码 |
| use | (String algorithm, int keysize, int ivsize, String password) | 设置加密算法及加密密码 |
| include | (String ant) | 指定要加密的资源相对于classpath的ANT路径表达式 |
| include | (Pattern regex) | 指定要加密的资源相对于classpath的正则路径表达式 |
| exclude | (String ant) | 指定不加密的资源相对于classpath的ANT路径表达式 |
| exclude | (Pattern regex) | 指定不加密的资源相对于classpath的正则路径表达式 |
| to | (String xJar) | 指定加密后jar包输出路径,并执行加密 |
| to | (File xJar) | 指定加密后jar包输出路径,并执行加密 |
- algorithm: JDK内置加密算法,如:AES/CBC/PKCS5Padding(缺省值)和DES/CBC/PKCS5Padding
- keysize: 密钥长度,如:56、128(缺省值)、256
- ivsize: 密钥向量长度,如:128(缺省值)
- 用Go进行编译,生成Go启动器
go build xjar.go
- 第2步执行成功之后,在指定目录下会输出加密的jar包以及一个xjar.go文件
- 将 xjar.go 在不同的平台进行编译即可得到不同平台的启动器可执行文件,其中Windows下文件名为 xjar.exe 而Linux下为 xjar
- 用于编译的机器需要安装 Go 环境,用于运行的机器则可不必安装 Go 环境
- 由于启动器自带JAR包防篡改校验,故启动器无法通用,即便密码相同也不行
- 启动运行
xjar java -jar /path/to/encrypted.jar
- 在 Java 启动命令前加上编译好的Go启动器可执行文件名(xjar)即可启动运行加密后的JAR包
- 仅支持通过 -jar 方式启动,不支持-cp或-classpath的方式
使用方法(Maven插件方式)
Maven项目可通过集成 xjar-maven-plugin 以免去每次加密都要执行一次上述的代码,随着Maven构建自动生成加密后的JAR和Go启动器源码文件。
- 添加 xjar-maven-plugin
<project>

    <pluginRepositories>
        <pluginRepository>
            <id>jitpack.ioid>
            <url>https://jitpack.iourl>
        pluginRepository>
    pluginRepositories>

    <build>
        <plugins>
            <plugin>
                <groupId>com.github.core-libgroupId>
                <artifactId>xjar-maven-pluginartifactId>
                <version>4.0.0version>
                <executions>
                    <execution>
                        <goals>
                            <goal>buildgoal>
                        goals>
                        <phase>packagephase>

                        <configuration>

                            <password>io.xjarpassword>

                        configuration>
                    execution>
                executions>
            plugin>
        plugins>
    build>
project>
对于Spring Boot 项目或模块, 该插件要后于 spring-boot-maven-plugin 插件执行, 有两种方式
- 将插件放置于 spring-boot-maven-plugin 的后面, 因为其插件的默认 phase 也是 package
- 将插件的 phase 设置为 install(默认值为:package), 打包命令采用 mvn clean install
也可以通过Maven命令执行
mvn xjar:build -Dxjar.password=io.xjar
mvn xjar:build -Dxjar.password=io.xjar -Dxjar.targetDir=outputDir/encrypted.jar
但通常情况下是让XJar插件绑定到指定的phase中自动执行,这样就能在项目构建的时候自动构建出加密的包
mvn clean package -Dxjar.password=io.xjar
mvn clean install -Dxjar.password=io.xjar -Dxjar.targetDir=/directory/to/save/target.xjar
强烈建议
不要在 pom.xml 的 xjar-maven-plugin 配置中写上密码,这样会导致打包出来的 xjar 包中的 pom.xml 文件保留着密码,极其容易暴露密码!强烈推荐通过 mvn 命令来指定加密密钥!
exe4j加密工具
使用方法
-
下载exe4j工具并安装
官网下载地址:https://exe4j.apponic.com/ -
安装完成后打开软件,填写Name, Company 和 Licence key. Name 和 Company 随便填,Licence key 网上搜一个即可,如 A-XVK258563F-1p4lv7mg7sav

-
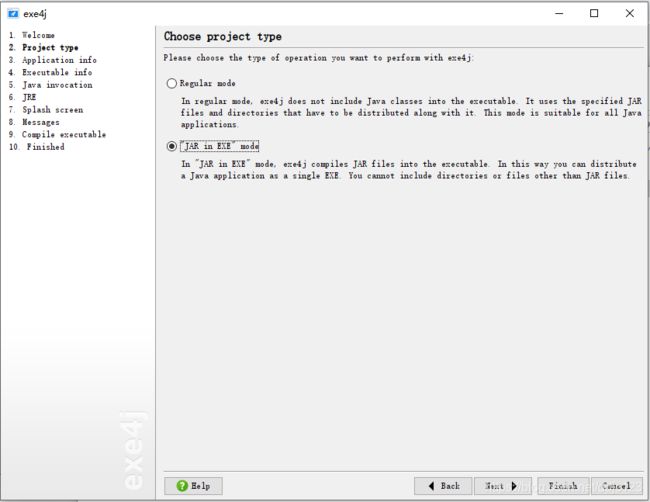
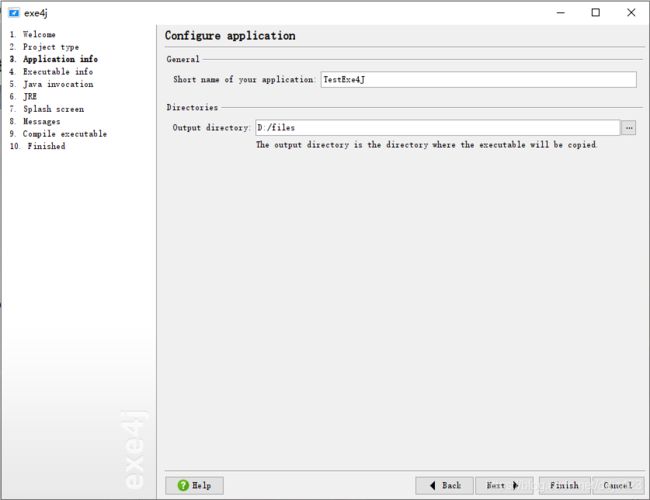
点击 Next, 进行exe程序配置;如需要兼容64位操作系统,需点击 “Advanced Options”, 选择 “32-bit or 64-bit”, 进入设置页面,勾选 “Generate 64-bit executable” 选项

-
点击 Next, 进入 “Java invocation” 页面;点击右侧 “+” 图标,添加项目jar包以及所有依赖jar包;添加后点击下方 “…” 图标选择程序启动的 Main class;并输入启动参数(如需要)

-
点击 Next, 填写JRE版本;点击 “Advanced Options”, 选择 “Search sequence”, 点击右侧 “+” 图标,添加本地java安装路径下的jre路径;添加后把jre路径移到第一项(或者把默认的三项删掉)


-
保存 & 完成
jvmti加密工具
采用jvmti方式对Class文件进行加密,使用C++生成加密和解密库,先用加密库对Jar包进行加密,将加密后的Jar包及解密库文件发布出去,执行时候需要JVM引入解密库文件,解密后执行
使用方法
- 下载加密程序压缩包:JarEncrypt2
解压后目录及文件如下:
./JarEncrypt2/encrypt   ## 加密库
—– encrypt.cpp
—– Makefile

./JarEncrypt2/decrypt    ## 解密库
—–decrypt.cpp
—– Makefile

./JarEncrypt2/Encrypt.java   ## Java加密执行文件
- 修改 encrypt 和 decrypt 下的Makefile文件,修改其中的 "INCLUDEDIR"为实际jdk路径
INCLUDEDIR = -I /home/jdk1.8/include -I /home/jdk1.8/include/linux
- 根据需要加密的代码,修改 Encrypt.java 和 decrypt.cpp 文件
// Encrypt.java
// 只对特定类型和package下的文件加密
if (name.endsWith(".class") && name.startsWith("com/du/")) {
// decrypt.cpp
// 设置需要解密的package
if (name && strncmp(name, "com/du/", 7) == 0) {
- 分别进入 encrypt 和 decrypt 目录,执行 make,生成 libencrypt.so 和 liblinux.so 库文件
- 编译并运行Encrypt.java;生成 test_encrypt.jar 文件
javac Encrypt.java
java -Djava.library.path=./encrypt/ -cp . Encrypt -src test.jar
- 生成的加密jar包无法直接运行和反编译,直接运行会出现ClassFormatError,用jd-gui工具反编译会显示 // INTERNAL ERROR //
Error: A JNI error has occurred, please check your installation and try again
Exception in thread "main" java.lang.ClassFormatError: Incompatible magic value 3455696313 in class file
- 使用解密库文件 liblinux.so 解密运行
export LD_LIBRARY_PATH=${LD_LIBRARY_PATH}:/home/JarEncrypt2/decrypt
java -agentlib:linux -jar test_encrypt.jar
- 完成;发布的时候需要把 test_encrypt.jar 和 liblinux.so 一起发布,启动时按上一步操作
参考
- XJar: Spring-Boot JAR 包加密运行工具,避免源码泄露以及反编译
- java:编写jar包加密工具,防止反编译
- Java加密Jar包和Class文件-防止反编译


