Elasticsearch+Logstash+Kibana日志采集服务搭建并简单整合应用
ELK简介
ELK是Elasticsearch+Logstash+Kibana的简称
Elasticsearch 是一个分布式的搜索和分析引擎,可以用于全文检索、结构化检索和分析,并能将这三者结合起来。Elasticsearch 基于 Lucene 开发,现在是使用最广的开源搜索引擎之一。
Logstash 简单来说就是一根具备实时数据传输能力的管道,负责将数据信息从管道的输入端传输到管道的输出端,与此同时这根管道还可以让你根据自己的需求在中间加上滤网,Logstash提供了很多功能强大的滤网以满足你的各种应用场景。
Kibana 是一个开源的分析与可视化平台,设计出来用于和Elasticsearch一起使用的。你可以用kibana搜索、查看、交互存放在Elasticsearch索引里的数据,使用各种不同的图标、表格、地图等,kibana能够很轻易的展示高级数据分析与可视化。
软件版本
- CentOS-7-x86_64
- JAVA8
- elasticsearch-7.7.0-x86_64
- logstash-7.7.0
- kibana-7.7.0-x86_64
准备工作
关闭安全策略
这个一定要关闭 关闭 关闭,重要的事说三遍,至于为什么不知道,反正不关闭我没有安装成功。。。。。
查看Selinux状态
[root@lijl ~]# sestatus
SELinux status:                 enabled
SELinuxfs mount:                /sys/fs/selinux
SELinux root directory:         /etc/selinux
Loaded policy name:             targeted
Current mode:                   enforcing
Mode from config file:          enforcing
Policy MLS status:              enabled
Policy deny_unknown status:     allowed
Max kernel policy version:      28
关闭Selinux
这个很简单就是将config文件中的SELinux对应的值修改成disabled,保存重启。
[root@lijl etc]# cd /etc/selinux/
[root@lijl selinux]# vim config


# This file controls the state of SELinux on the system.
# SELINUX= can take one of these three values:
#     enforcing - SELinux security policy is enforced.
#     permissive - SELinux prints warnings instead of enforcing.
#     disabled - No SELinux policy is loaded.
SELINUX=disabled
# SELINUXTYPE= can take one of three two values:
#     targeted - Targeted processes are protected,
#     minimum - Modification of targeted policy. Only selected processes are protected.
#     mls - Multi Level Security protection.
SELINUXTYPE=targeted
下载ELK的RPM安装包
wget若下载不下来,可复制链接通过迅雷之类的下载器下载,反正我通过wget是下载不下来
https://artifacts.elastic.co/downloads/elasticsearch/elasticsearch-7.7.0-x86_64.rpm
https://artifacts.elastic.co/downloads/kibana/kibana-7.7.0-x86_64.rpm
https://artifacts.elastic.co/downloads/logstash/logstash-7.7.0.rpm
下载好后可建一个文件夹将这个三个安装包放在一起,方便后面查找安装
安装Elasticsearch
安装
[root@lijl elk]# rpm --install elasticsearch-7.7.0-x86_64.rpm
出现下面这些说明安装成功
warning: elasticsearch-7.7.0-x86_64.rpm: Header V4 RSA/SHA512 Signature, key ID d88e42b4: NOKEY
Creating elasticsearch group... OK
Creating elasticsearch user... OK
### NOT starting on installation, please execute the following statements to configure elasticsearch service to start automatically using systemd
 sudo systemctl daemon-reload
 sudo systemctl enable elasticsearch.service
### You can start elasticsearch service by executing
 sudo systemctl start elasticsearch.service
future versions of Elasticsearch will require Java 11; your Java version from [/var/jdk1.8.0_281/jre] does not meet this requirement
Created elasticsearch keystore in /etc/elasticsearch/elasticsearch.keystore
启动
跟着安装日志中的提示一顿撸进行了
设置开启启动
[root@lijl elk]# systemctl daemon-reload
[root@lijl elk]# systemctl enable elasticsearch
启动Elasticsearch
[root@lijl elk]# systemctl start elasticsearch
查看Elasticsearch运行状态
[root@lijl elk]# systemctl status elasticsearch

查看Elasticsearch的配置文件
[root@lijl elk]# rpm -qc elasticsearch
/etc/elasticsearch/elasticsearch.yml
/etc/elasticsearch/jvm.options
/etc/elasticsearch/log4j2.properties
/etc/elasticsearch/role_mapping.yml
/etc/elasticsearch/roles.yml
/etc/elasticsearch/users
/etc/elasticsearch/users_roles
/etc/init.d/elasticsearch
/etc/sysconfig/elasticsearch
/usr/lib/sysctl.d/elasticsearch.conf
/usr/lib/systemd/system/elasticsearch.service
这一步可有可无,主要针对第一次安装的,该操作可知道文件有哪些以及位置,方便后续修改
查看端口使用情况
[root@lijl elk]# netstat -nltp
Active Internet connections (only servers)
Proto Recv-Q Send-Q Local Address           Foreign Address         State       PID/Program name
tcp        0      0 0.0.0.0:111             0.0.0.0:*               LISTEN      1/systemd
tcp        0      0 192.168.122.1:53        0.0.0.0:*               LISTEN      1507/dnsmasq
tcp        0      0 0.0.0.0:22              0.0.0.0:*               LISTEN      1144/sshd
tcp        0      0 127.0.0.1:631           0.0.0.0:*               LISTEN      1141/cupsd
tcp        0      0 127.0.0.1:25            0.0.0.0:*               LISTEN      1387/master
tcp        0      0 127.0.0.1:6010          0.0.0.0:*               LISTEN      2951/sshd: root@pts
tcp        0      0 127.0.0.1:6011          0.0.0.0:*               LISTEN      3900/sshd: root@pts
tcp6       0      0 :::111                  :::*                    LISTEN      1/systemd
tcp6       0      0 127.0.0.1:9200          :::*                    LISTEN      3622/java
tcp6       0      0 ::1:9200                :::*                    LISTEN      3622/java
tcp6       0      0 127.0.0.1:9300          :::*                    LISTEN      3622/java
tcp6       0      0 ::1:9300                :::*                    LISTEN      3622/java
tcp6       0      0 :::22                   :::*                    LISTEN      1144/sshd
tcp6       0      0 ::1:631                 :::*                    LISTEN      1141/cupsd
tcp6       0      0 ::1:25                  :::*                    LISTEN      1387/master
tcp6       0      0 ::1:6010                :::*                    LISTEN      2951/sshd: root@pts
tcp6       0      0 ::1:6011                :::*                    LISTEN      3900/sshd: root@pts
为什么要查看,因为我不想关闭防火墙,通过这一步方便我知道应该开放哪些端口
开放9200和9300端口
[root@lijl elk]# firewall-cmd --permanent --add-port={9200/tcp,9300/tcp}
success
[root@lijl elk]# firewall-cmd --reload
success
[root@lijl elk]# firewall-cmd --list-all
public (active)
  target: default
  icmp-block-inversion: no
  interfaces: ens32
  sources:
  services: ssh dhcpv6-client
  ports: 9200/tcp 9300/tcp
  protocols:
  masquerade: no
  forward-ports:
  source-ports:
  icmp-blocks:
  rich rules:

[root@lijl elk]#
以上都做完后可通过CURL访问一下试试
[root@lijl selinux]# curl http://127.0.0.1:9200
{
  "name" : "lijl.com",
  "cluster_name" : "elasticsearch",
  "cluster_uuid" : "2F64hc_lRPGcX9-qGqIfWw",
  "version" : {
    "number" : "7.7.0",
    "build_flavor" : "default",
    "build_type" : "rpm",
    "build_hash" : "81a1e9eda8e6183f5237786246f6dced26a10eaf",
    "build_date" : "2020-05-12T02:01:37.602180Z",
    "build_snapshot" : false,
    "lucene_version" : "8.5.1",
    "minimum_wire_compatibility_version" : "6.8.0",
    "minimum_index_compatibility_version" : "6.0.0-beta1"
  },
  "tagline" : "You Know, for Search"
}
[root@lijl selinux]#
安装Kibana
安装
[root@lijl elk]# rpm --install kibana-7.7.0-x86_64.rpm
warning: kibana-7.7.0-x86_64.rpm: Header V4 RSA/SHA512 Signature, key ID d88e42b4: NOKEY
[root@lijl elk]#
设置开机自启动
[root@lijl elk]#
[root@lijl elk]# systemctl daemon-reload
[root@lijl elk]# systemctl enable kibana
Created symlink from /etc/systemd/system/multi-user.target.wants/kibana.service to /etc/systemd/system/kibana.service.
修改配置文件
[root@lijl elk]# rpm -qc kibana
/etc/kibana/kibana.yml
[root@lijl elk]# vim /etc/kibana/kibana.yml
配置如下,如果打开yml不想找对应的属性,可将yml中的内容清空将下面这几行Copy进去保存退出即可

server.port: 5601
server.host: "0.0.0.0"
elasticsearch.hosts: ["http://localhost:9200"]
i18n.locale: "zh-CN"
启动Kibana
[root@lijl elk]# systemctl start kibana
[root@lijl elk]#
[root@lijl elk]# systemctl status kibana

开放5601端口
如果的你防火墙已经关闭了,开放端口这步是可以忽略的
[root@lijl elk]# firewall-cmd --zone=public --permanent --add-port=5601/tcp
success
[root@lijl elk]# firewall-cmd --reload
success
[root@lijl elk]# firewall-cmd --list-all
public (active)
  target: default
  icmp-block-inversion: no
  interfaces: ens32
  sources:
  services: ssh dhcpv6-client
  ports: 9200/tcp 9300/tcp 5601/tcp
  protocols:
  masquerade: no
  forward-ports:
  source-ports:
  icmp-blocks:
  rich rules:

[root@lijl elk]#
上面的步骤都完成后,可以浏览器访问一下Kibana
安装Logstash
安装
[root@lijl elk]# rpm -ivh logstash-7.7.0.rpm
Preparing...                          ################################# [100%]
Updating / installing...
   1:logstash-1:7.7.0-1               ################################# [100%]
Using provided startup.options file: /etc/logstash/startup.options
/usr/share/logstash/vendor/bundle/jruby/2.5.0/gems/pleaserun-0.0.31/lib/pleaserun/platform/base.rb:112: warning: constant ::Fixnum is deprecated
Successfully created system startup script for Logstash
[root@lijl elk]#
设置Logstash开机自启动
[root@lijl elk]# systemctl daemon-reload
[root@lijl elk]# systemctl enable logstash
Created symlink from /etc/systemd/system/multi-user.target.wants/logstash.service to /etc/systemd/system/logstash.service.
启动Logstash
[root@lijl elk]#
[root@lijl elk]# systemctl start logstash
[root@lijl elk]#
查看运行状态
[root@lijl logstash]# systemctl status logstash.service

可以看出已经成功启动,到这里ELK大致就已经搭建完成了。接下来就结合一个简单的web程序,将运行日志收集到ELK中分析
整合SpringBoot
创建收集配置
为方便理解,我就直接再/etc/logstash/conf.d目录下创建一个logstash-springboot.conf配置文件
[root@lijl conf.d]# vim logstash-springboot.conf

input {
  tcp {
    port => 4560
    codec => json_lines
  }
}
output {
  elasticsearch {
    hosts => localhost
    index => "springboot-logstash-%{+YYYY.MM.dd}"
  }
stdout{codec => rubydebug}
}
简单解释一下配置
- port 端口默认4560,可自定义。端口再整合程序时需对应logback.xml日志配置文件里appender中的destination
- codec 数据格式 json_lines是json解析插件,有些版本的logstash需要单独安装,目前我安装的这个版本中已经有了,所有就不介绍怎么安装了,没有请自行百度安装logstash-codec-json_lines插件教程
- output 配置的是ES的基础信息与日志文件索引
- stdout 控制台打印,这个可忽略,为了掩饰先加上方便看效果
配置完成后,我们先关闭logstash服务,手动启动logstash并指定加载该配置,一定要先停掉logstash服务。。。不然就。。。。

创建一个SpringBoot项目
创建过程就不截下来了,就是一普通的SpringBoot项目,因为需要将日志推送给logstash服务所以需要加一个logstash依赖
            net.logstash.logback
            logstash-logback-encoder
            4.11
创建logback日志配置文件,配置文件与平时创建的也是一毛一样,唯一不一样的就是多加了一个LogstashTcpSocketAppender用于连接Logstash将日志推送至Logstash上
    ${APP_NAME}


            ${LOG_FILE_PATH}/${APP_NAME}-%d{yyyy-MM-dd}.log
            30


            ${FILE_LOG_PATTERN}


        192.168.78.128:4560

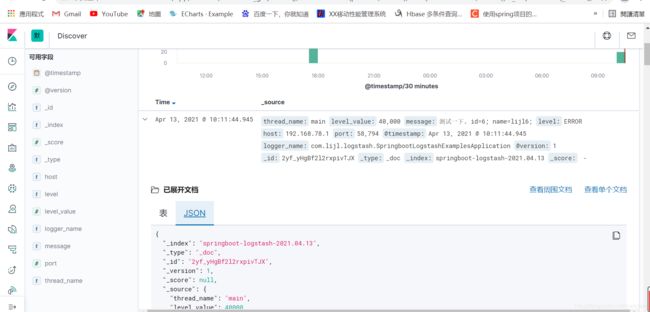
回到服务器上看下logstash控制台的打印

可以看到,已经打印出来了,并且通过json_lines插件已经数据格式化成json了,这时其实是已经可以在Kibana中看到了,回来Kibana,管理界面,创建索引


