Springboot项目使用smart-doc+Apifox 便捷生成管理接口文档
文章目录
- 1. 前言
- 2. 使用流程
- 3. 使用示例
-
- 3.1 接口代码编写
- 3.2 引入Smart-doc插件
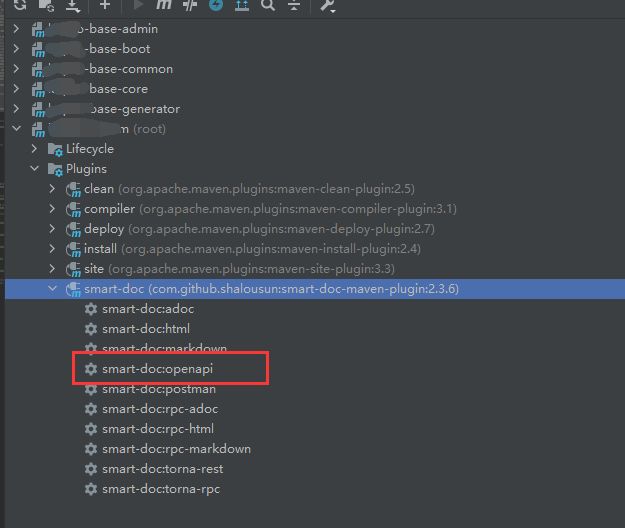
- 3.3 生成文档
- 3.4 接口导入Apifox
- 4. 总结
1. 前言
相信大家在Java开发中都用过不少接口文档工具,最常见的就是Swagger了。但它有一个不好的缺点就是,想要接口文档清晰和美观需要加入许多声明和注解,代码的侵入性很强。最近在维护一个老的项目,项目中没有用到Swagger,之前前后端的交互用的是Yapi,接口写好了,手动在Yapi上手写一遍文档,真的要吐血,于是决定寻找一款工具可以方便快捷的生成API文档。于是乎百度谷歌各类工具,以下是我尝试过的工具或者平台:

可以说市面上常用的都试过了一遍,最后选定了smart-doc+Apifox的组合!
smart-doc:https://gitee.com/smart-doc-team/smart-doc
Apifox:https://www.apifox.cn/#
PS:smart-doc推荐搭配Torna一起使用,我看了Torna确实做得不错,也是开源的,可以私有化部署用起来,一般情况也够用了,但是我想要测试用例保存功能(并且问过Torna作者不打算做这个功能),所以选择了Apifox。
2. 使用流程
- 按
smart-doc和JavaDoc的标准写好参数、方法、类等的注释(这一点深得我心,我是一个很喜欢写注释的程序员,非常鄙视一点注释都不写的猿类,代码全裸,维护和看着都贼不舒服,用了这个工具可以让项目最起码的一些注释会有。)
PS:这个注释标准就是很通常的注释标准! - 引入
smart-doc的Maven插件,生成openapi.json文件 - 在
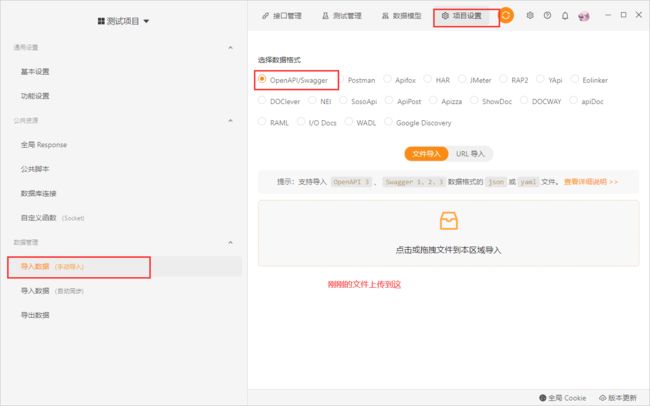
Apifox中导入openapi.json文件,生成和管理对应的接口
3. 使用示例
3.1 接口代码编写
Controller增删查改
package com.luqiao.boot.controller.auth;


/**
 * 部门相关接口
 *
 * @author Gangbb
 * @date 2022/1/16
 **/
@RestController
@RequestMapping("/auth/dept")
public class AuthDeptController extends BaseController {

    private final IAuthOrganizationService organizationService;

    public AuthDeptController(IAuthOrganizationService organizationService) {
        this.organizationService = organizationService;
    }

    /**
     * 获取组织下部门列表
     *
     * @param dto 部门列表请求 dto
     * @return ApiResult> 部门列表请求返回参数
     * @author Gangbb
     * @date 2021/10/29
     **/
    @GetMapping("/list")
    public ApiResult<PageResult<DeptListVO>> list(@Validated DeptListDTO dto) {

        return ApiResult.success(organizationService.getDeptList(dto));
    }

    /**
     * 添加部门
     *
     * @param addDeptDTO 新增部门 dto
     * @return ApiResult 操作结果
     * @author Gangbb
     * @date 2021/10/29
     **/
    @PostMapping
    public ApiResult add(@RequestBody @Validated AddDeptDTO addDeptDTO) {
        // DTO转换
        AddOrganizationDTO addOrganizationDTO = AddDeptDTO.INSTANCE.toAddOrganizationDTO(addDeptDTO);

        return toApiRes(organizationService.insertOrganization(addOrganizationDTO));
    }


    /**
     * 编辑部门
     *
     * @param updateDeptDTO
     * @return ApiResult 操作结果
     * @author Gangbb
     * @date 2021/10/29
     **/
    @PutMapping
    public ApiResult updateDept(@RequestBody @Validated UpdateDeptDTO updateDeptDTO) {
        UpdateOrgDTO updateOrgDTO = UpdateDeptDTO.INSTANCE.toUpdateOrgDTO(updateDeptDTO);

        return toApiRes(organizationService.editOrg(updateOrgDTO));
    }

    /**
     * 删除部门
     *
     * @param ids 待删除部门的id数组
     * @return ApiResult 操作结果
     * @author Gangbb
     * @date 2021/10/26
     **/
    @DeleteMapping("/{ids}")
    public ApiResult deleteDept(@NotEmpty(message = "ids不能为空") @PathVariable Long[] ids) {

        return toApiRes(organizationService.deleteOrg(ids));
    }
}
其中一个DTO(请求参数)和VO(返回参数)代码示例:
/**
 * 部门列表请求 dto
 *
 * @author Gangbb
 * @date 2022/1/19
 **/
@Data
public class DeptListDTO extends PageRequest {

    /** 组织名称 */
    private String deptName;

    /** 组织架构id*/
    @NotNull(message = "所属组织架构(公司)id organizationId 不能为空")
    private Long organizationId;

}
/**
 * 部门列表请求返回参数
 *
 * @author Gangbb
 * @date 2022/1/19
 **/
@Data
public class DeptListVO {
    /**
     * 部门id
     */
    private Long id;

    /**
     * 部门名字
     */
    private String deptName;

    /**
     * 备注
     */
    private String remark;

}
代码中的逻辑内容和未贴出的方法和类不是重点,重点看代码的注释就行!就是最基本的注释。
3.2 引入Smart-doc插件
我这里是单体多模块项目,在根pom.xml引入:
    <build>
        <plugins>

            <plugin>
                <groupId>com.github.shalousungroupId>
                <artifactId>smart-doc-maven-pluginartifactId>
                <version>2.3.6version>
                <configuration>

                    <configFile>./src/main/resources/smart-doc.jsonconfigFile>


                    <projectName>test-systemprojectName>
                configuration>
                <executions>
                    <execution>

                        <phase>compilephase>
                        <goals>

                            <goal>htmlgoal>
                        goals>
                    execution>
                executions>
            plugin>

        plugins>
    build>
在放着Controller的模块的/src/main/resources路径下编写smart-doc.json文件。

以下是我的示例配置,具体配置详解可以看官网。
{
  "serverUrl": "http://127.0.0.1:8088", //服务器地址,非必须。导出postman建议设置成http://{{server}}方便直接在postman直接设置环境变量
  "pathPrefix": "", //设置path前缀,非必须。如配置Servlet ContextPath 。@since 2.2.3
  "isStrict": false, //是否开启严格模式
  "allInOne": true,  //是否将文档合并到一个文件中,一般推荐为true
  "outPath": "src/main/resources/static/doc", //指定文档的输出路径
  "coverOld": true,  //是否覆盖旧的文件,主要用于mardown文件覆盖
  "createDebugPage": true,//@since 2.0.0 smart-doc支持创建可以测试的html页面,仅在AllInOne模式中起作用。
  "packageFilters": "com.xxx.boot.controller.auth.AuthDeptController",//controller包过滤,多个包用英文逗号隔开,2.2.2开始需要采用正则com.test.controller.*
  "md5EncryptedHtmlName": false,//只有每个controller生成一个html文件是才使用
  "style":"atelier-cave-light", //基于highlight.js的代码高设置,可选值很多可查看码云wiki,喜欢配色统一简洁的同学可以不设置
  "projectName": "test-system",//配置自己的项目名称
  "framework": "spring",//smart-doc默认支持spring和dubbo框架的文档,使用默认框架不用配置,当前支持spring、dubbo、JAX-RS(待完善)
  "skipTransientField": true,//目前未实现
  "sortByTitle":false,//接口标题排序,默认为false,@since 1.8.7版本开始
  "showAuthor":true,//是否显示接口作者名称,默认是true,不想显示可关闭
  "requestFieldToUnderline":false,//自动将驼峰入参字段在文档中转为下划线格式,//@since 1.8.7版本开始
  "responseFieldToUnderline":false,//自动将驼峰入参字段在文档中转为下划线格式,//@since 1.8.7版本开始
  "inlineEnum":true,//设置为true会将枚举详情展示到参数表中,默认关闭,//@since 1.8.8版本开始
  "recursionLimit":7,//设置允许递归执行的次数用于避免一些对象解析卡主,默认是7,正常为3次以内,//@since 1.8.8版本开始
  "allInOneDocFileName":"test-system.html",//自定义设置输出文档名称, @since 1.9.0
  "requestExample":"true",//是否将请求示例展示在文档中,默认true,@since 1.9.0
  "responseExample":"true",//是否将响应示例展示在文档中,默认为true,@since 1.9.0
  "displayActualType":true,//配置true会在注释栏自动显示泛型的真实类型短类名,@since 1.9.6
  "revisionLogs": [{ //文档变更记录,非必须
    "version": "1.0", //文档版本号
    "revisionTime": "2021-01-19 10:30", //文档修订时间
    "status": "update", //变更操作状态,一般为:创建、更新等
    "author": "Gangbb", //文档变更作者
    "remarks": "desc" //变更描述
  }],
  "requestHeaders": [
    { //设置请求头,没有需求可以不设置
      "name": "AUTH-TOKEN",//请求头名称
      "type": "string",//请求头类型
      "desc": "请求token,通过登录接口获取",//请求头描述信息
      "value":"token请求头的值",//不设置默认null
      "required": true
//      "pathPatterns": "/auth/**,/system/**",//
//      "excludePathPatterns":"/common/**"//
    }
  ],
  "responseBodyAdvice":{ //自smart-doc 1.9.8起,非必须项,ResponseBodyAdvice统一返回设置(不要随便配置根据项目的技术来配置),可用ignoreResponseBodyAdvice tag来忽略
    "className":"com.luqiao.cloud.security.luqiaointernal.core.ApiResult" //通用响应体
  }
}
3.3 生成文档
//生成html
mvn -Dfile.encoding=UTF-8 smart-doc:html
//生成markdown
mvn -Dfile.encoding=UTF-8 smart-doc:markdown
//生成adoc
mvn -Dfile.encoding=UTF-8 smart-doc:adoc
//生成postman json数据
mvn -Dfile.encoding=UTF-8 smart-doc:postman
// 生成 Open Api 3.0+,Since smart-doc-maven-plugin 1.1.5
mvn -Dfile.encoding=UTF-8 smart-doc:openapi
结果:
它自带生成的文档已经很不错了,也能支持调试,我下面再用
Apifox是为了管理所有项目的接口,接口权限等等。
3.4 接口导入Apifox
4. 总结
本文只介绍了smart-doc和Apifox最基本的使用截图,详细体验可以自己用用看,它们官网都介绍得很全面。总体来说这个组合搭配使用还是不错的。不过有一点不好就是Apifox私有化部署应该是要收费,费用怎么样还没有问过。目前Saas版是免费使用的,还有一个工具Apipost跟Apifox做得差不多,没看过,听说也不错。不贵的话,未来收费可以跟公司提,买一个版本。如果不想用了可以支持导出,到时候再导出到其他的工具也行。

最后提一句smart-doc 推荐搭配Torna也是不错的,未来Torna再发展几个版本会考虑使用。
Torna官网:http://torna.cn/


