Flutter第十四课:Image组件和Button组件
一:Flutter Image组件
Flutter中,我们可以通过Image来加载并显示图片,Image的数据源可以是asset、文件、内存以及网络。
图片组件( Image)是显示图像的组件, Image 组件有多种构造函数 :
new Image:从 ImageProvider 获取图像 。
new Image.asset:加载资源图片。
new Image.file:加载本地图片文件。
new Image.network:加 载网络图片 。
new Image.memory:加载 Uint8List 资源图片 。
当我第一次使用Image图片本地assets时候遇到如下问题:
Error on line 61, column 4: Expected a key while parsing a block mapping.
   ╷
61 │    assets:
   │    ^
╵//方式一:
//加载本地资产assets图片
return Scaffold(
body: Center(
child: Image(
image:AssetImage("assets/images/star.png"),//AssetImage的父类是AssetBundleImageProvider
//abstract class AssetBundleImageProvider extends ImageProvider 故:AssetImage是ImageProvider的实现类
width: 100,
height: 100,
),
));
//方式二:
return Scaffold(
body: Center(
child: Image.asset("assets/images/star.png",
width: 200,
height: 200,),
)); 源码的属性:
通过:new Image方式加载图片资源
const Image({
    Key? key,
    required this.image,//类型为ImageProvider 抽象类,需要自己实现获取图片数据的操作
    this.frameBuilder,
    this.loadingBuilder,
    this.errorBuilder,
    this.semanticLabel,
    this.excludeFromSemantics = false,
    this.width,//Image 显示区域的宽度和高度设置,这里需要把 Image 和图片两 个东西区分开,图片本身有大小, Image Widget 是图片的容器,本 身也有大小。 宽度和高度的配置经常和 fit 属性配合使用
    this.height,
    this.color,//图片颜色
    this.opacity,
    this.colorBlendMode,//在对图片进行手动处理的时候,可能用到图层混合,如改变图片的颜色。 此属性可以对颜色进行混合处理。 有多种模式
    this.fit,//图片填充模式
    this.alignment = Alignment.center,//控制图片的摆放位置,比如l图片放置在右下角则为 Alignment. bottom
    this.repeat = ImageRepeat.noRepeat,//此属性可以设置图片重复模式
    this.centerSlice,//当图片需要被拉伸显示时
    this.matchTextDirection = false,
    this.gaplessPlayback = false,
    this.isAntiAlias = false,
    this.filterQuality = FilterQuality.low,
  }) : assert(image != null),
       assert(alignment != null),
       assert(repeat != null),
       assert(filterQuality != null),
       assert(matchTextDirection != null),
       assert(isAntiAlias != null),
       super(key: key);
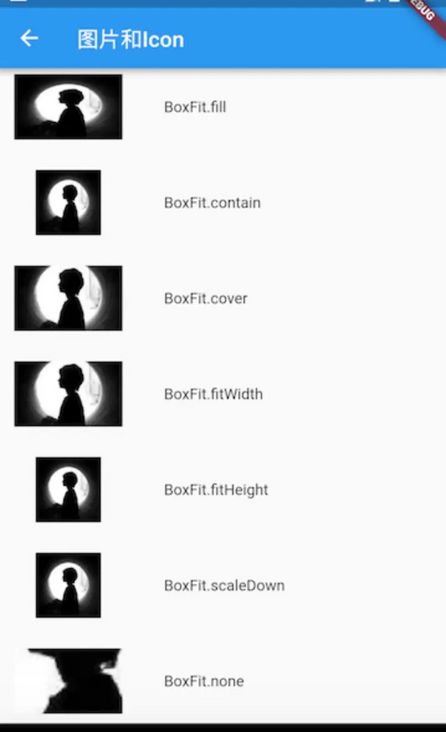
BoxFit取值及描述
| 取值 | 描述 |
|---|---|
| Boxfit.fill | 会拉伸填充满显示空间,图片本身长宽比会发生变化,图片会变形 |
| Boxfit.contain | 这是图片的默认适应规则,图片会在保证图片本身长宽比不变的情况下缩放以适应当前显示空间,图片不会变形。 |
| Boxfit.cover | 会按图片的长宽比放大后居中填满显示空间,图片不会变形,超出显示空间部分会被剪裁。 |
| BoxFit.fitWidth | 图片的宽度会缩放到显示空间的宽度,高度会按比例缩放,然后居中显示,图片不会变形,超出显示空间部分会被剪裁。 |
| BoxFit.fitHeigh | 图片的高度会缩放到显示空间的高度,宽度会按比例缩放,然后居中显示,图片不会变形,超出显示空间部分会被剪裁 |
| Boxf1t.none | 图片没有适应策略,会在显示空间内显示图片,如果图片比显示空间大,则显示空间只会显示图片中间部分。 |
| BoxFit.scaleDown | 效果和 Boxfit.contain差不多但是此属性不允许显示超过源图片大小,即可小不可大 |
ImageProvider
ImageProvider 是一个抽象类,主要定义了图片数据获取的接口 load(),从不同的数据源获取图片需要实现不同的 ImageProvider ,如 AssetImage 是实现了从 Asset 中加载图片的 ImageProvider,而 NetworkImage 实现了从网络加载图片的 ImageProvider。
从asset中加载图片
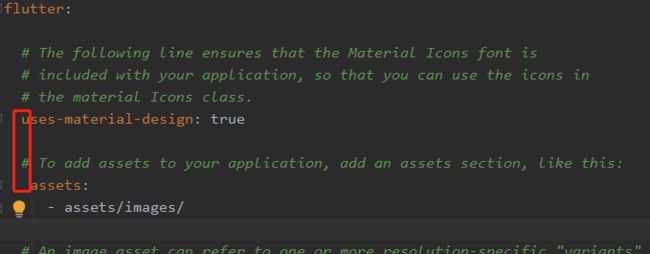
注意: 由于 yaml 文件对缩进严格,所以必须严格按照每一层两个空格的方式进行缩进,此处 assets 前面应有两个空格。
这里的配置一定要和程序中指定的路径相对应,否则会报找不到资源的错误 。 应用 里所有的静态资源都配置在这里 , 注意命名规范 。
二:Icon组件
Icon用于此类的可用图标列表(这个是不可以交互的图标)。
IconButton,用于交互式图标
  const Icon(
    this.icon, {//类别是IconData 显示的图标
    Key? key,
    this.size,//图标尺寸
    this.color,//图标颜色
    this.semanticLabel,
    this.textDirection,//用户呈现图标的文本方向
  }) : super(key: key);
Icons.abc等
child: Icon(
              Icons.abc,
          size: 24,),
IconButton
child: IconButton(
        icon: Icon(Icons.search),
        onPressed: () {
          print("点击了搜索");
        },
      ),
const IconButton({
Key? key,
this.iconSize,//图标大小
this.visualDensity,
this.padding = const EdgeInsets.all(8.0),//内边距
this.alignment = Alignment.center,//图标位置
this.splashRadius,
this.color,//颜色
this.focusColor,
this.hoverColor,
this.highlightColor,
this.splashColor,//水波纹颜色
this.disabledColor,//不可点击是高亮颜色
required this.onPressed,
this.mouseCursor,
this.focusNode,
this.autofocus = false,
this.tooltip,
this.enableFeedback = true,
this.constraints,
required this.icon,
}) : assert(padding != null),
assert(alignment != null),
assert(splashRadius == null || splashRadius > 0),
assert(autofocus != null),
assert(icon != null),
super(key: key);
三:Flutter Button按钮
在 Flutter 里有很多的 Button,包括了:MaterialButton、RaisedButton(凸起的按钮)、FloatingActionButton、FlatButton(扁平化的按钮)、IconButton(图标按钮 继承StatelessWidget)、ButtonBar、DropdownButton 等。
一般常用的 Button 是 MaterialButton、IconButton、FloatingActionButton。
const MaterialButton({
    Key? key,
    required this.onPressed,//按下事件
    this.onLongPress, //长按事件
    this.onHighlightChanged,//水波纹高亮变化回调
    this.mouseCursor,//鼠标指针的光标进入或悬停在此按钮的[InkWell]上时。
    this.textTheme,//按钮的主题
    this.textColor,//文字的颜色
    this.disabledTextColor,//按钮禁用时候文字的颜色
    this.color,//按钮的背景颜色
    this.disabledColor,//按钮禁用的背景颜色
    this.focusColor,//获取焦点的颜色
    this.hoverColor,//悬停颜色
    this.highlightColor,//点击或者toch控件高亮的时候显示在控件上面,水波纹下面的颜色
    this.splashColor,//水波纹的颜色
    this.colorBrightness,//按钮主题高亮
    this.elevation,//按钮下面的阴影
    this.focusElevation,//获取焦点的阴影
    this.hoverElevation, //悬停的阴影
    this.highlightElevation,//高亮时候的阴影
    this.disabledElevation,//未设置点击时的阴影高度
    this.padding,//内边距
    this.visualDensity,// 按钮布局的紧凑程度
    this.shape,//设置形状
    this.clipBehavior = Clip.none,
    this.focusNode,//在Flutter使用FocusNode来捕捉监听焦点获取与失去
    this.autofocus = false,
    this.materialTapTargetSize,//是配置组件点击区域大小的属性,很多组件都有
    this.animationDuration,//[shape]和[elevation]的动画更改的持续时间
    this.minWidth,//最小宽度
    this.height,//高度
    this.enableFeedback = true,// 检测到的手势是否应提供声音和/或触觉反馈。例如,在Android上
    // ,点击会产生咔哒声,启用反馈后,长按会产生短暂的振动。通常,组件默认值为true。
    this.child,//子View
  }) : assert(clipBehavior != null),
       assert(autofocus != null),
       assert(elevation == null || elevation >= 0.0),
       assert(focusElevation == null || focusElevation >= 0.0),
       assert(hoverElevation == null || hoverElevation >= 0.0),
       assert(highlightElevation == null || highlightElevation >= 0.0),
       assert(disabledElevation == null || disabledElevation >= 0.0),
       super(key: key);
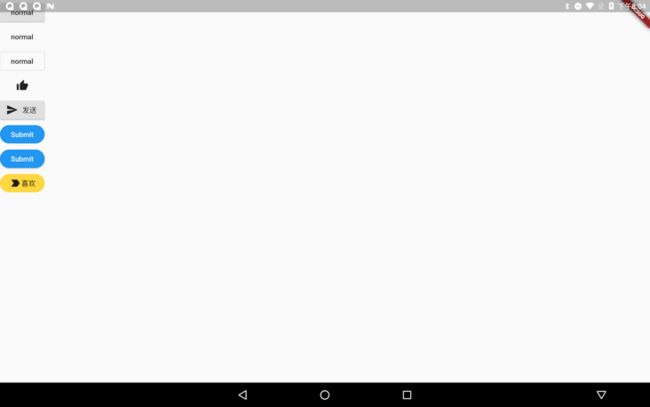
栗子:按钮的一些使用
return Scaffold(
        body: Column(children: [
      RaisedButton(
        child: Text("normal"),
        onPressed: () {},
      ),
      FlatButton(onPressed: () {}, child: Text("normal")),
      OutlineButton(
        child: Text("normal"),
        onPressed: () {},
      ),
      IconButton(
        icon: Icon(Icons.thumb_up),
        onPressed: () {},
      ),
      RaisedButton.icon(
          onPressed: () {}, icon: Icon(Icons.send), label: Text("发送")),
      FlatButton(
        color: Colors.blue,
        highlightColor: Colors.blue[700],
        colorBrightness: Brightness.dark,
        splashColor: Colors.grey,
        child: Text("Submit"),
        shape:
            RoundedRectangleBorder(borderRadius: BorderRadius.circular(20.0)),
        onPressed: () {},
      ),
      RaisedButton(
        color: Colors.blue,
        highlightColor: Colors.blue[700],
        colorBrightness: Brightness.dark,
        splashColor: Colors.grey,
        child: Text("Submit"),
        shape:
            RoundedRectangleBorder(borderRadius: BorderRadius.circular(20.0)),
        onPressed: () {},
      ),
      //自定义button
      FlatButton(
          color: Colors.amberAccent,
          onPressed: () {},
          shape:
              RoundedRectangleBorder(borderRadius: BorderRadius.circular(20)),
          child: Row(
            mainAxisSize: MainAxisSize.min,
            children: [Icon(Icons.label_important_outlined), Text("喜欢")],
          )),
    ]));

