Microsoft .NET 框架资源基础
摘要:Chris Sells 讨论无类型清单资源和有类型资源,它们是受 Microsoft .NET 框架支持的两种资源。他定义了这两种资源,并介绍了如何在您自己的应用程序中使用它们。
假设要在应用程序中通过从文件加载位图来设置窗体的背景图像:
public Form1() {

...

// Load a file from the file system

this.BackgroundImage =

new Bitmap(@"C:\WINDOWS\Web\Wallpaper\Azul.jpg");

}
该代码的问题是,并非所有 Microsoft Windows 的安装实例都有 Azul.jpg,即使是那些确实具有该文件的安装实例,该文件可能也不在安装实例的相同位置。即使您与应用程序一起交付该图片,节省空间的用户也可能决定删除它,这会导致您的应用程序出错。确保图片或任何文件与代码在一起的唯一安全方式是将它作为资源嵌入并加载。
清单资源
资源是在编译时添加到程序集中的。例如,如果您使用命令行编译器,则可以使用 /resource 开关嵌入资源:
C:\>csc.exe myApp.cs /resource:c:\windows\web\wallpaper\Azul.jpg
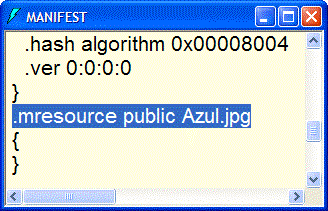
/resource 开关将文件作为资源嵌入,嵌入时使用文件名(没有路径)作为资源名称。文件嵌入到程序集的清单 资源集中。程序集的清单由一组作为程序集一部分的元数据组成。该元数据的一部分是与每个嵌入资源关联的名称和数据。执行 ildasm 时,可以在清单部分看见程序集清单资源的列表,如图 1 所示。
C:\>ildasm.exe myApp.exe

图 1. ildasm 显示嵌入资源
可以像 ildasm 一样枚举清单资源的列表,这需要使用 System.Reflection.Assembly 类的 GetManifestResourceNames 方法:
using System.Reflection;

...

// Get this type's assembly

Assembly assem = this.GetType().Assembly;

// Enumerate the assembly's manifest resources

foreach( string resourceName in assem.GetManifestResourceNames() ) {

MessageBox.Show(resourceName);

}
一旦通过枚举清单资源或硬编码一个您想要的清单资源而知道了清单资源的名称,就可以通过 Assembly 类的 GetManifestResourceStream 方法将该清单资源作为原始字节流进行加载,如下所示:
using System.IO;

public Form1() {

...

// Get this type's assembly

Assembly assem = this.GetType().Assembly;

// Get the stream that holds the resource

// NOTE1: Make sure not to close this stream!

// NOTE2: Also be very careful to match the case

//        on the resource name itself

Stream stream =

assem.GetManifestResourceStream("Azul.jpg");

// Load the bitmap from the stream

this.BackgroundImage = new Bitmap(stream);

}
因为资源可以像类型名称一样有冲突,所以最好用资源自己的“命名空间”来嵌入资源,该操作可以使用 /resource 开关的扩展格式来完成:
C:\>csc myApp.cs /resource:c:\...\azul.jpg,ResourcesApp.Azul.jpg
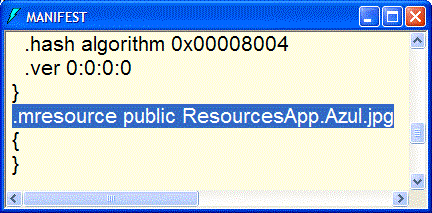
注意在要嵌入的文件名的逗号后面使用的备用资源名称。备用资源名称允许您为资源任意地提供时间嵌套名称,不管文件名是什么。它是设置在程序集中的备用名称,如图 2 所示。

图 2. 使用备用名称的嵌入资源
下面是使用备用名称的更新后的资源加载代码:
public Form1() {

...

// Get this type's assembly

Assembly assem = this.GetType().Assembly;

// Load a resource with an alternate name

Stream stream =

assem.GetManifestResourceStream("ResourcesApp.Azul.jpg");

// Load the bitmap from the stream

this.BackgroundImage = new Bitmap(stream);

}
为了更方便,如果您的资源和加载资源的类碰巧使用了相同的命名空间,则可以将类的类型作为可选的第一参数传递给 GetManifestResourceStream:
namespace ResourcesApp {

public class Form1 : Form {

public Form1() {

...

// Get this type's assembly

Assembly assem = this.GetType().Assembly;

// Load the resource using a namespace

// Will load resource named "ResourcesApp.Azul.jpg"

Stream stream =

assem.GetManifestResourceStream(this.GetType(), "Azul.jpg");

// Load the bitmap from the stream

this.BackgroundImage = new Bitmap(stream);

}

...

}

}
GetManifestResourceStream 将使用如下格式编写资源名称:
<namespace>.<fileName>
在加载某些类型(比如 Bitmap 类)时,使用类型和文件名也是有用的,这样可以通过提供构造函数避免由您自己打开流:
namespace ResourcesApp { public class Form1 : Form { public Form1() { ... // Get this type's assembly Assembly assem = this.GetType().Assembly; // Load the bitmap directly from the manifest resources this.BackgroundImage = new Bitmap(this.GetType(), "Azul.jpg"); } ... }}
Visual Studio .NET 中的清单资源
如果(大多数情况下)您使用 Visual Studio?NET 来开发和构建程序集,则用命令行嵌入清单资源的方法不可能非常吸引您。这种情况下,您可以将资源添加到 Windows 窗体项目中,该方法将把合适的命令行参数传递给编译器。
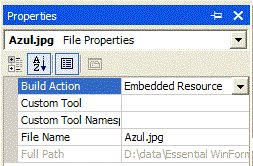
要将资源添加到项目中,请在 Solution Explorer 中右键单击项目,然后选择 Add New Item,并选择您想作为资源嵌入的文件。文件将复制到项目的目录中,但仍然不会被嵌入。要使文件作为资源嵌入,请右键单击文件,并选择 Properties,然后将 Build Action 从 Content(默认)更改为 Embedded Resource,如图 3 所示。

图 3. 将文件的 Build Action 设置为 Embedded Resource
这种嵌入资源的方法会使 Visual Studio .NET 为您创建一个备用资源名,其组成类似这样:
<defaultNamespace>.<folderName>.<fileName>
资源名称的默认命名空间部分是项目本身的默认命名空间,它是通过 Solution Explorer->(右键单击)->Properties->Common Properties->General->Default Namespace 来设置的。由于这是在生成新类时,新类得到的相同命名空间,所以这就使通过使用类型和部分资源名称来加载资源变得很方便。如果文件碰巧位于项目的子文件夹中,就需要在文件夹名称中包括子文件夹,并用点替换反斜杠。例如,一个名为 Azul.jpg 的位图位于项目根下面的 foo\bar 文件夹中,要加载它就需要这样做:
// If this code called within the ResourcesApp.Form1 class,

// and the file is \foo\bar\Azul.jpg,

// will load ResourcesApp.foo.bar.Azul.jpg

this.BackgroundImage =

new Bitmap(this.GetType(), "foo.bar.Azul.jpg");
有类型资源
尽管文件有扩展名,但清单资源是在没有类型信息的情况下嵌入的。例如,如果 Azul.jpg 文件的名称实际上是 Azul.quux,这对于 Bitmap 类来说是没有差别的,因为这个类将通过查看数据本身来确定其类型(JPEG、PNG、GIF 等)。这就需要由您来将每个资源的类型正确映射为加载该资源所需的对象的类型。
但如果您愿意多走一步,则可以用一个类型来标记资源。.NET 框架支持用于资源的一组扩展元数据,其中包括两种格式的 MIME 类型信息,一个是文本格式,另一个是二进制格式。这两种格式都有内置的读取器,以便在运行时取得类型正确的资源。
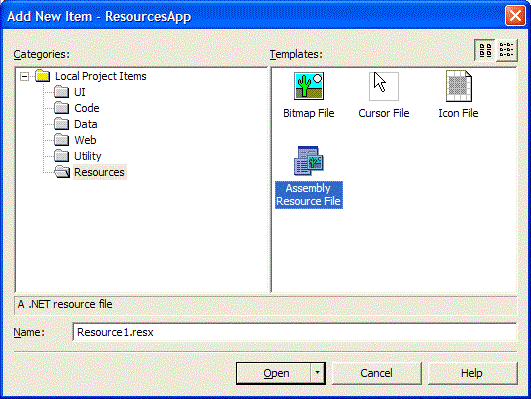
基于文本的格式是特定于.NET 框架的 XML 格式,称为 ResX(.resx 文件)。不考虑其 XML 基础,该格式不是专门为人工阅读而设计的(XML 格式很少是这样的)。但是,Visual Studio .NET 仍然为 .resx 文件提供了一个基本编辑器。要将新的 .resx 文件添加到 Visual Studio .NET 项目中,请从 Project 菜单中选择 Add New Item,然后选择 Assembly Resource File 模板,如图 4 所示。

图 4. 将 .resx 文件添加到项目中
到写本文时为止,即使空的 .resx 文件也是 42 行 XML,而其中大多数是架构信息。架构允许 .resx 文件中有任意数目的项,每项都有名称、值、注释、类型和 MIME 类型。图 5 显示了有两个项的 .resx 文件,即名为 MyString 的字符串和名为 MyImage 的图像。

图 5. 设计器的数据视图中简单的 .resx 文件
遗憾的是,只有字符串项能够在 .resx 编辑器的数据视图中实际进行编辑。任何二进制数据都需要手动直接输入到 XML 中(而且只能是 base64 编码)。因此,直接使用 .resx 文件只对字符串资源有用(尽管间接使用会使 .resx 文件对任何种类的数据都非常有用,我们随后将讨论这一点)。
来自 System.Resources 命名空间的 ResXResourceReader 类将分析 XML 文件,并公开一组命名的、有类型的值。要取得具体的项需要查找它:
using System.Collections;

using System.Resources;

...

public Form1() {

...

using( ResXResourceReader reader =

new ResXResourceReader(@"Resource1.resx") ) {

foreach( DictionaryEntry entry in reader ) {

if( entry.Key.ToString() == "MyString" ) {

// Set form caption from string resource

this.Text = entry.Value.ToString();

}

}

}

}
使用 Add New Item 对话框将 .resx 文件添加到项目中会使该文件作为 Embedded Resource 添加进项目,而编译项目时则会导致 .resx 数据作为嵌套资源 嵌入(“嵌套资源”是分组到命名容器中的资源)。容器的名称与作为资源添加的任何文件相同,只是不使用 .resx 扩展名,使用 .resource 扩展名。假定一个项目的默认命名空间是 ResourcesApp 而 .resx 文件名为 Resources1.resx,则嵌套资源的容器名为 ResourcesApp.Resources1.resx,如图 6 中的 ildasm 所示。

图 6. 嵌入的 .resources 文件
.resources 扩展名来自于在将 .resx 文件作为资源嵌入之前 Visual Studio .NET 处理该文件时所使用的工具。工具名称是 resgen.exe,它用来将 .resx XML 格式“编译”为二进制格式。可以手动将 .resx 文件编译成 .resources 文件,如下所示:
C:\> resgen.exe Resource1.resx
在将 .resx 文件编译成 .resources 文件以后,就可以使用 System.Resources 命名空间中的 ResourceReader 来枚举它:
using( ResourceReader reader =

new ResourceReader(@"Resource1.resources") ) {

foreach( DictionaryEntry entry in reader ) {

string s = string.Format("{0} ({1})= '{2}'",

entry.Key, entry.Value.GetType(), entry.Value);

MessageBox.Show(s);

}

}
除了类的名称和输入格式,ResourceReader 类的使用方法与 ResXResourceReader 相同,包括都不能随机访问命名项。
所以,虽然您可以将 .resx 文件转换成 .resources 文件,并使用 /resource 编译器命令行开关嵌入它,但容易得多的方法是直接在项目中让 Visual Studio .NET 接受被标记为 Embedded Resources 的 .resx 文件,然后将它编译进 .resources 文件并嵌入它,如图 4、图 5 和图 6 所示。一旦将 .resources 文件捆绑为资源,访问 .resources 文件中的资源就只需执行两个步骤的过程:
// 1. Load embedded .resources file

using( Stream stream =

assem.GetManifestResourceStream(

this.GetType(), "Resource1.resources") ) {

// 2. Find resource in .resources file

using( ResourceReader reader = new ResourceReader(stream) ) {

foreach( DictionaryEntry entry in reader ) {

if( entry.Key.ToString() == "MyString" ) {

// Set form caption from string resource

this.Text = entry.Value.ToString();

}

}

}

}
因为 ResourceReader 和 ResXResourceReader 都需要该两步过程才能找到具体的资源,因此 .NET 框架提供了 ResourceManager 类,该类公开了一个更简单的使用模型。
资源管理器
ResourceManager 类也来自 System.Resources 命名空间,该类包装了 ResourceReader,用于在构造时枚举资源,并使用其名称公开它们:
public Form1() {

...

// Get this type's assembly

Assembly assem = this.GetType().Assembly;

// Load the .resources file into the ResourceManager

// Assumes a file named "Resource1.resx" as part of the project

ResourceManager resman =

new ResourceManager("ResourcesApp.Resource1", assem);

// Set form caption from string resource

this.Text = (string)resman.GetObject("MyString"); // The hard way

this.Text = resman.GetString("MyString"); // The easy way

}
用来查找 .resources 文件的命名方式与命名任何其他种类的资源相同(注意追加到 Resource1.resources 文件中的项目默认命名空间的使用方法),只是 .resources 扩展名是假定的,并且不能包括在名称中。为了更方便,如果您碰巧将一个 .resx 文件命名为类型名称,则 .resources 文件和程序集的名称将从类型确定:
// Use the type to determine resource name and assembly

ResourceManager resman = new ResourceManager(this.GetType());
一旦已经创建了资源管理器的实例,就可以通过使用 GetObject 方法并强制转换为合适的类型,从而按名称找到嵌套资源。如果使用 .resx 文件来处理字符串资源,则可以使用 GetString 方法,该方法将执行到 System.String 类型的强制转换。
设计器资源
缺少用于 .resx 文件的合适的编辑器使它们在使用除字符串资源以外的任何其他资源时非常困难。您不仅必须通过手动编写代码才能在运行时输入数据,而且无法在设计时看见资源的使用情况;例如,窗体的背景图像。
幸运的是,设计器再次在这里帮助了我们。如果打开 Visual Studio .NET Solution Explorer,并选择 Show All Files 按钮,您将看见每个组件(无论它是窗体、控件还是简单的组件)都有相应的 .resx 文件。这是为了让资源与组件的属性保持关联,这种关联是在 Property Browser 中设置的。例如,如果设置窗体的 BackgroundImage 属性,那么不仅在设计器中窗体将显示背景图像,而且窗体的 .resx 文件将包含该图像的对应项。同样,如果在相同窗体上设置 PictureBox 控件的 Image 属性,则 .resx 文件同样会增大以便包括该资源。这两项都可以在图 7 中看到。

图 7. 组件的 .resx 文件
每个组件的 .resx 文件将作为 .resources 文件进行编译和嵌入,就像已经将您自己的 .resx 文件添加到项目中一样,这将使资源能够在运行时被组件使用。除了组件的 .resx 文件中的项之外,设计器还会将代码添加到 InitializeComponent 中,以便加载组件的资源管理器,并使用从资源获得的对象来填充组件的属性:
namespace ResourcesApp {

public class Form1 : Form {

...

private void InitializeComponent() {

ResourceManager resources = new ResourceManager(typeof(Form1));

...

this.pictureBox1.Image =

(System.Drawing.Bitmap)resources.GetObject("pictureBox1.Image");

...

this.BackgroundImage =

(System.Drawing.Bitmap)resources.GetObject("$this.BackgroundImage");

...

}

}

}
注意 ResourceManager 对象是使用组件的类型来构造的,该类型用来构造组件的 .resources 资源名称。还要注意设计器在命名资源时所使用的命名约定。对于组件字段上的属性,名称的格式是:
<fieldName>.<propertyName>
对于组件本身的属性,名称格式是:
$this.<propertyName>
如果您想添加供组件本身使用的自定义字符串属性,您可以这样做,但要确保与设计器生成的名称格式不同。