uniapp+离线打包+ios+xcode+集成极光推送(jpush)简单易懂
最近公司有app业务 决定用uniapp 也是第一次上手,本人完全没有ios安卓原生的底子
能怎么办 硬着头皮上呗。每天看文档+找资料 做推送功能需要集成极光推送。
网上没有靠谱的本地打包即成极光的文章 所以只能自己摸索
相信这片文章能帮助和我一样的小白解决问题,废话不多说直奔主题吧
一、从uni官方下载原声插件到本地
插件地址:极光JPush官方SDK - DCloud 插件市场
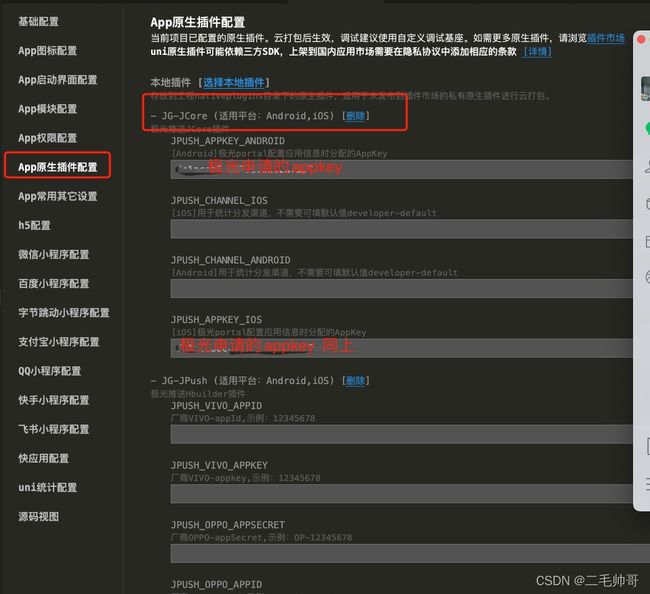
二、把下载好的插件nativeplugins文件 放到uniapp项目根目录,然后在manifest.json里引入原声插件并配置极光appkey。
三、创建静态jpush.js 不需要做任何修改 直接复制即可
// 引用方式
var jpushModule = uni.requireNativePlugin("JG-JPush");
console.log('【sk】【引用方式】【jpushModule】【requireNativePlugin】')

// 开启 debug 模式,默认是关闭
function openDebug() {
    jpushModule.setLoggerEnable(true);
}

// 关闭 debug 模式,默认是关闭
function closeDebug() {
    jpushModule.setLoggerEnable(false);
}

// 获取 RegistrationID,只有当应用程序成功注册到 JPush 的服务器时才返回对应的值,否则返回空字符串
function getRegistrationID(skBack) {
    jpushModule.getRegistrationID(result=>{
        // code number  状态码 0 - 成功, 1011 - iOS模拟器调用会报此错误
        // registerID   string  返回的 registrationID
        console.log('【sk】获取 RegistrationID=>',result)
        skBack(result.registerID)
    })
}

// 跳转至系统设置页面,0 - 成功 1 - 失败
function openSettingsForNotification() {
    jpushModule.openSettingsForNotification((result)=>{
        // code number  0 - 成功 1 - 失败
        console.log('【sk】跳转至系统设置页面result=>',result.code)
    })
}

// 初始化SDK iOS 说明:如果在mainfest.json里 将JPUSH_DEFAULTINITJPUSH_IOS值配置为"true",插件内部将默认初始化JPush,用户则不需要调用该初始化方法。
function initJPushService() {
    console.log(jpushModule)
    jpushModule.initJPushService()
}

// 连接状态回调,true - 已连接, false - 未连接
function addConnectEventListener(skBack) {
    jpushModule.addConnectEventListener(result=>{
        // connectEnable    boolean true - 已连接, false - 未连接
        console.log('【sk】连接状态回调=>',result.connectEnable)
        skBack(result.connectEnable);
    })
}

// 通知事件回调
function addNotificationListener(skBack) {
    jpushModule.addNotificationListener(result=>{
        // messageID    string  唯一标识通知消息的 ID
        // title    string  对应 Portal 推送通知界面上的“通知标题”字段
        // content  string  对应 Portal 推送通知界面上的“通知内容”字段
        // badge    string  对应 Portal 推送通知界面上的可选设置里面的“badge”字段 (ios only)
        // ring string  推送通知界面上的可选设置里面的“sound”字段 (ios only)
        // extras   dictionary  对应 Portal 推送消息界面上的“可选设置”里的附加字段
        // iOS  dictionary  对应原生返回的通知内容,如需要更多字段请查看该字段内容
        // android  dictionary  对应原生返回的通知内容,如需要更多字段请查看该字段内容
        // notificationEventType    string  分为notificationArrived和notificationOpened两种
        console.log('【sk】通知事件回调result=>',result)
        skBack(result);
    })
}

// 自定义消息事件回调
function addCustomMessageListener(skBack) {
    jpushModule.addCustomMessageListener(result=>{
        // messageID    string  唯一标识通知消息的 ID
        // content  string  对应 Portal 推送通知界面上的“通知内容”字段
        // extras   dictionary  对应 Portal 推送消息界面上的“可选设置”里的附加字段
        console.log('【sk】自定义消息事件回调result=>',result)
        skBack(result);
    })
}

// 应用内消息回调
function addInMessageListener(skBack) {
    jpushModule.addInMessageListener(result=>{
        // eventType    string  show - 应用内消息展示 disappear - 应用内消息已消失 click - 应用内消息点击
        // messageType  string  消息类型, eventType 不为 disappear时返回, inMessageNoti - 通知类型的inMessage
        // content  dictionary  应用内消息内容, eventType 不为 disappear 时返回
        console.log('【sk】应用内消息回调result=>',result)
        skBack(result);
    })
}

// 本地通知事件回调
function addLocalNotificationListener(skBack) {
    jpushModule.addLocalNotificationListener(result=>{
        // messageID    string  唯一标识通知消息的ID
        // title    string  对应“通知标题”字段
        // content  string  对应“通知内容”字段
        // extras   dictionary  对应“附加内容”字段
        console.log('【sk】本地通知事件回调result=>',result)
        skBack(result);
    })
}

// 添加一个本地通知
function addLocalNotification(e) {
    jpushModule.addLocalNotification({
        messageID: e.messageID ? e.messageID : '', // 唯一标识通知消息的ID
        title: e.title ? e.title : '', // 对应“通知标题”字段
        content: e.content ? e.content : '', // 对应“通知内容”字段
        extras: e.extras ? e.extras : {name: '', age: ''} // 对应“附加内容”字段
    })
}

// 移除指定的本地通知
function removeLocalNotification(e) {
    jpushModule.removeLocalNotification({
        messageID: e.messageID ? e.messageID : '' // 唯一标识通知消息的ID
    })
}

// 移除所有的本地通知
function clearLocalNotifications() {
    jpushModule.clearLocalNotifications()
}

// 标签别名事件回调
function addTagAliasListener(skBack) {
    jpushModule.addTagAliasListener(result=>{
        // code number  请求状态码 0 - 成功
        // sequence number  请求时传入的序列号,会在回调时原样返回
        // tags StringArray 执行tag数组操作时返回
        // tag  string  执行查询指定tag(queryTag)操作时会返回
        // tagEnable    boolean 执行查询指定tag(queryTag)操作时会返回是否可用
        // alias    string  对alias进行操作时返回
        console.log('【sk】标签别名事件回调result=>',result)
        skBack(result);
    })
}

// 新增标签
function addTags(e) {
    jpushModule.addTags({
        'tags': e.tags ? e.tags : [], // StringArray  string类型的数组
        'sequence': e.sequence ? e.sequence : 1 // number  请求时传入的序列号,会在回调时原样返回
    })
}

// 覆盖标签
function updateTags(e) {
    jpushModule.updateTags({
        'tags': e.tags ? e.tags : [], // StringArray  string类型的数组
        'sequence': e.sequence ? e.sequence : 1 // number  请求时传入的序列号,会在回调时原样返回
    })
}

// 删除指定标签
function deleteTags(e) {
    jpushModule.deleteTags({
        'tags': e.tags ? e.tags : [], // StringArray  string类型的数组
        'sequence': e.sequence ? e.sequence : 1 // number  请求时传入的序列号,会在回调时原样返回
    })
}

// 清除所有标签
function cleanTags(e) {
    jpushModule.cleanTags({
        'sequence': e.sequence ? e.sequence : 1 // number  请求时传入的序列号,会在回调时原样返回
    })
}

// 查询指定 tag 与当前用户绑定的状态
function queryTag(e) {
    jpushModule.queryTag({
        'tag': e.tag ? e.tag : '', // string  需要查询的标签
        'sequence': e.sequence ? sequence : 1 // number  请求时传入的序列号,会在回调时原样返回
    })
}

// 查询所有标签
function getAllTags(e) {
    jpushModule.getAllTags({
        'sequence': e.sequence ? e.sequence : 1 // number  请求时传入的序列号,会在回调时原样返回
    })
}

// 设置别名
function setAlias(e) {
    console.log('设置别名',e)
    jpushModule.setAlias({
        'alias': e.alias ? e.alias : '', // string  有效的别名组成:字母(区分大小写)、数字、下划线、汉字、特殊字符@!#$&*+=.|
        'sequence': e.sequence ? e.sequence : 1 // number  请求时传入的序列号,会在回调时原样返回
    })
}

// 删除别名
function deleteAlias(e) {
    jpushModule.deleteAlias({
        'sequence': e.sequence ? e.sequence : 1 // number  请求时传入的序列号,会在回调时原样返回
    })
}

// 查询别名
function queryAlias(e) {
    jpushModule.queryAlias({
        'sequence': e.sequence ? e.sequence : 1 // number  请求时传入的序列号,会在回调时原样返回
    })
}

// 开启 CrashLog 上报
function initCrashHandler() {
    jpushModule.initCrashHandler()
}

// 设置地理围栏的最大个数
function setMaxGeofenceNumber(e) {
    jpushModule.setMaxGeofenceNumber(e.geofenceNumber ? e.geofenceNumber : 10) // 默认值为 10 ,iOS系统默认地理围栏最大个数为20
}

// 删除指定id的地理围栏
function deleteGeofence(e) {
    jpushModule.deleteGeofence(e.geofence ? e.geofence : '') // 删除指定id的地理围栏
}

// 设置 Badge
function setBadge(e) {
    jpushModule.setBadge(e.badge ? e.badge : 0) // number
}

// 设置手机号码
function setMobileNumber(e) {
    jpushModule.setMobileNumber({
        sequence: e.sequence ? e.sequence : 1, // number  请求时传入的序列号,会在回调时原样返回
        mobileNumber: e.mobileNumber ? e.mobileNumber : '' // string  手机号码 会与用户信息一一对应。可为空,为空则清除号码。
    })
}

// 设置手机号码回调
function addMobileNumberListener(skBack) {
    jpushModule.addMobileNumberListener(result=>{
        // code number  状态码 0 - 成功
        // sequence number  请求时传入的序列号,会在回调时原样返回
        console.log('【sk】设置手机号码回调result=>',result)
        skBack(result);
    })
}


module.exports = {
    openDebug: openDebug,
    closeDebug: closeDebug,
    getRegistrationID: getRegistrationID,
    openSettingsForNotification: openSettingsForNotification,
    initJPushService: initJPushService,
    addConnectEventListener: addConnectEventListener,
    addNotificationListener: addNotificationListener,
    addCustomMessageListener: addCustomMessageListener,
    addInMessageListener: addInMessageListener,
    addLocalNotificationListener: addLocalNotificationListener,
    addLocalNotification: addLocalNotification,
    removeLocalNotification: removeLocalNotification,
    clearLocalNotifications: clearLocalNotifications,
    addTagAliasListener: addTagAliasListener,
    addTags: addTags,
    updateTags: updateTags,
    deleteTags: deleteTags,
    cleanTags: cleanTags,
    queryTag: queryTag,
    getAllTags: getAllTags,
    setAlias: setAlias,
    deleteAlias: deleteAlias,
    queryAlias: queryAlias,
    initCrashHandler: initCrashHandler,
    setMaxGeofenceNumber: setMaxGeofenceNumber,
    deleteGeofence: deleteGeofence,
    setBadge: setBadge,
    setMobileNumber: setMobileNumber,
    addMobileNumberListener: addMobileNumberListener
}
四、在uniapp项目 app.vue文件 引入上面的jpush.js
然后在app.vue里onlaunch方法里添加以下代码
// 极光推送-init
			skJGPush.initJPushService()

			// 极光推送-打开debug
			skJGPush.openDebug()

			// 极光推送-获取rid
			skJGPush.getRegistrationID(result => {
				console.log('【业务getRegistrationID】', result)

			})

			// 极光推送-通知事件回调
			skJGPush.addNotificationListener(result => {

				console.log('【业务addNotificationListener】', result)
			})

			// 极光推送-标签别名事件回调
			skJGPush.addTagAliasListener(result => {
				console.log('【业务addTagAliasListener】', result)
			})
五、到此 已经可以实现uniapp云打包 极光推送的集成了。如果需求是离线打包,请继续跟着下面操作
下面操作 默认你们已经将uniapp ios sdk集成到xcode里 并且已经掌握Xcode大概玩法
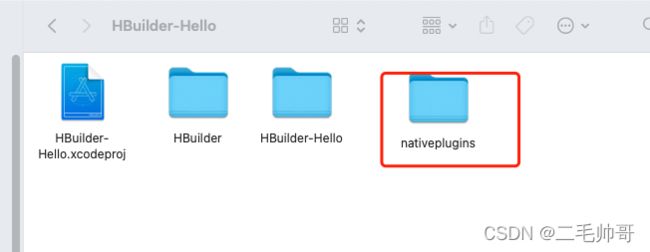
下来我们将nativeplugins文件夹 放到ios sdk的ios项目根目录下
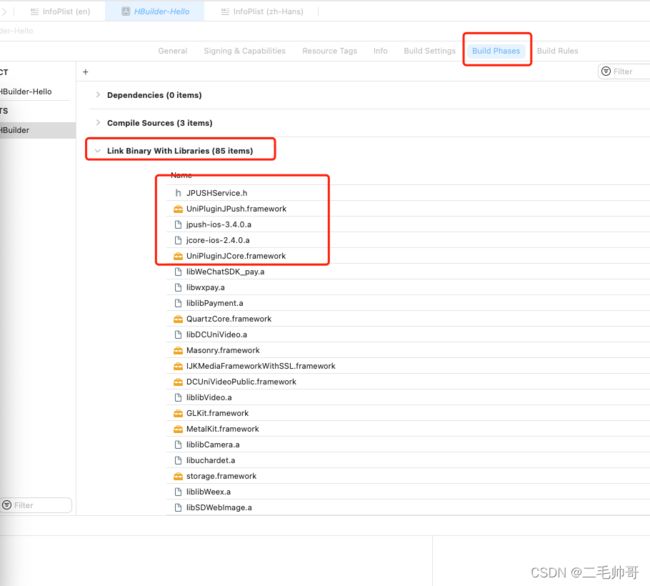
六、打开xcode 在项目build phases 里引入nativeplugins > ios文件夹里的依赖。一共五个 如下图
七、引入成功后 再项目info.plist里 加入如下2块儿配置:
红色框起来的部分 需要手动敲上去 注意细节 缺一不可
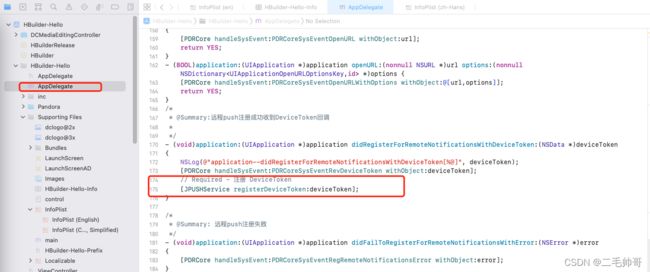
 八、这部仔细看 我踩了好多坑。对于完全不懂ios原生代码的我们来说 确实找了好久才突破。
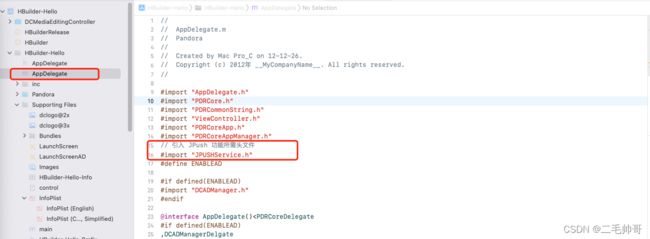
大家照我的截图 傻瓜式复制就行了 一共两句代码
1.在appdelegate.m 头部 引入依赖
2. 找到这个方法 加入这行代码
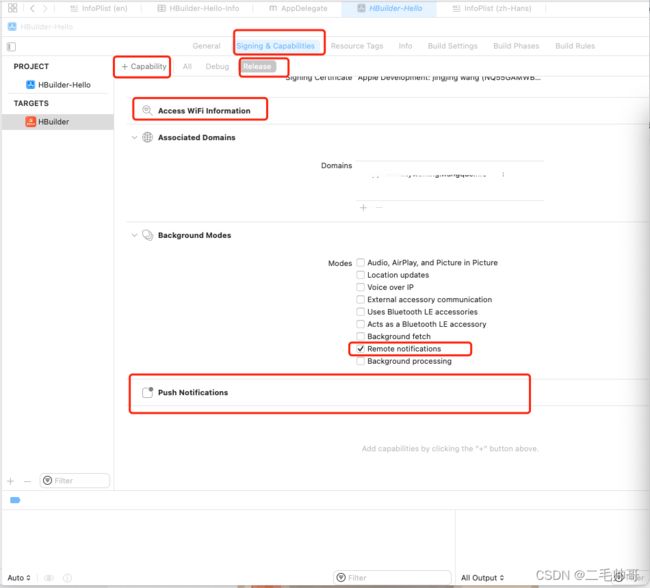
九、 在capability里加入push natifications模块和wifi呢个模块(不清楚对推送功能有没有影响,有大神懂得可以评论区解释下) 如下图 这部很简单。
十、到此 xcode离线打包要配置的所有东西就配置完成了。然后从xcode 打包 运行app。就会获取到设备的registration id 拿到这个id 去极光推送控制台可以先手动创建一个推送试试吧
第一次写技术文章,经验不足请理解。如果帮助到你 就点个赞吧。
下面正在研究安卓离线打包集成极光推送 ,成功后会更新下一篇。
如果还有朋友看不懂或者遇到ios集成别的问题 可以加我qq或者评论区我会回复尽力帮助你
后面有时间我会陆续更新uniapp离线打包集成 支付 视频播放 IM即时通讯等原生功能。
本文纯属小白摸坑 大神勿喷。
谢谢点赞支持。
qq:172791749

