Silverlight+WCF 新手实例 象棋 棋子移动-吃子(五)
上一节,我们的棋子就是一个Canvas,里面add进了一个Ellipse圆圈和TextBlock字
想想我们是怎么下棋的,要先选中棋子吧,选中后,随便找个地方点,棋就会自动移过去。
所以,这里就产生了两件事,一是选中,二是移动。
要选中,其实就是选中棋子,选中棋子就是选中Canvas了。
于是,我们为Canvas增加一个鼠标点击事件。
让我们回到棋子类Chessman的Draw方法里,为chessman添加一个MouseLeftButtonDown事件,于是代码变成了

{
// 这里实现画啦
Ellipse elp = new Ellipse()
{
Width = Radius * 2 ,
Height = Radius * 2 ,
Stroke = new SolidColorBrush(Color),
Fill = new SolidColorBrush(Color),
Opacity = 15
};
TextBlock text = new TextBlock()
{
TextAlignment = TextAlignment.Center,
Foreground = new SolidColorBrush(Colors.White),
Text = Name,
FontFamily = new FontFamily( " 宋体 " ),
FontSize = Radius,
FontWeight = FontWeights.Bold,
Margin = new Thickness(Radius / 2 - 2 , Radius / 2 - 2 , 0 , 0 )
};
chessman = new Canvas();
// ----这里新加一个事件啦-----
chessman.MouseLeftButtonDown += new MouseButtonEventHandler(chessman_MouseLeftButtonDown);
// ----这里新加一个事件啦-----
Point pixel = Parent.SwitchPixelArray(InitPoint);
chessman.Margin = new Thickness(pixel.X - Radius, pixel.Y - Radius, 0 , 0 );
chessman.Children.Add(elp);
chessman.Children.Add(text);
container.Children.Add(chessman);
}
// 新加的事件方法
void chessman_MouseLeftButtonDown( object sender, MouseButtonEventArgs e)
{
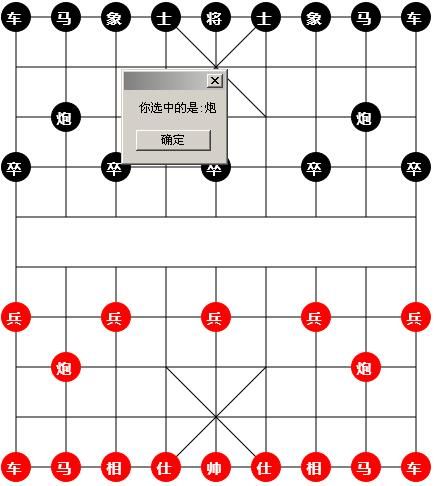
MessageBox.Show( " 你选中的是: " + Name);
}
其实就一共新增加了三行代码,运行看看效果。

好了,选中是OK了,那我们怎么移动?
Silverlight里有几种移动方法,这里挑了Storyboard故事板来移动棋子。
按原始想法,棋子自己不会动,所以新建一个ChessAction类来实现棋子的移动。
啥也不说,对着类库右键-》添加类—》ChessAction.cs就新建了。
/// 棋子动作类 by 路过秋天
/// </summary>
public class ChessAction
{
}
想想棋子是怎么动的?其实就两个动作,一个是吃子,另一个没子吃直接移动。于是呢,就先产生两个方法:

/// 棋子动作类 by 路过秋天
/// </summary>
public class ChessAction
{
/// <summary>
/// 吃子
/// </summary>
/// <param name="moveChessman"> 移动的棋子 </param>
/// <param name="eatChessman"> 被吃的棋子 </param>
public void EatChessman(Chessman moveChessman, Chessman eatChessman)
{
}
/// <summary>
/// 移动棋子
/// </summary>
/// <param name="chessman"> 棋子 </param>
/// <param name="toX"> 移动到X坐标 </param>
/// <param name="toY"> 移动到Y坐标 </param>
public bool MoveTo(Chessman chessman, Point moveTo)
{
return true ;
}
}
再想想,其实吃子,就是移动棋子,让后叫被吃的那个子离开自己的位置gotodead。
-_-..这里顺便为Chessman棋子类自己加个方法叫GoToDead好了。

/// 销亡
/// </summary>
public void GoToDead()
{
container.Children.Remove(chessman); // 从控件中移除
Parent.ChessmanList.Remove( this ); // 从棋子列表移除
}
OK,我们可以为吃子方法写完它了。先移动棋子,然后叫被吃的自己GoToDead了。

{
if (MoveTo(moveChessman, eatChessman.MovePoint))
{
eatChessman.GoToDead();
}
}
说来说去,就剩下要完成MoveTo的时候,棋子要移动了。
我们把移动的动作封成一个函数叫PlayMove,所以在MoveTo里轻松调用PlayMove就搞定了。

{
PlayMove(chessman, moveTo);
return true ;
}
void PlayMove(Chessman chessman, Point moveTo)
{
// 这里完成移动啦
}
移动的代码的故事版,先上代码,再解说

{
// 这里完成移动啦
moveTo = Parent.SwitchPixelArray(moveTo);
Point initPixel = Parent.SwitchPixelArray(chessman.InitPoint);
Point movePixel = Parent.SwitchPixelArray(chessman.MovePoint);
Storyboard sb = new Storyboard(); // 创建动画版
// 创建X方向的动画
DoubleAnimation daX = new DoubleAnimation();
daX.Duration = new Duration(TimeSpan.FromMilliseconds( 200 ));
daX.From = movePixel.X - initPixel.X;
daX.To = moveTo.X - initPixel.X;
// 创建Y方向的动画
DoubleAnimation daY = new DoubleAnimation();
daY.Duration = new Duration(TimeSpan.FromMilliseconds( 200 ));
daY.From = movePixel.Y - initPixel.Y;
daY.To = moveTo.Y - initPixel.Y;
// 设置动画版上的目标
Storyboard.SetTarget(daX, chessman.chessman);
Storyboard.SetTarget(daY, chessman.chessman);
// 设置动画版上的目标要变化的属性
Storyboard.SetTargetProperty(daX, new PropertyPath( " (Canvas.Left) " ));
Storyboard.SetTargetProperty(daY, new PropertyPath( " (Canvas.Top) " ));
sb.Children.Add(daX);
sb.Children.Add(daY);
sb.Begin();
sb = null ;
}
其实Storyboard的类用法,比较死的,记住怎么用就行了,记不住就Copy多几次也就差不多了。
实在看不懂,多在博客园里多搜搜该类的用法,看来看去基本就是这么用,看的多了习惯了就也是这么一回事了。
这里说几个注意点:
1。Parent哪来的?我们的棋子类不是也有一个Parent么,其实就是Chess类对象了。
所以呢,我们要为ChessAction添加一个属性和构造函数,让Chess对象传进来啦。

/// Chess对象
/// </summary>
public Chess Parent
{
get ;
set ;
}
public ChessAction(Chess ownChess)
{
Parent = ownChess;
}
2。就是那个坐标要先转换成像素坐标,比较滑动的时候是用像素来算的
3。这个重要了:故事板滑动的几个from,to的像素,要减去棋子本身的初始相对坐标,才能滑的正确。
关于这个,我调试了好久,才让它滑的正确,默认博客园里的相关文章都没有相对物体一开始就相对存在的情况做说明。
4。最后一点就是,在Chess类的构造函数里默认实例化一下这个ChessAction对象。
其实Chess类的构造函数加了一行代码,同时多了一个属性

/// 棋子动作,新加的属性
/// </summary>
public ChessAction Action
{
get ;
set ;
}
public Chess(Panel control)
{
container = control;
ChessmanList = new List < Chessman > ( 32 );
Action = new ChessAction( this );//新增加的
}
OK,该写的都写的差不多完了。可是目前运行的话,还是没有效果可看。
我们还是赶紧弄一下吃子的效果出来先。吃子,就是选中一颗棋子,然后再点另一颗棋子。
所以在棋子被点击的时候,我们要判断,是不是已经有了一颗棋子被点击了,如果有,就执行吃子动作了。
这里要判断,怎么判断有没有已经被选中的,这里我倒有一个方法:
为棋子增加一个ReadyMove属性
/// 待移动
/// </summary>
public bool ReadyMove
{
get ;
set ;
}
这样,我们被点击的时候,只要设置一下自己的ReadyMove就行了。
那我们怎么找哪一颗棋子曾经被选中??这个简单了,遍历棋子列表,找出ReadyMove=true的棋子就行了。
我们为Chess类增加一个ReadyMoveChessman属性,返回被激活ReadyMove为true的棋子。

/// 激活的棋子,就是选中要下的棋子。
/// </summary>
public Chessman ReadyMoveChessman
{
get
{
foreach (Chessman chessman in ChessmanList)
{
if (chessman.ReadyMove)
{
return chessman;
}
}
return null ;
}
}
OK,现在我们可以回到棋子点击事件里,加if判断如下:

void chessman_MouseLeftButtonDown( object sender, MouseButtonEventArgs e)
{
if (ReadyMove) // 取消激活
{
ReadyMove = false ;
chessman.Background = null ;
}
else if (Parent.ReadyMoveChessman == null ) // 激活
{
ReadyMove = true ;
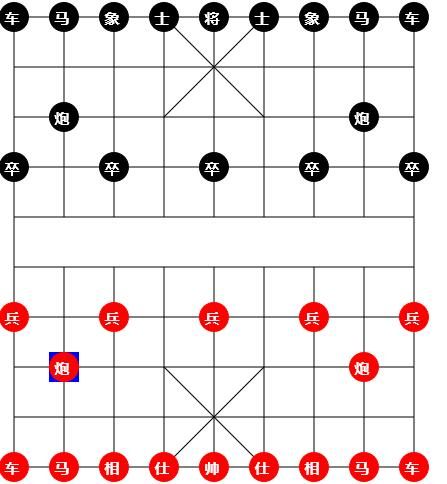
chessman.Background = new SolidColorBrush(Colors.Blue); // 选中时加个背景色
}
else // 吃子
{
if (Parent.ReadyMoveChessman.Color == this .Color) // 同颜色,切换
{
Parent.ReadyMoveChessman.chessman.Background = null ;
Parent.ReadyMoveChessman.ReadyMove = false ;
ReadyMove = true ;
chessman.Background = new SolidColorBrush(Colors.Blue);
}
else
{
Parent.Action.EatChessman(Parent.ReadyMoveChessman, this );
}
}
}
OK,按F5执行。
1。点击棋子,发现棋子背景色没变?
2。点另一个棋子,发现吃棋子动作完成了。这个很好。
3。再点另一个棋子,还是继续吃棋?
小小调试了一下发现:
1。背景色没变,原来是忘记了给Canvas弄个宽和高。
到Chessman类里,在Draw函数里找到Canvas,设置一下宽和高就行了。

{
// 这里实现画啦
Ellipse elp = new Ellipse()
{
Width = Radius * 2 ,
Height = Radius * 2 ,
Stroke = new SolidColorBrush(Color),
Fill = new SolidColorBrush(Color),
Opacity = 15
};
TextBlock text = new TextBlock()
{
TextAlignment = TextAlignment.Center,
Foreground = new SolidColorBrush(Colors.White),
Text = Name,
FontFamily = new FontFamily( " 宋体 " ),
FontSize = Radius,
FontWeight = FontWeights.Bold,
Margin = new Thickness(Radius / 2 - 2 , Radius / 2 - 2 , 0 , 0 )
};
chessman = new Canvas()
{
Width = elp.Width, // 新增加的宽
Height = elp.Height // 新增加的高
};
chessman.MouseLeftButtonDown += new MouseButtonEventHandler(chessman_MouseLeftButtonDown);
Point pixel = Parent.SwitchPixelArray(InitPoint);
chessman.Margin = new Thickness(pixel.X - Radius, pixel.Y - Radius, 0 , 0 );
chessman.Children.Add(elp);
chessman.Children.Add(text);
container.Children.Add(chessman);
}
于是点击时候的背景色出来了。

3.怎么一直吃子?那是移动后呢?有手尾要做的
a.设置棋子的ReadyMove=false;
b.去掉棋子的背景色。
c.移动后,棋子的Move坐标要换成被吃棋子的坐标。
于是,我们回到MoveTo函数里,新增加这几个手尾:

{
chessman.ReadyMove = false ;
chessman.chessman.Background = null ;
PlayMove(chessman, moveTo);
chessman.MovePoint = moveTo;
return true ;
}
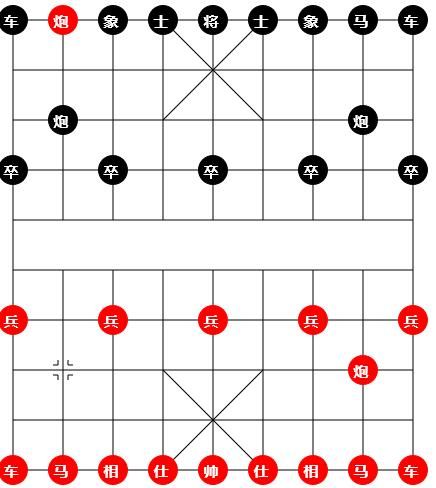
好了,手尾弄好了,现在移动棋子就变成吃子了:

OK,到现在棋子终于可以走了,不过目前只是吃子,而且是随便吃的。。。
下节说不吃子,让棋子走到线的交叉点上。
OK,打完收工
