Spring Security OAuth2实现多用户类型认证、刷新Token
需求
最近在搞Spring Cloud,想用OAuth2想实现一个认证服务器能够认证多种用户类型,如前台普通用户、后台管理员用户(分了不同的表了),想在请求token、刷新token的时候通过一个字段区分用户类型,但是OAuth2默认提供的UserDetailsService只允许传入一个参数,这样就区分不了用户类型了…
public interface UserDetailsService {
    UserDetails loadUserByUsername(String var1) throws UsernameNotFoundException;
}
经过查找,基本上都是不分表不同用户放同一张表,不然就得通过拼字符串的方式,如:zhangsan@@normalUser、manager@@admin,请求Token的时候拼接好再传入认证服务器,但是发现刷新token的时候会刷新不了…而且这种方式我个人是极不情愿的…最后找到一个大神的:https://www.jianshu.com/p/45f9707b1792,大体上可以实现了,不过没有啥过多的说明,而且刷新token部分好像少了一个Filter,刷新token不成功…经过探索,最后终于搞通了=。=
主要有两大点,一是登陆时获取token,二是刷新token。
实现
1 登陆获取token
1.1 新增CustomUserDetailsService extends UserDetailsService,新增自定义的方法
/**
 * 继承原来的UserDetailsService新增自定义方法
 */
public interface CustomUserDetailsService extends UserDetailsService {

    UserDetails loadUserByUsername(String var1, String var2) throws UsernameNotFoundException;

}
然后根据自己需要实现它,这里就不放出来了
public class UserDetailsServiceImpl implements CustomUserDetailsService {
	@Override
    public UserDetails loadUserByUsername(String username, String userType) throws UsernameNotFoundException {
    	// 根据自己需要进行实现
        // 1.获取用户
        // 2.获取用户可访问权限信息
		// 3.构造UserDetails信息并返回
        return userDetail;
    }
}
从现在开始,所有需要用到userDetailsService的,全部都要替换成自定义CustomUserDetailsService
1.2 复制org.springframework.security.authentication.dao.DaoAuthenticationProvider的代码,自定义 CustomAuthenticationProvider,然后进行修改retrieveUser()方法,其他不需要动
记得将自定义的CustomAuthenticationProvider中的userDetailsService替换成自定义的CustomUserDetailsService
protected final UserDetails retrieveUser(String username, UsernamePasswordAuthenticationToken authentication) throws AuthenticationException {
        this.prepareTimingAttackProtection();
        Map<String,String> map = (Map<String, String>) authentication.getDetails(); // 自定义添加
        try {
            String userType = map.get("userType"); // 自定义添加
            UserDetails loadedUser = this.getUserDetailsService().loadUserByUsername(username, userType); // 自定义添加userType参数
            if (loadedUser == null) {
                throw new InternalAuthenticationServiceException("UserDetailsService returned null, which is an interface contract violation");
            } else {
                return loadedUser;
            }
        } catch (UsernameNotFoundException var4) {
            this.mitigateAgainstTimingAttack(authentication);
            throw var4;
        } catch (InternalAuthenticationServiceException var5) {
            throw var5;
        } catch (Exception var6) {
            throw new InternalAuthenticationServiceException(var6.getMessage(), var6);
        }
    }
1.3 到WebSecurityConfig配置上面的CustomAuthenticationProvider
 	@Bean(name="customAuthenticationProvider")
    public AuthenticationProvider customAuthenticationProvider() {
        CustomAuthenticationProvider customAuthenticationProvider= new CustomAuthenticationProvider();
        customAuthenticationProvider.setUserDetailsService(userDetailsService);
        customAuthenticationProvider.setHideUserNotFoundExceptions(false);
        customAuthenticationProvider.setPasswordEncoder(passwordEncoder());
        return customAuthenticationProvider;
    }

    @Override
    protected void configure(AuthenticationManagerBuilder auth) throws Exception {
        auth.authenticationProvider(customAuthenticationProvider());
    }
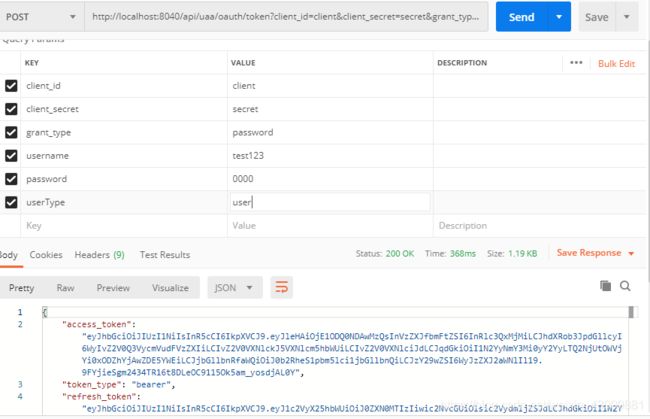
到这里,就可以去获取token试试了

现在去请求刷新Token会发现怎样也刷新不了,因为刷新Token时用的还是原版的UserDetailsService,所以下面要重新自定义相关类来替换掉
2 刷新Token
2.1 复制org.springframework.security.core.userdetails.UserDetailsByNameServiceWrapper 自定义 CustomUserDetailsByNameServiceWrapper 在 loadUserDetails() 方法添加自定义的userType
注意这个类中的 userDetailsService 也需要替换成自定义的CustomUserDetailsService
public UserDetails loadUserDetails(T authentication) throws UsernameNotFoundException {
        // ----------添加自定义的内容----------
        AbstractAuthenticationToken principal = (AbstractAuthenticationToken) authentication.getPrincipal();
        Map<String,String> map = (Map<String, String>) principal.getDetails();
        String userType = map.get("userType");
        // ----------添加自定义的内容----------
        return this.userDetailsService.loadUserByUsername(authentication.getName(), userType); // 使用自定义的userDetailsService
    }
2.2 复制 org.springframework.security.oauth2.provider.token.DefaultTokenServices 到自定义的 CustomTokenServices 然后修改refreshAccessToken() 方法
其实只改了if (this.authenticationManager != null && !authentication.isClientOnly()) 这里面的内容,其他的都没动(这个方法好长,容易造成太长不看的感觉…整个弄上来我其实是不情愿的=。=)
public OAuth2AccessToken refreshAccessToken(String refreshTokenValue, TokenRequest tokenRequest) throws AuthenticationException {
        if (!this.supportRefreshToken) {
            throw new InvalidGrantException("Invalid refresh token: " + refreshTokenValue);
        } else {
            OAuth2RefreshToken refreshToken = this.tokenStore.readRefreshToken(refreshTokenValue);
            if (refreshToken == null) {
                throw new InvalidGrantException("Invalid refresh token: " + refreshTokenValue);
            } else {
                OAuth2Authentication authentication = this.tokenStore.readAuthenticationForRefreshToken(refreshToken);
                if (this.authenticationManager != null && !authentication.isClientOnly()) {
                    // OAuth2Authentication 中的 Authentication userAuthentication 丢失了 Detail的信息,需要补上
                    // 1.从tokenRequest中获取请求的信息,并重新构造成 UsernamePasswordAuthenticationToken
                    // 2.设置好了Detail的信息再传入构造 PreAuthenticatedAuthenticationToken 交由后面的验证
                    tokenRequest.getRequestParameters();
                    Object details = tokenRequest.getRequestParameters();
                    UsernamePasswordAuthenticationToken userAuthentication = (UsernamePasswordAuthenticationToken) authentication.getUserAuthentication();
                    userAuthentication.setDetails(details);
                    // 去掉原来的,使用自己重新构造的 userAuthentication
//                    Authentication user = new PreAuthenticatedAuthenticationToken(authentication.getUserAuthentication(), "", authentication.getAuthorities());
                    Authentication user = new PreAuthenticatedAuthenticationToken(userAuthentication, "", authentication.getAuthorities());
                    user = this.authenticationManager.authenticate(user);
                    authentication = new OAuth2Authentication(authentication.getOAuth2Request(), user);
                    authentication.setDetails(details);
                }

                String clientId = authentication.getOAuth2Request().getClientId();
                if (clientId != null && clientId.equals(tokenRequest.getClientId())) {
                    this.tokenStore.removeAccessTokenUsingRefreshToken(refreshToken);
                    if (this.isExpired(refreshToken)) {
                        this.tokenStore.removeRefreshToken(refreshToken);
                        throw new InvalidTokenException("Invalid refresh token (expired): " + refreshToken);
                    } else {
                        authentication = this.createRefreshedAuthentication(authentication, tokenRequest);
                        if (!this.reuseRefreshToken) {
                            this.tokenStore.removeRefreshToken(refreshToken);
                            refreshToken = this.createRefreshToken(authentication);
                        }

                        OAuth2AccessToken accessToken = this.createAccessToken(authentication, refreshToken);
                        this.tokenStore.storeAccessToken(accessToken, authentication);
                        if (!this.reuseRefreshToken) {
                            this.tokenStore.storeRefreshToken(accessToken.getRefreshToken(), authentication);
                        }

                        return accessToken;
                    }
                } else {
                    throw new InvalidGrantException("Wrong client for this refresh token: " + refreshTokenValue);
                }
            }
        }
    }
2.3 到认证服务器配置类 AuthorizationServerConfig 配置刚刚自定义的两个类 CustomUserDetailsByNameServiceWrapper 和 CustomTokenServices
@Override
    public void configure(AuthorizationServerEndpointsConfigurer endpoints) throws Exception {
        endpoints.tokenStore(jwtTokenStore()) // 根据自己需要
                 .tokenEnhancer(jwtAccessTokenConverter())
                 .reuseRefreshTokens(true)
                 .authenticationManager(authenticationManager)
                 .userDetailsService(userDetailsService)
                 .tokenServices(customTokenServices(endpoints)); // 自定义TokenServices
    }

    public CustomTokenServices customTokenServices(AuthorizationServerEndpointsConfigurer endpoints){
        CustomTokenServices tokenServices = new CustomTokenServices();
        tokenServices.setTokenStore(endpoints.getTokenStore());
        tokenServices.setSupportRefreshToken(true);
        tokenServices.setReuseRefreshToken(true);
        tokenServices.setClientDetailsService(clientDetails());
        tokenServices.setTokenEnhancer(endpoints.getTokenEnhancer());
        // 设置自定义的CustomUserDetailsByNameServiceWrapper
        if (userDetailsService != null) {
            PreAuthenticatedAuthenticationProvider provider = new PreAuthenticatedAuthenticationProvider();
            provider.setPreAuthenticatedUserDetailsService(new CustomUserDetailsByNameServiceWrapper(userDetailsService));
            tokenServices.setAuthenticationManager(new ProviderManager(Arrays.asList(provider)));
        }
        return tokenServices;
    }
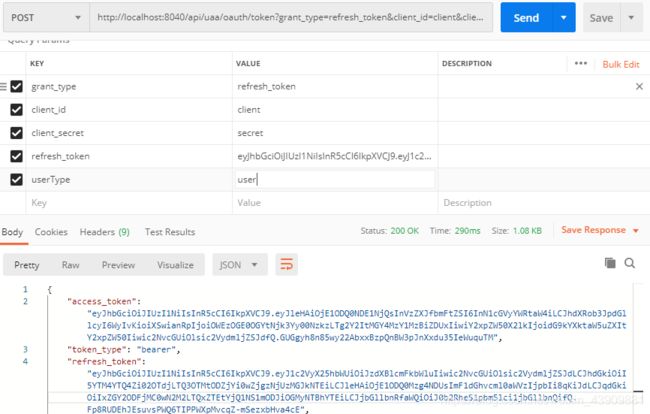
至此就大功告成了~ 去postman请求刷新Token试试~

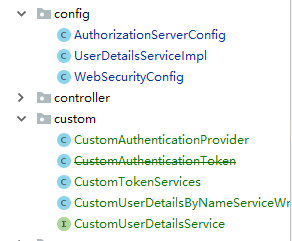
项目结构
后记
刷新token部分折腾了好久,也查过其他自定义token的,基本上都是要自定义一个Filter,而且在尝试的过程中也发现不是自己想要的结果…
然后就自己慢慢debug找刷新token失败的原因,最后发现,不管是获取token还是刷新token,都会从 AbstractAuthenticationToken 的子类(一般是UsernamePasswordAuthenticationToken)获取details,就下面这货:
public abstract class AbstractAuthenticationToken implements Authentication, CredentialsContainer {
    private final Collection<GrantedAuthority> authorities;
    private Object details;
    private boolean authenticated = false;
    ...
}
然后我们从details中拿到自定义的userType,再传入自定义的CustomUserDetailsService中,整个过程跑通了就ok了。
在获取Token的时候,像client_id,client_secret等请求参数,框架会自动放到details中,但是在刷新token的时候不知什么原因,details中并没有放入请求的参数,所以需要自己重新构造,还好这些信息都保存在tokenRequest中,所以new一个UsernamePasswordAuthenticationToken,把它们都放进details中,再传入
PreAuthenticatedAuthenticationToken,后续就交由框架去验证就可以了。
if (this.authenticationManager != null && !authentication.isClientOnly()) {
        // OAuth2Authentication 中的 Authentication userAuthentication 丢失了 Detail的信息,需要补上
        // 1.从tokenRequest中获取请求的信息,并重新构造成 UsernamePasswordAuthenticationToken
        // 2.设置好了Detail的信息再传入构造 PreAuthenticatedAuthenticationToken 交由后面的验证
        tokenRequest.getRequestParameters();
        Object details = tokenRequest.getRequestParameters();
        UsernamePasswordAuthenticationToken userAuthentication = (UsernamePasswordAuthenticationToken) authentication.getUserAuthentication();
        userAuthentication.setDetails(details);
        // 去掉原来的,使用自己重新构造的 userAuthentication
//                    Authentication user = new PreAuthenticatedAuthenticationToken(authentication.getUserAuthentication(), "", authentication.getAuthorities());
        Authentication user = new PreAuthenticatedAuthenticationToken(userAuthentication, "", authentication.getAuthorities());
        user = this.authenticationManager.authenticate(user);
        authentication = new OAuth2Authentication(authentication.getOAuth2Request(), user);
        authentication.setDetails(details);
    }
能力有限,有误的地方的欢迎指出哈~
源码
【2022.5】鉴于笔者能力有限,且这篇文章距今时间比较长,很多细节已经忘记了(捂脸…)无法解答评论区的各种问题,所以这里贴出源码供大家研(pi)究(dou),代码很烂,还请不要介意
https://gitee.com/luvying/todayProject
其中关于Spring Security OAuth2认证的相关代码在这个路径
https://gitee.com/luvying/todayProject/tree/master/today-auth-server/src/main/java/com/ying/todayauthserver
