认证服务,(集成社交登录(OAuth2.0),单点登录功能) 分布式spring session
目录
- 创建项目gulimall-auth-server,并配置相关环境
- 获取验证码,用户注册,普通登录
- 社交登录
-
- 什么是社交登录
- 社交登录流程图
- 原理图
- 微博开放平台的使用
- 登录成功之后,将用户信息在首页显示。需要解决子域的seession共享问题,跨域session共享问题和多服务下的session共享
- 分布式spring session
-
- 使用spring session完美解决上述所有问题
-
- spring session 核心原理
- 单点登录
认证中心(gulimall-auth-server):在微服务系统中,当用户登录的时候,应该是统一到认证中心统一认证,认证成功之后,才能进行各种微服务的调用。
参考地址1
参考地址2
创建项目gulimall-auth-server,并配置相关环境
获取验证码,用户注册,普通登录
- 获取验证码,gulimall-auth-server调用第三方短信服务gulimall-third-party
- 用户注册,gulimall-auth-server调用会员服务gulimall-member
- 用户登录(普通登录)gulimall-auth-server 调用会员服务gulimall-member
登录过程中,密码使用的是md5加盐的加密方式,使用封装好的工具类BCryptPasswordEncoder.encode()
社交登录
什么是社交登录
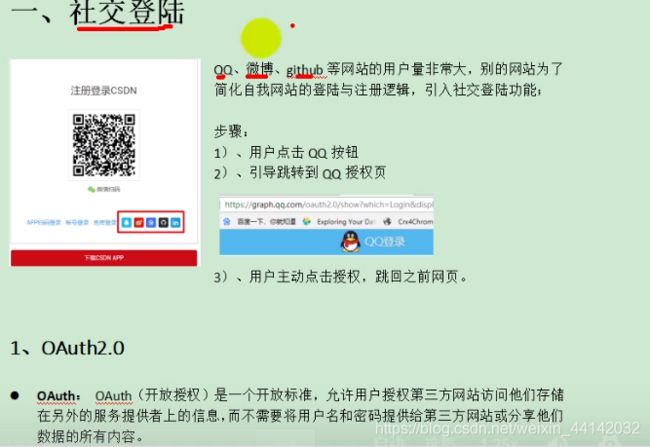

社交登录流程图

原理图

微博开放平台的使用
需要在微博开放平台注册自己的系统账号才可以。
微博开放平台地址
点击网站进入
填写一些个人信息后,https://open.weibo.com/apps/new?sort=web 创建新应用gulimallxxx,会得到APP KEY和APP Secret
在高级信息里填写
授权回调页:gulimall.com/success
取消授权回调页:gulimall.com/fail
授权机制说明 查看OAuth2
登录成功之后,将用户信息在首页显示。需要解决子域的seession共享问题,跨域session共享问题和多服务下的session共享
登录成功跳转到首页,但是怎么保证没有验证情况下访问不了首页:用shiro, Spring Security等安全框架拦截器功能
两个框架比较:https://www.cnblogs.com/aoeiuv/p/5868128.html
分布式spring session

问题:1. 多个服务下的session共享
2. 不同域名下的session共享:解决:设置session对应浏览器cooken的作用域到父域名,gulimall.com(子域名auth.gulimall.com)

使用spring session完美解决上述所有问题
上面解决了同域名的session问题,但如果taobao.com和tianmao.com这种不同的域名也想共享session呢?spring session不能解决。
spring session原理:将session存储在redis中;

spring session 核心原理
网上百度一下:https://blog.csdn.net/m0_46539364/article/details/110533408
就是分析@EnableRedisHttpSession,
@Import({RedisHttpSessionConfiguration.class})
@Configuration( proxyBeanMethods = false)
public @interface EnableRedisHttpSession {
public class RedisHttpSessionConfiguration
    extends SpringHttpSessionConfiguration // 继承
    implements 。。。{

    // 后面SessionRepositoryFilter会构造时候自动注入他
    @Bean // 操作session的方法,如getSession()  deleteById()
    public RedisIndexedSessionRepository sessionRepository() {
SessionRepositoryFilter,每个请求都要经过该filter
public class SpringHttpSessionConfiguration
    implements ApplicationContextAware {

    @Bean
    public <S extends Session> SessionRepositoryFilter<? extends Session> springSessionRepositoryFilter(SessionRepository<S> sessionRepository) { // 注入前面的bean
        SessionRepositoryFilter<S> sessionRepositoryFilter = new SessionRepositoryFilter(sessionRepository);
        sessionRepositoryFilter.setHttpSessionIdResolver(this.httpSessionIdResolver);
        return sessionRepositoryFilter;
    }
前面我们@Bean注入了sessionRepositoryFilter,他是一个过滤器,那我们需要知道他过滤做了什么事情:
原生的获取session时是通过HttpServletRequest获取的
这里对request进行包装,并且重写了包装request的getSession()方法
@Override // SessionRepositoryFilter.java
protected void doFilterInternal(HttpServletRequest request,
                                HttpServletResponse response,
                                FilterChain filterChain) {

    request.setAttribute(SESSION_REPOSITORY_ATTR, this.sessionRepository);

    //对原生的request、response进行包装
    // SessionRepositoryRequestWrapper.getSession()
    SessionRepositoryRequestWrapper wrappedRequest = new SessionRepositoryRequestWrapper(
        request, response, this.servletContext);
    SessionRepositoryResponseWrapper wrappedResponse = new SessionRepositoryResponseWrapper(
        wrappedRequest, response);

    try {
        filterChain.doFilter(wrappedRequest, wrappedResponse);
    }
    finally {
        wrappedRequest.commitSession();
    }
}
绣花前面的代码,controller层加参数HttpSession,直接session.setAttribute(“user”,user)即可
前端页面的显示可以用
-
单点登录
单点登录:一处登录,处处登录。
别人写好的框架,类似于人人开源。 gitee上搜索xxl-sso自己的例子:gulimall-test-sso-server gulimall-test-sso-client


