基于TensorFlow2的神经网络MNIST手写数字识别(多层感知器)
文章目录
-
- 1 导包
- 2 数据导入与处理
- 3 创建模型(MLP多层感知器)
- 4 定义优化器与损失函数
- 5 编译模型与训练
- 6 训练过程结果可视化
- 7 预测示例
1 导包
import tensorflow  as tf
import matplotlib.pyplot as plt
import numpy as np
%matplotlib inline
2 数据导入与处理
# 数据导入,获取训练集和测试集
(train_image, train_labels), (test_image, test_labels) = tf.keras.datasets.mnist.load_data()
# train_image.shape,train_labels.shape为(60000, 28, 28), (60000,)

# 增加通道维度
train_image = tf.expand_dims(train_image, -1)
test_image = tf.expand_dims(test_image, -1)
# TensorShape([60000, 28, 28, 1]), (60000,)

### 归一化 类型转换
train_image = tf.cast(train_image/255, tf.float32)
test_image = tf.cast(test_image/255, tf.float32)
train_labels = tf.cast(train_labels, tf.int64)
test_labels = tf.cast(test_labels, tf.int64)

# 标签one-hot处理(可用可不用)
# train_labels = tf.keras.utils.to_categorical(train_labels,num_classes=10)
# test_labels = tf.keras.utils.to_categorical(test_labels,num_classes=10)

### 创建Dataset
dataset = tf.data.Dataset.from_tensor_slices((train_image, train_labels)).shuffle(60000).batch(256)
test_dataset = tf.data.Dataset.from_tensor_slices((test_image, test_labels)).batch(256)
关于Dataset的使用方法可查看:TensorFlow2中tf.data.Dataset对象的使用(常用函数总结)
3 创建模型(MLP多层感知器)
## 模型创建
model = tf.keras.Sequential([
    tf.keras.layers.Flatten(input_shape=(28, 28, 1)),
    tf.keras.layers.Dense(128, activation='relu'),
    tf.keras.layers.Dense(64, activation='relu'),
    tf.keras.layers.Dense(10,activation='softmax') # 对应0-9这10个数字
])
4 定义优化器与损失函数
此分类为多分类问题,因此使用CategoricalCrossentropy(),同时注意one-hot编码时损失函数的不同。
optimizer = tf.keras.optimizers.Adam()
loss_func = tf.keras.losses.SparseCategoricalCrossentropy()# 顺序编码用SparseCategoricalCrossentropy,(如果model最后一层未使用激活,则需要添加参数from_logits=True)
# loss_func = tf.keras.losses.CategoricalCrossentropy() # 如果标签one-hot处理后 用CategoricalCrossentropy
5 编译模型与训练
model.compile(optimizer=optimizer,loss=loss_func,metrics=['acc'])   # 编译模型
# 训练10个批次
history = model.fit(dataset,validation_data=test_dataset,epochs=10) # 返回字典类型的数据 其中记录了准确率和损失的信息
6 训练过程结果可视化
查看history的key
print(history.history.keys())
# 输出dict_keys(['loss', 'acc', 'val_loss', 'val_acc'])
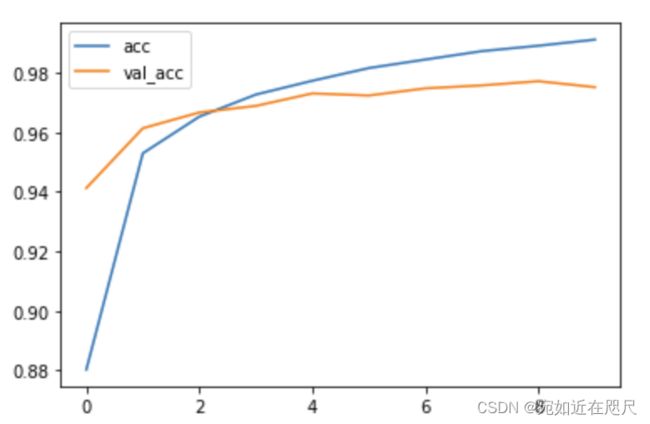
准确率变化:
plt.plot(history.epoch, history.history.get('acc'), label='acc')
plt.plot(history.epoch, history.history.get('val_acc'), label='val_acc')
plt.legend()
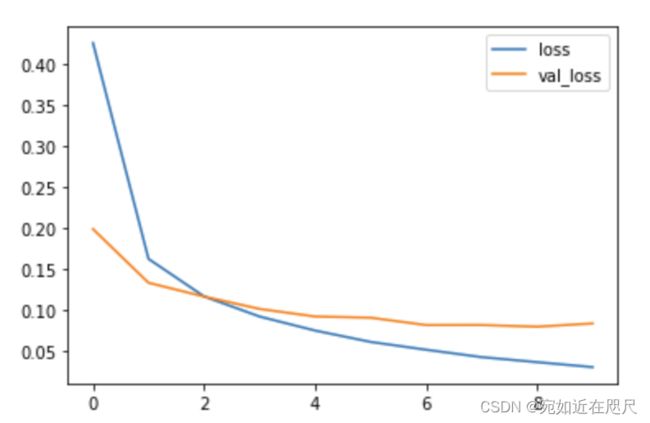
plt.plot(history.epoch, history.history.get('loss'), label='loss')
plt.plot(history.epoch, history.history.get('val_loss'), label='val_loss')
plt.legend()
7 预测示例
对测试数据集进行预测
pre = model.predict(test_dataset)
print(pre)
查看输出:
[[3.53520448e-08 1.59630407e-08 1.97583995e-06 ... 9.99849081e-01
  6.05364846e-07 3.37913411e-06]
 [6.13543039e-09 5.89039837e-06 9.99988317e-01 ... 1.00316535e-11
  5.76975310e-07 1.29064745e-11]
 [9.44570002e-06 9.84281600e-01 1.94140442e-03 ... 1.84494711e-03
  9.98479687e-03 6.83085018e-05]
 ...
 [1.03997776e-10 1.10911905e-11 1.15478211e-12 ... 1.99689339e-06
  2.43097219e-07 1.45793412e-04]
 [3.78633902e-10 8.37031573e-12 5.18594846e-12 ... 1.80990853e-07
  8.22161383e-06 2.27738037e-11]
 [2.64491706e-10 3.78421600e-12 1.59776789e-10 ... 1.65203985e-14
  4.33915490e-12 1.24108894e-13]]
取出测试集中的第一个预测结果与真实结果:
(使用np.argmax()取出最大值的索引)
print("预测结果:",np.argmax(pre[0]),"真实结果:",test_labels[0])
输出:
预测结果: 7 真实结果: tf.Tensor(7, shape=(), dtype=int64)
标签如果使用one-hot编码,则输出:
预测结果: 7 真实结果: [0. 0. 0. 0. 0. 0. 0. 1. 0. 0.]
基于卷积神经网络的手写数字识别可以查看这篇博客哦:基于Tensorflow2的卷积神经网络MNIST手写数字识别

