Java之JDBC之批处理及数据库连接池
文章目录
-
-
- 1、JDBC之批处理
-
- 1.1、 基本介绍
- 1.2、 应用实例
- 2、数据库连接池
-
- 2.1、5000 次连接数据库问题
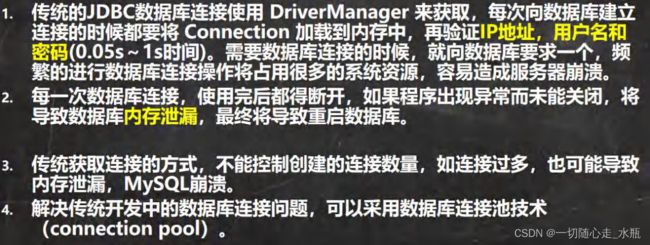
- 2.2、传统获取 Connection 问题分析
- 2.3、数据库连接池种类
- 2.4、C3P0 应用实例
-
1、JDBC之批处理
1.1、 基本介绍
1.2、 应用实例
CREATE TABLE admin2
( id INT PRIMARY KEY auto_increment,
username VARCHAR ( 32 ) NOT NULL,
PASSWORD VARCHAR ( 32 ) NOT NULL );
Batch_.java
package jdbc.batch_;

import jdbc.utils.JDBCUtils;
import org.junit.jupiter.api.Test;

import java.sql.Connection;
import java.sql.PreparedStatement;

/**
 * java 的批处理
 */
@SuppressWarnings({"all"})
public class Batch_ {
    // 传统方法, 添加 5000 条数据到 admin2
    @Test
    public void noBatch() throws Exception {
        Connection connection = JDBCUtils.getConnection();
        String sql = "insert into admin2 values(null, ?, ?)";
        PreparedStatement preparedStatement = connection.prepareStatement(sql);
        System.out.println("开始执行");
        long start = System.currentTimeMillis();  // 开始时间
        for (int i = 0; i < 5000; i++) {  // 5000 执行
            preparedStatement.setString(1, "jack" + i);
            preparedStatement.setString(2, "666");
            preparedStatement.executeUpdate();
        }
        long end = System.currentTimeMillis();
        System.out.println("传统的方式 耗时=" + (end - start));  // 传统的方式 耗时=14122
        // 关闭连接
        JDBCUtils.close(null, preparedStatement, connection);
    }

    // 使用批量方式添加数据
    @Test
    public void batch() throws Exception {
        Connection connection = JDBCUtils.getConnection();
        String sql = "insert into admin2 values(null, ?, ?)";
        PreparedStatement preparedStatement = connection.prepareStatement(sql);
        System.out.println("开始执行");
        long start = System.currentTimeMillis();  // 开始时间
        for (int i = 0; i < 5000; i++) {
            preparedStatement.setString(1, "jack" + i);
            preparedStatement.setString(2, "666");
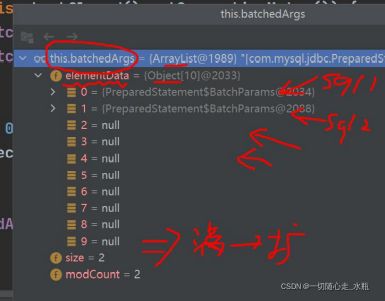
            // 将 sql 语句加入到批处理包中 -> 看源码
            /*
            // 1. 第一就创建 ArrayList - elementData => Object[]
            // 2. elementData => Object[] 就会存放我们预处理的 sql 语句
            // 3. 当 elementData 满后, 就按照 1.5 扩容
            // 4. 当添加到指定的值后, 就 executeBatch
            // 5. 批量处理会减少我们发送 sql 语句的网络开销, 而且减少编译次数, 因此效率提高
            public void addBatch() throws SQLException {
                synchronized(this.checkClosed().getConnectionMutex()) {
                    if (this.batchedArgs == null) {
                        this.batchedArgs = new ArrayList();
                    }

                    for(int i = 0; i < this.parameterValues.length; ++i) {
                        this.checkAllParametersSet(this.parameterValues[i], this.parameterStreams[i], i);
                    }

                    this.batchedArgs.add(new PreparedStatement.BatchParams(this.parameterValues, this.parameterStreams, this.isStream, this.streamLengths, this.isNull));
                }
            }
            */
            preparedStatement.addBatch();
            // 当有 1000 条记录时, 在批量执行
            if ((i + 1) % 1000 == 0) {  // 满 1000 条 sql
                preparedStatement.executeBatch();
                // 清空一把
                preparedStatement.clearBatch();
            }
        }
        long end = System.currentTimeMillis();
        System.out.println("批量方式 耗时=" + (end - start));  // 批量方式 耗时=86
        // 关闭连接
        JDBCUtils.close(null, preparedStatement, connection);
    }
}
JDBCUtils.java
package jdbc.utils;

import java.io.FileInputStream;
import java.io.IOException;
import java.sql.*;
import java.sql.DriverManager;
import java.sql.SQLException;
import java.util.Properties;

/**
 * 这是一个工具类, 完成 mysql 的连接和关闭资源
 */
@SuppressWarnings({"all"})
public class JDBCUtils {
    // 定义相关的属性(4 个), 因为只需要一份, 因此, 我们做出 static
    private static String user;  // 用户名
    private static String password;  // 密码
    private static String url;  // url
    private static String driver;  // 驱动名

    // 在 static 代码块去初始化
    static {
        try {
            Properties properties = new Properties();
            properties.load(new FileInputStream("src\\mysql.properties"));
            // 读取相关的属性值
            user = properties.getProperty("user");
            password = properties.getProperty("password");
            url = properties.getProperty("url");
            driver = properties.getProperty("driver");
        } catch (IOException e) {
            // 在实际开发中, 我们可以这样处理
            // 1. 将编译异常转成 运行异常
            // 2. 调用者可以选择捕获该异常, 也可以选择默认处理该异常, 比较方便
            throw new RuntimeException(e);
        }
    }

    // 连接数据库, 返回 Connection
    public static Connection getConnection() {
        try {
            return DriverManager.getConnection(url, user, password);
        } catch (SQLException e) {
            // 1. 将编译异常转成 运行异常
            // 2. 调用者, 可以选择捕获该异常, 也可以选择默认处理该异常, 比较方便
            throw new RuntimeException(e);
        }
    }

    // 关闭相关资源
    /*
        1. ResultSet 结果集
        2. Statement 或者 PreparedStatement
        3. Connection
        4. 如果需要关闭资源, 就传入对象, 否则传入 null
    */
    public static void close(ResultSet set, Statement statement, Connection connection) {
        // 判断是否为 null
        try {
            if (set != null) {
                set.close();
            }

            if (statement != null) {
                statement.close();
            }

            if (connection != null) {
                connection.close();
            }
        } catch (SQLException e) {
            // 将编译异常转成运行异常抛出
            throw new RuntimeException(e);
        }
    }
}
mysql.properties
user=root
password=root
driver=com.mysql.jdbc.Driver
url=jdbc:mysql://localhost:3306/user_db?useUnicode=true&characterEncoding=UTF-8&rewriteBatchedStatements=true
2、数据库连接池
2.1、5000 次连接数据库问题
package jdbc.datasource;

import jdbc.utils.JDBCUtils;
import org.junit.jupiter.api.Test;

import java.sql.*;

public class ConQuestion {
    // 代码 连接 mysql 5000 次
    @Test
    public void testCon() {
        // 看看连接-关闭 connection 会耗用多久
        long start = System.currentTimeMillis();
        System.out.println("开始连接.....");
        for (int i = 0; i < 5000; i++) {
            // 使用传统的 jdbc 方式, 得到连接
            Connection connection = JDBCUtils.getConnection();
            //做一些工作, 比如得到 PreparedStatement, 发送 sql
            // ..........
            // 关闭
            JDBCUtils.close(null, null, connection);
        }
        long end = System.currentTimeMillis();
        System.out.println("传统方式 5000 次 耗时=" + (end - start));  // 传统方式 5000 次 耗时=9537
    }
}
2.2、传统获取 Connection 问题分析
2.3、数据库连接池种类
2.4、C3P0 应用实例
使用代码实现c3p0 数据库连接池,配置(c3p0-config.xml)文件放src目录下
C3P0_.java
package jdbc.datasource;

import com.mchange.v2.c3p0.ComboPooledDataSource;
import org.junit.jupiter.api.Test;

import java.io.FileInputStream;
import java.sql.Connection;
import java.util.Properties;

/**
 * c3p0 的使用
 */
public class C3P0_ {
    // 方式 1: 相关参数, 在程序中指定 user, url, password 等
    @Test
    public void testC3P0_01() throws Exception {
        // 1. 创建一个数据源对象
        ComboPooledDataSource comboPooledDataSource = new ComboPooledDataSource();
        // 2. 通过配置文件 mysql.properties 获取相关连接的信息
        Properties properties = new Properties();
        properties.load(new FileInputStream("src\\mysql.properties"));
        // 读取相关的属性值
        String user = properties.getProperty("user");
        String password = properties.getProperty("password");
        String url = properties.getProperty("url");
        String driver = properties.getProperty("driver");
        // 给数据源 comboPooledDataSource 设置相关的参数
        // 注意: 连接管理是由 comboPooledDataSource 来管理
        comboPooledDataSource.setDriverClass(driver);
        comboPooledDataSource.setJdbcUrl(url);
        comboPooledDataSource.setUser(user);
        comboPooledDataSource.setPassword(password);
        // 设置初始化连接数
        comboPooledDataSource.setInitialPoolSize(10);
        // 最大连接数
        comboPooledDataSource.setMaxPoolSize(50);
        // 测试连接池的效率, 测试对 mysql 500000 次操作
        long start = System.currentTimeMillis();
        for (int i = 0; i < 500000; i++) {
            Connection connection = comboPooledDataSource.getConnection();  // 这个方法就是从 DataSource 接口实现的
            // System.out.println("连接 OK");
            connection.close();
        }
        long end = System.currentTimeMillis();
        // c3p0 500000 连接 mysql 耗时=2041
        System.out.println("c3p0 500000 连接 mysql 耗时=" + (end - start));
    }

    // 第二种方式 使用配置文件模板来完成
    // 1. 将 c3p0 提供的 c3p0.config.xml 拷贝到 src 目录下
    // 2. 该文件指定了连接数据库和连接池的相关参数
    @Test
    public void testC3P0_02() throws Exception {
        ComboPooledDataSource comboPooledDataSource = new ComboPooledDataSource("allen");
        // 测试 500000 次连接 mysql
        long start = System.currentTimeMillis();
        System.out.println("开始执行....");
        for (int i = 0; i < 500000; i++) {
            Connection connection = comboPooledDataSource.getConnection();
            // System.out.println("连接 OK~");
            connection.close();
        }
        long end = System.currentTimeMillis();
        // c3p0 的第二种方式(500000) 耗时=1944
        System.out.println("c3p0 的第二种方式(500000) 耗时=" + (end - start));
    }
}
c3p0-config.xml
<c3p0-config>
    <!-- 数据源名称代表连接池 -->
    <named-config name="allen">
        <!-- 驱动类 -->
        <property name="driverClass">com.mysql.jdbc.Driver</property>
        <!-- url-->
        <property name="jdbcUrl">jdbc:mysql://127.0.0.1:3306/user_db
        <!-- 用户名 -->
        <property name="user">root</property>
        <!-- 密码 -->
        <property name="password">root</property>
        <!-- 每次增长的连接数-->
        <property name="acquireIncrement">5</property>
        <!-- 初始的连接数 -->
        <property name="initialPoolSize">10</property>
        <!-- 最小连接数 -->
        <property name="minPoolSize">5</property>
        <!-- 最大连接数 -->
        <property name="maxPoolSize">50</property>
        <!-- 可连接的最多的命令对象数 -->
        <property name="maxStatements">5</property>
        <!-- 每个连接对象可连接的最多的命令对象数 -->
        <property name="maxStatementsPerConnection">2</property>
    </named-config>
</c3p0-config>


