python matlabplot_10分钟用Python或MATLAB制作漂亮的甘特图(Gantt)
Python画Gantt图
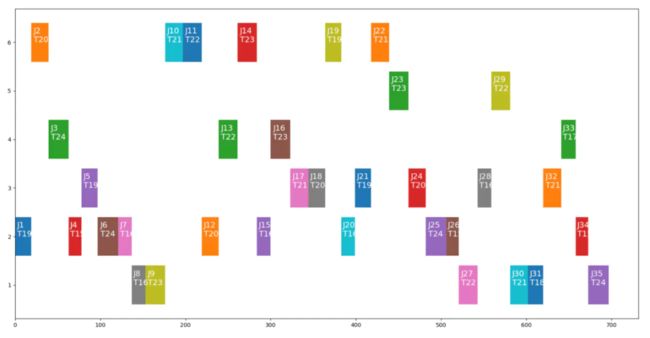
其实用Python画gantt原理是利用plt.barh()绘制水平方向的条形图,然后加以不同颜色区分表示。就是这么简单的。下面给出一个代码模板:
import matplotlib.pyplot as plt
import numpy as np
ax=plt.gca()
[ax.spines[i].set_visible(False) for i in ["top","right"]]
def gatt(m,t):
"""甘特图
m机器集
t时间集
"""
for j in range(len(m)):#工序j
i=m[j]-1#机器编号i
if j==0:
plt.barh(i,t[j])
plt.text(np.sum(t[:j+1])/8,i,'J%s\nT%s'%((j+1),t[j]),color="white",size=8)
else:
plt.barh(i,t[j],left=(np.sum(t[:j])))
plt.text(np.sum(t[:j])+t[j]/8,i,'J%s\nT%s'%((j+1),t[j]),color="white",size=8)
if __name__=="__main__":
"""测试代码"""
m=np.random.randint(1,7,35)
t=np.random.randint(15,25,35)
gatt(m,t)
plt.yticks(np.arange(max(m)),np.arange(1,max(m)+1))
plt.show()
效果图如下:
这里讲讲plt.barh这个函数,官方barh()项目地址如下:
https://matplotlib.org/api/_as_gen/matplotlib.pyplot.barh.html?highlight=barh#matplotlib.pyplot.barh
barh()表示绘制水平方向的条形图,基本使用方法为:
barh(y, width, left=0, height=0.8, edgecolor)
各个参数解析如下:
-y:在y轴上的位置
-width:条形图的宽度(从左到右的哦)
-left:开始绘制的x坐标
-edgecolor:图形边缘的颜色
还是用图解释方便一点,比如下图【J12 T21】:
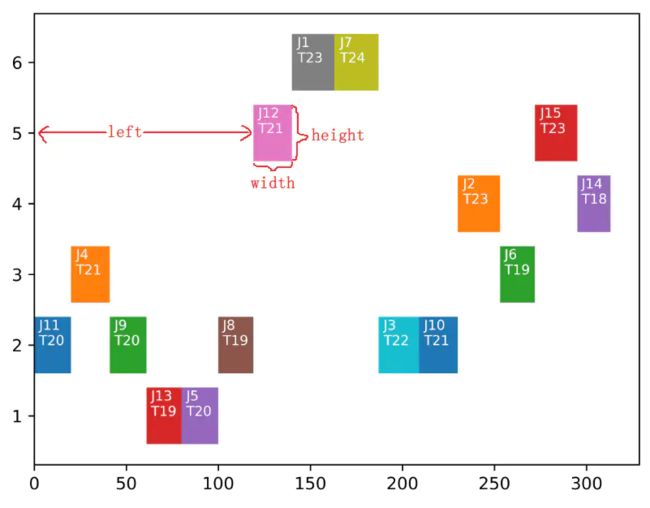
当然,为了让各个图形更有区分度,你也可以指定边缘的颜色。
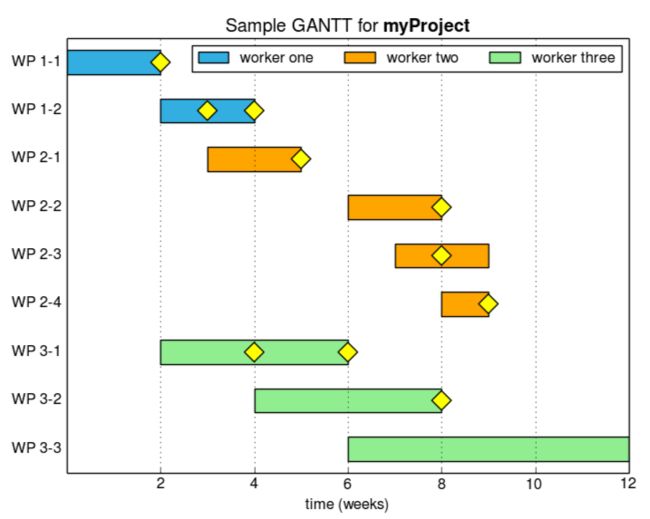
上面的是生产调度的甘特图。这里再帖一个项目管理的甘特图。是GitHub上的@stefanSchinkel大神(总是大神大神,让我觉得有种营销号的感觉!/哭笑)做的。详情可以戳:
https://github.com/stefanSchinkel/gantt
东西全都封装好了。只需要下载上述文件中的gantt.py,
然后
from gantt import Gantt
即可使用。
✎ 运行环境要求
matplotlib==3.0.3
numpy>=1.16.3
不过读取数据采用的是
json
格式的,结构如下:
{
"packages": [
{ "label" : "WP 1-1",
"start": 0,
"end": 2,
"milestones" : [2],
"legend": "worker one"
},
{ "label" : "WP 1-2",
"start": 2,
"end": 4,
"milestones" : [3, 4]
}
],
"title" : " Sample GANTT for \\textbf{myProject}",
"xlabel" : "time (weeks)",
"xticks" : [2,4,6,8,10,12]
}
-label:表示工作流程的名称
-start:开始时间
-end:结束时间
-milestones:里程碑
-legend:标签
-title:标题
-xlabel:x轴名称
-xticks:x轴的刻度标签
使用也很简单,比如利用当前目录下的sample.json生成一张甘特图:
from gantt import Gantt
g = Gantt('./sample.json')
g.render()
g.show() # or save w/ g.save('foo.png')
效果图如下:
MATLAB画Gannt图
当然MATLAB也是可以画的,具体我这里就不展开说了(因为我很少用这玩意,不太熟悉)。直接给出一个CSDN上@mnmalist大神写的脚本模板:
%fileName:mt06_final.mt06
%fileDescription:create a gatt chart whith the data given
%creator:by mnmlist
%Version:1.0
%last edit time:06-05-2015
clear;
axis([0,42,0,6.5]);%x轴 y轴的范围
set(gca,'xtick',0:2:42) ;%x轴的增长幅度
set(gca,'ytick',0:1:6.5) ;%y轴的增长幅度
xlabel('加工时间','FontName','微软雅黑','Color','b','FontSize',16)
ylabel('机器号','FontName','微软雅黑','Color','b','FontSize',16,'Rotation',90)
title('mk01 的一个最佳调度(最短完工时间为40)','fontname','微软雅黑','Color','b','FontSize',16);%图形的标题
n_bay_nb=6;%total bays //机器数目
n_task_nb = 55;%total tasks //任务数目
%x轴 对应于画图位置的起始坐标x
n_start_time=[0 0 2 6 0 0 3 4 10 13 4 3 10 6 12 4 5 6 14 7 9 9 16 7 11 14 15 12 16 17 16 15 18 19 19 20 21 20 22 21 24 24 25 27 30 30 27 25 28 33 36 33 30 37 37];%start time of every task //每个工序的开始时间
%length 对应于每个图形在x轴方向的长度
n_duration_time =[6 2 1 6 4 3 1 6 3 3 2 1 2 1 2 1 1 3 2 2 6 2 1 4 4 2 6 6 1 2 1 4 6 1 6 1 1 1 5 6 1 6 4 3 6 1 6 3 2 6 1 4 6 1 3];%duration time of every task //每个工序的持续时间
%y轴 对应于画图位置的起始坐标y
n_bay_start=[1 5 5 1 2 4 5 5 4 4 3 0 5 2 5 0 0 3 5 0 3 0 5 2 2 0 3 1 0 5 4 2 1 0 5 0 0 2 0 3 2 1 2 0 1 0 3 4 5 3 0 2 5 2 0]; %bay id of every task ==工序数目,即在哪一行画线
%工序号,可以根据工序号选择使用哪一种颜色
n_job_id=[1 9 8 2 0 4 6 9 9 0 6 4 7 1 5 8 3 8 2 1 1 8 9 6 8 5 8 4 2 0 6 7 3 0 2 1 7 0 4 9 3 7 5 9 5 2 4 3 3 7 5 4 0 6 5];%
rec=[0,0,0,0];%temp data space for every rectangle
color=[1,0,0;
0,1,0;
0,0,1;
1,1,0;
1,0,1;
0,1,1;
0.67,0,1;
1,.5,0;
.9,.5,.2;
.5,.5,.5];%和上一个版本的最大不同在于,matlab中仅可以用字符表示8种颜色,超过8种就不可以了,现在用rgb数组可以表示任意多的颜色
for i =1:n_task_nb
rec(1) = n_start_time(i);%矩形的横坐标
rec(2) = n_bay_start(i)+0.7; %矩形的纵坐标
rec(3) = n_duration_time(i); %矩形的x轴方向的长度
rec(4) = 0.6;
txt=sprintf('p(%d,%d)=%d',n_bay_start(i)+1,n_job_id(i)+1,n_duration_time(i));%将机器号,工序号,加工时间连城字符串
rectangle('Position',rec,'LineWidth',0.5,'LineStyle','-','FaceColor',[color(n_job_id(i)+1,1),color(n_job_id(i)+1,2),color(n_job_id(i)+1,3)]);%draw every rectangle
text(n_start_time(i)+0.2,(n_bay_start(i)+1),txt,'FontWeight','Bold','FontSize',16);%label the id of every task ,字体的坐标和其它特性
end
效果图如下:
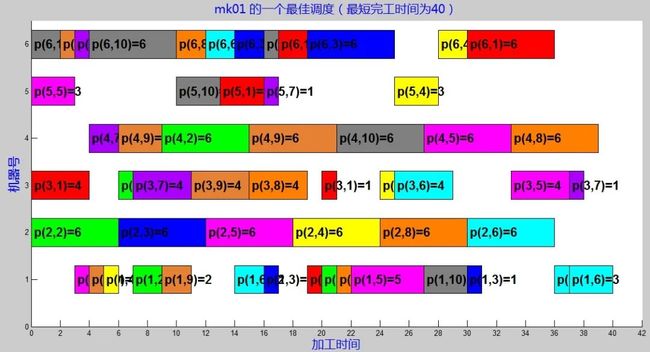
看起来也还行(花里胡哨的)。。。
好了,以上,这就是今天的内容介绍。
推荐阅读:

记得点个
在看
支持下哦~
![]()