Unity 之 接入IOS内购过程解析【文末源码】

Unity 之 接入IOS内购过程解析

  • 前言
    • 需要准备
    • 内购导图
  • 一,效果展示
  • 二,苹果后台
    • 2.1 注册应用程序
    • 2.2 添加应用内购买
    • 2.3 测试IAP
  • 三,下载IAP包
    • 3.1 下载Package
    • 3.2 打开Srever配置
  • 四,代码逻辑
    • 4.1 逻辑分析
    • 4.2 示例源码
  • 五,打包测试
    • 5.1 代码配置
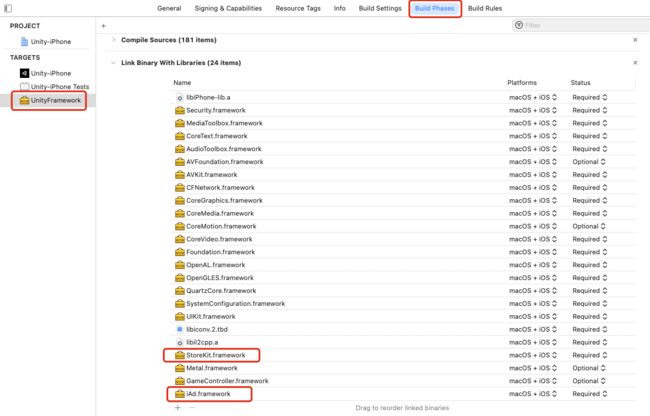
    • 5.2 手动配置
  • 六,问题汇总
    • 6.1 示例日志
    • 6.2 注意事项
    • 6.3 参考链接
    • 6.4 文末源码

前言

看完此文章你可以了解IOS内购接入全过程,可以学习到Unity从零接入内购功能。另外此博文和文末源码没有涉及到掉单补单部分逻辑。

需要准备

  • 一台mac系统机器
  • 苹果开发者账号
  • Unity2019.4.x (不同版本,3步骤略有不同)
  • Xcode (我的版本12.5)

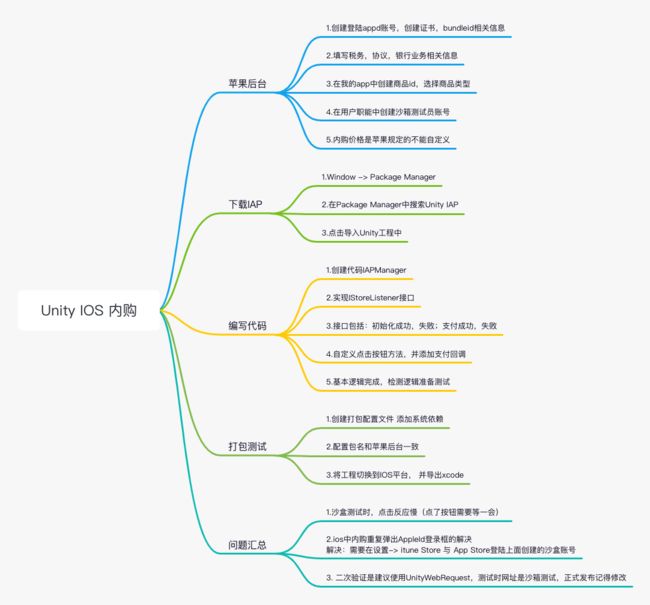
内购导图

Unity 之 接入IOS内购过程解析【文末源码】_第1张图片

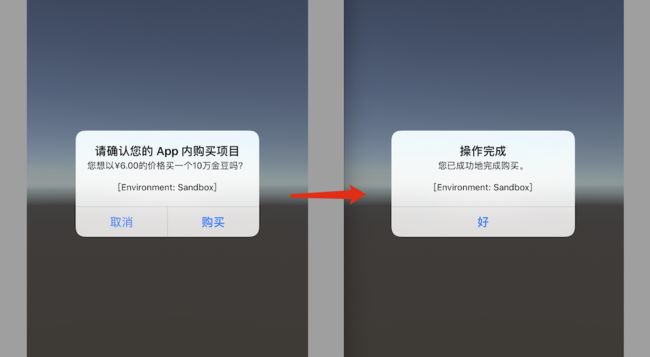
一,效果展示

Unity 之 接入IOS内购过程解析【文末源码】_第2张图片


二,苹果后台

PS:若公司已有运营人员在后台操作过了,可以跳过此步骤。注意测试机上还是需要登陆沙箱账号奥。

2.1 注册应用程序

  1. 首先打开苹果开发者官网:https://developer.apple.com/

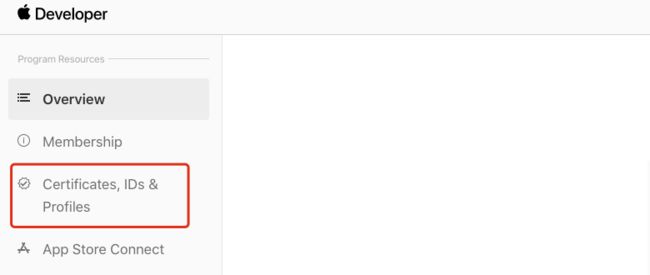
  2. 点击登陆并点“Account”,在Apple Developer Center中,导航到相应的标识符部分:

Unity 之 接入IOS内购过程解析【文末源码】_第3张图片

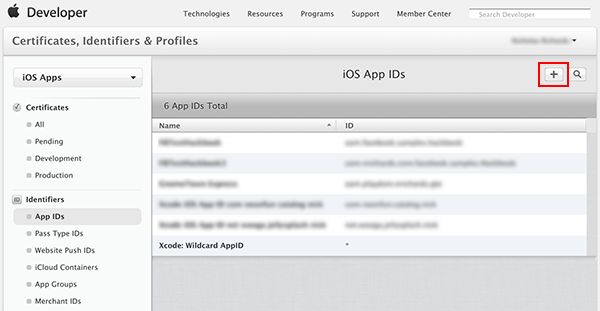
  1. 添加新的 App ID 以创建与 Apple 的基本应用程序实体。

    • 注意:使用显式应用程序 ID。通配符应用 ID (com.example.*) 不能用于使用应用内购买的应用。

    • 注意:在开发者中心创建 App ID 后,即可在 iTunes Connect 中使用它。

Unity 之 接入IOS内购过程解析【文末源码】_第4张图片

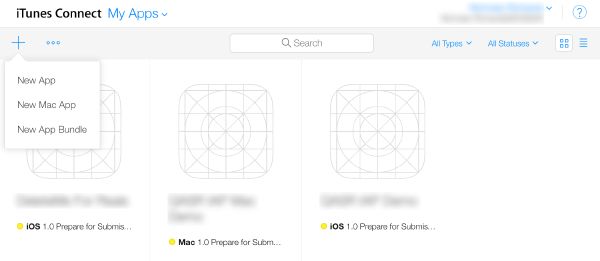
  1. 导航到iTunes Connect并创建一个应用程序,以与游戏建立商店关系:

Unity 之 接入IOS内购过程解析【文末源码】_第5张图片

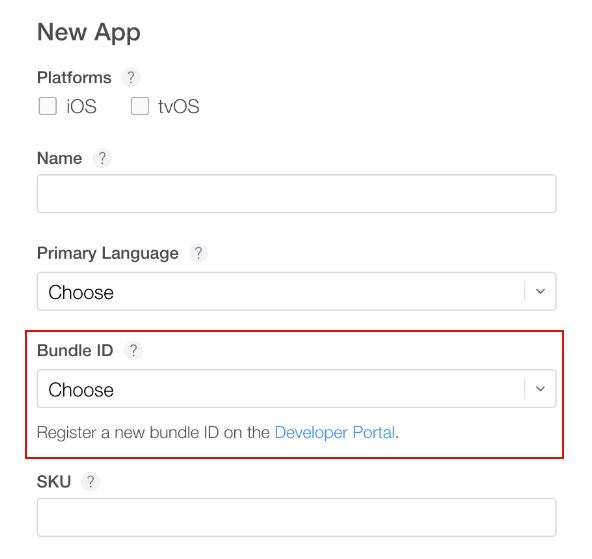
  1. 使用新创建的 App ID 作为应用的 Bundle ID:

Unity 之 接入IOS内购过程解析【文末源码】_第6张图片

2.2 添加应用内购买

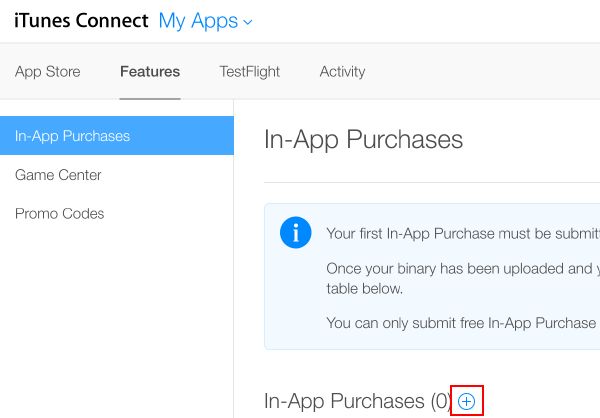
  1. 选择功能并使用加号 (“+”) 按钮添加新的应用内购买:
    Unity 之 接入IOS内购过程解析【文末源码】_第7张图片

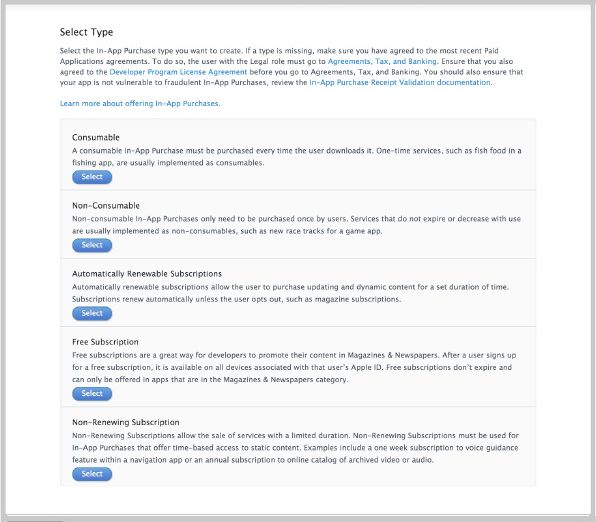
  2. 选择产品类型:

Unity 之 接入IOS内购过程解析【文末源码】_第8张图片

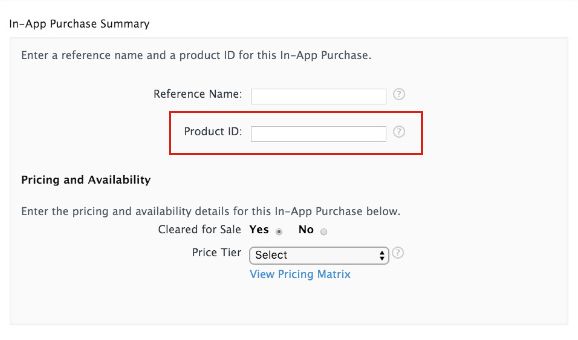
  1. 指定产品标识符,并根据要求填写其他字段。
  • 注意:此处的“产品 ID”与游戏源代码中使用的标识符相同,通过AddProduct()或AddProducts()添加到Unity IAP ConfigurationBuilder实例。

Unity 之 接入IOS内购过程解析【文末源码】_第9张图片

2.3 测试IAP

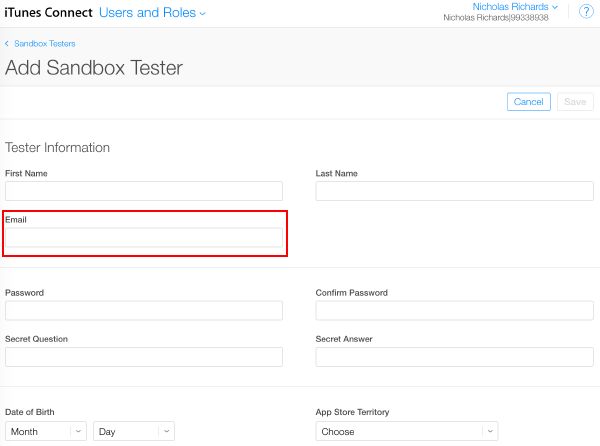
  1. 使用iTunes Connect创建沙盒测试器以在您的测试设备的iTunes帐户上使用。为此,请导航至iTunes Connect > Users and Roles,然后选择加号 (“+”) 按钮。

PS:详情可查看AppleSandbox Tester文档,。

Unity 之 接入IOS内购过程解析【文末源码】_第10张图片

Unity 之 接入IOS内购过程解析【文末源码】_第11张图片

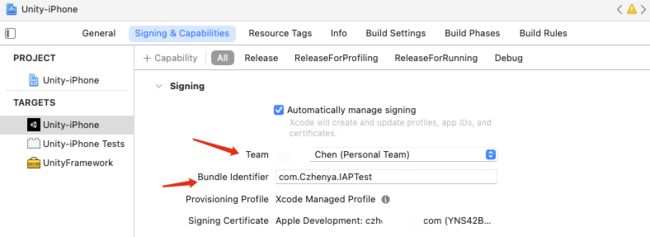
  1. Xcode项目配置
    Xcode 项目中Bundle IdentitifierTeamiTunes Connect 中使用的一致
    PS:Unity中的包名也应该保持一致

Unity 之 接入IOS内购过程解析【文末源码】_第12张图片

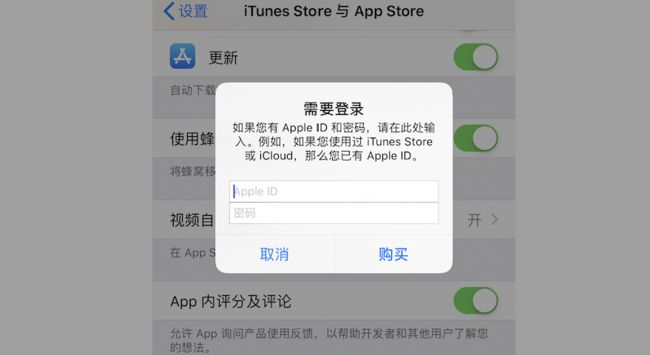
  1. 在测试设备登陆沙箱测试账号
    Unity 之 接入IOS内购过程解析【文末源码】_第13张图片

三,下载IAP包

3.1 下载Package

打开Windows -> Package Manager 下载 In App Purchasing
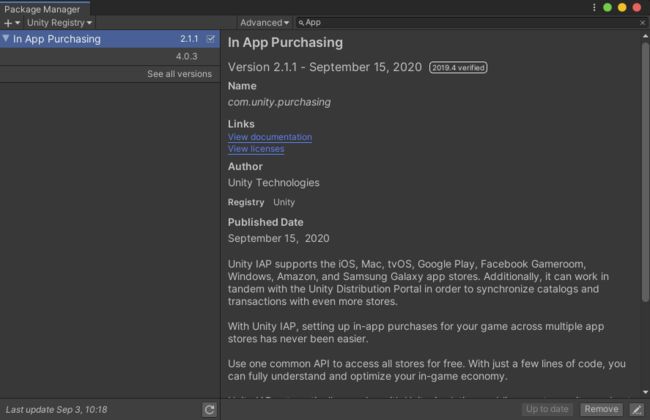
Unity 之 接入IOS内购过程解析【文末源码】_第14张图片

3.2 打开Srever配置

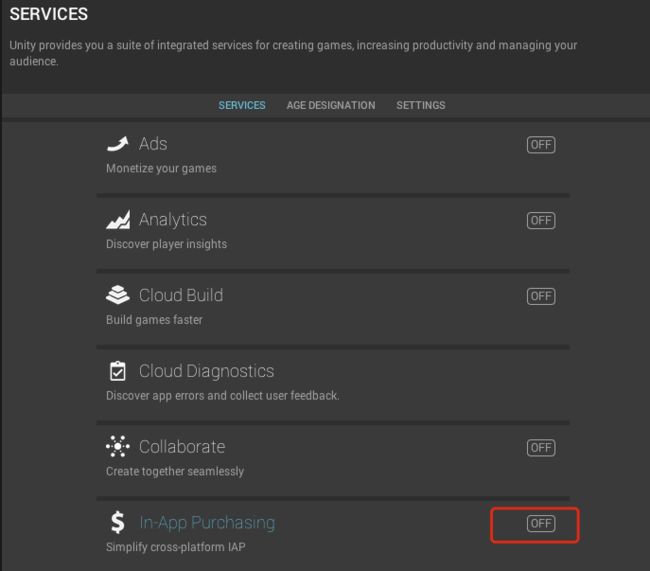
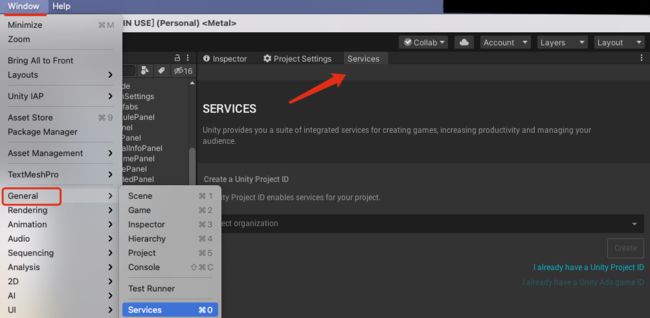
  1. 打开服务窗口,在服务窗口中查找和启用应用内购买
    Unity 之 接入IOS内购过程解析【文末源码】_第15张图片

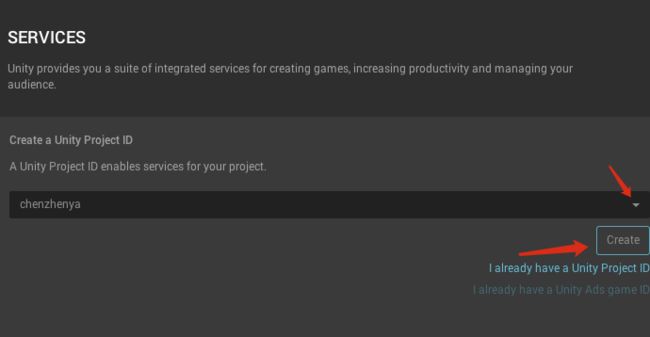
  2. 选择项目ID(当前登录的账号)
    Unity 之 接入IOS内购过程解析【文末源码】_第16张图片

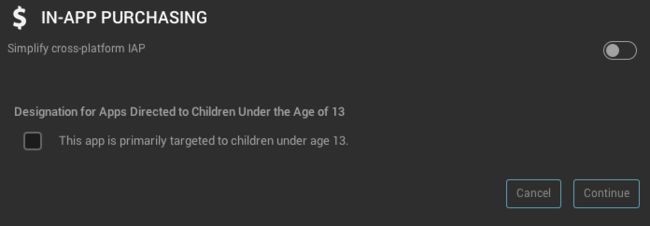
  3. 启用In-APP Purchasing (有的时候切换慢,需要等一会)
    Unity 之 接入IOS内购过程解析【文末源码】_第17张图片

  4. 回答问题
    问:这款应用主要面向13岁以下的儿童(是就勾选,不是不勾选)Unity 之 接入IOS内购过程解析【文末源码】_第18张图片

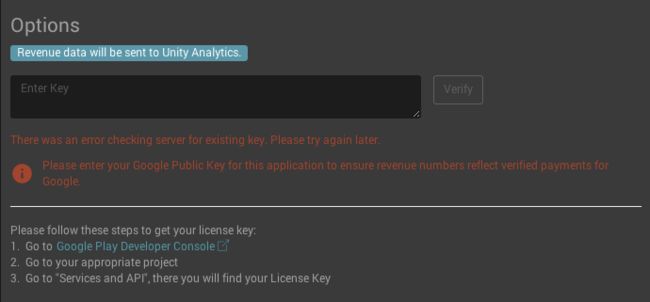
  5. 有个报错
    我没有解决也没有影响,需要解决的话按照下面的提示操作一下
    Unity 之 接入IOS内购过程解析【文末源码】_第19张图片


四,代码逻辑

4.1 逻辑分析

  1. 实现IStoreListener接口,接口提供四个回调函数,分别是初始化成功、失败,购买成功、失败;

  2. 编写初始化逻辑,完善初始化成功、失败回调接口函数;

  3. 编写调用购买逻辑,完善购买成功、失败回调接口函数;

  4. 实际开发中需要限制,购买按钮只被点击一次。

代码结构就是这样了,详细解释代码注释已经写得很清楚了,这里不再赘述。

使用时将代码挂载到场景即可进行初始化,然后创建Button监听代码中的OnClickPurchase方法即可打包测试。

PS:注意需要将goodsList数组中的key换成你后台申请的

4.2 示例源码

using System;
using System.Collections;
using System.Collections.Generic;
using UnityEngine;
using UnityEngine.Purchasing;

/// 
/// IAP管理类
/// 
public class IAPManager : MonoBehaviour, IStoreListener
{
    /// 
    /// 需要换成对应游戏后台的key
    /// 
    private string[] goodsList = new string[]
    {
        "com.czhenya.gold.1",
        "com.czhenya.gold.2",
        "com.czhenya.gold.3"
    };

    // 控制器
    private IStoreController controller;

    // 苹果扩展
    private IAppleExtensions appleExtensions;

    // 谷歌商店扩展
    private IGooglePlayStoreExtensions googlePlayStoreExtensions;

    // 是否可以发起购买
    private bool isCanOnClickBubBtn = false;

    void Start()
    {
        Init();
    }

    /// 
    /// 初始化
    /// 
    private void Init()
    {
        // 没有网络,IAP会一直初始化
        if (Application.internetReachability == NetworkReachability.NotReachable)
        {
            Debug.Log("----- 用户没有连接网络 IAP不可用 ------");
        }

        var module = StandardPurchasingModule.Instance();
        ConfigurationBuilder builder = ConfigurationBuilder.Instance(module);
        // builder.AddProduct("商品id1", ProductType.Consumable); 
        // ProductType :和后台说明对应
        // consumable:可消费的,如游戏中的金币,用完还可以再购买。
        // non-consumable:不可销毁的,一次购买,永久生效。比如去广告,解锁游戏关卡,这种商品只能购买一次。
        // subscription:订阅的,这种一般用于新闻、杂志、或者app里面的月卡。可以按月或者按年收费。
        for (int i = 0; i < goodsList.Length; i++)
        {
            builder.AddProduct(goodsList[i], ProductType.Consumable);
        }

        // 开始初始化
        UnityPurchasing.Initialize(this, builder);
    }

    /// 
    /// 初始化成功 -- 接口函数
    /// 
    /// 
    /// 
    public void OnInitialized(IStoreController controller, IExtensionProvider extensions)
    {
        Debug.Log("【Unity IAP】初始化成功 IAP initialize success");
        isCanOnClickBubBtn = true;
        this.controller = controller;

        // 回调赋值
        this.appleExtensions = extensions.GetExtension<IAppleExtensions>();
        this.googlePlayStoreExtensions = extensions.GetExtension<IGooglePlayStoreExtensions>();

        //登记 购买延迟 监听器
        appleExtensions.RegisterPurchaseDeferredListener(OnDeferred);
    }

    //购买延迟提示
    private void OnDeferred(Product item)
    {
        Debug.Log("【Unity IAP】 网速慢.................");
    }

    /// 
    /// 初始化失败回调 -- 接口函数
    /// 
    /// 
    public void OnInitializeFailed(InitializationFailureReason error)
    {
        Debug.LogError("【Unity IAP】初始化失败 OnInitializeFailed, reason:" + error.ToString());
    }

    /// 
    /// 购买失败回调 -- 接口函数
    /// 
    /// 
    /// 
    public void OnPurchaseFailed(Product i, PurchaseFailureReason p)
    {
        Debug.LogError("【Unity IAP】购买失败 OnPurchaseFailed,reason:" + p.ToString());
        if (this.onPurchaseFailed != null)
        {
            this.onPurchaseFailed();
            this.onPurchaseFailed = null;
        }
    }

    /// 
    /// 购买成功回调 -- 接口函数
    /// 
    /// 
    /// 
    public PurchaseProcessingResult ProcessPurchase(PurchaseEventArgs e)
    {
        Debug.LogError("【Unity IAP】购买过程 purchase finished, apple return receipt:" + e.purchasedProduct.receipt);

        if (this.onPurchaseSuccess != null)
        {
            this.onPurchaseSuccess(e.purchasedProduct.receipt);
            this.onPurchaseSuccess = null;
        }

        return PurchaseProcessingResult.Complete;
    }

    /// 
    /// 支付失败回调
    /// 
    private Action onPurchaseFailed;

    /// 
    /// 支付成功回调
    /// 
    private Action<string> onPurchaseSuccess;

    /// 
    /// 购买产品
    /// 
    /// 产品ID
    /// 失败回调
    /// 成功回调
    public void PurchaseProduct(string productId, Action onFailed, Action<string> onSuccess)
    {
        this.onPurchaseFailed = onFailed;
        this.onPurchaseSuccess = onSuccess;

        if (controller != null)
        {
            var product = controller.products.WithID(productId);
            if (product != null && product.availableToPurchase)
            {
                Debug.Log("【Unity IAP】开始购买");
                controller.InitiatePurchase(productId);
            }
            else
            {
                Debug.LogError("【Unity IAP】失败回调 no product with productId:" + productId);
                if (this.onPurchaseFailed != null)
                {
                    this.onPurchaseFailed();
                }
            }
        }
        else
        {
            Debug.LogError("【Unity IAP】失败回调 controller is null,can not do purchase");
            if (this.onPurchaseFailed != null)
            {
                this.onPurchaseFailed();
            }
        }
    }

    /// 
    /// 发起购买函数  -- 商城按钮监听
    /// 
    /// 
    public void OnClickPurchase(int i)
    {
        // 正式项目时需限制 -- 不允许多次点击 

        Debug.Log("【Unity IAP】发起购买函数 " + Application.internetReachability);
        if (Application.internetReachability == NetworkReachability.NotReachable)
        {
            Debug.Log("【Unity IAP】用户没网... ");
            return;
        }

        PurchaseProduct(goodsList[0], OnBuyFailed, OnBuySuccess);
    }

    /// 
    /// 购买失败回调
    /// 
    void OnBuyFailed()
    {
        Debug.Log("【Unity IAP】购买失败回调 OnBuyFailed...");
    }

    /// 
    /// 购买成功回调
    /// 
    /// 
    void OnBuySuccess(string str)
    {
        Debug.Log("【Unity IAP】购买成功回调 OnBuySuccess..." + str);
        //会得到下面这样一个字符串
        //{"Store":"AppleAppStore",
        //"TransactionID":"1000000845663422",
        //"Payload":"MIIT8QYJKoZIhvcNAQcCoIIT4jCCE94CAQExBBMMIIBa ... 还有N多 ..."}
    }
}

五,打包测试

代码配置和手动配置选择一个习惯用的方式即可。

5.1 代码配置

由于内购需要系统库StoreKit.frameworkiAd.framework。为了不每次打包Xcode时都手动添加,所以创建打包配置代码。(复制下面文件,放到Editor文件夹下)

using System.IO;
using UnityEditor;
using UnityEngine;
#if UNITY_IOS
using UnityEditor.Callbacks;
using UnityEditor.iOS.Xcode;
#endif

/// 
/// 打包自动配置文件
/// 
public class CZYConfigEditor
{
#if UNITY_IOS
    [PostProcessBuildAttribute(100)]
    public static void onPostProcessBuild(BuildTarget target, string targetPath)
    {
        if (target != BuildTarget.iOS)
        {
            return;
        }

        string projPath = PBXProject.GetPBXProjectPath(targetPath);
        PBXProject proj = new PBXProject();
        proj.ReadFromString(File.ReadAllText(projPath));
        string unityTarget = proj.GetUnityFrameworkTargetGuid();

        #region 系统依赖库

        proj.AddFrameworkToProject(unityTarget, "StoreKit.framework", false);
        proj.AddFrameworkToProject(unityTarget, "iAd.framework", false);

        #endregion

        string content = proj.WriteToString();
        File.WriteAllText(projPath, content);
    }
#endif
}

5.2 手动配置

不写上面代码的话,打包出Xcode工程后,需要手动添加StoreKit.frameworkiAd.framework

Unity 之 接入IOS内购过程解析【文末源码】_第20张图片

然后正常打包进行测试~ 即可完成开篇效果。


六,问题汇总

6.1 示例日志

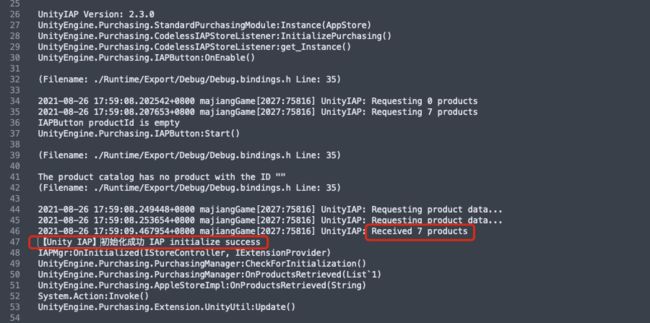
  • IAP初始化成功日志:
    Unity 之 接入IOS内购过程解析【文末源码】_第21张图片

  • 购买成功回调日志:

【Unity IAP】购买成功回调 OnBuySuccess…{“Store”:“AppleAppStore”,“TransactionID”:“1000000866663121”,“Payload”:“MIIT8QYJKoZIhvcNAQcCo
…中间省略N多行…
jSYLAk”}
System.Action`1:Invoke(T)
IAPMgr:ProcessPurchase(PurchaseEventArgs)
UnityEngine.Purchasing.PurchasingManager:ProcessPurchaseIfNew(Product)
UnityEngine.Purchasing.JSONStore:OnPurchaseSucceeded(String, String, String)
System.Action:Invoke()
UnityEngine.Purchasing.Extension.UnityUtil:Update()

6.2 注意事项

  • 真机测试的时候,一定要退出原来的账号(app store 登录的账号退出),才能用沙盒测试账号。
  • 请务必使用真机来测试,一切以真机为准。
  • 项目的Bundle identifier需要与您申请AppID时填写的bundleID一致,不然会无法请求到商品信息。
  • 沙盒环境测试appStore内购流程的时候,请使用没越狱的设备。
  • 沙盒的测试账号和你请求商品信息没有关系。请求商品信息的流程是,你在后台配置好了内购商品,并且将其添加到了需要集成内购功能的App中,然后你请求商品。请求到商品后的流程是这样的,苹果系统会自动弹出登录框让你登录账号。然后根据提示操作进行购买,这里的账号就是你配置的沙盒测试账号。

6.3 参考链接

官方文档 Unity IAP

官方手册 Unity IAP

6.4 文末源码

其实源码以及步骤都在上面分享过了,若还有什么不明白的,可以点击下面链接下载,积分不够的童鞋关注下方卡片公号​,回复:IOS内购 即可获得Demo源码~

源码链接

你可能感兴趣的:(ジ﹋★☆『,引擎进阶,』,ジ﹋★☆『,经典示例,』,ios,unity)