深度学习PyTorch笔记(13):多层感知机
深度学习PyTorch笔记(13):多层感知机
- 7 多层感知机
-
- 7.1 隐藏层
- 7.2 激活函数(activation function)
-
- 7.2.1 ReLU函数(修正线性单元Rectified linear unit,ReLU)
-
- 7.2.1.1 pReLU
- 7.2.2 sigmoid函数(挤压函数,squashing function)
- 7.2.3 tanh函数(双曲正切)
- 7.2 多层感知机的从零开始实现
-
- 7.2.1 数据读取
- 7.2.2 初始化模型参数
- 7.2.3 激活函数
- 7.2.4 模型
- 7.2.5 损失函数
- 7.2.6 训练
- 7.3 MLP的简洁实现
这是《动手学深度学习》(PyTorch版)(Dive-into-DL-PyTorch)的学习笔记,里面有一些代码是我自己拓展的。
其他笔记在专栏 深度学习 中。
这并不是简单的复制原文内容,而是加入了自己的理解,里面的代码几乎都有详细注释!!!
7 多层感知机
7.1 隐藏层
在网络中加入一个或多个隐藏层来克服线性模型的限制, 使其能处理更普遍的函数关系类型。
最简单的方法是将许多全连接层堆叠在一起。 每一层都输出到上面的层,直到生成最后的输出——多层感知机(multilayer perceptron,MLP):

- 输入: X ∈ R n × d , \mathbf{X} \in \mathbb{R}^{n \times d}, X∈Rn×d,表示 n n n个样本的小批量,每个样本具有 d d d个输入(特征)。
- 中间层: H ∈ R n × h \mathbf{H} \in \mathbb{R}^{n \times h} H∈Rn×h,单隐藏层,有 h h h个隐藏单元,称为隐藏表示(hidden representations)。
在数学或代码中, H \mathbf{H} H也被称为隐藏层变量(hidden-layer variable)或隐藏变量(hidden variable)。 - 因为隐藏层和输出层都是全连接的,所以我们具有隐藏层权重 W ( 1 ) ∈ R d × h \mathbf{W}^{(1)} \in \mathbb{R}^{d \times h} W(1)∈Rd×h和隐藏层偏置 b ( 1 ) ∈ R 1 × h \mathbf{b}^{(1)} \in \mathbb{R}^{1 \times h} b(1)∈R1×h;
输出层权重 W ( 2 ) ∈ R h × q \mathbf{W}^{(2)} \in \mathbb{R}^{h \times q} W(2)∈Rh×q和输出层偏置 b ( 2 ) ∈ R 1 × q \mathbf{b}^{(2)} \in \mathbb{R}^{1 \times q} b(2)∈R1×q。 - 输出: O ∈ R n × q \mathbf{O} \in \mathbb{R}^{n \times q} O∈Rn×q,按如下方式计算:
H = X W ( 1 ) + b ( 1 ) , O = H W ( 2 ) + b ( 2 ) . \begin{aligned} \mathbf{H} & = \mathbf{X} \mathbf{W}^{(1)} + \mathbf{b}^{(1)}, \\ \mathbf{O} & = \mathbf{H}\mathbf{W}^{(2)} + \mathbf{b}^{(2)}. \end{aligned} HO=XW(1)+b(1),=HW(2)+b(2).
此时仍然是线性的,需要在仿射变换之后对每个隐藏单元应用非线性的激活函数(activation function) σ \sigma σ,激活函数的输出被称为活性值(activations),这样就发挥了多层架构的潜力:
H = σ ( X W ( 1 ) + b ( 1 ) ) , O = H W ( 2 ) + b ( 2 ) . \begin{aligned} \mathbf{H} & = \sigma(\mathbf{X} \mathbf{W}^{(1)} + \mathbf{b}^{(1)}), \\ \mathbf{O} & = \mathbf{H}\mathbf{W}^{(2)} + \mathbf{b}^{(2)}.\\ \end{aligned} HO=σ(XW(1)+b(1)),=HW(2)+b(2).
通过使用更深(而不是更广)的网络,我们可以更容易地逼近许多函数。
7.2 激活函数(activation function)
激活函数通过计算加权和并加上偏置来确定神经元是否应该被激活, 它们将输入信号转换为输出的可微运算。 大多数激活函数都是非线性的。
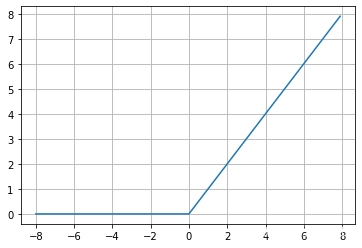
7.2.1 ReLU函数(修正线性单元Rectified linear unit,ReLU)
给定元素 x x x,ReLU函数被定义为该元素与 0 0 0的最大值:
ReLU ( x ) = max ( x , 0 ) . \operatorname{ReLU}(x) = \max(x, 0). ReLU(x)=max(x,0).
%matplotlib inline
import torch
import matplotlib.pyplot as plt

x = torch.arange(-8, 8, 0.1, requires_grad=True)
y = torch.relu(x)
plt.plot(x.detach(), y.detach())
plt.grid()
梯度:
- 如果用y.backward()会报错,因为此时y不是标量,需要传入一个与out同形的Tensor,即torch.ones_like(x),详细说明。
- 下文中retain_graph=True的作用:进行一次backward之后,各个节点的值会清除,这样进行第二次backward会报错,如果加上retain_graph==True后,可以再来一次backward。
y.backward(torch.ones_like(x), retain_graph=True)
plt.plot(x.detach(), y.detach())
plt.grid()
7.2.1.1 pReLU
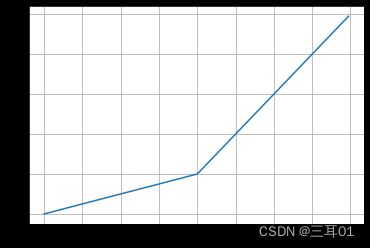
ReLU函数有许多变体,包括参数化ReLU(Parameterized ReLU,pReLU)函数。该变体为ReLU添加了一个线性项,因此即使参数是负的,某些信息仍然可以通过:
pReLU ( x ) = max ( 0 , x ) + α min ( 0 , x ) . \operatorname{pReLU}(x) = \max(0, x) + \alpha \min(0, x). pReLU(x)=max(0,x)+αmin(0,x).
x = torch.arange(-8, 8, 0.1, requires_grad=True)

def prelu(x, alpha):
    x_like_zero = torch.zeros_like(x)
    y = torch.relu(x) + alpha * torch.min(x, x_like_zero)
    return y

y = prelu(x, 0.25)
plt.plot(x.detach(), y.detach())
plt.grid()
y.backward(torch.ones_like(x), retain_graph=True)
plt.plot(x.detach(), x.grad)
plt.grid()
7.2.2 sigmoid函数(挤压函数,squashing function)
将范围(-inf, inf)中的任意输入压缩到区间(0, 1)中的某个值:
sigmoid ( x ) = 1 1 + exp ( − x ) . \operatorname{sigmoid}(x) = \frac{1}{1 + \exp(-x)}. sigmoid(x)=1+exp(−x)1.
sigmoid函数是一个平滑的、可微的阈值单元近似。 当我们想要将输出视作二元分类问题的概率时, sigmoid仍然被广泛用作输出单元上的激活函数 (可以将sigmoid视为softmax的特例)。
然而,sigmoid在隐藏层中已经较少使用, 它在大部分时候被更简单、更容易训练的ReLU所取代。
x = torch.arange(-8, 8, 0.1, requires_grad=True)
y = torch.sigmoid(x)
plt.plot(x.detach(), y.detach())
plt.grid()
sigmoid函数的导数为下面的公式:
d d x sigmoid ( x ) = exp ( − x ) ( 1 + exp ( − x ) ) 2 = sigmoid ( x ) ( 1 − sigmoid ( x ) ) . \frac{d}{dx} \operatorname{sigmoid}(x) = \frac{\exp(-x)}{(1 + \exp(-x))^2} = \operatorname{sigmoid}(x)\left(1-\operatorname{sigmoid}(x)\right). dxdsigmoid(x)=(1+exp(−x))2exp(−x)=sigmoid(x)(1−sigmoid(x)).
y.backward(torch.ones_like(x), retain_graph=True)
plt.plot(x.detach(), x.grad)
plt.grid()
7.2.3 tanh函数(双曲正切)
与sigmoid函数类似,tanh(双曲正切)函数也能将其输入压缩转换到区间(-1, 1)上:
tanh ( x ) = 1 − exp ( − 2 x ) 1 + exp ( − 2 x ) . \operatorname{tanh}(x) = \frac{1 - \exp(-2x)}{1 + \exp(-2x)}. tanh(x)=1+exp(−2x)1−exp(−2x).
函数的形状类似于sigmoid函数, 不同的是tanh函数关于坐标系原点中心对称:
x = torch.arange(-8, 8, 0.1, requires_grad=True)
y = torch.tanh(x)
plt.plot(x.detach(), y.detach())
plt.grid()
当输入接近0时,tanh函数的导数接近最大值1。 与我们在sigmoid函数图像中看到的类似, 输入在任一方向上越远离0点,导数越接近0:
y.backward(torch.ones_like(x), retain_graph=True)
plt.plot(x.detach(), x.grad)
plt.grid()
7.2 多层感知机的从零开始实现
torch.nn库的说明
继续使用Fashion-MNIST图像分类数据集:
7.2.1 数据读取
import torch
from torch import nn
import torchvision
from torchvision import transforms
from torch.utils import data

batch_size = 256

"""获取和读取Fashion-MNIST数据集"""
def load_data_fashion_mnist(batch_size):
    trans = transforms.Compose([transforms.ToTensor()])  # transforms.Compose将多个转换函数组合起来使用,转换为张量
    mnist_train = torchvision.datasets.FashionMNIST(
        root="C:/Users/xinyu/Desktop/myjupyter/data",
        train=True,
        transform=trans,
        download=False)
    mnist_test = torchvision.datasets.FashionMNIST(
        root="C:/Users/xinyu/Desktop/myjupyter/data",
        train=False,
        transform=trans,
        download=False)
    return (data.DataLoader(mnist_train, batch_size, shuffle=True, num_workers=4),
           data.DataLoader(mnist_test, batch_size, shuffle=False, num_workers=4))

train_iter, test_iter = load_data_fashion_mnist(batch_size)

# i=0
# for X, y in train_iter:
#     print(X.shape, y.shape)  # torch.Size([256, 1, 28, 28]) torch.Size([256])
#     print(y)
#     i+=1  # 235次循环,最后一次不是256
# print(i)

# i=0
# for X, y in test_iter:
#     print(X.shape, y.shape)
#     i+=1  # 40次循环,最后一次不是256
# print(i)
7.2.2 初始化模型参数
每个图像由 28*28=784 个灰度像素值组成。 所有图像共分为10个类别。 忽略像素之间的空间结构, 我们可以将每个图像视为具有784个输入特征 和10个类的简单分类数据集。
因此,我们实现一个具有单隐藏层的多层感知机, 它包含256个隐藏单元(可以将这两个变量都视为超参数)。
通常,选择2的若干次幂作为层的宽度。 因为内存在硬件中的分配和寻址方式,这么做往往可以在计算上更高效。
num_inputs, num_hiddens, num_outputs = 784, 256, 10

W1 = nn.Parameter(torch.randn(num_inputs, num_hiddens, requires_grad=True) * 0.01)
b1 = nn.Parameter(torch.zeros(num_hiddens, requires_grad=True))
W2 = nn.Parameter(torch.randn(num_hiddens, num_outputs, requires_grad=True) * 0.01)
b2 = nn.Parameter(torch.zeros(num_outputs, requires_grad=True))

params = [W1, b1, W2, b2]
7.2.3 激活函数
很简单,就用relu:
def relu(x):
    a = torch.zeros_like(x)
    return torch.max(a, x)
7.2.4 模型
def mlp_net(x):
    x = x.reshape((-1, num_inputs))  # torch.Size([256, 784])
    h = torch.mm(x, W1) + b1  # torch.Size([256, 256])
    h_relu = relu(h)  # torch.Size([256, 256])
    y_hat = torch.mm(h, W2) + b2  # torch.Size([256, 10])
    return y_hat
7.2.5 损失函数
loss = nn.CrossEntropyLoss()
# x = torch.randn(256,10)  # 小数
# y1 = torch.randint_like(y, 0, 9)  # 整数,torch.Size([256])
# loss(x,y), loss(x,y).sum()  # 可以得出结果,两边结果一样
7.2.6 训练
epochs, lr = 10, 0.1
optimizer = torch.optim.SGD(params, lr=lr)

a=0
def mlp_train(mlp_net, train_iter, test_iter, loss, epochs, batch_size, params=None, lr=None, optimizer=None):
    for epoch in range(epochs):
        train_loss_sum, train_acc_sum, n = 0.0, 0.0, 0
        for X, y in train_iter:
            # print(y.shape) # torch.Size([256])
            y_hat = mlp_net(X)  # torch.Size([256, 10])
            mlp_loss = loss(y_hat, y)
#             optimizer.zero_grad()

            # 梯度清零
            if optimizer is not None:
                optimizer.zero_grad()
            elif params is not None and params[0].grad is not None:
                for param in params:
                    param.grad.data.zero_()

            mlp_loss.backward()
#             optimizer.step()
            if optimizer is None:
                SGD(params, lr, batch_size)
            else:
                optimizer.step()  # “softmax回归的简洁实现”一节将用到

            train_loss_sum += mlp_loss.item()  # .item()转换为标量
            train_acc_sum += (y_hat.argmax(dim=1) == y).sum().item()  # .item()将Tensor变量转换为python标量(int float等)
            n += y.shape[0]
        test_acc = evaluate_accuracy(test_iter, mlp_net)
        print("epoch: {}, loss: {:.4f}, train acc: {:.3f}, test acc: {:.3f}".format(
            epoch, train_loss_sum / n, train_acc_sum / n, test_acc))


def evaluate_accuracy(test_iter, mlp_net):
    acc_sum, n = 0.0, 0
    for X, y in test_iter:
        acc_sum += (mlp_net(X).argmax(dim=1) == y).float().sum().item()
        n += y.shape[0]
    return acc_sum / n

mlp_train(mlp_net, train_iter, test_iter, loss, epochs, batch_size, params, lr, optimizer)
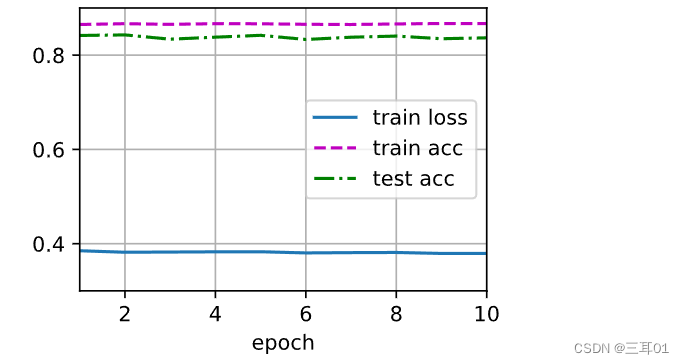
emmm好像有哪里出了问题的样子,最后的结果:
epoch: 0, loss: 0.0015, train acc: 0.863, test acc: 0.810
epoch: 1, loss: 0.0015, train acc: 0.864, test acc: 0.834
epoch: 2, loss: 0.0015, train acc: 0.864, test acc: 0.815
epoch: 3, loss: 0.0015, train acc: 0.863, test acc: 0.845
epoch: 4, loss: 0.0015, train acc: 0.864, test acc: 0.828
epoch: 5, loss: 0.0015, train acc: 0.864, test acc: 0.831
epoch: 6, loss: 0.0015, train acc: 0.866, test acc: 0.817
epoch: 7, loss: 0.0015, train acc: 0.865, test acc: 0.838
epoch: 8, loss: 0.0015, train acc: 0.865, test acc: 0.844
epoch: 9, loss: 0.0015, train acc: 0.866, test acc: 0.838
7.3 MLP的简洁实现
import torch
from torch import nn

mlp_net = nn.Sequential(nn.Flatten(),
                       nn.Linear(784, 256),
                       nn.ReLU(),
                       nn.Linear(256, 10))

def init_weights(m):
    if type(m) == nn.Linear:
        nn.init.normal_(m.weight, std=0.01)

mlp_net.apply(init_weights);

batch_size, lr, num_epochs = 256, 0.1, 10
loss = nn.CrossEntropyLoss()
optimizer = torch.optim.SGD(mlp_net.parameters(), lr=lr)

train_iter, test_iter = load_data_fashion_mnist(batch_size)
mlp_train(mlp_net, train_iter, test_iter, loss, epochs, batch_size, params, lr, optimizer)
epoch: 0, loss: 0.0041, train acc: 0.639, test acc: 0.719
epoch: 1, loss: 0.0023, train acc: 0.793, test acc: 0.803
epoch: 2, loss: 0.0020, train acc: 0.819, test acc: 0.813
epoch: 3, loss: 0.0019, train acc: 0.833, test acc: 0.828
epoch: 4, loss: 0.0018, train acc: 0.840, test acc: 0.795
epoch: 5, loss: 0.0017, train acc: 0.847, test acc: 0.826
epoch: 6, loss: 0.0016, train acc: 0.853, test acc: 0.847
epoch: 7, loss: 0.0016, train acc: 0.858, test acc: 0.833
epoch: 8, loss: 0.0015, train acc: 0.862, test acc: 0.812
epoch: 9, loss: 0.0015, train acc: 0.863, test acc: 0.844

以后的代码应该不会跟着李沐的书走了,他的代码大量使用了自己的包 d2l,这让我感到很困扰,因为有一些函数并没有在原文给出,而是直接用 d2l 引用,而且直接无脑使用 d2l 也会让人忘记具体如何操作。尤其是当想原封不动使用这里的代码的时候,总会有 d2l。。。


