MVVM理解之逐步重构成为MVVM模式,比MVC的独到之处
一:Prism的下载和安装
1:在http://compositewpf.codeplex.com/上下载最新的包。
下载完毕后,运行之,选择解压目录解压之。解压完毕的根目录下有chm帮助文档。
2:运行RegisterPrismBinaries.bat注册Prism组件,注册完毕才能在VS的引用中直接找到Prism组件,否则需要手动添加这些组件。
3:运行Silverlight Only - Basic MVVM QuickStart.bat可以打开一个MVVM的简单事例。
二:MVVM理解
1:现在,我们自己创建一个普通的SilverLight样例,并且将它逐步重构成为MVVM模式。
这个 普通的SL样例需求有:在界面上放置文本框用来显示Name和Button用来显示文本框中的Name的值。
前台:
后台:
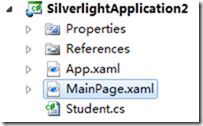
SL的目录结构:
2:问题来了
如果我们需要让页面的值和Student实例的值保持一致,则必须要让类型继承自INotifyPropertyChanged接口,并像下面这样编码:
|
1
2
3
4
5
6
7
8
9
10
11
12
13
14
15
16
17
18
19
20
21
22
23
24
25
26
27
28
29
30
31
32
33
34
35
36
37
38
39
40
41
42
43
44
45
46
47
48
|
public
class
Student : INotifyPropertyChanged
{
string
firstName;
public
string
FirstName
{
get
{
return
firstName;
}
set
{
firstName = value;
Notify(
"FirstName"
);
}
}
string
lastName;
public
string
LastName
{
get
{
return
lastName;
}
set
{
lastName = value;
Notify(
"LastName"
);
}
}
public
Student(
string
firstName,
string
lastName)
{
this
.firstName = firstName;
this
.lastName = lastName;
}
void
Notify(
string
propName)
{
if
(PropertyChanged !=
null
)
{
PropertyChanged(
this
,
new
PropertyChangedEventArgs(propName));
}
}
#region INotifyPropertyChanged Members
public
event
PropertyChangedEventHandler PropertyChanged;
#endregion
}
|
如果应用程序中存在多个这样的类型,则每个类型都要实现自己的Notify方法,这显然是不合理的。所以,无论是Prism框架,还是轻量级的 Mvvm light toolkit,都实现了一个超类来包装这种需求,在Prism里该超类是NotificationObject,而Mvvm light toolkit中是ObservableObject,当然,毫无例外滴,它们都继承自INotifyPropertyChanged。
3:现在,我们参照这两个类型,来实现自己的NotificationObject,以便加深印象
|
1
2
3
4
5
6
7
8
9
10
11
12
13
14
15
16
17
18
19
20
21
22
23
24
25
26
27
28
29
30
31
32
33
34
35
36
37
38
39
40
41
42
43
44
45
46
47
48
49
50
51
52
53
54
55
56
57
|
public
abstract
class
NotificationObject : INotifyPropertyChanged
{
public
event
PropertyChangedEventHandler PropertyChanged;
protected
virtual
void
RaisePropertyChanged(
string
propertyName)
{
PropertyChangedEventHandler handler =
this
.PropertyChanged;
if
(handler !=
null
)
{
handler(
this
,
new
PropertyChangedEventArgs(propertyName));
}
}
protected
void
RaisePropertyChanged(
params
string
[] propertyNames)
{
if
(propertyNames ==
null
)
throw
new
ArgumentNullException(
"propertyNames"
);
foreach
(var name
in
propertyNames)
{
this
.RaisePropertyChanged(name);
}
}
protected
void
RaisePropertyChanged<T>(Expression<Func<T>> propertyExpression)
{
var propertyName = ExtractPropertyName(propertyExpression);
this
.RaisePropertyChanged(propertyName);
}
public
static
string
ExtractPropertyName<T>(Expression<Func<T>> propertyExpression)
{
if
(propertyExpression ==
null
)
{
throw
new
ArgumentNullException(
"propertyExpression"
);
}
var memberExpression = propertyExpression.Body
as
MemberExpression;
if
(memberExpression ==
null
)
{
throw
new
ArgumentException(
"PropertySupport_NotMemberAccessExpression_Exception"
,
"propertyExpression"
);
}
var property = memberExpression.Member
as
PropertyInfo;
if
(property ==
null
)
{
throw
new
ArgumentException(
"PropertySupport_ExpressionNotProperty_Exception"
,
"propertyExpression"
);
}
var getMethod = property.GetGetMethod(
true
);
if
(getMethod.IsStatic)
{
throw
new
ArgumentException(
"PropertySupport_StaticExpression_Exception"
,
"propertyExpression"
);
}
return
memberExpression.Member.Name;
}
}
|
相应的,Student类型修改为:
|
1
2
3
4
5
6
7
8
9
10
11
12
13
14
15
16
17
18
19
20
21
22
23
24
25
26
27
28
29
30
31
32
33
34
35
36
37
38
39
|
public
class
Student : NotificationObject
{
string
firstName;
public
string
FirstName
{
get
{
return
firstName;
}
set
{
firstName = value;
//Notify("FirstName");
this
.RaisePropertyChanged(
"FirstName"
);
}
}
string
lastName;
public
string
LastName
{
get
{
return
lastName;
}
set
{
lastName = value;
//Notify("LastName");
this
.RaisePropertyChanged(
"LastName"
);
}
}
public
Student(
string
firstName,
string
lastName)
{
this
.firstName = firstName;
this
.lastName = lastName;
}
}
|
4:问题再次出现,经过修改后的Student类型,是什么?
是实体Model,领域Model,还是别的什么?实际上,因为没有采用任何架构模式,当前的Student类型什么也不是,揉杂了很多功能。它既要负责提供属性,也要负责控制。
在MVVM架构模式中,和MVC称谓不同的地方,就是VM(ViewModel)部分。VM负责:接受View请求并决定调用哪个模型构件去处理请 求,同时它还负责将数据返回给View进行显示。也就是说,VM完成的角色可以理解为MVC中的Control。(另外需要注意的一点是,在MVC中有一 个概念叫做表现模型,所谓表现模型是领域模型的一个扁平化投影,不应和MVVM中的VIEW MODEL相混淆)。
所以,我们现在要明确这些概念。首先,将Student类型的功能细分化,VM的部分,我们跟页面名称对应起来应该叫做 MainViewModel。实际项目中,功能页面会相应名为StudentView.xaml,则对应的VM名便称之为 StudentViewModel.cs。我们继续重构上面的代码。
三:建立MVVM的各个部分
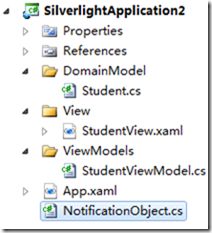
首先,建立View文件夹,然后,将MainPage.xmal修改为StudentView.xaml后放置到该目录下。
其次,简历ViewModels文件夹,新建一个类StudentViewModel.cs,放置到该目录下。
最后,原类型Student需要继续拆分,将作为领域模型部分的功能独立出来,放置到DomainModel文件夹下。最后的结果看起来如下:
1:领域模型DomainModel部分
|
1
2
3
4
5
6
7
8
9
10
11
12
13
14
15
16
17
18
19
20
21
22
23
24
25
26
27
28
29
30
31
32
33
34
35
36
37
38
39
40
41
|
public
class
Student
{
string
firstName;
public
string
FirstName
{
get
{
return
firstName;
}
set
{
firstName = value;
}
}
string
lastName;
public
string
LastName
{
get
{
return
lastName;
}
set
{
lastName = value;
}
}
public
Student()
{
//模拟获取数据
Mock();
}
public
void
Mock()
{
FirstName =
"firstName"
+ DateTime.Now.ToString();
LastName =
"lastName"
+ DateTime.Now.ToString();
}
}
|
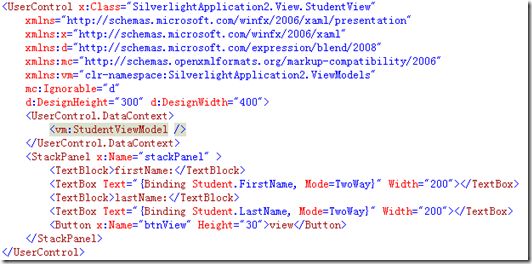
2:视图View部分
3:ViewModel部分
|
1
2
3
4
5
6
7
8
9
10
11
12
13
14
15
16
17
18
19
20
21
|
public
class
StudentViewModel : NotificationObject
{
public
StudentViewModel()
{
student =
new
Student();
}
Student student;
public
Student Student
{
get
{
return
this
.student;
}
private
set
{
this
.student = value;
this
.RaisePropertyChanged(() =>
this
.student);
}
}
}
|
4:若干解释
在这个简单的事例中,领域模型Student负责获取数据,而数据来源于何处不是我们关心的重点,所以,我们直接在Student中模拟了获取数据的过程,即Mock方法。
这相当于完成了一次OneWay的过程,即把后台数据推送到前台进行显示。这只能算是完成跟UI交互的一部分功能。UI交互还需要包括从UI中将数据持久化(如保存到数据库)。而UI跟后台的交互,就需要通过命令绑定的机制去实现了。
5:命令绑定
在本里中,我们演示两类命令,一类是属性类命令绑定,一类是事件类命令绑定。
首先,我们知道,VM负责UI和领域模型的联系,所以,绑定所支持的方法一定是在VM中,于是,我们在StudentViewModel中定义一个属性CanSubmit,及一个方法Submit:
|
1
2
3
4
5
6
7
8
9
10
11
|
public
bool
CanSubmit
{
get
{
return
true
;
}
}
public
void
Submit()
{
student.Mock();
|
|
1
|
}
|
注意,Submit方法中为了简单期间,使用了模拟方法。由于Mock方法中仍然可能设计到UI的变动(如随数据库的某些具体的值变动而变动),故领域模型Student可能也会需要继承NotificationObject,在本例中,Student改变为如下:
|
1
2
3
4
5
6
7
8
9
10
11
12
13
14
15
16
17
18
19
20
21
22
23
24
25
26
27
28
29
30
31
32
33
34
35
36
37
38
39
40
41
42
43
|
public
class
Student : NotificationObject
{
string
firstName;
public
string
FirstName
{
get
{
return
firstName;
}
set
{
firstName = value;
this
.RaisePropertyChanged(
"FirstName"
);
}
}
string
lastName;
public
string
LastName
{
get
{
return
lastName;
}
set
{
lastName = value;
this
.RaisePropertyChanged(
"LastName"
);
}
}
public
Student()
{
//模拟获取数据
Mock();
}
public
void
Mock()
{
FirstName =
"firstName"
+ DateTime.Now.ToString();
LastName =
"lastName"
+ DateTime.Now.ToString();
}
}
|
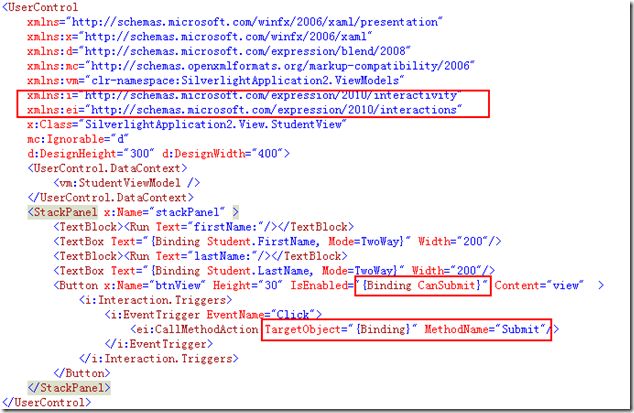
其次,需要改变VIEW,如下:
注意途中红线框起来的部分。
经过这一次的重构之后,基本满足了一个简单的MVVM模型的需要。代码下载在这里:http://files.cnblogs.com/luminji/SilverlightApplication2.rar


