spring源码学习_bean的初始化
先回顾一下上一篇spring源码学习_bean的实例化过程 bean实例化的流程
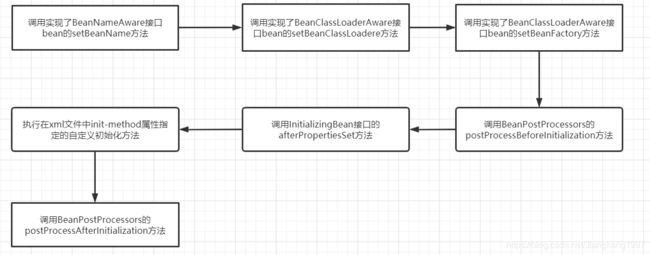
这是上一篇说到的bean的实例化过程,我们就着这个图继续说。 在bean的实例已创建且属性的注入完成后,就会调用 initializeBean方法进行bena的初始化。先看一下整体流程。
protected Object initializeBean(final String beanName, final Object bean, @Nullable RootBeanDefinition mbd) {
//第一步 调用invokeAwareMethods方法
if (System.getSecurityManager() != null) {
AccessController.doPrivileged((PrivilegedActionbena的初始化过程简单的分为四个步骤
第一步:调用了部分实现了Aware接口的bean的方法,注意这里是部分,不是全部。invokeAwareMethods这个方法名容易让人误解是全部的Aware接口实现类。下面会细说Aware接口的作用。
第二步:调用了所有BeanPostProcessors的postProcessBeforeInitialization方法。
第三步:这里会执行我们自定义的一些初始化方法
第四步:调用了所有BeanPostProcessors的postProcessAfterInitialization方法。
接下来,我们就每一步具体的来看。不过在此之前,我们首先要了解spring中非常重要的一个接口——Aware接口。
1. Aware接口
在bean的初始化过程中使用到了非常多的Aware接口实现类。了解这个接口有助于我们更好的理解bean初始化的全过程,及其意义。
先来看看Aware接口的定义
/**
 * A marker superinterface indicating that a bean is eligible to be notified by the
 * Spring container of a particular framework object through a callback-style method.
 * The actual method signature is determined by individual subinterfaces but should
 * typically consist of just one void-returning method that accepts a single argument.
 *
 * Note that merely implementing {@link Aware} provides no default functionality.
 * Rather, processing must be done explicitly, for example in a
 * {@link org.springframework.beans.factory.config.BeanPostProcessor}.
 * Refer to {@link org.springframework.context.support.ApplicationContextAwareProcessor}
 * for an example of processing specific {@code *Aware} interface callbacks.
 *
 * @author Chris Beams
 * @author Juergen Hoeller
 * @since 3.1
 */
public interface Aware {

}
很明显,这是一个空接口 。我们翻译一下接口说明:这是一个用于标记的父接口。他通过一个回调方法来接收一个来自于特定框架对象的spring容器的通知。其实际的方法签名由具体的子接口确定,但通常只由一个接受单个参数的void返回方法组成。这句话非常的难理解。为了便于理解我们先来看看Aware这个单词的意思。
Aware这个单词本意是对...有兴趣的,自觉的。我看到网络上也有人将他翻译为自动的,含义都差不多。所以我们意译一下就知道,spring会自动的或主动的执行Aware接口实现类的方法。
那么我们再结合一下注释的说明,就能大致的知道Aware接口的含义了。spring容器会主动的向Aware接口实现类方法发送通知,当然这个通知一定是特定对象完成特定操作后才进行的。而至于通知的内容由具体子接口而定。
例如:BeanNameAware,就是bean实例化完成之后,spring主动调用BeanNameAware的setBeanName方法,向BeanNameAware通知当前类的beanName。
这样来看,Aware接口其实类似于另一种形式的自动注入。只不过这个自动注入的内容没有办法通过传统的@Autowired方式进行。实现不同的Aware子接口其实就是声明了当前类需要自动注入那种类型的信息。
2. invokeAwareMethods方法
看懂了Aware接口的含义,那么这个方法的内容理解起来就可谓喝水一样简单
private void invokeAwareMethods(final String beanName, final Object bean) {
    if (bean instanceof Aware) {
        //通知 BeanName
        if (bean instanceof BeanNameAware) {
            ((BeanNameAware) bean).setBeanName(beanName);
        }
        //通知 ClassLoader
        if (bean instanceof BeanClassLoaderAware) {
            ClassLoader bcl = getBeanClassLoader();
            if (bcl != null) {
                ((BeanClassLoaderAware) bean).setBeanClassLoader(bcl);
            }
        }
        //通知BeanFactory
        if (bean instanceof BeanFactoryAware) {
            ((BeanFactoryAware) bean).setBeanFactory(AbstractAutowireCapableBeanFactory.this);
        }
    }
}
是不是很简单,我们通过Aware子接口的名字,就能明白spring向其实现类通知了什么内容。这里就是看当前bean是否实现了BeanNameAware,BeanClassLoaderAware,BeanFactoryAware,若实现了,则向其分别通知beanName,classLoader以及BaenFactory信息。
且能发现,在这里spring是写死了三种Aware子接口的通知,并没有提供扩展的可能。
3. applyBeanPostProcessorsBeforeInitialization方法 和applyBeanPostProcessorsAfterInitialization方法
方法名很长,但其实现却很简单
public Object applyBeanPostProcessorsBeforeInitialization(Object existingBean, String beanName)
    throws BeansException {

    Object result = existingBean;
    //遍历 BeanPostProcessor
    for (BeanPostProcessor processor : getBeanPostProcessors()) {
        //调用 BeanPostProcessor的 postProcessBeforeInitialization方法
        Object current = processor.postProcessBeforeInitialization(result, beanName);
        if (current == null) {
            return result;
        }
        result = current;
    }
    return result;
}

public Object applyBeanPostProcessorsAfterInitialization(Object existingBean, String beanName)
    throws BeansException {

    Object result = existingBean;
    //遍历 BeanPostProcessor
    for (BeanPostProcessor processor : getBeanPostProcessors()) {
        //调用 BeanPostProcessor的 postProcessAfterInitialization方法
        Object current = processor.postProcessAfterInitialization(result, beanName);
        if (current == null) {
            return result;
        }
	result = current;
    }
    return result;
}
这里就是在上述第三步invokeInitMethods方法调用的前后分别调用了BeanPostProcessor的两个方法。
BeanPostProcessor翻译成bean的后置处理器,在bean的实例化完成后触发执行。是spring为我们提供的一个用于参与bean初始化流程的扩展功能。例如:ApplicationContextAwareProcessor就是用来向实现了ApplicationContextAware接口的bean通知ApplicationContext。
我们可以利用这个扩展功能,实现我们自定义的Aware子接口。来向实现了自定义Aware子接口的类注入一些我们需要的信息。
4. invokeInitMethods方法
这里执行了我们自定义的初始化方法
protected void invokeInitMethods(String beanName, final Object bean, @Nullable RootBeanDefinition mbd)
throws Throwable {
boolean isInitializingBean = (bean instanceof InitializingBean);
//调用实现了InitializingBean接口bean的afterPropertiesSet方法
if (isInitializingBean && (mbd == null || !mbd.isExternallyManagedInitMethod("afterPropertiesSet"))) {
if (logger.isTraceEnabled()) {
logger.trace("Invoking afterPropertiesSet() on bean with name '" + beanName + "'");
}
if (System.getSecurityManager() != null) {
try {
AccessController.doPrivileged((PrivilegedExceptionAction这个方法执行了两个步骤。
第一步就是执行实现了InitializingBean接口bean的afterPropertiesSet方法。这一步很简单,但是我想分析一下这个方法的名字。意思就是在属性设置完成以后。
实际上,BeanPostProcessor中的前置处理方法着重于处理其他扩展的Aware子接口。如果我们把对Aware子接口的处理当作是一种特殊的自动注入的话。那BeanPostProcessor的前置处理方法也可以被认为是bean属性注入的一部分。所以在BeanPostProcessor的前置处理方法完成后,就可以认为这个bean的属性被全部设置完成了。 故这里的初始化方法被取名为afterPropertiesSet。
但是这种实现接口的方法显然对程序有很大的侵入性,所以spring同样也提供了没有侵入性的解决方案,就是下面的第二步。
第二步是执行我们在xml文件中init-method属性指定的自定义初始化方法,这种方法显然是没有侵入性的,但是需要我们手动配置自定义初始化方法。
对Spring熟悉的小伙伴应该知道还有@PostConstruct这个注解来标注初始化方法。标注有@PostConstruct注解的方法是在一个名为CommonAnnotationBeanPostProcessor的bean后置处理器中的后置处理方法中调用的。在bean的生命周期中,要后于xml中自定义的初始化方法。
最后通过图回顾一下bean初始化的整体流程。值得一说的是,很多博客中的流程步骤都不太一致。这是因为有的博主将大的流程拆细了,而有的又整理的比较笼统。所以对于这个流程的标准答案,还需要掌握原理后,自己去在源码中寻找。
