谷粒商城笔记+踩坑(5)——商品服务-属性分组、品牌关联分类
目录
8、商品服务-属性分组
8.0、 SPU和SKU
8.0.1、概念
8.0.2、举例
8.0.3、销售属性、基本属性(规格参数)、属性分组、平台属性
8.0.3、分类表、属性表、属性分组表表关系详解
8.1、环境准备
8.1.1、后台页面导入全部菜单
8.1.2、接口文档地址
8.2、导入前端代码
8.2.1、属性分组功能的前端组件
8.2.2、父子组件传递数据
8.3、属性分组菜单的按参数分页查询
8.4、新增属性分组
8.4.1、 新增选择框,elementUI级联选择器el-cascader
8.4.2、children字段注解@JsonInclude
8.4.3、前端报错解决,修改前端catelogId
8.5、修改回显“所属分类”功能
8.5.1、前端回显时,查询分类路径请求
8.5.2、AttrGroupEntity新增分类路径的成员变量
8.5.3、属性分组controller的info方法查询赋值分类路径
8.5.4、分类的service编写方法,查找分类路径
8.5.5、测试查询分类路径业务
8.5.6、前端,对话框关闭时清空数据,防止不合理回显
8.5.6、前端“所属分类”可搜索,显示提示信息
8.6、分页-mybatisplus分页拦截器
9、优化品牌管理
9.1、按搜索文字,分页查询
9.2、获取当前品牌关联的所有分类
8.2.1、前端
9.2.2、controller编写方法,获取当前品牌关联的所有分类
9.2.3、新增关联的controller、service
9.2.4、测试新增和查询“关联关系”
9.2.5、修改品牌名时,同步修改关联表的品牌名
9.2.6、修改分类名时,同步修改关联表的分类名。映射配置文件xml方法
8、商品服务-属性分组
8.0、 SPU和SKU
8.0.1、概念
SPU(Standard Product Unit):标准化产品单元。是商品信息聚合的最小单位,是一组可复用、易检索的标准化信息的集合,该集合描述了一个产品的特性。通俗点讲,属性值、特性相同的商品就可以称为一个SPU。
SKU(Stock Keeping Unit):SKU一般指最小存货单位、最小售卖单元。 最小存货单位(SKU),即库存进出计量的基本单元,可以是以件,盒,托盘等为单位。
SKU是对于大型连锁超市DC配送中心物流管理的一个必要的方法。现在已经被引申为产品统一编号的简称,每种产品对应有唯一的SKU号。如iphone13ProMax 1T 蓝色 是SKU,包子店中肉包子是SKU,素包子是SKU,水煎包是SKU…
8.0.2、举例

spu:这个苹果13是一个spu,标准化产品单位,它包括128g、256g、红色、绿色等。
sku:苹果13-绿色-128g-快充套餐-是一个sku。这些sku属于同一个spu,分辨率、发布日期等公用规格参数都是一样的。
一个spu包括了多个sku,sku决定最终价格:

8.0.3、销售属性、基本属性(规格参数)、属性分组、平台属性
销售属性:

开启快速展示的规格参数:

属性分组和规格参数:
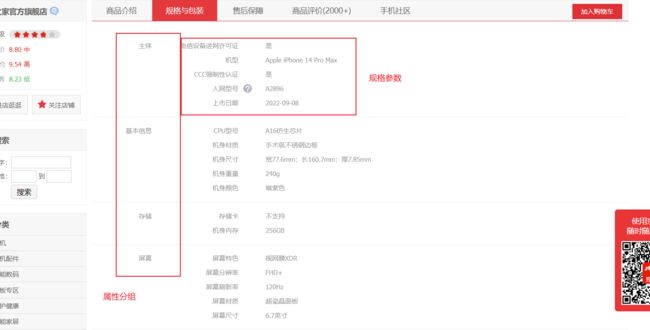
“平台属性”后台最终效果:


8.0.3、分类表、属性表、属性分组表表关系详解
(1)属性关系-规格参数-销售属性-三级分类 关联关系
每个三级分类下有各自的属性分组表通过id和catelogid关联,能查出每个分类下的属性分组
属性分组表和属性表通过一个属性&属性关联表进行关联,能查出每个属性分组下的属性
最终这样的关系我们可以查出每个分类的属性分组和每个属性分组对应的属性

(2)通过思维导图来理解
手机是一级分类,它下面又有属性组,每个属性组又有各自的属性

(3)SPU-SKU-属性表
商品属性表和属性表通过attrid和id进行关联,能查出每个spu的属性
sku销售属性表是为了表示spu下不同sku,比如1号spu在此表有两个sku,这两个sku有不同的销售属性,是通过和属性表关联获取的

(4)通过思维导图来理解
像网络、像素一般是固定不可选的所以是SPU属性
而内存、容量、颜色等可选的就为SKU销售属性

8.1、环境准备
8.1.1、后台页面导入全部菜单
运行sys_menus.sql创建全部菜单,建议复制粘贴到Navicat运行,直接拖进去可能会乱码。也可以在后台页面‘“系统管理-菜单管理”一个个创建。

8.1.2、接口文档地址
以后前端代码不自己编写了,复制/代码/前端/modules/文件夹里面的内容复制到vs中
接口文档地址:https://easydoc.xyz/s/78237135

8.2、导入前端代码
8.2.1、属性分组功能的前端组件
需求:在属性分组菜单中展示分类树,实现点击菜单的左边的分类树,能够实现在右边展示数据并且修改。


具体实现
-
在前端src-views-modeules下新建
common/categroy.vue,公共组件。抽出去左侧菜单 -
把前端生成的
attrgroup-add-or-update.vue复制到modules/product下 -
在modules/product/下创建
attrgroup.vue- 布局:左侧6用来显示菜单,右侧18用来显示表格
- 引入公共组件
Category, AddOrUpdate - 剩下的复制生成的
attrgroup.vue
查询 新增 批量删除 修改 删除
8.2.2、父子组件传递数据
要实现功能:点击左侧,右侧表格对应内容显示。
父子组件传递数据:category.vue点击时,引用它的attgroup.vue能感知到, 然后通知到add-or-update
1、子组件发送事件
- 在
category.vue中的树形控件绑定点击事件@node-click="nodeclick" - node-click方法中有三个参数(data, node, component),data表示当前数据,node为elementui封装的数据
- 点击之后向父组件发送事件:
this.$emit("tree-node-click",...)…为参数
//组件绑定事件


//methods中新增方法
	nodeclick(data, node, component){
      console.log("子组件categroy的节点被点击:", data,node,component);
      this.$emit("tree-node-click", data,node,component); //向父组件发送tree-node-click事件
    }
2、父组件接收事件
//引用的组件,可能会发散tree-node-click事件,当接收到时,触发父组件的treenodeclick方法
3、启动测试
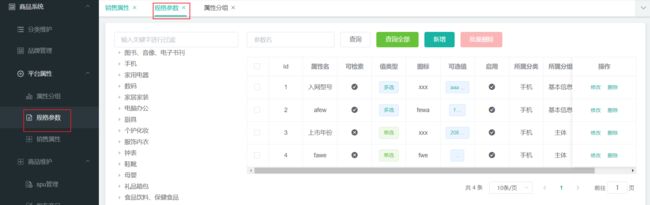
8.3、属性分组菜单的按参数分页查询

1、接口url:
/product/attrgroup/list/{catelogId}
attr是attribute缩写,译为属性。
2、修改controller的list方法
请求参数和响应数据:

    @RequestMapping("/list/{catelogId}")
    public R list(@RequestParam Map params, @PathVariable Long catelogId){
        //PageUtils page = attrGroupService.queryPage(params);
        PageUtils page = attrGroupService.queryPage(params, catelogId);
        return R.ok().put("page", page);
    }
3、service编写查询方法
    @Override
    public PageUtils queryPage(Map params, Long categoryId) {
        String key = (String) params.get("key");
        LambdaQueryWrapper wrapper = new LambdaQueryWrapper<>();
        //先根据检索查
        if(StringUtils.isNotEmpty(key)){
//wrapper.eq(AttrGroupEntity::getAttrGroupId,key).or().like(AttrGroupEntity::getAttrGroupName,key);//也可以
            wrapper.and(
                    obj->obj.eq(AttrGroupEntity::getAttrGroupId,key).or().like(AttrGroupEntity::getAttrGroupName,key)
            );
        }
        if(categoryId!=0) {
            wrapper.eq(AttrGroupEntity::getCatelogId,categoryId);
        }
        IPage page = this.page(
                new Query().getPage(params),
                wrapper
        );

        return new PageUtils(page);

    }
4、测试后端
GET http://localhost:88/api/product/attrgroup/list/1?page=1&key=aa
Content-Type: application/json


###
测试结果:

5、修改前端代码
- 修改getDataList()中的请求路径
- data中新增
catId - methods中修改点击方法

    treenodeclick(data, node, component) {
      //必须是三级分类,才显示属性
      if (data.catLevel == 3){
          this.catId = data.catId;
          this.getDataList();
      }
    },
6、新增假数据,测试页面:

225分类id对应手机

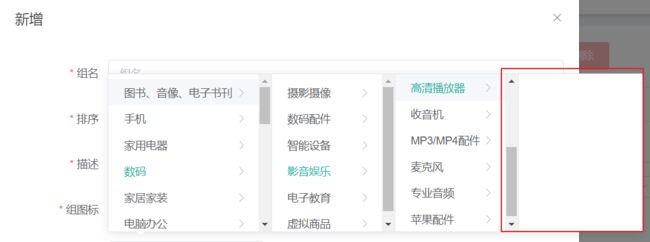
8.4、新增属性分组
新增时,父id改换成选择框
8.4.1、 新增选择框,elementUI级联选择器el-cascader

- 发现可以选择但是并不显示名称,原因是显示的属性是
label,通过props属性进行绑定
elementUI级联选择器
//data中新增属性,props用来绑定选择框的参数,categorys用来保存菜单
	  props:{
        value:"catId",
        label:"name",
        children:"children"
      },
      categroys:[],

//方法中新增getCategorys(),用来获取选择菜单的值
getCategorys() {
      this.$http({
        url: this.$http.adornUrl("/product/category/list/tree"),
        method: "get",
      }).then(({ data }) => {
        console.log("成功了获取到菜单数据....", data.data);
        this.categroys = data.data;
      });
    },


//组件创建的时候就要获取菜单的值
  created(){
    this.getCategorys();
  }
8.4.2、children字段注解@JsonInclude
当前问题:
发现返回的数据,无子分类下面也有children(为空)解决方法:设置后端,当children为空时,不返回children字段:
解决:
在分类实体类的children字段上添加注解:当值为空时,不返回当前字段
	@TableField(exist = false) //表示数据库表中不存在
	@JsonInclude(JsonInclude.Include.NON_EMPTY)
	private List children;
此时无子分类的children字段就为空:

8.4.3、前端报错解决,修改前端catelogId
选择“所属分类”之后报错:

原因是:el-cascader绑定的dataForm.catelogId是一个数组,其中包含选择框的父节点id和自己的id。而我们要提交的只需要三级分类的id,不需要父分类的id。
//修改data中的dataFrom
      dataForm: {
        attrGroupId: 0,
        attrGroupName: "",
        sort: "",
        descript: "",
        icon: "",
        catelogIds: [], //保存父节点和子节点的id
        catelogId: 0 //保存要提交的子节点的id
      },

//修改表单提交方法,要传送的数据,只传最后一个子id
catelogId: this.dataForm.catelogIds[this.dataForm.catelogIds.length - 1],
8.5、修改回显“所属分类”功能
8.5.0、分类路径无法回显问题

只能查到当前属性所属分类的id
8.5.1、前端回显时,查询分类路径请求
init(id) {
      this.dataForm.attrGroupId = id || 0;
      this.visible = true;
      this.$nextTick(() => {
        this.$refs["dataForm"].resetFields();
        if (this.dataForm.attrGroupId) {
          this.$http({
            url: this.$http.adornUrl(
              `/product/attrgroup/info/${this.dataForm.attrGroupId}`
            ),
            method: "get",
            params: this.$http.adornParams(),
          }).then(({ data }) => {
            if (data && data.code === 0) {
              this.dataForm.attrGroupName = data.attrGroup.attrGroupName;
              this.dataForm.sort = data.attrGroup.sort;
              this.dataForm.descript = data.attrGroup.descript;
              this.dataForm.icon = data.attrGroup.icon;
              this.dataForm.catelogId = data.attrGroup.catelogId;
              //查出catelogId的完整路径
              this.dataForm.catelogPath = data.attrGroup.catelogPath;
            }
          });
        }
      });
    },
8.5.2、AttrGroupEntity新增分类路径的成员变量
	@TableField(exist = false)
	private Long[] catelogPath;
8.5.3、属性分组controller的info方法查询赋值分类路径
AttrGroupController
    @Autowired
    private CategoryService categoryService;

	@RequestMapping("/info/{attrGroupId}")
    public R info(@PathVariable("attrGroupId") Long attrGroupId){
		AttrGroupEntity attrGroup = attrGroupService.getById(attrGroupId);

		Long catelogId = attrGroup.getCatelogId();
		//根据id查询完整路径。      查询结果要添加分类路径字段,样式[2,34,225]
		Long[] path = categoryService.findCatelogPath(catelogId);

		attrGroup.setCatelogPath(path);
        return R.ok().put("attrGroup", attrGroup);
    }
8.5.4、分类的service编写方法,查找分类路径
//categoryService接口

    /*
     *找到catelogId的完整路径
     */
    Long[] findCatelogPath(Long catelogId);


//categoryServiceImpl实现方法
	//查找完整路径方法
	@Override
    public Long[] findCatelogPath(Long catelogId) {
        List paths = new ArrayList<>();
        List parentPath = findParentPath(catelogId, paths);
        return parentPath.toArray(new Long[parentPath.size()]);
    }

	//递归查找父节点id
    public List findParentPath(Long catelogId,List paths){
        //1、收集当前节点id
        CategoryEntity byId = this.getById(catelogId);
        if (byId.getParentCid() != 0){
            findParentPath(byId.getParentCid(), paths);
        }
        paths.add(catelogId);
        return paths;
    }
8.5.5、测试查询分类路径业务
    @Autowired
    CategoryService categoryService;
    @Test
    public void testPathCatelog(){
        System.out.println(categoryService.findCatelogPath(225L));
}![]()
前端也正常回显:

8.5.6、前端,对话框关闭时清空数据,防止不合理回显
  //新增方法
    dialogClose(){
      this.dataForm.catelogPath = [];
    },
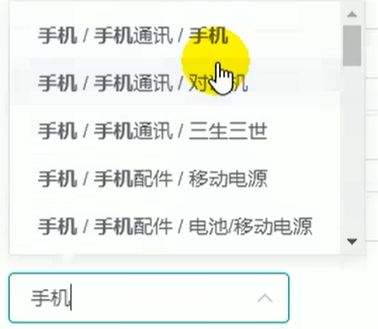
8.5.6、前端“所属分类”可搜索,显示提示信息
选择框加上搜索功能:filterable, 显示提示信息placeholder="试试搜索:手机"
8.6、分页-mybatisplus分页拦截器
发现自动生成的分页条不好使,原因是没有引入mybatis-plus的分页插件。
product模块新建config包,新建配置类,引入如下配置
@Configuration
public class MybatisPlusConfig {
    @Bean
    public MybatisPlusInterceptor mybatisPlusInterceptor(){
        MybatisPlusInterceptor interceptor = new MybatisPlusInterceptor();
        PaginationInnerInterceptor paginationInnerInterceptor = new PaginationInnerInterceptor();
//        溢出总页数后是否进行处理(默认不处理)
        paginationInnerInterceptor.setOverflow(true);
//        单页分页条数限制(默认无限制)
        paginationInnerInterceptor.setMaxLimit(1000L);
        interceptor.addInnerInterceptor(paginationInnerInterceptor);
        return interceptor;
    }
}
重启后分页展示正常。

9、优化品牌管理
9.1、按搜索文字,分页查询
修改BrandServiceImpl的queryPage方法:
这里仅检索id和name:
@Service("brandService")
public class BrandServiceImpl extends ServiceImpl implements BrandService {

    @Override
    public PageUtils queryPage(Map params) {
        String key = (String) params.get("key");
        LambdaQueryWrapper wrapper = new LambdaQueryWrapper<>();
        if(StringUtils.isNotEmpty(key)){
            wrapper.eq(BrandEntity::getBrandId,key).or().like(BrandEntity::getName,key);
        }
        IPage page = this.page(
                new Query().getPage(params),
                wrapper
        );

        return new PageUtils(page);
    }

}
测试成功:

9.2、获取当前品牌关联的所有分类
8.2.1、前端
复制粘贴前端代码。把课件modues下的common和product文件复制到对应目录
小米品牌下面可能包括手机、电器等分类,同样手机分类可能包括小米、华为等多个品牌。所以品牌与分类是多对多的关系。表pms_category_brand_relation保存品牌与分类的多对多关系
查看文档,获取品牌关联的分类: 15、获取品牌关联的分类 - 谷粒商城
9.2.2、controller编写方法,获取当前品牌关联的所有分类
请求:get
/product/categorybrandrelation/catelog/list
数据库:brandName和categoryName其实是冗余字段,目的减少数据库压力,仅在新增时根据id查name赋值,之后查关系时就不用再根据id查name。


修改CategoryBrandRelationServiceImpl
根据传过来的brandId,查找当前品牌关联所有的分类信息
    /**
     * 获取当前品牌关联的所有分类列表
     */
    @GetMapping("/catelog/list")
    public R catelogList(@RequestParam("brandId") Long brandId){
        List data = categoryBrandRelationService.list(
                new QueryWrapper().eq("brand_id", brandId)
        );

        return R.ok().put("data", data);
    }
9.2.3、新增关联的controller、service
新增品牌与分类关联关系,主要需要改动是在保存时,查询并赋值冗余字段brandName和categoryName
请求:post
product/categorybrandrelation/save
保存的时候,前端传过来brandid和categoryid,存储的时候还要存brandName和categoryName,所以在保存之前进行查找

修改controller
    /**
     * 保存
     */
    @RequestMapping("/save")
    //@RequiresPermissions("product:categorybrandrelation:save")
    public R save(@RequestBody CategoryBrandRelationEntity categoryBrandRelation){
		categoryBrandRelationService.saveDetail(categoryBrandRelation);

        return R.ok();
    }
service
    @Autowired
    CategoryDao categoryDao;

    @Autowired
    BrandDao brandDao;

	@Override
    public void saveDetail(CategoryBrandRelationEntity categoryBrandRelation) {
        Long brandId = categoryBrandRelation.getBrandId();
        Long catelogId = categoryBrandRelation.getCatelogId();
        //查询详细名字和分类名字
        BrandEntity brandEntity = brandDao.selectById(brandId);
        CategoryEntity categoryEntity = categoryDao.selectById(catelogId);
        categoryBrandRelation.setBrandName(brandEntity.getName());
        categoryBrandRelation.setCatelogName(categoryEntity.getName());
        this.save(categoryBrandRelation);

    }
9.2.4、测试新增和查询“关联关系”
新增华为和手机的关联分类:

9.2.5、修改品牌名时,同步修改关联表的品牌名
要对品牌(分类)名字进行修改时,品牌分类关系表之中的名字也要进行修改
-
品牌名字修改同时修改表数据
BrandController
    @RequestMapping("/update")
    //@RequiresPermissions("product:brand:update")
    public R update(@Validated(value = {UpdateGroup.class})@RequestBody BrandEntity brand){
		brandService.updateByIdDetail(brand);

        return R.ok();
    }
brandServiceImpl
	@Autowired
    CategoryBrandRelationService categoryBrandRelationService;

    @Transactional
    @Override
    public void updateByIdDetail(BrandEntity brand) {
        //保证冗余字段的数据一致
        this.updateById(brand);
        if (!StringUtils.isEmpty(brand.getName())){
            //如果修改了名字,则品牌分类关系表之中的名字也要修改
            categoryBrandRelationService.updateBrand(brand.getBrandId(), brand.getName());
            //TODO 更新其他关联
        }
    }
CategoryBrandRelationServiceImpl
    @Override
    public void updateBrand(Long brandId, String name) {
        CategoryBrandRelationEntity categoryBrandRelationEntity = new CategoryBrandRelationEntity();
        categoryBrandRelationEntity.setBrandName(name);
        categoryBrandRelationEntity.setBrandId(brandId);
        this.update(categoryBrandRelationEntity, new QueryWrapper().eq("brand_id", brandId));
    }
测试,修改品牌名时,关联表里的品牌名也改了:

9.2.6、修改分类名时,同步修改关联表的分类名。映射配置文件xml方法
CategoryController
    /**
     * 修改
     */
    @RequestMapping("/update")
    //@RequiresPermissions("product:category:update")
    public R update(@RequestBody CategoryEntity category){
		categoryService.updateCascade(category);

        return R.ok();
    }
CategroyServiceImpl
    //别忘了加业务注解,引导类开启了业务@EnableTransactionManagement
	@Transactional
    @Override
    public void updateCascade(CategoryEntity category) {
        this.updateById(category);
        categoryBrandRelationService.updateCategory(category.getCatId(), category.getName());
    }
CategoryBrandRelationServiceImpl
用上一节品牌修改的方法也行。这次使用映射配置文件xml方法
    @Override
    public void updateCategory(Long catId, String name) {
        this.baseMapper.updateCategroy(catId, name);
    }
CategoryBrandRelationDao
void updateCategroy(@Param("catId") Long catId,@Param("name") String name);
CateBrandRelationDao.xml
UPDATE `pms_category_brand_relation` SET catelog_name=#{name} WHERE catelog_id=#{catId}
测试:
修改分类中手机为“手机1”,发现关联表中分类名也改了:
