Flutter 开发中重要的 5 件事情
原文 https://medium.com/@kaushikid...
前言
你好,朋友们!欢迎回来... 今天我要分享一些我们不应该在 flutter 中做的事情
正文
01. 将方法转换成组件
When we have a large layout, then what we usually do is splitting using methods for each widget. Like
当我们有一个大的布局,然后我们通常做的是分割使用方法为每个 widget
import 'package:flutter/material.dart';

class MyHomePage extends StatelessWidget {
  const MyHomePage({Key? key}) : super(key: key);

  // first methodWidget
  _buildHeaderWidget(context) {
    return const Icon(
      Icons.account_box,
      size: 200,
      color: Colors.pink,
    );
  }

  //second methodWidget
  _buildMainWidget(BuildContext context) {
    return Expanded(
      child: Card(
        elevation: 10,
        color: Colors.grey[300],
        child: const Center(
          child: Text(
            'Hello Flutter',
          ),
        ),
      ),
    );
  }

// third methodWidget
  _buildFooterWidget() {
    return const Card(
      elevation: 10,
      child: Padding(
        padding: EdgeInsets.all(20.0),
        child: Text('This is the footer '),
      ),
    );
  }

  @overrideWidget
  build(BuildContext context) {
    return Scaffold(
      body: Padding(
        padding: const EdgeInsets.all(20.0),
        child: Column(
          mainAxisSize: MainAxisSize.min,
          children: [
            const SizedBox(
              height: 30,
            ),
            _buildHeaderWidget(context),
            _buildMainWidget(context),
            const SizedBox(
              height: 30,
            ),
            _buildFooterWidget(),
          ],
        ),
      ),
    );
  }
}
但是在上面的模式中,在内部发生的情况是,当我们进行任何更改并刷新整个 widget 时,它也会刷新方法中的 widget ,这会导致我们浪费 CPU 周期。
我们应该做的是按照以下方法将这些方法转换为无状态 Widget。
import 'package:flutter/material.dart';

class MyHomePage extends StatelessWidget {
  const MyHomePage({Key? key}) : super(key: key);
  @overrideWidget
  build(BuildContext context) {
    return Scaffold(
      body: Padding(
        padding: const EdgeInsets.all(20.0),
        child: Column(
          mainAxisSize: MainAxisSize.min,
          children: const [
            SizedBox(
              height: 30,
            ),
            HeaderWidget(),
            MainWidget(),
            SizedBox(
              height: 30,
            ),
            FooterWidget(),
          ],
        ),
      ),
    );
  }
}

// header class
class HeaderWidget extends StatelessWidget {
  const HeaderWidget({
    Key? key,
  }) : super(key: key);
  @overrideWidget
  build(BuildContext context) {
    return const Icon(
      Icons.account_box,
      size: 200,
      color: Colors.pink,
    );
  }
}

//Main class
class MainWidget extends StatelessWidget {
  const MainWidget({
    Key? key,
  }) : super(key: key);
  @overrideWidget
  build(BuildContext context) {
    return Expanded(
      child: Card(
        elevation: 10,
        color: Colors.grey[300],
        child: const Center(
          child: Text(
            'Hello Flutter',
          ),
        ),
      ),
    );
  }
}

//Footer class
class FooterWidget extends StatelessWidget {
  const FooterWidget({
    Key? key,
  }) : super(key: key);
  @overrideWidget
  build(BuildContext context) {
    return const Card(
      elevation: 10,
      child: Padding(
        padding: EdgeInsets.all(20.0),
        child: Text('This is the footer '),
      ),
    );
  }
}
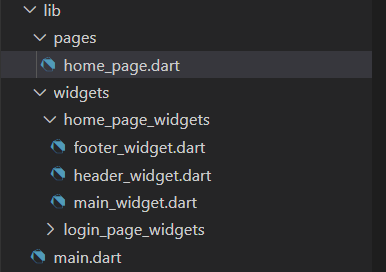
您可以在不同的文件夹和文件中分隔这些 widget 类
02. 避免有状态的 widget 但是为什么呢?
每次我们使用一个状态 widget ,就会创建一个状态对象。如果我们使用所有的状态 widget ,将会有很多不必要的状态对象,这将消耗大量的内存。因此,在不需要更改状态的地方,我们应该使用更简单的状态-无状态 widget ️
使用无状态 widget 而不是有状态 widget 的另一个原因是有状态 widget 有一个巨大的样板,根据 Flutter API 文档使用一堆嵌套的有状态 widget ,通过所有这些构建方法和构造函数传递数据会变得很麻烦。
因此,尽可能避免使用有状态 widget 。只在必要时使用。而是使用无状态 widget 。
03. 避免使用单独的颜色文件
大多数开发人员一遍又一遍地对所有页面使用颜色代码,这样使用真的好吗?假设你需要开发一个电子商务应用程序,这就是你的应用程序的颜色主题
mainColor = teal
ContainerColor = redContainerColor
appBar color = blue
ButtonColor = orange
popup color = gradient ( teal & orange )
您的应用程序中有超过 30 页,并且您正在应用每个页面的颜色!嗯,好吧,但是突然你的客户说要改变应用程序的主题,你会不会觉得改变每个页面的颜色代码有多可怕。
因此,使用单独的文件的主题!创建一个类并分配应用程序中使用的所有颜色。并通过从您想要的位置调用该类来使用它!比如说
import 'package:flutter/material.dart';
class AppColors {

  static const mainColor = Color(0xFFe3c6e4);

  static const primaryColor = Color(0xFFEFD9DC);

  static const cardColor = Color(0xFFF8EFF8);

  static const backgroundColor = Color(0xFFF5F5F5);

  static const appBarBackgroundColor = Color(0xFFFDF6FD);

  static const bottomLightIconColor = Color(0xFFd4c8d6);

  static const borderColor = Color(0xFF758A92);

  static const textColor = Color(0xFF2E0132);

  static const darkIconColor = Color(0xFF444647);

  static const darkTextColor = Color(0xFF3D0928);

  static const dullColor = Color(0xFFA7A7A7);

  static const shimmerColor = Colors.black12;

  static const greenColor = Color(0xFF00A35E);

  static const greyColor = Color(0xFF602865);

  static const yellowColor = Color(0xFFC9D103);

  static const lightMainColor = Color(0xFFf3e2f4);

  static const darkMainColor = Color(0xFFcda7d0);

  static const redColor = Color(0xFFB40000);

  static const pinkColor = Color.fromARGB(255, 236, 168, 220);

  static const whiteColor = Color(0xFFFFFFFF);

  static const blackColor = Color.fromARGB(255, 8, 8, 8);

}
//这是名为“ AppColors”的类,这里列出了我们应用程序中使用的所有颜色。.现在我们要做的是
我们想怎么说就怎么说,比如
Container(
  height:100,
  width:100,
  color:AppColors.mainColor,
),
//这里我们需要导入类“ AppColors”
有利于使用单独的颜色文件现在您可以很容易地改变您的申请的主题
04. 忘记检查调试控制台
假设您有一个完美工作的代码,一切看起来都很好,但是绝不会错过检查调试控制台。在 Flutter 中,有一些在后台进行的重构,在进入调试控制台之前,您不会看到这些重构。综合考虑所有因素,您不会发现更需要关注的是什么,但是对于长期业务来说,它可能会因应用程序崩溃而产生问题。
伙计!真的不要忘记检查调试控制台之前发送最后的 apk 到客户端,否则老板会喜欢
05. 过度依赖 Packages
软件包在应用程序数据库中存储各种功能方面发挥着重要作用。但是,过度使用这样的包可能会导致代码库的过度填充。正因为如此,应用程序的性能将在未来下降。您应该尽量减少这种软件包的使用,或者仅仅获得云服务器对数据库维护的支持。更快的速度和更好的性能可以提高用户对应用程序功能的参与度。
如果本文对你有帮助,请转发让更多的朋友阅读。
© 猫哥
- 微信 ducafecat
- https://wiki.ducafecat.tech
- https://video.ducafecat.tech
本文由mdnice多平台发布


