vue各组件之间多种通信方式
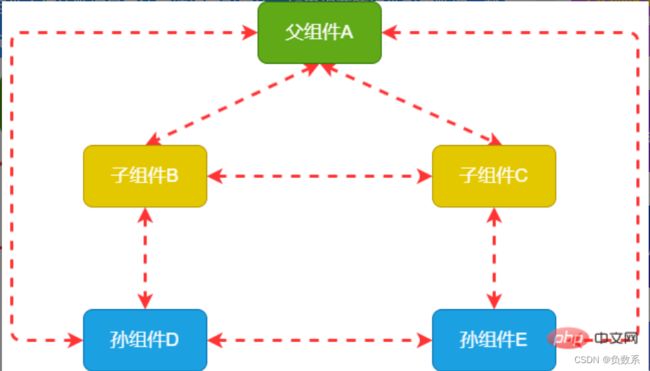
重点:vue的两大特性是响应式编程和组件化。组件(Component)是 Vue 最核心的功能,但是各个组件实例的作用域是相互独立的,这表明不同组件之间的数据是无法直接相互引用的。如果想要跨组件引用数据,就需要用到组件通信了,在通信之前先要理解组件之间的关系:

如上图所示:
父子关系:A与B,A与C,B与D,C与E
兄弟关系:B与C
隔代关系(可能隔更多代):A与D,A与E
跨级关系:B与E,D与E等
通信方式
一、/
父组件通过绑定一个自定义的属性,子组件通过接收父组件传来的数据;子组件通过触发事件,父组件用或者在子组件的自定义标签上使用来监听子组件触发的自定义事件,从而接收子组件传来的数据。(学习视频分享:vue视频教程)
1、父组件向子组件传值
下面通过一个例子来说明父组件向子组件传值,父组件parent.vue把数据传给子组件child.vue,并在child.vue中展示出来
// 父组件parent.vue
<template>
  <div>
    <Child :books="books"/>
  </div>
</template>
<script>
import Child from './components/Child.vue'
export default {
  name: 'parent',
  components: {
    Child
  },
  data() {
    return {
      books: ['JavaScript高级程序设计', 'CSS新世界', '图解 HTTP 彩色版']
    }
  }
}
</script>`
// 子组件child.vue
<template>
  <div>
    <ul>
      <li v-for="(item, index) in books" :key="index">{{item}}</li>
    </ul>
  </div>
</template>
<script>
export default {
  props: {
    books: {
      type: Array,
      default: () => {
        return []
      }
    }
  }
}
</script>
注意:通过props传递数据是单向的,父组件数据变化时会传递给子组件,但子组件不能通过修改props传过来的数据来修改父组件的相应状态,即所谓的单向数据流。
2、子组件向父组件传值
下面通过子组件点击书籍列表,用$emit()触发,然后再父组件中获取
// 子组件child.vue
<template>
  <div>
    <ul>
      <li v-for="(item, index) in books" :key="index" @click="like(item)">{{item}}</li>
    </ul>
  </div>
</template>
<script>
export default {
  props: {
    books: {
      type: Array,
      default: () => {
        return []
      }
    }
  },
  methods: {
    like(item) {
      this.$emit('likeBook', item)
    }
  }
}
</script>
// 父组件parent.vue
<template>
  <div>
    <Child :books="books" @likeBook="likeBook"/>
  </div>
</template>
<script>
import Child from './components/Child.vue'
export default {
  name: 'parent',
  components: {
    Child
  },
  data() {
    return {
      books: ['JavaScript高级程序设计', 'CSS新世界', '图解 HTTP 彩色版']
    }
  },
  methods: {
    likeBook(val) {
      alert('我最喜欢的书籍是《' + val + '》')
    }
  }
}
</script>
二、$parent/$children
$parent:访问父组件实例
$children:访问子组件实例
// 父组件parent.vue
<template>
  <div>
    <Child />
    <button @click="getChildData">获取子组件数据</button>
  </div>
</template>
<script>
import Child from './components/Child.vue'
export default {
  name: 'parent',
  components: {
    Child
  },
  data() {
    return {
      books: ['JavaScript高级程序设计', 'CSS新世界', '图解 HTTP 彩色版']
    }
  },
  methods: {
    getChildData() {
      alert(this.$children[0].msg)
    }
  }
}
</script>
// 子组件child.vue
<template>
  <div>
    <ul>
      <li v-for="(item, index) in bookLists" :key="index">{{item}}</li>
    </ul>
  </div>
</template>
<script>
export default {
  name: 'child',
  data() {
    return {
      bookLists: [],
      msg: '我是子组件的值!'
    }
  },
  mounted() {
    this.bookLists = this.$parent.books
  }
}
</script>
注意:$parent拿到的是对象,如果是最顶层没有父组件的情况下拿到的是undefined;$children拿到的是数组,如果是做底层没有子组件的情况下,拿到的是空数组;这两种通信方式只能用于父子组件通信
三、ref
ref如果在普通Dom元素上使用,引用指向的就是 DOM 元素;如果在子组件上使用,引用就指向组件实例,可以通过实例直接调用组件的方法和数据
// 父组件parent.vue
<template>
  <div>
    <Child ref="child" />
    <button @click="getChildData">获取子组件数据</button>
  </div>
</template>
<script>
import Child from './components/Child.vue'
export default {
  name: 'parent',
  components: {
    Child
  },
  methods: {
    getChildData() {
      const msg = this.$refs['child'].msg
      console.log(msg)
      this.$refs['child'].say()
    }
  }
}
</script>
// 子组件child.vue
<script>
export default {
  name: 'child',
  data() {
    return {
      msg: '我是子组件的值!'
    }
  },
  methods: {
    say() {
      alert('你好,我是子组件!')
    }
  },
}
</script>
四、provide/inject
祖先组件通过provide来提供变量,子孙组件通过inject注入变量来获取祖先组件的数据,不管子孙组件嵌套有多深, 只要调用了inject 那么就可以注入provide中的数据。下面是具体代码:
// 父组件
<template>
  <div>
    <h1>康熙</h1>
    <Son />
  </div>
</template>
<script>
import Son from './components/Son.vue'
export default {
  components: {
    Son
  },
  provide() {
    return {
      FatherToSon: this.FatherToSon,
      FatherToGrandson: this.FatherToGrandson,
    }
  },
  data() {
    return {
      FatherToSon: '我是康熙,雍正,你是我儿子!',
      FatherToGrandson: '我是康熙,乾隆,你是我孙子!',
    }
  }
}
</script>
// 子组件
<template>
  <div>
    <h1>雍正</h1>
    <button @click="receive">接收</button>
    <Grandson />
  </div>
</template>
<script>
import Grandson from './Grandson.vue'
export default {
  components: {
    Grandson
  },
  inject: ['FatherToSon'],
  methods: {
    receive() {
      alert(this.FatherToSon)
    }
  }
}
</script>
// 孙组件
<template>
  <div>
    <h1>乾隆</h1>
    <button @click="receive">接收</button>
  </div>
</template>
<script>
export default {
  inject: ['FatherToGrandson'],
  methods: {
    receive() {
      alert(this.FatherToGrandson)
    }
  }
}

</script>
注意:provide/inject只能从上往下传值,且不是响应式,若要变成响应式的数据provide需要提供函数
五、eventBus的$emit/$on
eventBus是消息传递的一种方式,基于一个消息中心,订阅和发布消息的模式,称为发布订阅者模式。
eventBus 又称为事件总线。在 Vue 中可使用 eventBus 来作为沟通桥梁的概念,就像是所有组件共用相同的事件中心,可向该中心注册发送事件或接收事件,所以组件都可以上下平行地通知其他组件。
$emit(‘name’,args): name:发布的消息名称 , args:发布的消息
KaTeX parse error: Expected 'EOF', got '&' at position 40: …息名称, fn: 订阅的消息 &̲dollar;once('na…on相似但是只触发一次,一旦触发之后,监听器就会被移除
$off(‘name’,callback):name:事件名称,callback:回调监听器
eventbus可以实现任何组件之前的通信,下面以兄弟组件为例
1、初始化,全局引入
// main.js
// 全局添加事件总线
Vue.prototype.$bus = new Vue()
2、发送事件
在parent.vue引入ChildA和ChildB组件,使它们成为兄弟组件
// 父组件parent.vue
<template>
  <div>
    <ChildA />
    <ChildB />
  </div>
</template>
<script>
import ChildA from './components/childA'
import ChildB from './components/childB'
export default {
  components: {
    ChildA,
    ChildB
  }
}
</script>
在ChildA组件中用$emit发送事件
// ChildA组件
<template>
  <div>
    <h1>组件A</h1>
    <button @click="send">发送</button>
  </div>
</template>
<script>
export default {
  methods: {
    // 发送事件
    send() {
      this.$bus.$emit('message', '欢迎使用eventBus!')
    }
  }
}
</script>
3、接收事件发送的事件
// ChildB组件
<template>
  <div>
    <h1>组件B</h1>
  </div>
</template>
<script>
export default {
  mounted() {
    // 接收事件
    this.$bus.$on('message', data => {
      alert('我是组件B,我收到的消息为:' + data)
    })
  },
  beforeDestroy() {
    this.$bus.$off('message')
  }
}
</script>
注意:$on监听的事件不会自动移除监听,因此在不用时最好使用$off移除监听以免产生问题