闪聚支付 第2章 讲义-商户注册&资质申请
需求概述
商户注册
闪聚支付为商户提供聚合支付业务,线下商户和线上商户都可以使用闪聚支付平台。
什么是线下和线上商户?
1)线下场所支付商户
使用线下场所支付的商户是指有实体经营场所的商家,也称为地面商户,一般包含酒店、餐厅、酒吧、美容、 美发、 媒体、 影楼、 家政、 艺廊、 KTV、 会所等。
2)线上支付商户
使用线上支付的商户是指通过互联网进行经营服务的商家,常见的有:电商网站、团购网站、旅游网站等。
商户使用闪聚支付平台第一步要在平台进行注册。
商户填写手机号、账号、密码、获取验证码申请注册,注册成功后商户成为闪聚平台的用户,即可使用闪聚支付平台提供的服务。
商户注册的业务流程如下:

1、用户填写手机号、账号、密码等信息

2、点击获取手机验证码
3、输入验证码,点击注册
4、商户注册成功
资质申请
商户在平台注册成功后,需要完善商户信息,将营业执照、申请人身份证以扫描件的形式上传到平台,由平台运营人员对商户资质进行审核,审核通过方可使用平台提供的服务。
资质申请业务流程如下:

1、商户填写资质信息

2、上传营业执照和法人身份证图片

3、提交资质信息
4、平台运营人员对商户资质信息进行审核

5、审核通过后,完成资质申请
商户注册
需求分析
系统交互流程
商户注册交互流程如下:

商户注册的流程由商户平台应用、商户服务、SaaS平台、验证码服务四个微服务之间进行交互完成,各微服务的职责介绍如下:
1)商户平台应用:此应用主要为商户提供业务功能,包括:商户资质申请、员工管理、门店管理等功能。
2)商户服务: 提供商户管理的相关服务接口,供其它微服务调用,主要为商户平台应用提供接口服务,功能包括:商户基本信息管理、资质申请、商户应用管理、渠道参数配置、商户员工信息管理、商户门店管理等。
3)SaaS平台:闪聚支付项目是一个SaaS平台 ,所谓SaaS平台即多个用户租用平台的业务功能,这样用户即可省去软件系统开发的成本,每个商户就是一个租户,所以又称为多租户系统。
SaaS平台提供租户管理、账号管理、权限管理、资源管理、套餐管理、系统认证授权等功业务功能。在上图商户注册的流程中,商户注册的账号等信息需要写入SaaS平台,由SaaS平台统一管理账号,分配权限,商户统一通过SaaS平台登录闪聚支付。
4)验证码服务:提供获取短信验证码、校验验证码的接口。
商户使用手机号进行注册,平台通过校验手机验证码来确认是否本人在注册。
交互流程如下:
- 前端请求商户平台应用进行注册
- 商户平台应用获取短信验证码
- 前端携带手机验证码、账号、密码等信息请求商户平台应用确认注册
- 验证码校验通过后请求商户服务新增商户
- 商户服务请求SaaS平台新增租户并初始化管理员
- SaaS平台返回创建成功给商户服务商户服务新增商户下根门店信息
- 商户服务新增商户下员工信息
- 注册成功
开发步骤
整个商户注册流程比较复杂,本模块采用迭代开发方式,具体开发步骤如下:
1、首先实现商户信息在商户服务注册成功(暂时不与SaaS平台交互)
商户信息只写入商户数据库,暂时不与SaaS平台交互。
2、待商户信息注册成功,资质申请通过、支付参数配置完成再与SaaS平台进行对接。
与SaaS平台交互前需要部署SaaS平台,学习SaaS暴露的接口及认证接口,接通SaaS方可实现用户登录,此部分放在本章节最后实现。
部署验证码服务
系统中所有验证码相关的功能由验证码服务提供,验证码服务是一个开源的项目,接入了腾讯、阿里等短信接口,本系统只需要和验证码服务接入即可使用腾讯、阿里等短信接口。
参考: 验证码服务使用指南 部署验证码服务。
获取短信验证码
根据系统整体交互流程,需要首先获取短信验证码。
RestTemplate技术预研
1、认识RestTemplate
验证码服务对外提供http接口,我们使用的postman和swagger-ui都属于http客户端的一种,使用它们可以调用验证码服务的接口获取验证码。现在我们需要使用Java程序模拟http客户端调用验证码服务的接口获取验证码。
RestTemplate是Spring提供的用于访问RESTful服务的客户端,RestTemplate提供了多种便捷访问远程Http服务的方法,能够大大提高客户端的编写效率。RestTemplate默认依赖JDK提供http连接的能力(HttpURLConnection),也可以通过替换为例如 Apache HttpComponents、Netty或OkHttp等其它HTTP 客户端,OkHttp的性能优越。
本项目使用OkHttp,官网:https://square.github.io/okhttp/,github:https://github.com/square/okhttp。
在shanjupay-merchant-application工程中引入依赖:
<dependency>
    <groupId>com.squareup.okhttp3groupId>
    <artifactId>okhttpartifactId>
dependency>
在父工程已规范了okhttp的版本
<dependency>
    <groupId>com.squareup.okhttp3groupId>
    <artifactId>okhttpartifactId>
    <version>3.9.1version>
dependency>
在MerchantApplicationBootstrap类中添加RestTemplate初始化:
@Bean
public RestTemplate restTemplate() {
    return new RestTemplate(new OkHttp3ClientHttpRequestFactory());
}
在test下创建测试程序如下:
使用RestTemplate获取百度的网页内容。
package com.shanjupay.merchant;

import lombok.extern.slf4j.Slf4j;
import org.junit.Test;
import org.junit.runner.RunWith;
import org.springframework.beans.factory.annotation.Autowired;
import org.springframework.boot.test.context.SpringBootTest;
import org.springframework.http.ResponseEntity;
import org.springframework.test.context.junit4.SpringRunner;
import org.springframework.web.client.RestTemplate;

@SpringBootTest
@RunWith(SpringRunner.class)
@Slf4j
public class RestTemplateTest {

    @Autowired
    private RestTemplate restTemplate;

    //测试使用restTemplate作为http的客户端向http服务端发起请求
    @Test
    public void gethtml(){
        String url = "http://www.baidu.com/";
        //向url发送http请求,得到响应结果
        ResponseEntity<String> forEntity = restTemplate.getForEntity(url, String.class);
        String body = forEntity.getBody();
        System.out.println(body);
    }
}
通过测试发现可以成功获取百度的网页内容。
网页内容中中文乱码解决方案:
原因:
当RestTemplate默认使用String存储body内容时默认使用ISO_8859_1字符集。
解决:
配置StringHttpMessageConverter 消息转换器,使用utf-8字符集。
修改MerchantApplicationBootstrap类的RestTemplate的定义方法
@Bean
RestTemplate restTemplate() {
    RestTemplate restTemplate = new RestTemplate(new OkHttp3ClientHttpRequestFactory());
    //得到消息转换器
    List<HttpMessageConverter<?>> messageConverters = restTemplate.getMessageConverters();
    //指定StringHttpMessageConverter消息转换器的字符集为utf-8,支持中文字符集,默认ISO‐8859‐1,支持utf‐8
    messageConverters.set(1, new StringHttpMessageConverter(StandardCharsets.UTF_8));
    return restTemplate;
}
2、使用RestTemplate获取验证码
下边通过RestTemplate请求验证码服务获取验证码。
package com.shanjupay.merchant;

import com.alibaba.fastjson.JSON;
import lombok.extern.slf4j.Slf4j;
import org.junit.Test;
import org.junit.runner.RunWith;
import org.springframework.beans.factory.annotation.Autowired;
import org.springframework.boot.test.context.SpringBootTest;
import org.springframework.http.*;
import org.springframework.test.context.junit4.SpringRunner;
import org.springframework.web.client.RestTemplate;

import java.util.HashMap;
import java.util.Map;

@SpringBootTest
@RunWith(SpringRunner.class)
@Slf4j
public class RestTemplateTest {

    @Autowired
    private RestTemplate restTemplate;

    //向验证码服务发送请求,获取验证码(方式一)
    //http://localhost:56085/sailing/generate?effectiveTime=600&name=sms
    @Test
    public void getSmsCode() {
        String url = "http://localhost:56085/sailing/generate?effectiveTime=600&name=sms";//验证码过期时间为600秒

        //请求体
        Map<String, Object> body = new HashMap<>();
        body.put("mobile", "133456");
        //请求头
        HttpHeaders httpHeaders = new HttpHeaders();
        //设定数据格式,指定Content-Type: application/json
        httpHeaders.setContentType(MediaType.APPLICATION_JSON);
        //封装请求参数,请求信息,传入body,header
        HttpEntity httpEntity = new HttpEntity(body, httpHeaders);
        //向url请求
        ResponseEntity<Map> exchange = restTemplate.exchange(url, HttpMethod.POST, httpEntity, Map.class);

        log.info("请求验证码服务,得到响应:{}", JSON.toJSONString(exchange));
        Map bodyMap = exchange.getBody();
        System.out.println(bodyMap);
        Map result = (Map) bodyMap.get("result");
        String key = (String) result.get("key");
        System.out.println(key);
    }

    //获取验证码测试方法(方式二)
    @Test
    public void testGetSmsCode() {
        String url = "http://localhost:56085/sailing/generate?name=sms&effectiveTime=600";//验证码过期时间为600秒
        String phone = "13434343434";
        log.info("调用短信微服务发送验证码:url:{}", url);
        //请求体
        Map<String, Object> body = new HashMap();
        body.put("mobile", phone);
        //请求头
        HttpHeaders httpHeaders = new HttpHeaders();
        //设置数据格式为json
        httpHeaders.setContentType(MediaType.APPLICATION_JSON);
        //封装请求参数
        HttpEntity entity = new HttpEntity(body, httpHeaders);
        Map responseMap = null;
        try {
            //post请求
            ResponseEntity<Map> exchange = restTemplate.exchange(url, HttpMethod.POST, entity,
                    Map.class);
            log.info("调用短信微服务发送验证码: 返回值:{}", JSON.toJSONString(exchange));
            //获取响应
            responseMap = exchange.getBody();
        } catch (Exception e) {
            log.info(e.getMessage(), e);
        } //取出body中的result数据
        if (responseMap != null || responseMap.get("result") != null) {
            Map resultMap = (Map) responseMap.get("result");
            String value = resultMap.get("key").toString();
            System.out.println(value);
        }
    }
}
商户平台应用获取验证码(接口①)
接口定义
在商户平台应用工程定义获取验证码接口:
1、接口交互流程如下:
- 获取手机号
- 向验证码服务请求发送验证码并得到响应
- 响应前端验证码发送结果
2、在MerchantController类中添加getSMSCode接口方法,此接口供前端调:
@Autowired //注入本地的bean
public SmsService smsService;

@ApiOperation("获取手机验证码")
@ApiImplicitParam(name = "phone", value = "手机号", required = true, dataType = "String", paramType = "query")
@GetMapping("/sms")
public String getSMSCode(@RequestParam String phone) {
    log.info("向手机号:{}发送验证码", phone);
    //向验证码服务请求发送验证码
    return smsService.sendMsg(phone);
}
3、Service接口定义如下:
在shanjupay-merchant-application工程中创建Service接口和实现类
为了方便程序复用在 SmsService 接口中添加sendMsg方法用来获取验证码:
package com.shanjupay.merchant.service;

/**
 * 手机短信服务接口
 */
public interface SmsService {
    /**
     * 发送手机验证码
     * @param phone 手机号
     * @return 验证码对应的key
     */
    String sendMsg(String phone);
}
接口实现
1、配置验证码服务的接口地址
在nacos上配置验证码的接口地址
① 登录nacos,编辑merchant-application.yaml配置:
![]()
② 配置如下参数
sms:
  url: "http://localhost:56085/sailing"
  effectiveTime: 600
- url:验证码服务地址
- effectiveTime:验证码过期时间

2、编写接口实现方法
编写SmsServiceImpl实现sendMsg方法。
package com.shanjupay.merchant.service;

import com.alibaba.fastjson.JSON;
import lombok.extern.slf4j.Slf4j;
import org.springframework.beans.factory.annotation.Autowired;
import org.springframework.beans.factory.annotation.Value;
import org.springframework.http.*;
import org.springframework.web.client.RestClientException;
import org.springframework.web.client.RestTemplate;

import java.util.HashMap;
import java.util.Map;

@org.springframework.stereotype.Service//实例为一个bean
@Slf4j
public class SmsServiceImpl implements SmsService {

    @Value("${sms.url}")
    private String url;

    @Value("${sms.effectiveTime}")
    private String effectiveTime;

    @Autowired
    private RestTemplate restTemplate;

    /**
     * 发送手机验证码
     *
     * @param phone 手机号
     * @return 验证码对应的key
     */
    @Override
    public String sendMsg(String phone) {
        //向验证码服务发送请求的地址
        String sms_url = url + "/generate?name=sms&effectiveTime=" + effectiveTime;//验证码过期时间为600秒 10分钟

        log.info("调用短信微服务发送验证码:url:{}", url);
        //请求体
        Map<String, Object> body = new HashMap<>();
        body.put("mobile", phone);
        //请求头
        HttpHeaders httpHeaders = new HttpHeaders();
        //指定Content-Type: application/json
        httpHeaders.setContentType(MediaType.APPLICATION_JSON);
        //请求信息,传入body,header
        HttpEntity httpEntity = new HttpEntity(body, httpHeaders);
        //向url请求
        ResponseEntity<Map> exchange = null;

        Map bodyMap = null;
        try {
            exchange = restTemplate.exchange(sms_url, HttpMethod.POST, httpEntity, Map.class);
            log.info("请求验证码服务,得到响应:{}", JSON.toJSONString(exchange));
            bodyMap = exchange.getBody();
        } catch (RestClientException e) {
            e.printStackTrace();
            throw new RuntimeException("发送验证码失败");
        }
        if (bodyMap == null || bodyMap.get("result") == null) {
            throw new RuntimeException("发送验证码失败");
        }

        Map result = (Map) bodyMap.get("result");
        String key = (String) result.get("key");
        log.info("得到发送验证码对应的key:{}", key);
        return key;
    }
}
3、Controller实现方法如下
@ApiOperation("获取手机验证码")
@ApiImplicitParam(name = "phone", value = "手机号", required = true, dataType = "String", paramType = "query")
@GetMapping("/sms")
public String getSMSCode(@RequestParam String phone) {
    log.info("向手机号:{}发送验证码", phone);
    //向验证码服务请求发送验证码
    return smsService.sendMsg(phone);
}
访问:http://localhost:57010/merchant/swagger-ui.html

接口测试
使用postman测试获取验证码接口:http://localhost:57010/merchant/sms?phone=17717171717

结果:
在shanjupay-merchant-application工程的控制台输出如下信息:

在验证码服务的控制台输出以下信息:
![]()
postman测试:

商户注册
系统设计
商户拿到获取的验证码即可提交注册信息,完成商户注册,本节完成商户注册功能。
商户注册信息向三个地方写入数据 ,如下图:
当前阶段暂时只向商户表写入数据 ,待接入SaaS系统时向员工表、SaaS系统写入。

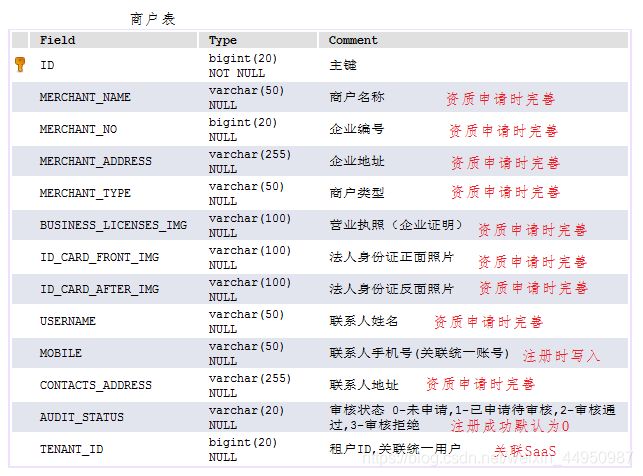
商户注册表的数据模型如下:
商户服务注册商户(接口②)
商户服务提供商户注册的服务接口供商户平台应用使用,本节实现商户服务注册商户接口。
接口定义
在商户服务定义商户注册接口
1、接口描述如下:
1)校验商户注册的基础数据:账号、密码、手机号
2)添加商户
注意:本节暂不实现对接SaaS系统,仅实现新增一个商户,并将手机号填写到商户表。
3)返回注册结果给商户平台应用
2、定义商户注册DTO
此DTO作为商户注册、资质申请的公共类。
在shanjupay-merchant-api工程的com.shanjupay.merchant.api.dto包下添加MerchantDTO:
package com.shanjupay.merchant.api.dto;

import io.swagger.annotations.ApiModel;
import io.swagger.annotations.ApiModelProperty;
import lombok.Data;

import java.io.Serializable;

/**
 * @author Administrator
 * @version 1.0
 **/
@ApiModel(value = "MerchantDTO", description = "商户信息")
@Data
public class MerchantDTO implements Serializable {

    @ApiModelProperty("商户id")
    private Long id;

    @ApiModelProperty("企业名称")
    private String merchantName;

    @ApiModelProperty("企业编号")
    private String merchantNo;

    @ApiModelProperty("企业地址")
    private String merchantAddress;

    @ApiModelProperty("行业类型")
    private String merchantType;

    @ApiModelProperty("营业执照")
    private String businessLicensesImg;

    @ApiModelProperty("法人身份证正面")
    private String idCardFrontImg;

    @ApiModelProperty("法人身份证反面")
    private String idCardAfterImg;

    @ApiModelProperty("联系人")
    private String username;

    @ApiModelProperty("密码")
    private String password;

    @ApiModelProperty("手机号,关联统一账号")
    private String mobile;

    @ApiModelProperty("联系人地址")
    private String contactsAddress;

    @ApiModelProperty("审核状态,0-未申请,1-已申请待审核,2-审核通过,3-审核拒绝")
    private String auditStatus;

    @ApiModelProperty("租户ID")
    private Long tenantId;
}
DTO可以使用“代码生成工具”自动生成:
修改代码生成工具中的MyBatisPlusGenerator类:
public class MyBatisPlusGenerator {
...
private static final Boolean IS_DTO = true;
...
if (IS_DTO) {
	globalConfig.setSwagger2(true);
	globalConfig.setEntityName("%sDTO");
	packageConfig.setEntity("dto");
}
System.out.println("===================== MyBatis Plus Generator ==================");

autoGenerator.execute();
...
当生成dto时将IS_DTO设置为true,运行生成工具即可。
3、接口定义如下:
在MerchantService接口类中定义如下接口:
/**
 *  注册商户服务接口,接收账号、密码、手机号,为了可扩展性使用merchantDto接收数据
 * @param merchantDTO 商户注册信息
 * @return 注册成功的商户信息
 */
MerchantDTO createMerchant(MerchantDTO merchantDTO);
接口实现
实现MerchantServiceImpl中的createMerchant方法:
package com.shanjupay.merchant.service;

import com.shanjupay.merchant.api.MerchantService;
import com.shanjupay.merchant.api.dto.MerchantDTO;
import com.shanjupay.merchant.entity.Merchant;
import com.shanjupay.merchant.mapper.MerchantMapper;
import lombok.extern.slf4j.Slf4j;
import org.springframework.beans.factory.annotation.Autowired;
import org.springframework.transaction.annotation.Transactional;

/**
 * Created by Administrator.
 */
@org.apache.dubbo.config.annotation.Service
@Slf4j
public class MerchantServiceImpl implements MerchantService {

    @Autowired
    MerchantMapper merchantMapper;

    /**
     * 注册商户服务接口,接收账号、密码、手机号,为了可扩展性使用merchantDto接收数据
     *
     * @param merchantDTO 商户注册信息
     * @return 注册成功的商户信息
     */
    @Override
    @Transactional
    public MerchantDTO createMerchant(MerchantDTO merchantDTO) {
        Merchant merchant = new Merchant();
        //设置审核状态0‐未申请,1‐已申请待审核,2‐审核通过,3‐审核拒绝
        merchant.setAuditStatus("0");
        // 设置手机号
        merchant.setMobile(merchantDTO.getMobile());
        // ...
        // 保存商户
        merchantMapper.insert(merchant);
        // 将新增商户id返回
        merchantDTO.setId(merchant.getId());
        return merchantDTO;
    }
}
商户平台应用注册商户(接口③)
商户平台应用调用商户服务提供的商户注册接口即可完成商户注册业务,本节实现商户平台应用注册商户接口的开发。
接口定义
1、接口描述如下:
1)接收商户填写的注册数据
2)商户平台应用校验手机验证码
3)请求商户服务进行商户注册
4)返回注册结果给前端
2、定义商户注册VO:
在shanjupay-merchant-application工程的com.shanjupay.merchant.vo包下添加VO类型,VO类型负责接收前端请求的数据。
下图是商户注册的用户界面,根据用户界面中的元素定义VO类的属性:

package com.shanjupay.merchant.vo;

import io.swagger.annotations.ApiModel;
import io.swagger.annotations.ApiModelProperty;
import lombok.Data;

import java.io.Serializable;

/**
 * 用于接收前端提交的数据
 */
@ApiModel(value = "MerchantRegisterVO", description = "商户注册信息")
@Data
public class MerchantRegisterVO implements Serializable {

    @ApiModelProperty("商户手机号")
    private String mobile;

    @ApiModelProperty("商户用户名")
    private String username;

    @ApiModelProperty("商户密码")
    private String password;

    @ApiModelProperty("验证码的key")
    private String verifiykey;

    @ApiModelProperty("验证码")
    private String verifiyCode;

}
3、接口定义如下:
在MerchantController类中定义如下接口:
@ApiOperation("商户注册")
@ApiImplicitParam(value = "商户注册信息", name = "merchantRegisterVO", required = true, dataType = "MerchantRegisterVO", paramType = "body")
@PostMapping("/merchants/register")
public MerchantRegisterVO registerMerchant(@RequestBody MerchantRegisterVO merchantRegisterVO) {
    //校验验证码
    //...
    //注册商户
    //...
    return merchantRegisterVO;
}
校验验证码实现
1、在SmsService中定义校验验证码的service接口
/**
 *  校验手机验证码,抛出异常则校验无效
 * @param verifiyKey 验证码的key
 * @param verifiyCode 验证码
 */
void checkVerifiyCode(String verifiyKey, String verifiyCode);
2.、在SmsServiceImpl中定义校验验证码的service 实现方法
/**
 * 校验手机验证码
 *
 * @param verifiyKey  验证码的key
 * @param verifiyCode 验证码
 */
@Override
public void checkVerifiyCode(String verifiyKey, String verifiyCode) {
    //实现校验验证码的逻辑
    //校验验证码的url
    String url = "http://localhost:56085/sailing/verify?name=sms&verificationCode=" + verifiyCode + "&verificationKey=" + verifiyKey;

    Map bodyMap = null;
    try {
        //使用restTemplate请求验证码服务
        ResponseEntity<Map> exchange = restTemplate.exchange(url, HttpMethod.POST, HttpEntity.EMPTY, Map.class);
        log.info("请求验证码服务,得到响应:{}", JSON.toJSONString(exchange));
        bodyMap = exchange.getBody();
    } catch (Exception e) {
        e.printStackTrace();
        throw new RuntimeException("校验验证码失败");
    }
    if (bodyMap == null || bodyMap.get("result") == null || !(Boolean) bodyMap.get("result")) {
        throw new RuntimeException("校验验证码失败");
    }
}
3、在controller中调用校验验证码
@ApiOperation("商户注册")
@ApiImplicitParam(value = "商户注册信息", name = "merchantRegisterVO", required = true, dataType = "MerchantRegisterVO", paramType = "body")
@PostMapping("/merchants/register")
public MerchantRegisterVO registerMerchant(@RequestBody MerchantRegisterVO merchantRegisterVO) {
    //校验验证码
    smsService.checkVerifiyCode(merchantRegisterVO.getVerifiykey(),merchantRegisterVO.getVerifiyCode());
    //注册商户
    //...
    return merchantRegisterVO;
}
注册商户实现
在Controller中调用Dubbo接口实现注册商户
@org.apache.dubbo.config.annotation.Reference //注入的远程调用的接口
public MerchantService merchantService;

@ApiOperation("商户注册")
@ApiImplicitParam(value = "商户注册信息", name = "merchantRegisterVO", required = true, dataType = "MerchantRegisterVO", paramType = "body")
@PostMapping("/merchants/register")
public MerchantRegisterVO registerMerchant(@RequestBody MerchantRegisterVO merchantRegisterVO) {
    //校验验证码
    smsService.checkVerifiyCode(merchantRegisterVO.getVerifiykey(), merchantRegisterVO.getVerifiyCode());
    //注册商户
    //向dto写入商户注册的信息
    MerchantDTO merchantDTO = new MerchantDTO();
    merchantDTO.setUsername(merchantRegisterVO.getUsername());
    merchantDTO.setMobile(merchantRegisterVO.getMobile());
    merchantDTO.setPassword(merchantRegisterVO.getPassword());
    //调用dubbo服务接口
    merchantService.createMerchant(merchantDTO);
    return merchantRegisterVO;
}
接口测试
下面使用Postman对注册商户整体流程进行测试:
1、 获取短信验证码
在验证码服务的http://localhost:56085/sailing/swagger-ui.html进行获取
2、商户注册:http://localhost:57010/merchant/merchants/register,填写注册信息:
{
	"mobile": "17717171717",
	"username": "test02",
	"password": "123456",
	"verifiykey": "sms:e2a941234da64eb6bd795287c3a9ed34",
	"verifiyCode": "544351"
}

3、注册成功
MapStruct对象转换
数据传输对象
在商户注册开发过程中用于数据传输的对象有MerchantRegisterVO、MerchantDTO、entity(实体类),它们的用途如下:
- MerchantRegisterVO用于应用层接收前端请求及响应前端数据。
- MerchantDTO 用于服务层传入及响应数据。
- entity(实体类) 用于持久层传入及响应数据。
如下图:

数据传输对象(Data Transfer Object)是系统在交互过程中根据需要及规范将数据封装到数据对象中进行传输。
本项目数据传输对象的规范:
1、应用层
如没有接口参数的特殊要求,应用层使用DTO结尾的对象传输,否则单独定义VO结尾的对象传输。
2、服务层
统一使用DTO结尾的对象传输。
3、持久层
统一使用Entity对象传输。
MapStruct
1、数据传输对象转换的繁琐
每层有自己的数据传输对象,当数据流程到该层由需要将数据转成符合要求的格式,比如:当数据由应用层流转到服务层则需要将数据转成DTO格式,当数据由服务层流向持久层则需要将数据转成Entity格式数据
下边的代码数据由服务层流向持久层:
public MerchantDTO createMerchant(MerchantDTO merchantDTO) {
    Merchant merchant = new Merchant();
    //设置审核状态0‐未申请,1‐已申请待审核,2‐审核通过,3‐审核拒绝
    merchant.setAuditStatus("0");
    // 设置手机号
    merchant.setMobile(merchantDTO.getMobile());
    //设置联系人
    merchant.setUsername(merchantDTO.getUsername());
    // ...
    // 保存商户
    merchantMapper.insert(merchant);
    // 将新增商户id返回
    merchantDTO.setId(merchant.getId());
    return merchantDTO;
}
上边代码的问题是:由merchantDTO转成entity实现过程繁琐。
2、MapStruct解决数据传输对象转换的繁琐
MapStruct是一个代码生成器,它基于约定优于配置的方法大大简化了Java Bean对象之间的映射转换的实现。MapStruct 使用简单的方法即可完成对象之间的转换,它速度快、类型安全且易于理解。
官方地址:https://mapstruct.org/
1)添加依赖
在使用MapStruct的工程添加MapStruct依赖:
<dependency>
    <groupId>org.mapstructgroupId>
    <artifactId>mapstruct-jdk8artifactId>
dependency>
<dependency>
    <groupId>org.mapstructgroupId>
    <artifactId>mapstruct-processorartifactId>
    <version>${org.mapstruct.version}version>
dependency>
2)服务层对象转换
在商户服务工程定义商户对象转换类
定义MerchantConvert转换类,使用@Mapper注解快速实现对象转换
/**
 * 定义dto和entity之间的转换规则
 * Created by Administrator.
 */
@Mapper //对象属性的映射
public interface MerchantConvert {

    //转换类实例
    MerchantConvert INSTANCE = Mappers.getMapper(MerchantConvert.class);

    //把dto转换成entity
    Merchant dto2entity(MerchantDTO merchantDTO);

    //把entity转换成dto
    MerchantDTO entity2dto(Merchant merchant);
}
在MerchantCovert中定义测试方法:
public static void main(String[] args) {
    //将dto转成entity
    Merchant merchant  =new Merchant();
    merchant.setUsername("测试");
    merchant.setMobile("123456");
    MerchantDTO merchantDTO = MerchantConvert.INSTANCE.entity2dto(merchant);
    System.out.println(merchantDTO);

    //将entity转成dto
    merchantDTO.setMerchantName("商户名称");
    Merchant merchant1 = MerchantConvert.INSTANCE.dto2entity(merchantDTO);
    System.out.println(merchant1);
}
List数据也可以转换:
在MerchantCovert中定义list的方法,如下:
//list之间也可以转换,很entity的List转成MerchantDTO list
List<MerchantDTO> entityList2dtoList(List<Merchant> merchants);
测试:
在main方法编写list之间的转换测试
//定义的list
List entityList = new ArrayList();
entityList.add(merchant);
//将lIST转成包含dto的list
List list = MerchantConvert.INSTANCE.entityList2dtoList(entityList);
System.out.println(list);
最终代码
package com.shanjupay.merchant.convert;

import com.shanjupay.merchant.api.dto.MerchantDTO;
import com.shanjupay.merchant.entity.Merchant;
import org.mapstruct.Mapper;
import org.mapstruct.factory.Mappers;

import java.util.ArrayList;
import java.util.List;

/**
 * 定义dto和entity之间的转换规则
 * Created by Administrator.
 */
@Mapper //对象属性的映射
public interface MerchantConvert {

    //转换类实例
    MerchantConvert INSTANCE = Mappers.getMapper(MerchantConvert.class);

    //把dto转换成entity
    Merchant dto2entity(MerchantDTO merchantDTO);

    //把entity转换成dto
    MerchantDTO entity2dto(Merchant merchant);

    //list之间也可以转换,很entity的List转成MerchantDTO list
    List<MerchantDTO> entityList2dtoList(List<Merchant> merchants);


    public static void main(String[] args) {
        //将dto转成entity
        Merchant merchant  =new Merchant();
        merchant.setUsername("测试");
        merchant.setMobile("123456");
        MerchantDTO merchantDTO = MerchantConvert.INSTANCE.entity2dto(merchant);
        System.out.println(merchantDTO);

        //将entity转成dto
        merchantDTO.setMerchantName("商户名称");
        Merchant merchant1 = MerchantConvert.INSTANCE.dto2entity(merchantDTO);
        System.out.println(merchant1);

        //定义的list
        List entityList = new ArrayList();
        entityList.add(merchant);
        //将lIST转成包含dto的list
        List list = MerchantConvert.INSTANCE.entityList2dtoList(entityList);
        System.out.println(list);
    }
}
3)应用层对象转换
在商户平台应用工程定义商户对象转换类
package com.shanjupay.merchant.convert;

import com.shanjupay.merchant.api.dto.MerchantDTO;
import com.shanjupay.merchant.vo.MerchantRegisterVO;
import org.mapstruct.Mapper;
import org.mapstruct.factory.Mappers;

/**
 * 将商户注册vo和dto进行转换
 * Created by Administrator.
 */
@Mapper
public interface MerchantRegisterConvert {

    MerchantRegisterConvert INSTANCE = Mappers.getMapper(MerchantRegisterConvert.class);

    //将dto转成vo
    MerchantRegisterVO dto2vo(MerchantDTO merchantDTO);
    //将vo转成dto
    MerchantDTO vo2dto(MerchantRegisterVO merchantRegisterVO);
}
代码优化
1、优化服务层代码
修改商户服务工程MerchantServiceImpl中的createMerchant方法:
/**
 * 注册商户服务接口,接收账号、密码、手机号,为了可扩展性使用merchantDto接收数据
 *
 * @param merchantDTO 商户注册信息
 * @return 注册成功的商户信息
 */
@Override
@Transactional
public MerchantDTO createMerchant(MerchantDTO merchantDTO) {
    //Merchant merchant = new Merchant();
    //设置审核状态0‐未申请,1‐已申请待审核,2‐审核通过,3‐审核拒绝
    //merchant.setAuditStatus("0");
    // 设置手机号
    //merchant.setMobile(merchantDTO.getMobile());
    //设置联系人
    //merchant.setUsername(merchantDTO.getUsername());
    //..写入其它属性

    //使用MapStruct进行对象转换
    Merchant merchant = MerchantConvert.INSTANCE.dto2entity(merchantDTO);
    //审核状态为0-未进行资质申请
    merchant.setAuditStatus("0");
    //调用mapper向数据库写入记录
    merchantMapper.insert(merchant);
    // ...
    //保存商户
    //merchantMapper.insert(merchant);
    // 将新增商户id返回
    //merchantDTO.setId(merchant.getId());
    //将entity转成dto
    MerchantDTO merchantDTONew = MerchantConvert.INSTANCE.entity2dto(merchant);
    return merchantDTONew;
}
2、优化应用层代码
修改商户平台应用工程MerchantController中的registerMerchant方法:
@ApiOperation("商户注册")
@ApiImplicitParam(value = "商户注册信息", name = "merchantRegisterVO", required = true, dataType = "MerchantRegisterVO", paramType = "body")
@PostMapping("/merchants/register")
public MerchantRegisterVO registerMerchant(@RequestBody MerchantRegisterVO merchantRegisterVO) {
    //校验验证码
    smsService.checkVerifiyCode(merchantRegisterVO.getVerifiykey(), merchantRegisterVO.getVerifiyCode());
    //注册商户
    //向dto写入商户注册的信息
    //MerchantDTO merchantDTO = new MerchantDTO();
    //merchantDTO.setUsername(merchantRegisterVO.getUsername());
    //merchantDTO.setMobile(merchantRegisterVO.getMobile());
    //merchantDTO.setPassword(merchantRegisterVO.getPassword());
    //调用dubbo服务接口
    //merchantService.createMerchant(merchantDTO);
    //使用MapStruct转换对象
    MerchantDTO merchantDTO = MerchantRegisterConvert.INSTANCE.vo2dto(merchantRegisterVO);
    merchantService.createMerchant(merchantDTO);
    return merchantRegisterVO;
}
异常处理
异常信息格式
系统在交互中难免会有异常发生,前端为了解析异常信息向用户提示特定义了异常信息的返回格式,如下:
1、返回response状态说明
| 状态码 | 说明 |
|---|---|
| 200 | 成功 |
| 401 | 没有权限 |
| 500 | 程序错误(需要自定义错误体) |
2、自定义错误体
{
	"errCode ": "000000 ",
	"errMessage": "错误说明"
}
异常处理流程
截至目前系统并没有按照前端要求返回异常信息,测试如下:
注册商户时输入一个错误的验证码,返回信息如下:
{
	"timestamp": "2019‐12‐10T10:06:19.936+0000",
	"status": 500,
	"error": "Internal Server Error",
	"message": "验证码错误",
	"path": "/merchant/merchants/register"
}
从上边的返回信息得知,状态码为500符合要求,按前端的规范定义的错误信息要写在“errMessage” 中,显然不符合要求。
系统规范了异常处理流程,如下:

1、在服务层抛出自定义异常类型及不可预知异常类型。
上图中BusinessException为系统的自定义异常类型,程序中在代码显示抛出该异常,此类异常是程序员可预知的。
另一部分是系统无法预知的异常,如:数据库无法连接,服务器宕机等场景下所抛出的异常,此类异常是程序员无法预知的异常。
2、应用层接收到服务层抛出异常继续向上抛出,应用层自己也可以抛出自定义异常类型及不可预知异常类型。
3、统一异常处理器捕获到异常进行解析。
判断如果为自定义异常则直接取出错误代码及错误信息,因为程序员在抛出自定义异常时已将错误代码和异常信息指定。
如果为不可预知的异常则统一定义为99999异常代码。
4、统一异常处理器将异常信息格式为前端要求的格式响应给前端。
服务端统一将异常信息封装在下边的Json格式中返回:
{
	"errCode ": "000000 ",
	"errMessage": "错误说明"
}
自定义业务异常类
1、在shanjupay-common工程的com.shanjupay.common.domain包下添加业务异常类BusinessException:
package com.shanjupay.common.domain;

/**
 * 自定义的异常类型
 */
public class BusinessException extends RuntimeException {
    //错误代码
    private ErrorCode errorCode;

    public BusinessException(ErrorCode errorCode) {
        super();
        this.errorCode = errorCode;
    }

    public BusinessException() {
        super();
    }

    public void setErrorCode(ErrorCode errorCode) {
        this.errorCode = errorCode;
    }

    public ErrorCode getErrorCode() {
        return errorCode;
    }
}
2、定义错误代码
在common工程专门定义了ErrorCode接口及CommonErrorCode通用代码。
从资料文件夹的代码目录获取 CommonErrorCode.java类。
自定义业务异常处理器
1、在shanjupay‐common工程的com.shanjupay.common.domain包下添加错误响应包装类RestErrorResponse:
package com.shanjupay.common.domain;

import io.swagger.annotations.ApiModel;
import lombok.Data;

@ApiModel(value = "RestErrorResponse", description = "错误响应参数包装")
@Data
public class RestErrorResponse {

    private String errCode;

    private String errMessage;

    public RestErrorResponse(String errCode, String errMessage) {
        this.errCode = errCode;
        this.errMessage = errMessage;
    }
}
2、定义全局异常处理器
全局异常处理器使用ControllerAdvice注解实现,ControllerAdvice是SpringMVC3.2提供的注解,用ControllerAdvice可以方便实现对Controller面向切面编程,具体用法如下:
- ControllerAdvice和ExceptionHandler注解实现全局异常处理
- ControllerAdvice和ModelAttribute注解实现全局数据绑定
- ControllerAdvice和InitBinder注解实现全局数据预处理
今天学习第一种用法,其它用法有兴趣的可自行查阅相关资料。
ControllerAdvice和ExceptionHandler结合可以捕获Controller抛出的异常,根据异常处理流程,Service和持久层最终都会抛给Controller,所以此方案可以实现全局异常捕获,异常被捕获到即可格式为前端要的信息格式响应给前端。
在shanjupay‐merchant‐application工程的com.shanjupay.merchant.common.intercept添加
GlobalExceptionHandler:
package com.shanjupay.merchant.common.intercept;

import com.shanjupay.common.domain.BusinessException;
import com.shanjupay.common.domain.CommonErrorCode;
import com.shanjupay.common.domain.ErrorCode;
import com.shanjupay.common.domain.RestErrorResponse;
import org.slf4j.Logger;
import org.slf4j.LoggerFactory;
import org.springframework.http.HttpStatus;
import org.springframework.web.bind.annotation.ControllerAdvice;
import org.springframework.web.bind.annotation.ExceptionHandler;
import org.springframework.web.bind.annotation.ResponseBody;
import org.springframework.web.bind.annotation.ResponseStatus;

import javax.servlet.http.HttpServletRequest;
import javax.servlet.http.HttpServletResponse;

/**
 * 全局异常处理器
 *
 * @author Administrator
 * @version 1.0
 **/
@ControllerAdvice//与@Exceptionhandler配合使用实现全局异常处理
public class GlobalExceptionHandler {
    private static final Logger LOGGER = LoggerFactory.getLogger(GlobalExceptionHandler.class);

    //捕获Exception异常
    @ExceptionHandler(value = Exception.class)
    @ResponseBody
    @ResponseStatus(HttpStatus.INTERNAL_SERVER_ERROR)
    public RestErrorResponse processExcetion(HttpServletRequest request,
                                             HttpServletResponse response,
                                             Exception e) {
        //解析异常信息
        //如果是系统自定义异常,直接取出errCode和errMessage
        if (e instanceof BusinessException) {
            LOGGER.info(e.getMessage(), e);
            //解析系统自定义异常信息
            BusinessException businessException = (BusinessException) e;
            ErrorCode errorCode = businessException.getErrorCode();
            //错误代码
            int code = errorCode.getCode();
            //错误信息
            String desc = errorCode.getDesc();
            return new RestErrorResponse(String.valueOf(code), desc);
        }

        LOGGER.error("系统异常:", e);
        //统一定义为99999系统未知错误
        return new RestErrorResponse(String.valueOf(CommonErrorCode.UNKNOWN.getCode()), CommonErrorCode.UNKNOWN.getDesc());
    }
}
抛出自定义异常
按照异常处理流程,应用层抛出自定义异常由异常处理器进行解析。
1、校验验证码接口抛出 BusinessException
修改商户平台应用工程中SmsServicer接口的checkVerifiyCode方法
public void checkVerifiyCode(String verifiyKey, String verifiyCode) throws BusinessException;
接口实现中抛出异常自定义异常类型
/**
 * 校验手机验证码
 *
 * @param verifiyKey  验证码的key
 * @param verifiyCode 验证码
 */
@Override
public void checkVerifiyCode(String verifiyKey, String verifiyCode) throws BusinessException{
    //实现校验验证码的逻辑
    //校验验证码的url
    String url = "http://localhost:56085/sailing/verify?name=sms&verificationCode=" + verifiyCode + "&verificationKey=" + verifiyKey;

    Map bodyMap = null;
    try {
        //使用restTemplate请求验证码服务
        ResponseEntity<Map> exchange = restTemplate.exchange(url, HttpMethod.POST, HttpEntity.EMPTY, Map.class);
        log.info("请求验证码服务,得到响应:{}", JSON.toJSONString(exchange));
        bodyMap = exchange.getBody();
    } catch (Exception e) {
        e.printStackTrace();
        //throw new RuntimeException("校验验证码失败");
        throw new BusinessException(CommonErrorCode.E_100102);
    }
    if (bodyMap == null || bodyMap.get("result") == null || !(Boolean) bodyMap.get("result")) {
        //throw new RuntimeException("校验验证码失败");
        throw new BusinessException(CommonErrorCode.E_100102);
    }
}
2、测试
请求商户注册,输出一个错误的验证码,返回信息如下:
{
	"errCode": "100102",
	"errMessage": "验证码错误"
}
3、测试不可预知异常
故意在Controller中制造异常,测试是否抛出未知错误异常。
代码如下:
public MerchantRegisterVO registerMerchant(@RequestBody MerchantRegisterVO merchantRegisterVO) {

    int i = 1 / 0;//故意制造异常
    ......
}
请商户注册,返回信息如下:
{
	"errMessage": "未知错误",
	"errCode": "999999"
}
校验商户手机号
实现思路
校验商户手机号的唯一性,根据商户的手机号查询商户表,如果存在记录则说明已有相同的手机号重复,手机号不唯一则抛出异常自定义异常。
完善代码
1、修改商户服务注册商户接口,添加抛出异常声明
/**
 *  注册商户服务接口,接收账号、密码、手机号,为了可扩展性使用merchantDto接收数据
 * @param merchantDTO 商户注册信息
 * @return 注册成功的商户信息
 */
MerchantDTO createMerchant(MerchantDTO merchantDTO) throws BusinessException;
2、修改商户服务注册商户接口实现方法
/**
 * 注册商户服务接口,接收账号、密码、手机号,为了可扩展性使用merchantDto接收数据
 *
 * @param merchantDTO 商户注册信息
 * @return 注册成功的商户信息
 */
@Override
@Transactional
public MerchantDTO createMerchant(MerchantDTO merchantDTO) throws BusinessException {
    //校验参数的合法性
    if (merchantDTO == null) {
        throw new BusinessException(CommonErrorCode.E_100108);
    }
    //手机号非空校验
    if (StringUtils.isBlank(merchantDTO.getMobile())) {
        throw new BusinessException(CommonErrorCode.E_100112);
    }
    //手机号格式的合法性校验
    if (!PhoneUtil.isMatches(merchantDTO.getMobile())) {
        throw new BusinessException(CommonErrorCode.E_100109);
    }
    //联系人非空校验
    if (StringUtils.isBlank(merchantDTO.getUsername())) {
        throw new BusinessException(CommonErrorCode.E_100110);
    }
    //密码非空校验
    if (StringUtils.isBlank(merchantDTO.getPassword())) {
        throw new BusinessException(CommonErrorCode.E_100111);
    }
    //校验商户手机号的唯一性
    //根据商户手机号查询商户表,如果存在记录则说明已有相同的手机号重复
    Integer count = merchantMapper.selectCount(new LambdaQueryWrapper<Merchant>().eq(Merchant::getMobile, merchantDTO.getMobile()));
    if (count > 0) {
        throw new BusinessException(CommonErrorCode.E_100113);
    }

    //Merchant merchant = new Merchant();
    //设置审核状态0‐未申请,1‐已申请待审核,2‐审核通过,3‐审核拒绝
    //merchant.setAuditStatus("0");
    // 设置手机号
    //merchant.setMobile(merchantDTO.getMobile());
    //设置联系人
    //merchant.setUsername(merchantDTO.getUsername());
    //..写入其它属性

    //使用MapStruct进行对象转换
    Merchant merchant = MerchantConvert.INSTANCE.dto2entity(merchantDTO);
    //审核状态为0-未进行资质申请
    merchant.setAuditStatus("0");
    //调用mapper向数据库写入记录
    merchantMapper.insert(merchant);
    // ...
    //保存商户
    //merchantMapper.insert(merchant);
    // 将新增商户id返回
    //merchantDTO.setId(merchant.getId());
    //将entity转成dto
    MerchantDTO merchantDTONew = MerchantConvert.INSTANCE.entity2dto(merchant);
    return merchantDTONew;
}
3、修改商户应用平台注册商户接口
添加对注册信息的非空校验。
@ApiOperation("商户注册")
@ApiImplicitParam(value = "商户注册信息", name = "merchantRegisterVO", required = true, dataType = "MerchantRegisterVO", paramType = "body")
@PostMapping("/merchants/register")
public MerchantRegisterVO registerMerchant(@RequestBody MerchantRegisterVO merchantRegisterVO) {

    //int i = 1 / 0;//故意制造异常
    //校验参数的合法性
    if (merchantRegisterVO == null) {
        throw new BusinessException(CommonErrorCode.E_100108);
    }
    //手机号非空校验
    if (StringUtils.isBlank(merchantRegisterVO.getMobile())) {
        throw new BusinessException(CommonErrorCode.E_100112);
    }
    //手机号格式校验
    if (!PhoneUtil.isMatches(merchantRegisterVO.getMobile())) {
        throw new BusinessException(CommonErrorCode.E_100109);
    }
    //联系人非空校验
    if (StringUtils.isBlank(merchantRegisterVO.getUsername())) {
        throw new BusinessException(CommonErrorCode.E_100110);
    }
    //密码非空校验
    if (StringUtils.isBlank(merchantRegisterVO.getPassword())) {
        throw new BusinessException(CommonErrorCode.E_100111);
    }
    //验证码非空校验
    if (StringUtils.isBlank(merchantRegisterVO.getVerifiyCode()) ||
            StringUtils.isBlank(merchantRegisterVO.getVerifiykey())) {
        throw new BusinessException(CommonErrorCode.E_100103);
    }

    //校验验证码
    smsService.checkVerifiyCode(merchantRegisterVO.getVerifiykey(), merchantRegisterVO.getVerifiyCode());
    //注册商户
    //向dto写入商户注册的信息
    //MerchantDTO merchantDTO = new MerchantDTO();
    //merchantDTO.setUsername(merchantRegisterVO.getUsername());
    //merchantDTO.setMobile(merchantRegisterVO.getMobile());
    //merchantDTO.setPassword(merchantRegisterVO.getPassword());
    //调用dubbo服务接口
    //merchantService.createMerchant(merchantDTO);
    //使用MapStruct转换对象
    MerchantDTO merchantDTO = MerchantRegisterConvert.INSTANCE.vo2dto(merchantRegisterVO);
    merchantService.createMerchant(merchantDTO);
    return merchantRegisterVO;
}
商户资质申请
需求分析
系统交互流程
商户资质申请交互流程如下:

七牛云:
七牛云是国内一家云服务提供商,本系统与七牛云对接将商户资质照片存储在七牛云。
交互流程如下:
- 前端上传证件照片,请求商户平台应用。
- 商户平台应用请求七牛云上传图片。
- 上传成功返回图片标识给前端。
- 前端携带证件图片标识和资质申请信息提交到商户平台应用。
- 请求商户服务保存资质申请。
- 保存成功返回给前端。
商户资质申请界面如下:

资质信息存储
商户资质 信息存储在商户表,上传的资质证件照片存储Url绝对路径。
关于资质 申请状态 说明如下 :
- 提交资质申请,审核状态 为1(已申请待审核)
- 资质审核后,审核状态 为2(审核通过 )或3(审核不通过 )

七牛云
商户上传证件照片要与七牛云对接,参考七牛云使用指南完成对接。
上传证件
商户平台应用证件上传(接口①)
接口定义
1、接口描述
1)前端携带证件信息请求商户平台应用
2)商户平台应用请求七牛云服务上传证件图片
3)七牛云返回图片地址给前端
2、接口定义如下:
定义FileService负责文件上传至七牛云:
package com.shanjupay.merchant.service;

import com.shanjupay.common.domain.BusinessException;

/**
 * @author Administrator
 * @version 1.0
 **/
public interface FileService {

    /**
     *  上传文件
     * @param bytes 文件字节数组
     * @param fileName 文件名
     * @return  文件访问路径(绝对的url)
     * @throws BusinessException
     */
    public String upload(byte[] bytes,String fileName) throws BusinessException;
}
在MerchantController定义upload负责接收前端上传证件的请求。
@ApiOperation("上传证件照")
@PostMapping("/upload")
public String upload(@ApiParam(value = "证件照", required = true) @RequestParam("file") MultipartFile multipartFile) throws IOException {
    return null;
}
接口实现
使用提供的七牛云工具类完成图片上传到七牛云
1、在shanjupay-common工程引入
<dependency>
    <groupId>com.qiniugroupId>
    <artifactId>qiniu-java-sdkartifactId>
    <version>7.2.25version>
dependency>
<dependency>
    <groupId>com.google.code.gsongroupId>
    <artifactId>gsonartifactId>
    <version>2.8.2version>
dependency>
<dependency>
    <groupId>com.alibabagroupId>
    <artifactId>fastjsonartifactId>
    <version>1.2.47version>
dependency>
2、编写工具类
在common工程中编写七牛云上传工具类,此工具类被FileService调用。
2、FileServiceImpl
在nacos配置七牛云上传参数:
# 七牛云
oss:
  qiniu:
    url: "http://qdxio5fpa.bkt.clouddn.com/"
    accessKey: "88Vvm_0jHMVJp2tJna8SVKwmt8oCmR8CDZdMVDeX"
    secretKey: "V68zp5TjijcGX7Rp_aVJ1Rw1ZzSEikazfTwhWuo0"
    bucket: "shanjupay-test1"

FileServiceImpl上传证件实现方法如下:
package com.shanjupay.merchant.service;

import com.shanjupay.common.domain.BusinessException;
import com.shanjupay.common.domain.CommonErrorCode;
import com.shanjupay.common.util.QiniuUtils;
import org.springframework.beans.factory.annotation.Value;

@org.springframework.stereotype.Service
public class FIleServiceImpl implements FileService {

    @Value("${oss.qiniu.url}")
    private String qiniuUrl;

    @Value("${oss.qiniu.accessKey}")
    private String accessKey;

    @Value("${oss.qiniu.secretKey}")
    private String secretKey;

    @Value("${oss.qiniu.bucket}")
    private String bucket;

    /**
     * 上传文件
     *
     * @param bytes    文件字节数组
     * @param fileName 文件名
     * @return 文件访问路径(绝对的url)
     * @throws BusinessException
     */
    @Override
    public String upload(byte[] bytes, String fileName) throws BusinessException {
        //调用common 下的工具类
        //String accessKey,String secretKey,String bucket, byte[] bytes,String fileName
        try {
            QiniuUtils.upload2qiniu(accessKey, secretKey, bucket, bytes, fileName);
        } catch (Exception e) {
            e.printStackTrace();
            throw new BusinessException(CommonErrorCode.E_100106);
        }
        //上传成功返回文件的访问地址(绝对路径)
        return qiniuUrl + fileName;
    }
}
3、MerchantController
@Autowired
FileService fileService;

@ApiOperation("上传证件照")
@PostMapping("/upload")
public String upload(@ApiParam(value = "证件照", required = true) @RequestParam("file") MultipartFile multipartFile) throws IOException {
    //调用fileService上传文件
    //生成的文件名称fileName,要保证它的唯一
    //文件原始名称
    String originalFilename = multipartFile.getOriginalFilename();
    //扩展名
    String suffix = originalFilename.substring(originalFilename.lastIndexOf(".") - 1);
    //文件名称
    String fileName = UUID.randomUUID() + suffix;
    //上传文件,返回文件下载url
    //byte[] bytes,String fileName
    String fileurl = fileService.upload(multipartFile.getBytes(), fileName);
    return fileurl;
}

接口测试
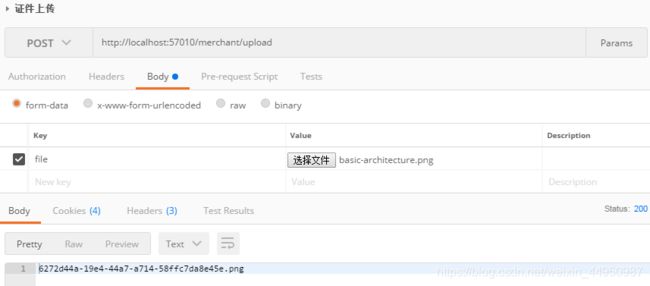
2、上传成功,登录七牛云查询图片是否上传成功
资质申请
商户服务资质申请(接口②)
接口定义
1、接口描述
- 接收资质申请信息,更新商户信息及审核状态(待审核)
- 返回结果
2、接口定义如下:
在 MerchantService中定义applyMerchant接口
/**
 * 资质申请接口
 * @param merchantId 商户id
 * @param merchantDTO 资质申请的信息
 * @throws BusinessException
 */
public void applyMerchant(Long merchantId, MerchantDTO merchantDTO) throws BusinessException;
接口实现
实现MerchantServiceImpl 中的applyMerchant方法
/**
 * 资质申请接口
 *
 * @param merchantId  商户id
 * @param merchantDTO 资质申请的信息
 * @throws BusinessException
 */
@Override
@Transactional
public void applyMerchant(Long merchantId, MerchantDTO merchantDTO) throws BusinessException {
    //接收资质申请信息,更新到商户表
    if (merchantId == null || merchantDTO == null) {
        throw new BusinessException(CommonErrorCode.E_300009);
    }
    //根据id查询商户,校验merchantId合法性,查询商户表,如果查询不到记录,认为非法
    Merchant merchant = merchantMapper.selectById(merchantId);
    if (merchant == null) {
        throw new BusinessException(CommonErrorCode.E_200002);
    }
    //将dto转成entity
    Merchant entity = MerchantConvert.INSTANCE.dto2entity(merchantDTO);
    //将必要的参数设置到entity
    entity.setId(merchant.getId());
    entity.setMobile(merchant.getMobile());//因为资质申请的时候手机号不让改,还使用数据库中原来的手机号
    entity.setAuditStatus("1");//审核状态1-已申请待审核
    entity.setTenantId(merchant.getTenantId());//租户id
    //调用mapper更新商户表
    merchantMapper.updateById(entity);
}
商户平台应用资质申请(接口③)
接口定义
1、接口描述
(1)商户登录闪聚支付平台
(2)商户上传证件,填写资质信息

(3)请求商户平台应用进行资质申请
(4)商户平台应用请求商户服务完成资质申请
(5)返回结果
2、接口定义如下:
根据原型编写商户资质申请VO:MerchantDetailVO
package com.shanjupay.merchant.vo;

import io.swagger.annotations.ApiModel;
import io.swagger.annotations.ApiModelProperty;
import lombok.Data;

import java.io.Serializable;

/**
 * 资质申请信息
 * @author Administrator
 * @version 1.0
 **/
@ApiModel(value = "MerchantDetailVO", description = "商户资质申请信息")
@Data
public class MerchantDetailVO implements Serializable {

    @ApiModelProperty("企业名称")
    private String merchantName;

    @ApiModelProperty("企业编号")
    private String merchantNo;

    @ApiModelProperty("企业地址")
    private String merchantAddress;

    @ApiModelProperty("行业类型")
    private String merchantType;

    @ApiModelProperty("营业执照")
    private String businessLicensesImg;

    @ApiModelProperty("法人身份证正面")
    private String idCardFrontImg;

    @ApiModelProperty("法人身份证反面")
    private String idCardAfterImg;

    @ApiModelProperty("联系人")
    private String username;

    @ApiModelProperty("联系人地址")
    private String contactsAddress;
}
在MerchantController中定义saveMerchant
@ApiOperation("商户资质申请")
@PostMapping("/my/merchants/save")
@ApiImplicitParams({
        @ApiImplicitParam(name = "merchantInfo", value = "商户认证资料", required = true, dataType = "MerchantDetailVO", paramType = "body")
})
public void saveMerchant(@RequestBody MerchantDetailVO merchantInfo) {

}
获取商户身份
1、商户登录临时方案
因前期未实现登录功能,故目前手动指定的商户ID生成Token(用户登录后的身份令牌),将Token配置在前端,前端拥有了token则说明该商户Id对应的商户登录成功。
商户登录及身份解析流程如下:
1)前端携带token访问商户平台应用。
2)商户平台应用解析token取出商户id
2、生成token
拷贝“资料”–>"代码"下的TokenTemp.java到商户平台应用的test下。
代码如下:
package com.shanjupay.merchant;

import com.alibaba.fastjson.JSON;
import com.alibaba.fastjson.JSONObject;
import com.shanjupay.common.util.EncryptUtil;
import com.shanjupay.merchant.api.MerchantService;
import com.shanjupay.merchant.api.dto.MerchantDTO;
import org.junit.Test;
import org.junit.runner.RunWith;
import org.springframework.beans.factory.annotation.Autowired;
import org.springframework.boot.test.context.SpringBootTest;
import org.springframework.test.context.junit4.SpringRunner;

/**
 * @author Administrator
 * @version 1.0
 **/
@RunWith(SpringRunner.class)
@SpringBootTest
public class TokenTemp {

    @Autowired
    MerchantService merchantService;

    //生成token,指定商户id
    @Test
    public void createTestToken() {
        Long merchantId = 1211232081483444226L;//填写用于测试的商户id
        MerchantDTO merchantDTO = merchantService.queryMerchantById(merchantId);
        JSONObject token = new JSONObject();
        token.put("mobile", merchantDTO.getMobile());
        token.put("user_name", merchantDTO.getUsername());
        token.put("merchantId", merchantId);

        String jwt_token = "Bearer " + EncryptUtil.encodeBase64(JSON.toJSONString(token).getBytes());
        System.out.println(jwt_token);
    }
}
向merchantId中设置商户id,运行此测试方法。(运行测试之前停止商户平台应用服务)
3、暂时使用工具类从请求中获取Token并解析
从“资料”–》“代码”文件夹拷贝“util(模拟token)”目录下的SecurityUtil及相关类到商户平台应用工程的util包下


资质申请实现
1)编写对象转换类
package com.shanjupay.merchant.convert;

import com.shanjupay.merchant.api.dto.MerchantDTO;
import com.shanjupay.merchant.vo.MerchantDetailVO;
import org.mapstruct.Mapper;
import org.mapstruct.factory.Mappers;

/**
 * 将商户资质申请vo和dto进行转换
 * Created by Administrator.
 */
@Mapper
public interface MerchantDetailConvert {

    MerchantDetailConvert INSTANCE = Mappers.getMapper(MerchantDetailConvert.class);

    //将dto转成vo
    MerchantDetailVO dto2vo(MerchantDTO merchantDTO);
    //将vo转成dto
    MerchantDTO vo2dto(MerchantDetailVO merchantDetailVO);
}
2)编写MerchantController中的saveMerchant方法
前端携带Token请求此方法,在此方法中需要解析token获取当前商户的Id。
@ApiOperation("商户资质申请")
@PostMapping("/my/merchants/save")
@ApiImplicitParams({
        @ApiImplicitParam(name = "merchantInfo", value = "商户认证资料", required = true, dataType = "MerchantDetailVO", paramType = "body")
})
public void saveMerchant(@RequestBody MerchantDetailVO merchantInfo) {
    //解析token,取出当前登录商户的id
    Long merchantId = SecurityUtil.getMerchantId();

    // 资质申请
    //Long merchantId,MerchantDTO merchantDTO
    MerchantDTO merchantDTO = MerchantDetailConvert.INSTANCE.vo2dto(merchantInfo);
    merchantService.applyMerchant(merchantId, merchantDTO);
}
接口测试
1、生成token
运行createTestToken测试方法生成临时token。
在Header中添加 :key:authorization value:token
例子如下 :

注意:token内容前边固定添加 “Bearer ”(后边一个空格 )
2、上传证件,获取证件标识
参考证件上传测试。
3、资质申请
请求数据:
{
	"merchantName": "学生餐厅",
	"merchantNo": "32321321312",
	"merchantType": "餐饮",
	"merchantAddress": "郑州梧桐创业大厦",
	"contactsAddress": "郑州梧桐街",
	"businessLicensesImg": "6272d44a‐19e4‐44a7‐a714‐58ffc7da8e45e.png",
	"idCardAfterImg": "6272d44a‐19e4‐44a7‐a714‐58ffc7da8e45e.png",
	"idCardFrontImg": "6272d44a‐19e4‐44a7‐a714‐58ffc7da8e45e.png",
	"username": "张先生"
}
测试截图:

