Pytorch简单入门操作
前言
本文概述pytorch的一些简单操作。大部分内容摘取于笔记 | PyTorch安装及入门教程
详细文档第2章 Pytorch基础 – Python技术交流与分享
PyTorch主要由4个包组成:
torch:可以将张量转换为torch.cuda.TensorFloat
torch.autograd:自动梯度
torch.nn:具有共享层和损失函数的神经网络库
torch.optim:具有通用的优化算法包(SGD、Adam)
目录
前言
1 Numpy 与 Tensor
1.1 Tensor概述
1.2 创建Tensor
1.3 修改Tensor形状
1.4 索引操作
1.5 广播机制
1.6 逐元素操作
1.7 归并操作
1.8 比较操作
1.9 矩阵操作
1.10 PyTorch与Numpy比较
2 Tensor与Autograd
2.1 自动求导的要点
2.2 计算图
2.3 标量反向传播
2.4 非标量的反向传播
3 使用Numpy实现机器学习
4 使用Tensor及Autograd实现机器学习
1 Numpy 与 Tensor
Numpy会把ndarray 放在CPU中运行加速,而由Torch产生的Tensor会放在GPU中进行加速运算。
1.1 Tensor概述
从接口的角度划分:
1. torch.function           torch.sum       torch.add
2. tensor.function         tensor.view     tensor.add
从修改方式的角度划分:
1. 不修改自身数据,x.add(y),x数据不变,返回新的Tensor
2. 修改自身数据,x.add_(y),运算结果存在x中,x被修改
import torch
x=torch.tensor([1,2])
y=torch.tensor([3,4])
z=x.add(y)
print(z)
print(x)
x.add_(y)
print(x)
# output
tensor([4, 6])
tensor([1, 2])
tensor([4, 6])1.2 创建Tensor
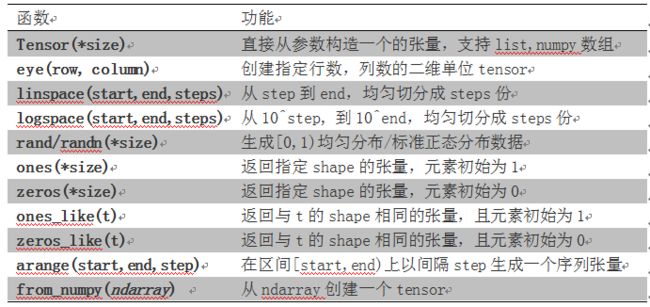
创建Tensor的常用方法
* Tensor(*size)                         从参数构建,List或者Numpy都行
* eye(row,column)                       指定行数和列数的二维Tensor
* linspace(start,end,steps)             均匀分成
* longspace(start,end,steps)            10^start到10^end,均匀分成
* rand/randn(*size)                     生成[0,1)均与分布,标准正态分布
* ones(*size)                           返回指定shape张量,元素为1
* zeros(*size)                          返回指定shape张量,元素为0
* ones_like(t)
* zeros_like(t)
* arange(start,end,stop)
* from_Numpy(ndarray)
import torch

print(torch.Tensor([1,2,3,4,5,6]))
print(torch.Tensor(2,3))  # 随机数字
t = torch.Tensor([[1,2,3],[4,5,6]])
print(t)
print(t.size())
t.shape
torch.Tensor(t.size())

# output
tensor([1., 2., 3., 4., 5., 6.])
tensor([[1.0000e+00, 2.0000e+00, 8.4078e-45],
        [0.0000e+00, 1.4013e-45, 0.0000e+00]])
tensor([[1., 2., 3.],
        [4., 5., 6.]])
torch.Size([2, 3])torch.Tensor与torch.tensor的区别:
-
torch.Tensor是torch.empty 和 torch.tensor 之间的混合。传入数据时,torch.Tensor使用全局默认dtype(FloatTensor),而torch.tensor是从数据中推断数据类型。
-
torch.tensor(1)返回的是固定值1;torch.Tensor返回的是大小为1的张量,是随机初始化的值。
import torch
t1=torch.Tensor(1)
t2=torch.tensor(1)
print("t1的值{},t1的数据类型{}".format(t1,t1.type()))
print("t2的值{},t2的数据类型{}".format(t2,t2.type()))

# output
t1的值tensor([0.]),t1的数据类型torch.FloatTensor
t2的值1,t2的数据类型torch.LongTensor
import torch
print(torch.eye(2,2))
print(torch.zeros(2,3))
print(torch.linspace(1,10,4))
print(torch.rand(2,3))
print(torch.randn(2,3))
print(torch.zeros_like(torch.rand(2,3)))
# output
tensor([[1., 0.],
[0., 1.]])
tensor([[0., 0., 0.],
[0., 0., 0.]])
tensor([ 1., 4., 7., 10.])
tensor([[0.5942, 0.1468, 0.3175],
[0.2744, 0.9218, 0.7266]])
tensor([[ 1.0187, -0.2809, 1.0421],
[-0.1697, -0.0604, -1.6645]])
tensor([[0., 0., 0.],
[0., 0., 0.]])1.3 修改Tensor形状
常用的tensor修改形状的函数
* size()                       计算张量属性值,与shape等价
* numel(input)                  计算张量的元素个数
* view(*shape)                  修改张量的shape,共享内存,修改一个同时修改。
* resize()                      类似于view
* item                          返回标量
* unsqueeze                     在指定维度增加一个1
* squeeze                       在指定维度压缩一个1
import torch

x = torch.randn(2,3)
print(x.size())
print("维度:" ,x.dim())
print("这里把矩阵变为3x2的矩阵:",x.view(3,2))
print("这里把x展为1维向量:", x.view(-1))

y=x.view(-1)
z=torch.unsqueeze(y,0)
print("没增加维度前:",y,"  的维度",y.size())
print("增加一个维度:", z)
print("z的维度:", z.size())
print("z的个数:", z.numel())

# output
torch.Size([2, 3])
维度:2
这里把矩阵变为3x2的矩阵:tensor([[ 1.3014,  1.0249],
        [ 0.8903, -0.4908],
        [-0.3393,  0.7987]])
这里把x展为1维向量:tensor([ 1.3014,  1.0249,  0.8903, -0.4908, -0.3393,  0.7987])
没增加维度前:tensor([ 1.3014,  1.0249,  0.8903, -0.4908, -0.3393,  0.7987])   的维度 torch.Size([6])
增加一个维度: tensor([[ 1.3014,  1.0249,  0.8903, -0.4908, -0.3393,  0.7987]])
z的维度:torch.Size([1, 6])
z的个数:6
torch.view 与 torch.reshape 的异同:
-
reshape()可以由torch.reshape()或者torch.Tensor.reshape()调用;而view()只可以由torch.Tensor.view()调用
-
新的size必须与原来的size与stride兼容,否则,在view之前必须调用contiguous()方法
-
同样返回数据量相同的但形状不同的Tensor,若满足view条件,则不会copy,若不满足,就copy
-
只想重塑,就使用torch.reshape,如果考虑内存并共享,就用torch.view
1.4 索引操作
常用选择操作的函数
* index_select(input,dim,index)     在指定维度上选择列或者行
* nonzero(input)                    获取非0元素的下标
* masked_select(input,mask)         使用二元值进行选择
* gather(input,dim,index)           指定维度选择数据,输出形状与index一致
* scatter_(input,dim,index,src)     gather的反操作,根据指定索引补充数据
import torch
# 设置一个随机种子
torch.manual_seed(100)
# print(torch.manual_seed(100))
x = torch.randn(2,3)
print(x)
# 索引获取第一行所有数据x[0,:]
print(x[0,:])
# 获取最后一列的数据x[:,-1]
print(x[:,-1])
# 生成是否大于0的张量
mask=x>0
print(mask)
# 获取大于0的值
torch.masked_select(x,mask)
print(torch.masked_select(x,mask))
# 获取非0下标,即行、列的索引
torch.nonzero(mask)
print(torch.nonzero(mask))
# 获取指定索引对应的值,输出根据以下规则得到
# out[i][j] = input[index[i][j][j]]   # 如果 if dim == 0
# out[i][j] = input[i][index[i][j]]   # 如果 if dim == 1
index = torch.LongTensor([[0,1,1]])
print(index)
torch.gather(x,0,index)
index=torch.LongTensor([[0,1,1],[1,1,1]])
a = torch.gather(x,1,index)
print("a: ",a)
# 把a的值返回到2x3的0矩阵中
z = torch.zeros(2,3)
z.scatter_(1,index,a)
print("z:",z)

# output
tensor([[ 0.3607, -0.2859, -0.3938],
        [ 0.2429, -1.3833, -2.3134]])
tensor([ 0.3607, -0.2859, -0.3938])
tensor([-0.3938, -2.3134])
tensor([[1, 0, 0],
        [1, 0, 0]], dtype=torch.uint8)
tensor([0.3607, 0.2429])
tensor([[0, 0],
        [1, 0]])
tensor([[0, 1, 1]])
a:  tensor([[ 0.3607, -0.2859, -0.2859],
        [-1.3833, -1.3833, -1.3833]])
z:  tensor([[ 0.3607, -0.2859,  0.0000],
        [ 0.0000, -1.3833,  0.0000]])
1.5 广播机制
import torch
import numpy as np
A = np.arange(0,40,10).reshape(4,1)
B = np.arange(0,3)
A1 = torch.from_numpy(A)   #形状4x1
B1 = torch.from_numpy(B)   #形状3
#自动广播
C=A1+B1
#也可以根据广播机制手动配置
# B1要与A1看齐,变成(1,3)
B2=B1.unsqueeze(0)
A2=A1.expand(4,3)
B3=B2.expand(4,3)
C1=A2+B3
print("A1:",A1)
print("B1:",B1)
print("C:",C)
print("B2:",B2)
print("A2:",A2)
print("B3:",B3)
print("C1:",C1)

# output
A1: tensor([[ 0],
        [10],
        [20],
        [30]], dtype=torch.int32)
B1: tensor([0, 1, 2], dtype=torch.int32)
C: tensor([[ 0,  1,  2],
        [10, 11, 12],
        [20, 21, 22],
        [30, 31, 32]], dtype=torch.int32)
B2: tensor([[0, 1, 2]], dtype=torch.int32)
A2: tensor([[ 0,  0,  0],
        [10, 10, 10],
        [20, 20, 20],
        [30, 30, 30]], dtype=torch.int32)
B3: tensor([[0, 1, 2],
        [0, 1, 2],
        [0, 1, 2],
        [0, 1, 2]], dtype=torch.int32)
C1: tensor([[ 0,  1,  2],
        [10, 11, 12],
        [20, 21, 22],
        [30, 31, 32]], dtype=torch.int32)
1.6 逐元素操作
常见的逐元素操作
* abs   add                                绝对值,加法
* addcdiv(t,v,t1,t2)                       t1与t2按元素除后,乘v加t
* addcmul(t,v,t1,t2)                       t1与t2按元素乘后,乘v加t
* ceil   floor                             向上取整;向下取整
* clamp(t, min , max)                      将张量元素限制在指定区间
* exp   log   pow                          指数,对数,幂
* mul(  或  *  )   neg                     逐元素乘法,取反
* sigmoid   tanh    softmax                激活函数
* sign   sqrt                              取符号,开根号
import torch
t = torch.randn(1,3)
t1 = torch.randn(3,1)
t2 = torch.randn(1,3)
# t+0.1*(t1/t2)
a = torch.addcdiv(t, 0.1, t1, t2)
#计算sigmoid
b = torch.sigmoid(t)
# 将t限制在【0,1】之间
c = torch.clamp(t,0,1)
#t+2进行直接运算
t.add_(2)
print("t: ",t)
print("t1: ",t1)
print("t2: ",t2)
print("a: ",a)
print("b: ",b)
print("c: ",c)

# output
t:  tensor([[1.7266, 2.0815, 3.4672]])
t1:  tensor([[0.2309],
        [0.3393],
        [1.3639]])
t2:  tensor([[-0.5414, -1.4628, -0.4191]])
a:  tensor([[-0.3161,  0.0657,  1.4121],
        [-0.3361,  0.0583,  1.3863],
        [-0.5254, -0.0117,  1.1418]])
b:  tensor([[0.4321, 0.5204, 0.8126]])
c:  tensor([[0.0000, 0.0815, 1.0000]])
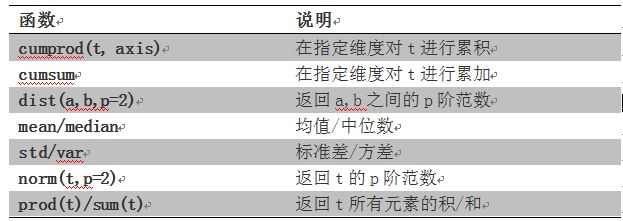
1.7 归并操作
常用的归并操作
* cumprod(t,axis)           在指定维度上对t进行累积
* cumsum                    对指定维度进行累加
* dist(a,b,p=2)           返回a,b之间的p阶范数
* mean   ;  median          平均值,中位数
* std   var                 标准差      方差
* norm(t,p=2)               返回t的p阶范数
* prod(t)   sum(t)          返回所有元素的积,和
import torch
a=torch.linspace(0,10,6)
#使用view变为2x3矩阵
a=a.view((2,3))
print("a: ",a)
# 沿着y轴方向累加,dim=0
b=a.sum(dim=0)
print("b: ",b)
# 沿着y轴方向累加,dim=0,并保留含1的维度
b=a.sum(dim=0,keepdim=True)
print("b: ",b)

# output
a:  tensor([[ 0.,  2.,  4.],
        [ 6.,  8., 10.]])
b:  tensor([ 6., 10., 14.])
b:  tensor([[ 6., 10., 14.]])
1.8 比较操作
常用的比较函数
* eq                                  是否相等
* equal                               是否相同的shape和值
* ge  /  le  /  gt  /  lt             大于、小于、大于等于、小于等于
* max  /  min  (t,axis)               返回最值,指定axis返回下标
* topk(t,k,axis)                      在指定维度上取最高的k个值
import torch
x=torch.linspace(0,10,6).view(2,3)
print(torch.max(x))
print(torch.max(x,dim=0))
print(torch.topk(x,1,dim=0))

# output
tensor([[ 0.,  2.,  4.],
        [ 6.,  8., 10.]])
tensor(10.)
torch.return_types.max(
values=tensor([ 6.,  8., 10.]),
indices=tensor([1, 1, 1]))
torch.return_types.topk(
values=tensor([[ 6.,  8., 10.]]),
indices=tensor([[1, 1, 1]]))
1.9 矩阵操作
常用的矩阵函数
* dot(t1,t2)                                计算内积
* mm(mat1,mat2)    bmm(batch1,batch2)       计算矩阵乘积,3D矩阵
* mv(t1,v1)                                 计算矩阵与向量乘法
* t                                         转置
* svd(t)                                    计算SVD
import torch
a=torch.tensor([2,3])
b=torch.tensor([3,4])
print(torch.dot(a,b))
x=torch.randint(10,(2,3))
print(x)
y=torch.randint(6,(3,4))
print(y)
print(torch.mm(x,y))
x=torch.randint(10,(2,2,3))
print(x)
y=torch.randint(6,(2,3,4))
print(y)
print(torch.bmm(x,y))

# output
tensor(18)
tensor([[1, 1, 1],
        [3, 1, 9]])
tensor([[1, 4, 4, 5],
        [1, 5, 2, 4],
        [2, 0, 3, 3]])
tensor([[ 4,  9,  9, 12],
        [22, 17, 41, 46]])
tensor([[[0, 9, 3],
         [7, 1, 4]],
        [[9, 6, 3],
         [2, 0, 1]]])
tensor([[[0, 5, 1, 3],
         [2, 4, 3, 1],
         [5, 2, 1, 1]],
        [[4, 3, 0, 0],
         [4, 5, 0, 4],
         [0, 0, 3, 3]]])
tensor([[[33, 42, 30, 12],
         [22, 47, 14, 26]],
        [[60, 57,  9, 33],
         [ 8,  6,  3,  3]]])
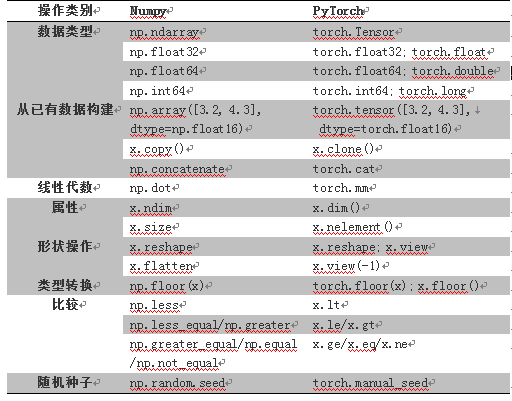
1.10 PyTorch与Numpy比较
PyTorch与Numpy函数对照表
| np.ndarry([3.2,4.3],dtype=np.float16) | torch.tensor([3.2,4.3], dtype=torch.float16 | |
|---|---|---|
| x.copy() | x.clone() | |
| np.dot | torch.mm | |
| x.ndim | x.dim | |
| x.size | x.nelement() | |
| x.reshape | x.reshape,x.view | |
| x.flatten | x.view(-1) | |
| np.floor(x) | torch.floor(x), x.floor() | |
| np.less | x.lt | |
| np.random.seed | torch.manual_seed |
2 Tensor与Autograd
2.1 自动求导的要点
-
创建叶子节点的Tensor,使用requires_grad指定是否需要对其进行操作
-
可以利用requiresgrad()方法修改Tensor的requires_grad属性。可以调用 .detach()或者 with torch.no_grad()
-
自动赋予grad_fn属性,表示梯度函数。
-
执行backward()函数后,保存到grad属性中了。计算完成,非叶子节点梯度会自动释放
-
backward()函数接收参数,维度相同。
-
反向传播的中间缓存会被清空,如果需要多次反向传播,需指定backward中的retain_graph=True 多次反向传播时,梯度累加
-
非叶子节点的梯度backward 调用后即被清空
-
用 torch.no_grad()包裹代码块形式阻止autograd去追踪那些标记为.requesgrad=True的张量历史记录
2.2 计算图
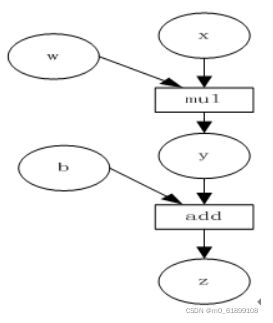
计算图是一种有向无环图像,用图形方式表示算子与变量之间的关系,直观高效。如图2-8所示,圆形表示变量,矩阵表示算子。如表达式:z=wx+b,可写成两个表示式:y=wx,则z=y+b,其中x、w、b为变量,是用户创建的变量,不依赖于其他变量,故又称为叶子节点。为计算各叶子节点的梯度,需要把对应的张量参数requires_grad属性设置为True,这样就可自动跟踪其历史记录。y、z是计算得到的变量,非叶子节点,z为根节点。mul和add是算子(或操作或函数)。由这些变量及算子,就构成一个完整的计算过程(或前向传播过程)。
表达式z=w*x+b
可以写成:y=w*x z=y+b
x,w,b为变量;y,z是计算得到的变量,不是叶子节点
根据链式法则计算的
-
z对x求导为w
-
z对w求导为x
-
z对b求导为1
我们的目标是更新各叶子节点的梯度,根据复合函数导数的链式法则,不难算出各叶子节点的梯度。
Pytorch调用backward(),将自动计算各节点的梯度,这是一个反向传播过程,这个过程可用图2-9表示。在反向传播过程中,autograd沿着图下,从当前根节点z反向溯源,利用导数链式法则,计算所有叶子节点的梯度,其梯度值将累加到grad属性中。对非叶子节点的计算操作(或function)记录在grad_fn属性中,叶子节点的grad_fn值为None。
2.3 标量反向传播
主要步骤如下:
-
定义叶子节点及算子节点
-
查看叶子节点、非叶子节点的其他属性
-
自动求导,实现梯度方向传播,也就是梯度的反向传播
分步进行展示
(1)定义叶子节点及算子节点
import torch
# 定义输入张量x
x=torch.Tensor([2])
# 初始化权重参数w,偏移量b,并设置require_grad属性为True
w=torch.randn(1,requires_grad=True)
b=torch.randn(1,requires_grad=True)
# 实现前向传播
y=torch.mul(w,x)   # 等价于w*x
z=torch.add(y,b)   # 等价于y+b
# 查看x,w,b叶子节点的requires_grad属性
print("x,w,b叶子节点的requires_grad属性分别为:{},{},{}".format(x.requires_grad,w.requires_grad,b.requires_grad))
运行结果:
x,w,b叶子节点的requires_grad属性分别为:False,True,True(2)查看叶子节点、非叶子节点的其他属性
# 查看非叶子节点的requires_grad属性
print("y, z的requires_grad属性分别为:{},{}".format(y.requires_grad,z.requires_grad))
# 查看各节点是否为叶子节点
print("x, w, b, y, z是否为叶子节点:{},{},{},{},{}".format(x.is_leaf,w.is_leaf,b.is_leaf,y.is_leaf,z.is_leaf))
# 查看叶子节点的grad_fn属性
print("x, w, b的 grad_fn属性:{},{},{}".format(x.grad_fn,w.grad_fn,b.grad_fn))
# 查看非叶子节点的grad_fn属性
print("y, z是否为叶子节点:{},{}".format(y.grad_fn,z.grad_fn))
运行结果:
y, z的requires_grad属性分别为:True,True
x, w, b, y, z是否为叶子节点:True,True,True,False,False
x, w, b的 grad_fn属性:None,None,None
y, z是否为叶子节点:,
(3)自动求导,实现梯度方向传播,也就是梯度的反向传播
# 基于张量z进行求导,执行backward后计算图会自动清空
z.backward()
# 如果需要多次使用backward,需要修改参数为retain_graph=True,此时梯度累加
# z.backward(retain_graph=True)
# 查看叶子节点的梯度,x是叶子节点但是无需求导,故梯度为None
print("参数w, b,x的梯度分别为:{},{},{}".format(w.grad,b.grad,x.grad))
# 非叶子节点的梯度,执行backward后会自动清空
print("非叶子节点y, z的梯度分别为:{},{}".format(y.grad,z.grad))
运行结果:
参数w, b,x的梯度分别为:tensor([2.]),tensor([1.]),None
非叶子节点y, z的梯度分别为:None,None
2.4 非标量的反向传播
张量对张量的求导转换成标量对张量的求导
Pytorch有个简单的规定,不让张量(tensor)对张量求导,只允许标量对张量求导,因此,如果目标张量对一个非标量调用backward(),需要传入一个gradient参数,该参数也是张量,而且需要与调用backward()的张量形状相同。为什么要传入一个张量gradient?
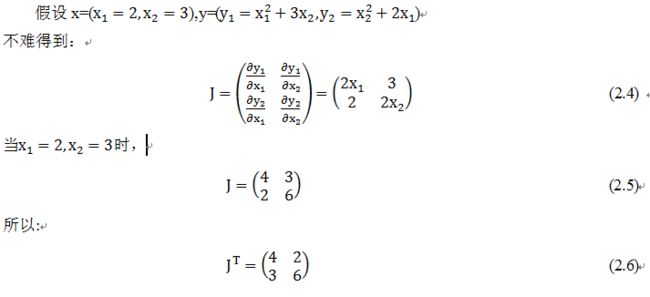
传入这个参数就是为了把张量对张量求导转换为标量对张量求导。这有点拗口,我们举一个例子来说,假设目标值为loss=(y_1,y_2,…,y_m)传入的参数为v=(v_1,v_2,…,v_m),那么就可把对loss的求导,转换为对loss*v^T标量的求导。即把原来∂loss/∂x得到雅可比矩阵(Jacobian)乘以张量v^T,便可得到我们需要的梯度矩阵。
backward函数的格式
backward(gradient=None, retain_graph=None, create_graph=False)举例:
(1)定义叶子叶子节点及计算节点
import torch

#定义叶子节点张量x,形状为1x2
x= torch.tensor([[2, 3]], dtype=torch.float, requires_grad=True)

#初始化Jacobian矩阵
J= torch.zeros(2 ,2)

#初始化目标张量,形状为1x2
y = torch.zeros(1, 2)

#定义y与x之间的映射关系:
#y1=x1**2+3*x2,y2=x2**2+2*x1

y[0, 0] = x[0, 0] ** 2 + 3 * x[0 ,1]
y[0, 1] = x[0, 1] ** 2 + 2 * x[0, 0]
(2)手工计算y对x的梯度
我们先手工计算一下y对x的梯度,为了验证Pytorch的backward的结果是否正确。
y对x的梯度是一个雅可比矩阵,各项的值,我们可通过以下方法进行计算。
(3)调用backward获取y对x的梯度
y.backward(torch.Tensor([[1, 1]]))
print(x.grad)
#结果为tensor([[6., 9.]])
这个结果与我们手工运算的不符,显然这个结果是错误的,错在哪里呢?这个结果的计算过程是:
由此,错在v的取值错误,通过这种方式得的到并不是y对x的梯度。这里我们可以分成两步的计算。首先让v=(1,0)得到y_1对x的梯度,然后使v=(0,1),得到y_2对x的梯度。这里因需要重复使用backward(),需要使参数retain_graph=True,具体代码如下:
#生成y1对x的梯度
y.backward(torch.Tensor([[1, 0]]),retain_graph=True)
J[0]=x.grad

#梯度是累加的,故需要对x的梯度清零
x.grad = torch.zeros_like(x.grad)

#生成y2对x的梯度
y.backward(torch.Tensor([[0, 1]]))
J[1]=x.grad

#显示jacobian矩阵的值
print(J)
运行结果
tensor([[4., 3.],
        [2., 6.]])
这个结果与手工运行的式(2.5)结果一致。
整理代码:
# (1)定义叶子节点及计算节点
import torch
# 定义叶子节点张量x,形状为1x2
x = torch.tensor([[2, 3]], dtype=torch.float, requires_grad=True)
# 初始化雅可比矩阵
J = torch.zeros(2,2)
# 初始化目标张量,形状1x2
y = torch.zeros(1,2)
# 定义y与x之间的映射关系
# y1=x1**2 + 3*x2, y2=x2**2 + 2*x1
y[0, 0] = x[0, 0]**2+3*x[0, 1]
y[0, 1] = x[0, 1]**2+2*x[0, 0]
# 首先让v=(1,0)得到y1对x的梯度
# 然后让v=(0,1)得到y2对x的梯度
# 需要重复使用backward(),所以设置参数retain_graph=True
# 生成y1对x的梯度
y.backward(torch.Tensor([[1,0]]),retain_graph=True)
J[0]=x.grad
# 梯度是累加的,所以需要对x的梯度清零
x.grad = torch.zeros_like(x.grad)
# 生成y2对x的梯度
y.backward(torch.Tensor([[0,1]]))
J[1]=x.grad
# 显示雅克比矩阵的值
print(J)

# output
tensor([[4., 3.],
        [2., 6.]])
3 使用Numpy实现机器学习
主要步骤包括:
- 首先,是给出一个数组x,然后基于表达式:y=3x^2+2,加上一些噪音数据到达另一组数据y。
- 然后,构建一个机器学习模型,学习表达式y=wx^2+b的两个参数w,b。利用数组x,y的数据为训练数据
- 最后,采用梯度梯度下降法,通过多次迭代,学习到w、b的值。
## (1)导入所需要的库
# -*- coding : utf-8 -*-
import numpy as np
%matplotlib inline
from matplotlib import pyplot as plt
## (2)生成随机数据x及目标y
# 设置随机种子,生成同一份数据,方便多种方法比较
np.random.seed(100)
x = np.linspace(-1,1,100).reshape(100,1)
y = 3*np.power(x,2) + 2 + 0.2*np.random.rand(x.size).reshape(100,1)
## (3)查看x,y数据分布情况
plt.scatter(x,y)
plt.show()
## (4)初始化权重参数
w1 = np.random.rand(1,1)
b1 = np.random.rand(1,1)
## (5)训练模型
lr =0.001  # 学习率
for i in range(800):
    # 前向传播
    y_pred = np.power(x,2)*w1+b1
    # 定义损失函数
    loss = 0.5 * (y_pred - y) **2
    loss = loss.sum
    # 计算梯度
    grad_w = np.sum((y_pred - y)*np.power(x,2))
    grad_b = np.sum(y_pred - y)
    # 使用梯度下降法,使得loss最小
    w1 -= lr * grad_w
    b1 -= lr * grad_b
## 可视化结果
plt.plot(x, y_pred, 'r-', label='predict')
plt.scatter(x,y,color='blue',marker='o',label='true')
plt.xlim(-1,1)
plt.ylim(2,6)
plt.legend()
plt.show()
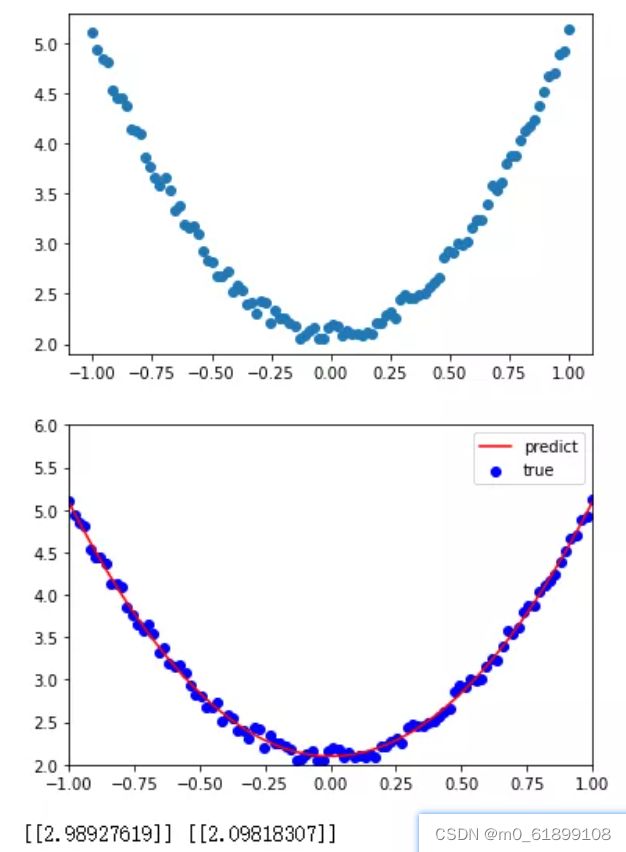
print(w1,b1)
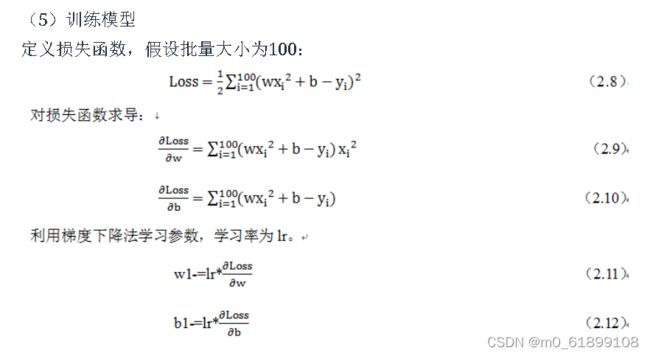
第5步的具体内容:
Numpy实现的源数据以及可视化Numpy学习结果:
4 使用Tensor及Autograd实现机器学习
# (1) 导入所需要的库
import torch as t
%matplotlib inline
from matplotlib import pyplot as plt
# (2)生成训练数据,并可视化数据分布情况
t.manual_seed(100)
dtype=t.float
# 生成x坐标数据,x为tensor,需要把x的形状转换为100x1
x = t.unsqueeze(t.linspace(-1,1,100),dim=1)
# 生成y坐标数据,y为tensor,形状为100x1,加上一些噪声
y = 3*x.pow(2)+ 2 + 0.2*t.rand(x.size())

# 画图,将tensor数据转换为numpy数据
plt.scatter(x.numpy(),y.numpy())
plt.show()
# (3)初始化权重
# 随机初始化参数,w,b需要学习,所以设定requires_grad=True
w = t.randn(1,1,dtype=dtype,requires_grad=True)
b = t.zeros(1,1,dtype=dtype,requires_grad=True)
# (4)训练模型
lr = 0.001 # 学习率
for ii in range(800):
    # 前向传播,定义损失函数
    y_pred = x.pow(2).mm(w) + b
    loss = 0.5 * (y_pred - y) **2
    loss = loss.sum()

    # 自动计算梯度
    loss.backward()

    # 手动更新参数,使用torch.no_grad(),使上下文切断自动求导计算
    with t.no_grad():
        w -= lr * w.grad
        b -= lr * b.grad

    # 梯度清零
        w.grad.zero_()
        b.grad.zero_()

# (5)可视化训练结果
plt.plot(x.numpy(), y_pred.detach().numpy(), 'r-', label='predict')
plt.scatter(x.numpy(),y.numpy(),color='blue',marker='o',label='true')
plt.xlim(-1,1)
plt.ylim(2,6)
plt.legend()
plt.show()
print(w,b)
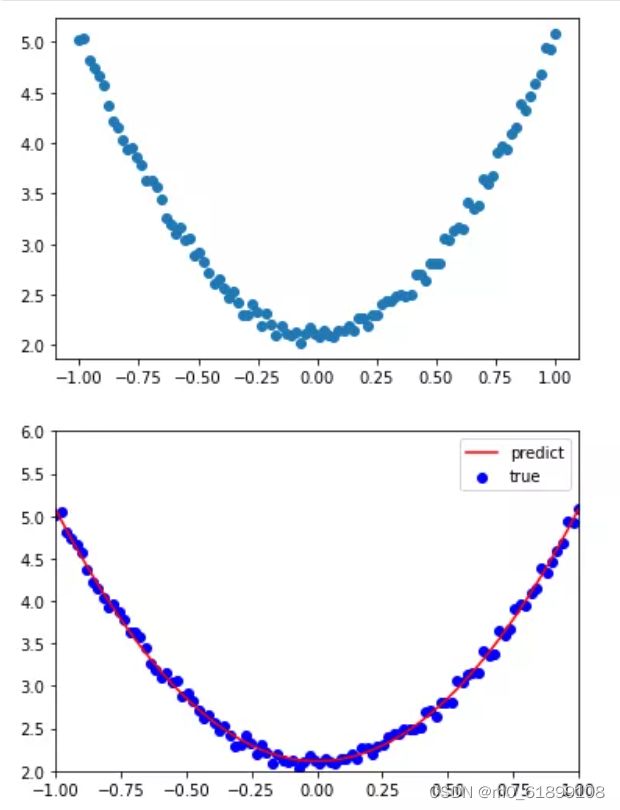
可视化输入数据以及使用autograd的运行结果 :
tensor([[2.9645]],requires_grad=True) tensor([[2.1146]],requires_grad=True)
