MobileVit代码解析
MobileVit代码逐行解析
代码链接:非官方实现
1.1导入所需模块
from torch import nn
import torch
from torch.nn.modules import conv
from torch.nn.modules.conv import Conv2d
from einops import rearrange
以下为MobileVit结构和函数入口

 其中 self.conv1=conv_bn(3,channels[0],kernel_size=3,stride=patch_size) 有关conv_bn的定义如下,结构为卷积+批归一化+激活
def conv_bn(inp,oup,kernel_size=3,stride=1):
    return nn.Sequential(
        nn.Conv2d(inp,oup,kernel_size=kernel_size,stride=stride,padding=kernel_size//2),
        nn.BatchNorm2d(oup),
        nn.SiLU()
    )
1.2 MobileNetv2 Block解析
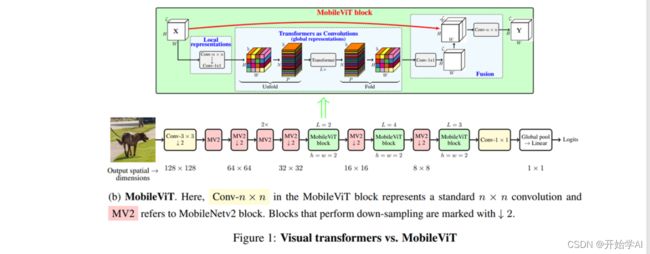
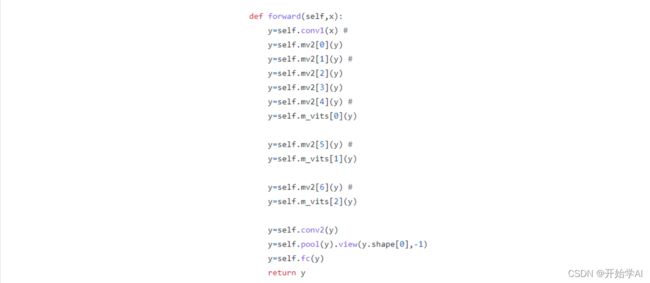
经过基础卷积之后,后面接5个MobileNetv2 Block,代码入口为:
y=self.mv2[0]
y=self.mv2[1] #
y=self.mv2[2]
y=self.mv2[3]
y=self.mv2[4] #
其中
self.mv2=nn.ModuleList([])
self.mv2.append(MV2Block(channels[0],channels[1],1))
self.mv2.append(MV2Block(channels[1],channels[2],2))
self.mv2.append(MV2Block(channels[2],channels[3],1))
self.mv2.append(MV2Block(channels[2],channels[3],1)) # x2
self.mv2.append(MV2Block(channels[3],channels[4],2))
MV2Block的定义如下:
class MV2Block(nn.Module):
    def __init__(self,inp,out,stride=1,expansion=4):
        super().__init__()
        self.stride=stride
        hidden_dim=inp*expansion
        self.use_res_connection=stride==1 and inp==out  # 先执行== 和and 再执行=

        if expansion==1:
            self.conv=nn.Sequential(
                nn.Conv2d(hidden_dim,hidden_dim,kernel_size=3,stride=self.stride,padding=1,groups=hidden_dim,bias=False),
                nn.BatchNorm2d(hidden_dim),
                nn.SiLU(),
                nn.Conv2d(hidden_dim,out,kernel_size=1,stride=1,bias=False),
                nn.BatchNorm2d(out)
            )
        else:
            self.conv=nn.Sequential(
                nn.Conv2d(inp,hidden_dim,kernel_size=1,stride=1,bias=False),
                nn.BatchNorm2d(hidden_dim),
                nn.SiLU(),
                nn.Conv2d(hidden_dim,hidden_dim,kernel_size=3,stride=1,padding=1,groups=hidden_dim,bias=False),
                nn.BatchNorm2d(hidden_dim),
                nn.SiLU(),
                nn.Conv2d(hidden_dim,out,kernel_size=1,stride=1,bias=False),
                nn.SiLU(),
                nn.BatchNorm2d(out)
            )
    def forward(self,x):
        if(self.use_res_connection):
            out=x+self.conv(x)
        else:
            out=self.conv(x)
        return out
以mobilevit_s()为例,其中channels = [16, 32, 64, 64, 96, 128, 160, 640]
MV2Block(channels[0],channels[1],1) 则为 MV2Block(16,32,1)
由于16 != 32 则 self.use_res_connection=0,则不使用残差连接
则输入x直接经过 self.conv , self.conv是一个3层卷积层
第一层卷积 采用 1 × 1 1\times1 1×1 ,将输入通道数16进行扩充到 4 × 16 4\times16 4×16,特征图大小不变,通道扩充因子expansion=4
第二层卷积 采用 3 × 3 3\times3 3×3 ,通道数不变,特征图大小不变,但采用了分组卷积思想,一个通道对应一个卷积核 大大减小了参数量
第三层卷积 采用 1 × 1 1\times1 1×1 ,将通道数 4 × 16 4\times16 4×16进行映射到32,特征图大小不变
MV2Block(channels[1],channels[2],2) 则为 MV2Block(32,64,2)
由于16 != 32 则 self.use_res_connection=0 ,则不使用残差连接
则输入x直接经过 self.conv , self.conv是一个3层卷积层
第一层卷积 采用 1 × 1 1\times1 1×1 ,将输入通道数32进行扩充到 4 × 32 4\times32 4×32,特征图大小不变,通道扩充因子expansion=4
第二层卷积 采用 3 × 3 3\times3 3×3 ,通道数不变,特征图大小不变,但采用了分组卷积思想,一个通道对应一个卷积核 大大减小了参数量
第三层卷积 采用 1 × 1 1\times1 1×1 ,将通道数 4 × 32 4\times32 4×32进行映射到32,特征图大小不变
需要注意的是 图中第二个MV2会下采样 但是该代码中并未下采样,由于strdie=2未成功用上.
1.3 Mobile Vit Block解析
经过几个类似的MV模块后,便开始进行了Mobile Vit Block的计算,其中函数入口为:

y=self.m_vits[0]

其中 self.m_vits[0]为self.m_vits.append(MobileViTAttention(channels[4],dim=dims[0],kernel_size=kernel_size,patch_size=patch_size,depth=depths[0],mlp_dim=int(2*dims[0])))

MobileViTAttention的相关定义如下:
class MobileViTAttention(nn.Module):
    def __init__(self,in_channel=3,dim=512,kernel_size=3,patch_size=7,depth=3,mlp_dim=1024):
        super().__init__()
        self.ph,self.pw=patch_size,patch_size
        self.conv1=nn.Conv2d(in_channel,in_channel,kernel_size=kernel_size,padding=kernel_size//2)
        self.conv2=nn.Conv2d(in_channel,dim,kernel_size=1)

        self.trans=Transformer(dim=dim,depth=depth,heads=8,head_dim=64,mlp_dim=mlp_dim)

        self.conv3=nn.Conv2d(dim,in_channel,kernel_size=1)
        self.conv4=nn.Conv2d(2*in_channel,in_channel,kernel_size=kernel_size,padding=kernel_size//2)

    def forward(self,x):
        y=x.clone() #bs,c,h,w

        ## Local Representation
        y=self.conv2(self.conv1(x)) #bs,dim,h,w

        ## Global Representation
        _,_,h,w=y.shape
        y=rearrange(y,'bs dim (nh ph) (nw pw) -> bs (ph pw) (nh nw) dim',ph=self.ph,pw=self.pw) #bs,h,w,dim
        y=self.trans(y)
        y=rearrange(y,'bs (ph pw) (nh nw) dim -> bs dim (nh ph) (nw pw)',ph=self.ph,pw=self.pw,nh=h//self.ph,nw=w//self.pw) #bs,dim,h,w

        ## Fusion
        y=self.conv3(y) #bs,dim,h,w
        y=torch.cat([x,y],1) #bs,2*dim,h,w
        y=self.conv4(y) #bs,c,h,w

        return y
其中首先经过两次卷积y=self.conv2(self.conv1(x))获得局部信息表示,且这两次卷积不会改变特征图尺寸,但将通道映射到了高维空间dim中。对应文章的该段文字。

然后通过 y=rearrange(y,‘bs dim (nh ph) (nw pw) -> bs (ph pw) (nh nw) dim’,ph=self.ph,pw=self.pw)
将形状为 [ b s , d i m , h , w ] [bs,dim,h,w] [bs,dim,h,w]的y进行重组,其中 n h × p h = h nh \times ph=h nh×ph=h 和 n w × p w = w nw \times pw=w nw×pw=w
重组后y的形状为 [ b s , P , N , d i m ] [bs,P,N,dim] [bs,P,N,dim],其中 P = p h × p w P = ph \times pw P=ph×pw 和 N = n h × n w N=nh \times nw N=nh×nw ,这里的P相当于每个patch的所有像素向量集,N相当于Patch数目,对应该片段的前半部分:

然后再经过一个Transformer层 y=self.trans(y),其中self.trans=Transformer(dim=dim,depth=depth,heads=8,head_dim=64,mlp_dim=mlp_dim),对应了以上最后一句话,和下述公式
X G ( p ) = \mathbf{X}_{G}(p)= XG(p)= Transformer ( X U ( p ) ) , 1 ≤ p ≤ P \left(\mathbf{X}_{U}(p)\right), 1 \leq p \leq P (XU(p)),1≤p≤P
Transformer的结构与代码下节再做分析,只需要知道做完Transformer后,张量的维度仍然是 [ b s , P , N , d i m ] [bs,P,N,dim] [bs,P,N,dim],未改变。
随后将y重整为图片格式,经
y=rearrange(y,‘bs (ph pw) (nh nw) dim -> bs dim (nh ph) (nw pw)’,ph=self.ph,pw=self.pw,nh=h//self.ph,nw=w//self.pw),
再将维度进行重排成 [ b s , d i m , n h ∗ p h , n w ∗ p w ] [bs,dim,nh*ph,nw*pw] [bs,dim,nh∗ph,nw∗pw],其中ph,pw是自定义的patch的高和宽,N=nh*nw, n h ∗ p h nh*ph nh∗ph则为图像的高h, n w ∗ p w nw*pw nw∗pw为图像的宽w。 [ b s , d i m , n h ∗ p h , n w ∗ p w ] [bs,dim,nh*ph,nw*pw] [bs,dim,nh∗ph,nw∗pw]则为 [ b s , d i m , h , w ] [bs,dim,h,w] [bs,dim,h,w]
之所以要把dim放前面,是为了满足pytorch中图像tensor的格式为 [ B , C , H , W ] [B,C,H,W] [B,C,H,W]
之后经y=self.conv3(y),将 [ b s , d i m , h , w ] [bs,dim,h,w] [bs,dim,h,w]映射回指定通道in_channel的特征图 [ b s , i n c h a n n e l , h , w ] [bs,inchannel,h,w] [bs,inchannel,h,w]
之后经y=torch.cat([x,y],1),y=self.conv4(y) 将通道还原到输入x的inchannel数目上。
总的来看MobileViTAttention不会改变图片的大小,也就是不会进行下采样,同时也不会改变通道数。
下采样和通道数的变化发生在MobileNetv2 Block中。
1.4 Transformer解析
class Transformer(nn.Module):
    def __init__(self,dim,depth,heads,head_dim,mlp_dim,dropout=0.):
        super().__init__()
        self.layers=nn.ModuleList([])
        for _ in range(depth):
            self.layers.append(nn.ModuleList([
                PreNorm(dim,Attention(dim,heads,head_dim,dropout)),
                PreNorm(dim,FeedForward(dim,mlp_dim,dropout))
            ]))


    def forward(self,x):
        out=x
        for att,ffn in self.layers:
            out=out+att(out)
            out=out+ffn(out)
        return out
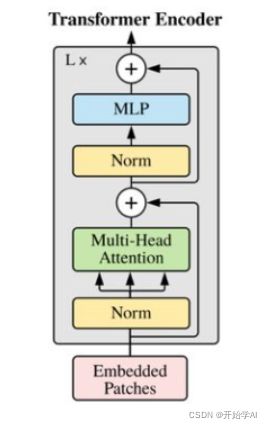
Tranformer的相关定义如上,其结构如下图所示,在实现结构上和图的顺序略有不同,图中顺序是先LNorm再做MSA,但是代码顺序是先MSA,再LNorm。

其中最重要的操作则是MSA 对应代码中的Attention块,Attention块的定义如下所示:
class Attention(nn.Module):
    def __init__(self,dim,heads,head_dim,dropout):
        super().__init__()
        inner_dim=heads*head_dim
        project_out=not(heads==1 and head_dim==dim)

        self.heads=heads
        self.scale=head_dim**-0.5

        self.attend=nn.Softmax(dim=-1)
        self.to_qkv=nn.Linear(dim,inner_dim*3,bias=False)

        self.to_out=nn.Sequential(
            nn.Linear(inner_dim,dim),
            nn.Dropout(dropout)
        ) if project_out else nn.Identity()

    def forward(self,x):
        qkv=self.to_qkv(x).chunk(3,dim=-1)
        q,k,v=map(lambda t:rearrange(t,'b p n (h d) -> b p h n d',h=self.heads),qkv)
        dots=torch.matmul(q,k.transpose(-1,-2))*self.scale
        attn=self.attend(dots)
        out=torch.matmul(attn,v)
        out=rearrange(out,'b p h n d -> b p n (h d)')
        return self.to_out(out)
其中query向量,key向量和value向量由下两句产生,先用线性层生成总维度为 h e a d s × h e a d d i m × 3 heads \times head_dim \times 3 heads×headdim×3 的向量,随后按最后一个维度,切分成3块。
    qkv=self.to_qkv(x).chunk(3,dim=-1)
    q,k,v=map(lambda t:rearrange(t,'b p n (h d) -> b p h n d',h=self.heads),qkv)
由上述分析 输入x的维度为 [ b s , P , N , d i m ] [bs,P,N,dim] [bs,P,N,dim],其中 P = p h × p w P = ph \times pw P=ph×pw 和 N = n h × n w N=nh \times nw N=nh×nw
经过qkv=self.to_qkv(x).chunk(3,dim=-1)后,qkv是一个包含3个元素的元组,且每个元素的维度为 [ b s , P , N , i n n e r d i m ] [bs,P,N,innerdim] [bs,P,N,innerdim],其中 i n n e r d i m = h e a d s × h e a d d i m innerdim=heads \times headdim innerdim=heads×headdim
随后需要将qkv单独拿出来,并把q,k,v调整到$[bs,P,heads,N,headdim]$维度上。之后再按公式进行计算:
Attention ( Q , K , V ) = Softmax ( Q K T d k ) V \operatorname{Attention}(Q, K, V)=\operatorname{Softmax}\left(\frac{Q K^{T}}{\sqrt{d_{k}}}\right) V Attention(Q,K,V)=Softmax(dkQKT)V
对应以下几行代码;
    dots=torch.matmul(q,k.transpose(-1,-2))*self.scale
    attn=self.attend(dots)
    out=torch.matmul(attn,v)
其中k.transpose(-1,-2)后的维度为 [ b s , P , h e a d s , h e a d d i m , N ] [bs,P,heads,headdim,N] [bs,P,heads,headdim,N],再与q做矩阵乘法后,dots的维度为 [ b s , P , h e a d s , N , N ] [bs,P,heads,N,N] [bs,P,heads,N,N], 之后再与value向量做矩阵乘法,out维度为 [ b s , P , h e a d s , N , h e a d d i m ] [bs,P,heads,N,headdim] [bs,P,heads,N,headdim], 刚拿到out时,需要将out维度先还原到 [ b s , P , N , i n n e r d i m ] [bs,P,N,innerdim] [bs,P,N,innerdim],对应代码out=rearrange(out,‘b p h n d -> b p n (h d)’) , 之后再通过线性层将out的维度映射回原来的输入维度 [ b s , P , N , d i m ] [bs,P,N,dim] [bs,P,N,dim],用于后续计算与将patch还原成image 。
1.5 总结
MobileViT的结构就是通过上述模块的堆叠,最后通过卷积池化全连接层作用到图像分类任务中,也可以不做全连接,用于到其余高阶任务中。