AI | 第4章 深度学习 TensorFlow2 入门笔记
第4章 深度学习 TensorFlow2 入门笔记
- 前言
- 1. 深度学习介绍
-
- 1.1 机器学习与深度学习的区别
- 1.2 深度学习的应用场景
- 1.3 深度学习框架介绍
-
- 1.3.1 常见深度学习框架对比
- 1.4 TensorfFlow 简介
- 1.5 TensorFlow 1.x 与 2.x
- 2. TF 数据流图
-
- 2.1 概述
- 2.2 数据流图介绍
- 3. 图 与 TensorBoard
-
- 3.1 概述
- 3.2 图相关操作
-
-
-
- code1 获取默认图代码示例
- code2 自定义图代码示例
-
-
- 3.3 TensorBoard 可视化
-
-
-
- code3 一个简单可视化代码示例
-
-
- 3.4 OP 操作对象
- 3.5 指令名称
- 4. 会话(2.x 已删除)
-
- 4.1 概述
- 4.2 会话创建的两种方式
- 4.3 会话的 run() 方法
-
- 4.3.1 2.x 推荐的占位符写法
- 4.4 运行时报错
-
-
-
- code4 会话演示代码示例
-
-
- 5. 张量 Tensor
-
- 5.1 概述
- 5.2 张量的阶
- 5.3 张量的类型
- 5.4 创建张量 API
- 5.5 张量的变换 API
- 5.6 张量的数学运算 API
- 5.7 与 Numpy 交互
- 6. 变量 Variable
-
- 6.1 概述
- 6.2 创建变量
-
-
-
- code5 创建变量代码示例
-
-
- 7. TensorFlow 的一些 API
-
- 7.1 其他数据结构
- 7.2 基础API
- 7.3 高级API
- 7.3 TensorFlow 的Python API
- 8. 一个线性回归的案例
-
- 8.1 案例需求及数据
- 8.2 步骤分析
- 8.3 相关 API
- 8.4 一些注意事项
-
-
-
- code6 一个线性回归的案例代码示例
-
-
- 最后
前言
仅供参考
1. 深度学习介绍
1.1 机器学习与深度学习的区别
- 特征提取方面:
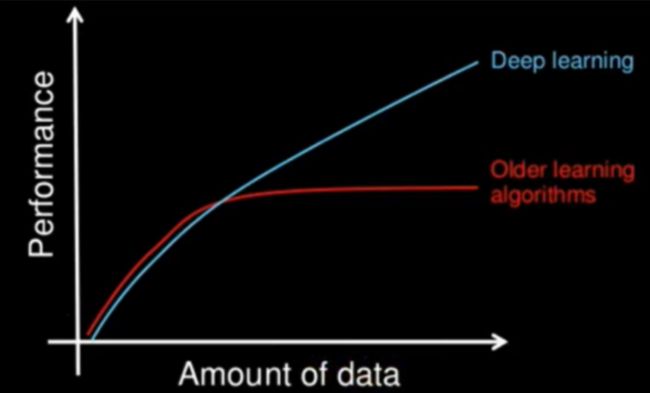
- 机器学习:特征工程步骤是要靠手动完成的,而且需要大量领域专业知识;
- 深度学习:通常由多个层组成,它们通常将更简单的模型组合在一起,将数据从一层传递到另一层来构建更复杂的模型。通过训练大量数据自动得到模型,不需要人工特征提取环节;
- 数据量和计算性能要求:
- 机器学习需要的执行时间远少于深度学习,深度学习参数往往很庞大,需要通过大量数据的多次优化来训练参数;
- 深度学习需要大量的训练数据集;
- 训练深度神经网络需要大量的算力;(需要强大的GPU服务器来进行计算)
- 算法代表:
- 机器学习:朴素贝叶斯,决策树;
- 深度学习:神经网络;
- 深度学习解决的问题:如何提取特征;
1.2 深度学习的应用场景
- 图像识别:物体识别、场景识别、车型识别、人脸检测跟踪、人脸关键点定位、人脸身份认证;
- 自然语言处理技术:机器翻译、文本识别、聊天对话;
- 语音技术:语音识别;
1.3 深度学习框架介绍
1.3.1 常见深度学习框架对比
| 框架名 | 主语言 | 从语言 | 灵活性 | 上手难度 | 开发者 |
|---|---|---|---|---|---|
| Tensorflow | C++ | cuda/python | 好 | 难 | |
| Caffe | C++ | cuda/python/Matlab | 一般 | 中等 | 贾扬清 |
| Pytorch | python | C/C++ | 好 | 中等 | |
| MXNet | C++ | cuda/R/julia | 好 | 中等 | 李沐、陈天奇等 |
| Torch | lua | C/cuda | 好 | 中等 | |
| Theano | python | C++/cuda | 好 | 易 | 蒙特利尔理工学院 |
- 最常用的框架当数 TensorFlow 和 Pytorch,而 Caffe 和 Caffe2 次之;
- PyTorch 和 Torch 更适用于学术研究(research);TensorFlow,Caffe,Catfe2 更适用于工业界的生产环境部署(industrial production);
- Caffe 适用于处理静态图像(static graph);Torch 和 PyTorch 更适用于动态图像(dynamic graph);TensorFlow 在两种情况下都很实用;
- Tensorflow 和 Caffe2 可在移动端使用;
1.4 TensorfFlow 简介
- 特点:
- 高度灵活;
- 语言多样;
- 设备支持;
- Tensorboard 可视化;
- 安装:
- win 系统:pip install tensorflow -i http://pypi.douban.com/simple/ --trusted-host pypi.douban.com;
- 不打印日志:
- 在运行 TensorFlow 应用时,如果不想打印太多日志,可以设置日志级别:(需要先设置再 import tensorflow)
import os
os.environ['TF_CPP_MIN_LOG_LEVEL'] = '2'
import tensorflow as tf
1.5 TensorFlow 1.x 与 2.x
- Tensorflow 1.x 与 2.x 有很多不同,如果本地环境是 2.x,想使用 1.x 的方法,可以用以下语句引入 1.x 的方法,屏蔽 2.x 的方法;
import tensorflow.compat.v1 as tf
tf.disable_v2_behavior()
2. TF 数据流图
2.1 概述
- TensorFlow 程序通常被组织成一个 构件图 阶段和一个 执行图 阶段;
- 图:这是TensorFlow 将计算表示为指令之间的依赖关系的一种表示法(数据+操作)。在 TensorFlow 1.x 里表示静态图,2.x 里表示动态图;
- (在 TensorFlow 1.x 里静态图需要使用会话
tensorflow.Session()去调用,2.x 里删除了会话相关);
- (在 TensorFlow 1.x 里静态图需要使用会话
- 张量(数据):TensorFlow 中的基本数据对象;
- 节点(操作):提供图当中执行的操作;
- 图:这是TensorFlow 将计算表示为指令之间的依赖关系的一种表示法(数据+操作)。在 TensorFlow 1.x 里表示静态图,2.x 里表示动态图;
2.2 数据流图介绍
- TensorFlow 是一个采用数据流图(data flow graphs),用于数值计算的开源框架;
- 节点(Operation)在图中表示数学操作,栈(edges)则表示在节点间相互联系的多维数据数组,即张量(tensor);
3. 图 与 TensorBoard
3.1 概述
- 图结构:图包含了一组 tf.Operation 代表的计算单元对象和 tf.Tensor 代表的计算单元之间流动的数据;
3.2 图相关操作
- 默认图:通常 tensorflow 会默认帮我们创建一张图;
- 查看默认图的两种方法:
- 通过调用
tf.compat.v1.get_default_graph()访问,要将操作添加到默认图形中,直接创建 OP 即可;(TensorFlow 1.x 为tf.get_default_graph()) - op、sess 都含有 graph 属性,默认都在一张图中;(2.x 中不允许查看 graph 属性)
- 通过调用
- 查看默认图的两种方法:
code1 获取默认图代码示例
def default_graph_demo():
    a = tf.constant(2)
    # 查看默认图
    # 方法1:调用方法
    default_g = tf.compat.v1.get_default_graph()
    print("default_g:", default_g)
    # 方法2:查看属性
    # print("a的图属性:", a.graph) # 2.x 中不支持

    return None
- 创建图:
- 通过
tf.Graph()自定义创建图; - 通过
tf.Graph.as_default()上下文管理器,定义张量和节点,图上下文管理器会自动将张量和节点绑定在图中; - 开启会话,需要传入自定义图;
- 通过
code2 自定义图代码示例
def user_graph_demo():
    g = tf.Graph()
    # 1.构建图:在上下文管理器内部就可以定义用户自己创建图的数据和操作
    with g.as_default():
        a_t = tf.constant(2)
        c_t = a_t
    # 2.执行图
    # 方式1:
    with tf.compat.v1.Session(graph=g) as sess:
        c_t_value = sess.run(c_t)
        print(c_t_value)
        print("我们自己创建的图为:\n", sess.graph)
    # 方式2:(包括会话的开启和关闭)
    # sess = tf.compat.v1.Session(graph=g)
    # c_t_value = sess.run(c_t)
    # print(c_t_value)
    # sess.close()
    return None
3.3 TensorBoard 可视化
- TensorFlow 可用于训练大规模深度神经网络所需的计算,使用该工具设计的计算往往复杂而深奥。为了更方便 TensorFlow 程序的理解、调试与优化,TensorFlow 提供了 TensorBoard 可视化工具;
- 实现程序可视化过程:
- 如果是使用 anaconda 虚拟环境,需要先进入对应环境;
- 打开终端,启动 TensorBoard
tensorboard --logdir=log_dir;log_dir 为绝对路径- 打开 cmd;
conda info --envs:查看所有虚拟环境,当前项目的虚拟环境为 tensorflow-2.3.0;activate tensorflow-2.3.0:启动当前项目的虚拟环境;tensorboard --logdir=tensorboard_out:启动 TensorBoard;- 浏览器打开
http://localhost:6006/;
code3 一个简单可视化代码示例
def tensorboard_demo():
    mnist = tf.keras.datasets.mnist
    (x_train, y_train), (x_test, y_test) = mnist.load_data()
    x_train, x_test = x_train / 255.0, x_test / 255.0
    model = create_model()
    model.compile(optimizer='adam',
                  loss='sparse_categorical_crossentropy',
                  metrics=['accuracy'])

    # log_dir为日志存放文件
    tensorboard_callback = tf.keras.callbacks.TensorBoard(log_dir="../resources/p02_deep_learning_tensorFlow/tensorboard_out", histogram_freq=1)

    model.fit(x=x_train,
              y=y_train,
              epochs=5,
              validation_data=(x_test, y_test),
              callbacks=[tensorboard_callback])
    return None

def create_model():
    return tf.keras.models.Sequential([
        tf.keras.layers.Flatten(input_shape=(28, 28)),
        tf.keras.layers.Dense(512, activation='relu'),
        tf.keras.layers.Dropout(0.2),
        tf.keras.layers.Dense(10, activation='softmax')
    ])


if __name__ == "__main__":
    # 代码4:TensorBoard 可视化
    tensorboard_demo()
3.4 OP 操作对象
- 分类:
| 类型 | 实例 |
|---|---|
| 标量运算 | add,sub, mul, div,exp, log, greater, less,equal |
| 向量运算 | concat,slice,splot, constant,rank,shape, shuffle |
| 矩阵运算 | matmul, matrixinverse,matrixdateminant |
| 带状态的运算 | Variable, assgin, assginadd |
| 神经网络组件 | softmax,sigmoid,relu,convolution,max_pool |
| 存储,恢复 | Save,Restroe |
| 队列及同步运算 | Enqueue,Dequeue,MutexAcquire,MutexRelease |
| 控制流 | Merge,Switch, Enter,Leave,Nextlteration |
- 操作函数 与 操作对象 的区别:
| 操作函数 | 操作对象 |
|---|---|
| tf.constant(Tensor对象) | 输入Tensor对象-Const输出 Tensor对象 |
| tf.add(Tensor对象1,Tensor对象2) | 输入(Tensor对象1,Tensor对象2) ,add对象,输出 Tensor对象3 |
-
一个操作对象(Operation)是 TensorFlow 图中的一个节点,可以接收 0 个或者多个输入 Tensor 对象,并且可以输出 0 个或者多个 Tensor,Operation 对象是通过 op 构造函数 (如tf.matmul()) 创建的;
-
例如: c = tf.matmul(a, b) 创建了一个Operation 对象,类型为 MatMul 类型,它将张量 a, b 作为输入,c 作为输出,并且输出数据,打印的时候也是打印的数据。其中 tf.matmul) 是函数,在执行 matmul 函数的过程中会通过 MatMul 类创建—个与之对应的对象;

-
打印出来的是张量 Tensor,在 2.x 中为:值+shape+dtype;
3.5 指令名称
- 一张图有对应自己的命名空间;
- tf.Graph 对象为其包含的 tf.Operation 对象定义的一个命名空间。TensorFlow 会自动为图中的每个指令选择一个唯一名称,用户也可以指定描述性名称,使程序阅读起来更轻松。我们可以以以下方式改写指令名称;
- 每个创建新的 tf.Operation 或返回新的 tf.Tensor 的 API函数可以接受可选的 name 参数;
- 例如,
tf.constant(42.0, name=“answer”)创建了一个名为 “answer" 的新 tf.Operation。如果默认图已包含名为 “answer” 的指令,则 TensorFlow 会在名称上附加 “1"、“2” 等字符,以便让名称具有唯一性; - 当修改好之后,我们在 Tensorboard 显示的名字也会被修改
4. 会话(2.x 已删除)
会话在 2.x 版本中已经删除,但为了学习这里还是做了总结;
4.1 概述
- 会话作用:
- TensorFlow 使用 tf.Session 类来表示客户端程序(通常为 Python 程序,但也提供了使用其他语言的类似接口)与 C++ 运行时之间的连接;
- tf.Session 对象使用分布式 TensorFlow 运行时提供对本地计算机中的设备和远程设备的访问权限;
4.2 会话创建的两种方式
- 用于完整的程序当中:
tf.compat.v1.Session(target=‘’,graph=None,config=None);(1.x 为tf.Session)- target:如果将此参数留空(默认设置),会话将仅使用本地计算机中的设备。可以指定 grpc:// 网址,以便指定 TensorFlow 服务器的地址,这使得会话可以访问该服务器控制的计算机上的所有设备;
- graph:默认情况下,新的 tf.Session 将绑定到当前的默认图;
- config:此参数允许您指定一个 tf.ConfigProto 以便控制会话的行为。例如,ConfigProto 协议用于打印设备使用信息。这里这样指定可以打印设备信息:
config=tf.compat.v1.ConfigProto(allow_soft_placement=True, log_device_placement=True)
- 用于交互式上下文中的 TensorFlow,例如 shell
tf.compat.v1.InteractiveSession();(1.x 为tf.InteractiveSession)
4.3 会话的 run() 方法
- 作用:通过使用 sess.run() 来运行operation;
- API:
run(fetches, feed_dict=None, options=None, run_metadata=None)- fetches:传入单一的operation,或者列表、元组(属于 tensorflow 的类型);
- feed_dict:参数运行调用者覆盖图中张量的值,运行时赋值,与
tf.placeholder()占位符搭配使用,则会检查值的形式是否与占位符兼容;
4.3.1 2.x 推荐的占位符写法
@tf.function
def get_h(x):
    h = 2 * x
    return h
4.4 运行时报错
- RuntimeError:如果这 Session 是无效状态(例如已关闭);
- TypeError:如果 fetches 或者 feed_dict 键的类型不合适;
- valueError:如果 fetches 或 feed_dict 键无效或引用 Tensor 不存在的键;
code4 会话演示代码示例
import os
os.environ['TF_CPP_MIN_LOG_LEVEL'] = '2'  # 去警告
import tensorflow as tf
tf.compat.v1.disable_eager_execution()

def session_demo():
    # 定义常量
    a = tf.constant(2, name="a")
    b = tf.constant(3)
    c = tf.add(a, b)

    # 定义占位符
    a_p = tf.compat.v1.placeholder(tf.float32)
    b_p = tf.compat.v1.placeholder(tf.float32)
    c_p = tf.add(a_p, b_p)

    # 默认的图
    default_g = tf.compat.v1.get_default_graph()
    print("默认的图为:\n", default_g)

    # 开启会话
    with tf.compat.v1.Session(config=tf.compat.v1.ConfigProto(allow_soft_placement=True, log_device_placement=True)) as sess:
        print("sess的图属性: \n", sess.graph)

        # 使用 run() 方法计算 c 的值
        abc = sess.run([a,b,c])
        print("abc的结果为: \n", abc)

        # 占位符结果
        c_p_sum = sess.run(c_p, feed_dict={a_p: 3.0, b_p: 4.0})
        print("c_p_sum的结果为: \n", c_p_sum)

    return None

if __name__ == "__main__":
    # 代码5:会话的演示
    session_demo()
5. 张量 Tensor
5.1 概述
- 张量从一个操作流向另一个操作;
- 可以理解成 Tensor 是可以做 GPU 计算的矩阵;
- TensorFlow 的张量就是一个N维数组,类型为 tf.Tensor;

- Tensor 具有的属性:
- shape:形状(阶);
- dtype:数据类型;
- 未指定类型时,默认类型:(与 ndarray 不同)
- 整型:tf.int32;
- 浮点型:tf.float32
- 未指定类型时,默认类型:(与 ndarray 不同)
5.2 张量的阶
| 阶 | 数学实例 | Python | 例子 |
|---|---|---|---|
| 0 | 表量 | (只有大小) | s = 483 |
| 1 | 向量 | (大小和方向) | v = [1.1,2.2,3.3] |
| 2 | 矩阵 | (数据表) | m = [[1,2,3],[4,5.6],[7,8,9]] |
| 3 | 3阶张量 | (数据立体) | t = [[[2],[4],[6]],[[8],[10],[12]],[[14],[16],[18]]] |
| 4 | n阶 |
5.3 张量的类型
| 数据类型 | Python类型 | 描述 |
|---|---|---|
| DT_FLOAT | tf.float32 | 32位浮点数 |
| DT_DOUBLE | tf.float64 | 64位浮点数 |
| DT_INT64 | tf. int64 | 64位有符号整型 |
| DT_INT32 | tf. int32 | 32位有符号整型 |
| DT_INT16 | tf.int16 | 16位有符号整型 |
| DT_INT8 | tf.int8 | 8位有符号整型 |
| DT_UINT8 | tf.uint8 | 8位无符号整型 |
| DT_STRING | tf.string | 可变长度的字节数组.每一个张量元素都是一个字节数组 |
| DT_BOOL | tf.bool | 布尔型 |
| DT_COMPLEX64 | tf.complex64 | 由两个32位浮点数组成的复数:实数和虚数 |
| DT_QINT32 | tf.qint32 | 用于量化Ops的32位有符号整型 |
| DT_QINT8 | tf.qint8 | 用于量化Ops的8位有符号整型 |
| DT_QUINT8 | tf.quint8 | 用于最化Ops的8位无符号整型 |
5.4 创建张量 API
- 创建固定值张量:
tf.zeros(shape, dtype=tf.float32,name=None):创建所有元素设置为零的张量。此操作返回一个 dtype 具有形状 shape 和所有元素设置为零的类型的张量;tf.zeros_like(tensor,dtype=None, name=None):给 tensor 定单张量(),此操作返回 tensor 与所有元素设置为零相同的类型和形状的张量;tf.ones(shape, dtype=tf.float32, name=None):创建一个所有元素设置为1的张量。此操作返回一个类型的张量,dtype 形状 shape 和所有元素设置为 1;tf.ones_like(tensor, dtype=None, name=None):给 tensor 定单张量(),此操作返回 tensor 与所有元素设置为 1 相同的类型和形状的张量;tf.fill(dims, value, name=None):创建一个填充了标量值的张量。此操作创建一个张量的形状 dims 并填充它 value;tf.constant(value, dtype=None,shape=None, name=‘Const’):创建一个常数张量;
- 创建随机张量:
tf.random.truncated_normal(shape, mean=0.0, stddev=1.0, dtype=tf.float32,seed=None,name=None):从截断的正态分布中输出随机值,和 tf.random_normal(0) 一样,但是所有数字都不超过两个标准差;(1.x 为tf.truncated_normal())tf.random.normal(shape, mean=0.0,stddev=1.0, dtype=tf.float32, seed=None, name=None):从正态分布中输出随机值,由随机正态分布的数字组成的矩阵;(1.x 为tf.random_normal())tf.random.uniform():创建一个均匀分布张量;tf.random.shuffle(a):随机打乱数组 a;
5.5 张量的变换 API
- 类型改变:
tf.string_to_number(string_tensor, out_type=None, name=None):;tf.to_double(x, name=‘ToDouble’):;tf.to_float(x, name=‘ToFloat’):;tf.to_bfloat16(x, name=“ToBFloat16”):;tf.to_int32(x, name=‘Tolnt32’):;tf.to_int64(x, name=‘Tolnt64’):;tf.cast(x, dtype, name=None):通用类型转换;
- 形状改变:
tf.reshape(tensor,shape):动态创建新张量,当原形状固定的时候,动态改变张量的时候,张量的元素个数必须一致。如 shape(2,3) 元素个数为 6,则动态改变张量的时候,也要确保元素的个数为 6;tensor.set_shape(shape):改变静态形状。只有原形状没有固定时才能更新静态形状。返回的是一个新的张量;
5.6 张量的数学运算 API
详情请见:https://tensorflow.google.cn/versions/r2.3/api_docs/python/tf?hl=zh-cn
- 算术运算符:
tf.add():;
- 基本数学函数:
- 矩阵运算:
tf.matmul():;
- reduce 操作:
tf.reduce_sum():;tf.reduce_mean():;tf.reduce_all():;
- 序列索引操作:
5.7 与 Numpy 交互
详情请见 tf.data 模块;
Tensor.numpy():转成 ndarray 数组;
6. 变量 Variable
6.1 概述
- 变量的特点:
- 存储持久化,如变量存储模型参数;
- 可修改值;
- 可指定被训练;
- 1.x 与 2.x 创建变量的区别:
- 1.x:创建完变量后,需要进行变量初始化,且运行该初始化后,才能使用变量
init = tf.global_variables_initializer();sess.run(init);
- 2.x:不需要初始化;
- 1.x:创建完变量后,需要进行变量初始化,且运行该初始化后,才能使用变量
- 生命周期:
- tf.Variable 与其他 python 对象的声明周期相同,若不使用,则自动回收;
6.2 创建变量
- API:
tf.Variable(initia_value=None, trainable=True, collections=None, name=None);- initial_value:初始化的值;
- trainable:是否被训练;
- collections:新变量将添加到列出的图的集合中collections,默认为[GraphKeys.GLOBAL_VARIABLES],如果trainable是True变量也被添加到图形集合GraphKeys.TRAINABLE_VARIABLES;
- name:两个变量可以使用相同的名称;若不命名,Tensorflow 默认为每个变量分配唯一的变量名;
code5 创建变量代码示例
def variable_demo():
	my_tensor = tf.constant([[1.0, 2.0], [3.0, 4.0]])
	my_variable = tf.Variable(my_tensor)
	bool_varible = tf.Variable([False, False, False, True])
	complex_varible = tf.Variable([5 + 4j, 6 + 1j])
	print("my_variable:\n", my_variable)
	print("bool_varible:\n", bool_varible)
	print("complex_varible:\n", complex_varible)

	print("Shape:", my_variable.shape)
	print("DType:", my_variable.dtype)
	print("As numpty:", my_variable.numpy)

	# 生命周期、命名
	a = tf.Variable(my_tensor, name="Mark")
	b = tf.Variable(my_tensor + 1, name="Mark")

	print(a == b)

	return None
7. TensorFlow 的一些 API
7.1 其他数据结构
tf.SparseTensor:稀疏张量。有效地表示主要包含零的张量。tf.sparse 程序包包含稀疏张量的
操作;tf.TensorArray:张量数组。张量的列表。默认情况下,它们的大小是固定的,但可以选择动
态设置。它们包含的所有张量必须具有相同的形状和数据类型;tf.RaggedTensor:不规则张量。表示张量列表的静态列表,其中每个张量具有相同的形状和数据
类型。tf.ragged 程序包包含用于不规则的张量的操作;tf.string类:字符串张量。表示字节字符串,。tf.strings包(带有s)包含用于字节字符串和 Unicode 字符串的操作(并将它们转换为另一个)。tf.string 是原子级的;
7.2 基础API
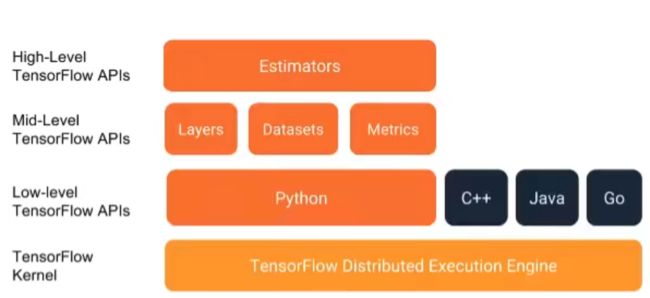
tf.app:这个模块相当于为 TensorFlow 进行的脚本提供一个main函数入口,可以定义脚本运行的 flags;tf.image:TensorFlow 的图像处理操作。主要是一些颜色变换、变形和图像的编码和解码;tf.gfile:这个模块提供了一组文件操作函数;tf.summary:用来生成 TensorBoard 可用的统计日志,目前 Summary 主要提供了 4 种类型:audio、image、histogram、scalar;tf.python_io:用来读写 TFRecords 文件;tf.train:这个模块提供了一些训练器,与 tf.nn 结合起来,实现一些网络的优化计算;tf.nn:这个模块提供了一些构建神经网络的底层函数。TensorFlow 构建网络的核心模块,其中包含了添加各种层的函数,比如添加卷积层、池化层等;
7.3 高级API
tf.keras:Kears 本来是一个独立的深度学习库,tensorflow 将其学习过来,增加这部分模块在于快速构建模型;tf.layers:高级 API,以便高级的概念层来定义一个模型。类似 tf.kears;tf.contrib:tf.contrib.layers 提供够将计算图中的网络层、正则化、摘要操作,是构建计算图的高级操作,但是 tf.contrib 包含不稳定和实验代码,有可能以后 API 会改变;tf.estimator:一个 estimator 相当于 model + training + evaluate 的合体。在模块中,已经实现了几种简单的分类器和回归其,包括:Baseline,learning 和 DNN。这里的 DNN 的网络,只是全连接网络,没有提供卷积之类的;
7.3 TensorFlow 的Python API
8. 一个线性回归的案例
8.1 案例需求及数据
- x:特征值,形状:(100,1);
- y_true:目标值 ,形状:(100,1);
- y_true = 0.8x + 0.7 ,100个样本;
- 即假设 x 和 y 之间的关系满足: y =kx + b, 最后求出 k≈0.8,b=0.7 为正确的答案;
8.2 步骤分析
- 准备数据集:随机 100 个满足 y=0.8*x+0.7 的样本;
- 定义变量(要求的量);
- 声明梯度下降优化算法:
tf.keras.optimizers.SGD(learning_rate=0.01) - 开始训练:
- 预测值(建立线性模型);
- 损失函数(均方误差):
tf.reduce_mean( tf.square(y_predict - y_ture) ); - 计算梯度(张量 y 对变量 x 的导数):
tape.gradient(y, x); - 更新参数(最小化某个特定的损失函数);
- 预测值、线性模型的建立思路:
- 由:[100,1] = [100,1] * [1,1];
- 得:y_predict = x * weights(1, 1) + bias(1,1)
- 即:y_predict = tf.matul(x, weights) + bias(1,1)
8.3 相关 API
tf.matul(x, weights):矩阵运算;tf.square(y_predict - y_ture):平方;tf.reduce_mean( x ):均值;tf.keras.optimizers.SGD(learning_rate):梯度下降优化;(1.x 为tf.train.GrandientDescentOptimizer(learning_rate)- learning_rate:学习率,一般为 0~1 之间比较小的值;
- return:梯度下降 op(梯度下降优化器);
apply_gradients(grads_and_vars=zip(grads, variables)):取某个特定的损失的最小值;zip(a, b):如果 a = [1,2,3],b = [4,5,6],则 zip(a, b) = [(1, 4), (2, 5), (3, 6)]。返回对象,想要返回数组需要 list(zip());
8.4 一些注意事项
- 学习率的设置、步数的设置与梯度爆炸:
- 学习率越小,训练到较好,结果的步数越大;
- 学习率越大,训练到较好,结果的步数越小;
- 但是学习过大会出现梯度爆炸现象,表现为:
- 在极端情况下,权重的值变得非常大,以至于溢出,导致 NaN 值;
- 解决梯度爆炸问题(深度神经网络当中更容易出现)
- 重新设计网络;
- 调整学习率;
- 使用梯度截断(在训练过程中检查和限制梯度的大小);
- 使用激活函数
code6 一个线性回归的案例代码示例
def linear_refression():
    # 1.准备数据
    X = tf.random.normal(shape=[100, 1])  # 特征值 100行1列
    y_true = tf.matmul(X, [[0.8]]) + 0.7  # 真实值 y_true = 0.8x + 0.7
    # 2.定义变量
    weights = tf.Variable(initial_value=tf.random.normal(shape=[1, 1]))  # 权重
    bias = tf.Variable(initial_value=tf.random.normal(shape=[1, 1]))  # 偏置
    variables = [weights, bias]
    # 3.声明梯度下降优化算法
    optimizer = tf.keras.optimizers.SGD(learning_rate=0.01)

    # 查看初始化模型参数之后的值
    print("训练前模型参数为:权重%f,偏置%f" % (weights.numpy(), bias.numpy()))

    # 4.开始训练
    # 声明循环迭代次数
    num = 1000
    for s in range(num):
        with tf.GradientTape() as tape:
            # 预测值
            y_predict = tf.matmul(X, weights) + bias  # 预测值
            # 损失函数(均方误差)
            loss = tf.reduce_mean(tf.square(y_predict - y_true))
            # 计算梯度
            grads = tape.gradient(loss, variables)
            # 更新参数(最小化某个特定的损失函数)
            optimizer.apply_gradients(grads_and_vars=zip(grads, variables))
            # 每10次打印一次结果
            if s % 10 == 0:
                print("第%f次训练后模型参数为:权重%f,偏置%f,损失为%f" % (s, weights.numpy(), bias.numpy(), loss))

    # 查看初始化模型参数之后的值
    print("训练后模型参数为:权重%f,偏置 %f" % (weights.numpy(), bias.numpy()))
    return None


