SSIM---结构相似性算法(OpenCV+Python)
SSIM---结构相似性算法
- 一.SSIM算法原理
- 二.skimage.metrics包下的SSIM算法
一.SSIM算法原理
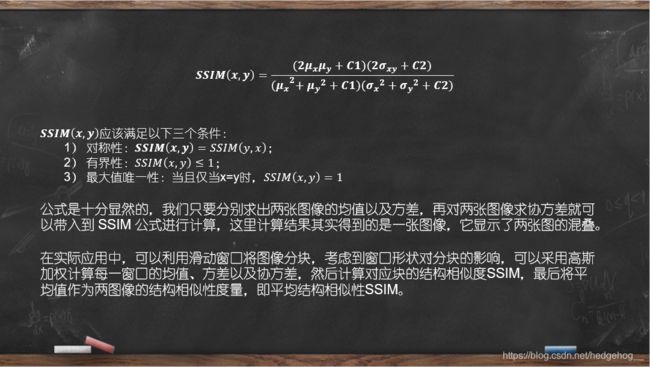
SSIM(structural similarity),结构相似性,是一种衡量两幅图像相似度的指标。SSIM算法主要用于检测两张相同尺寸的图像的相似度、或者检测图像的失真程度。原论文中,SSIM算法主要通过分别比较两个图像的亮度,对比度,结构,然后对这三个要素加权并用乘积表示。

常数, , 是为了避免当分母为 0 时造成的不稳定问题。
为均值, 为方差, 表示协方差。


二.skimage.metrics包下的SSIM算法
- 函数原型:
def structural_similarity(*, im1, im2,
                         win_size=None, gradient=False, data_range=None,
                         multichannel=False, gaussian_weights=False,
                         full=False, **kwargs)
- 参数:
:Ndarray,输入图像
:
| 参数 | 含义 |
|---|---|
| im1,im2 | Ndarray,输入图像 |
| win_size | int or none,optional,滑动窗口的边长,必为奇数,默认值为7, 当gaussian_weights=True时,滑动窗口的大小取决于sigma |
| gradient | bool, optional,若为True,返回相对于im2的梯度 |
| data_range | float,optional,图像灰度级数,图像灰度的最小值和最大可能值,默认情况----根据图像的数据类型进行估计 |
| multichannel | bool, optional,值为True时将 img.shape[-1] 视为图像通道数,对每个通道单独计算,取平均值作为相似度 |
| gaussian_weights | bool, optional,高斯权重,值为True时,平均值和方差在空间上的权重为归一化高斯核 宽度sigma=1.5 |
| full | bool, optional,值为true时,返回完整的结构相似性图像 |
-
其他参数:
use_sample_covariance:若为True,则通过N-1归一化协方差,N是滑动窗口内的像素数
K1,K2: float, 算法参数,默认值K1=0.01,K2=0.03
sigma: float,当gaussian_weights=True时,决定滑动窗口大小 -
返回值:
mssim—平均结构相似度
grad—结构相似性梯度 (gradient=True)
S—结构相似性图像(full=True)
下面是通过调用skimage.metrics包下的SSIM算法,结合OpenCV中的阈值分割及轮廓提取算法,找出两幅图像的差异。
import cv2
import imutils
from skimage.metrics import structural_similarity
import time
from skimage import filters, img_as_ubyte
import numpy as np

start = time.time()
# 读入图像,转为灰度图像
src = cv2.imread('C:/Users/Hedgehog/Desktop/right.jpg')
img = cv2.imread('C:/Users/Hedgehog/Desktop/left.jpg')
grayA = cv2.cvtColor(src, cv2.COLOR_BGR2GRAY)
grayB = cv2.cvtColor(img, cv2.COLOR_BGR2GRAY)

# 计算两个灰度图像之间的结构相似度
(score, diff) = structural_similarity(grayA, grayB, win_size=101, full=True)
diff = (diff * 255).astype("uint8")
cv2.namedWindow("diff", cv2.WINDOW_NORMAL)
cv2.imshow("diff", diff)
print("SSIM:{}".format(score))

# 找到不同的轮廓以致于可以在表示为 '不同'的区域放置矩形
# 全局自适应阈值分割(二值化),返回值有两个,第一个是阈值,第二个是二值图像
dst = cv2.threshold(diff, 0, 255, cv2.THRESH_BINARY_INV | cv2.THRESH_OTSU)[1]
cv2.namedWindow("threshold", cv2.WINDOW_NORMAL)
cv2.imshow('threshold', dst)
# findContours找轮廓,返回值有两个,第一个是轮廓信息,第二个是轮廓的层次信息(“树”状拓扑结构)
# cv2.RETR_EXTERNAL:只检测最外层轮廓
# cv2.CHAIN_APPROX_SIMPLE:压缩水平方向、垂直方向和对角线方向的元素,保留该方向的终点坐标,如矩形的轮廓可用4个角点表示
contours, hierarchy = cv2.findContours(dst.copy(), cv2.RETR_EXTERNAL, cv2.CHAIN_APPROX_SIMPLE)
print(contours)
newimg = np.zeros(dst.shape, np.uint8)  # 定义一个和图像分割处理后相同大小的黑色图
# drawContours画轮廓,将找到的轮廓信息画出来
cv2.drawContours(newimg, contours, -1, (255, 255, 255), 1)
cv2.namedWindow("contours", cv2.WINDOW_NORMAL)
cv2.imshow('contours', newimg)
# cnts = cnts[0] if imutils.is_cv3() else cnts[0]    取findContours函数的第一个返回值,即取轮廓信息

# 找到一系列区域,在区域周围放置矩形
for c in contours:
    (x, y, w, h) = cv2.boundingRect(c)  # boundingRect函数:计算轮廓的垂直边界最小矩形,矩形是与图像上下边界平行的
    cv2.rectangle(src, (x, y), (x + w, y + h), (0, 255, 0), 2)  # rectangle函数:使用对角线的两点pt1,pt2画一个矩形轮廓
    cv2.rectangle(img, (x, y), (x + w, y + h), (0, 255, 0), 2)  # 画矩形的图, pt1, pt2,(对角线两点的坐标), 矩形边框的颜色,矩形边框的粗细

end = time.time()
print(end - start)
# 用cv2.imshow 展现最终对比之后的图片
cv2.namedWindow("right", cv2.WINDOW_NORMAL)
cv2.imshow('right', src)
cv2.namedWindow("left", cv2.WINDOW_NORMAL)
cv2.imshow('left', img)
cv2.waitKey(0)
cv2.destroyAllWindows()


