Centos7.6部署Nginx服务器,并部署Vue前后端项目
文章目录
- 前言
- 一、Nginx介绍
- 二、Nginx安装
-
- 1、Nginx需要依赖几个包,先进行安装
- 2、下载解压Nginx
- 3、安装并启动Nginx
- 4、配置conf文件,部署vue前端项目
- 5、前端项目构建并上传
- 6、后端Springboot项目打包上传
- 总结
前言
在部署vue项目的时候,学习到需要使用nginx,本文就记录一下部署vue项目的过程,包括Linux上nginx服务器的安装,部署vue前端项目和部署Springboot后端项目。
一、Nginx介绍
Nginx (engine x) 是一个高性能的HTTP和反向代理web服务器,同时也提供了IMAP/POP3/SMTP服务。Nginx是由伊戈尔·赛索耶夫为俄罗斯访问量第二的Rambler.ru站点(俄文:Рамблер)开发的。Nginx除了是一个web服务器软件之外,还是具有反向代理,负载均衡功能和缓存功能。Ngix的优势包括部署起来更为简单、方便等。
二、Nginx安装
1、Nginx需要依赖几个包,先进行安装
yum -y install gcc zlib zlib-devel pcre-devel openssl openssl-devel
2、下载解压Nginx
可以在Linux上下载Nginx,也可以使用Windows下载好Nginx之后,再上传到Linux服务器上,我使用的后者
Nginx下载地址:http://nginx.org/download/nginx-1.13.7.tar.gz
如果使用Linux服务器下载,执行以下代码:
wget http://nginx.org/download/nginx-1.13.7.tar.gz
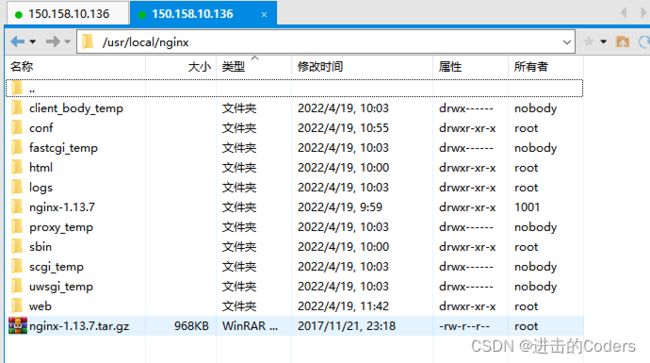
进入存放Nginx安装包的文件夹,执行tar -xvf nginx-1.13.7.tar.gz,我把Nginx上传到服务器的/usr/local/nginx目录下了:

3、安装并启动Nginx
安装Nginx:
//进入nginx目录
cd /usr/local/nginx/nginx-1.13.7
//执行命令
./configure --with-http_stub_status_module --with-http_ssl_module
//执行make命令
make
//执行make install命令
make install
启动Nginx
/usr/local/nginx/sbin/nginx -c /usr/local/nginx/conf/nginx.conf
查看Nginx是否启动:
ps -ef | grep nginx
4、配置conf文件,部署vue前端项目
使用下面命令打开nginx配置文件,并将配置文件的内容进行修改:
vi /usr/local/nginx/conf/nginx.conf
#user  nobody;
worker_processes  1;

#error_log  logs/error.log;
#error_log  logs/error.log  notice;
#error_log  logs/error.log  info;

#pid        logs/nginx.pid;


events {
    worker_connections  1024;
}


http {
    include       mime.types;
    default_type  application/octet-stream;

    #log_format  main  '$remote_addr - $remote_user [$time_local] "$request" '
    #                  '$status $body_bytes_sent "$http_referer" '
    #                  '"$http_user_agent" "$http_x_forwarded_for"';

    #access_log  logs/access.log  main;

    sendfile        on;
    #tcp_nopush     on;

    #keepalive_timeout  0;
    keepalive_timeout  65;

    #gzip  on;

    server {
        listen       80;
        server_name  192.158.10.136;

        #charset koi8-r;

        #access_log  logs/host.access.log  main;

        location / {
	add_header 'Access-Control-Allow-Origin' $http_origin;
        	add_header 'Access-Control-Allow-Credentials' 'true';
        	add_header 'Access-Control-Allow-Methods' 'GET, POST, OPTIONS';
        	add_header 'Access-Control-Allow-Headers' 'DNT,web-token,app-token,Authorization,Accept,Origin,Keep-Alive,User-Agent,X-Mx-ReqToken,X-Data-Type,X-Auth-Token,X-Requested-With,If-Modified-Since,Cache-Control,Content-Type,Range';
        	add_header 'Access-Control-Expose-Headers' 'Content-Length,Content-Range';
       		if ($request_method = 'OPTIONS') {
                	add_header 'Access-Control-Max-Age' 1728000;
                	add_header 'Content-Type' 'text/plain; charset=utf-8';
                	add_header 'Content-Length' 0;
               	 	return 204;
        	}

            	root   /usr/local/nginx/web/dist;
            	index  index.html index.htm;
        }

        location ^~ /dev-api/ {
		add_header 'Access-Control-Allow-Origin' $http_origin;
		add_header 'Access-Control-Allow-Credentials' 'true';
		add_header 'Access-Control-Allow-Methods' 'GET, POST, OPTIONS';
		add_header 'Access-Control-Allow-Headers' 'DNT,web-token,app-token,Authorization,Accept,Origin,Keep-Alive,User-Agent,X-Mx-ReqToken,X-Data-Type,X-Auth-Token,X-Requested-With,If-Modified-Since,Cache-Control,Content-Type,Range';
		add_header 'Access-Control-Expose-Headers' 'Content-Length,Content-Range';
		if ($request_method = 'OPTIONS') {
			add_header 'Access-Control-Max-Age' 1728000;
			add_header 'Content-Type' 'text/plain; charset=utf-8';
			add_header 'Content-Length' 0;
			return 204;
		}
		proxy_pass http://150.158.10.136:9201/;
        }
        error_page   500 502 503 504  /50x.html;
        location = /50x.html {
            root   html;
        }
    }

}
主要修改的内容:
listen 80; server_name 192.158.10.136; listen指的是监听的端口,server_name指的是服务器Ip,也就是将来访问的IP
location /和location ^~ /dev-api/ 下进行了跨域问题处理.
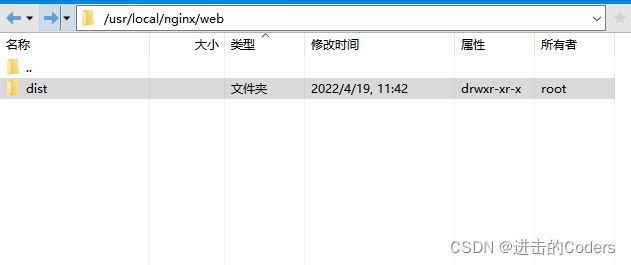
root /usr/local/nginx/web/dist;设置部署的项目,也就是项目需要放在该文件夹下。
proxy_pass http://150.158.10.136:9201/;设置代理的URL,会将该URL代理到上面配置的server_name:listen。
Nginx常用命令:
在 sbin目录下:
./nginx 启动
./nginx -v 查看nginx的版本号
./nginx -s stop停止
./nginx -s quit 安全退出
./nginx -s reload 重新加载配置文件
ps -ef | grep nginx 查看nginx进程
5、前端项目构建并上传
执行以下代码构建前端vue项目:
npm run build:prod
也有的vue配置是执行:
npm run build
视自己的情况而定。
打包成功之后会多一个dist文件夹,将该文件夹复制到服务器/usr/local/nginx/web/dist;位置就可以了

最后执行Nginx重启命令:
./nginx -s reload
6、后端Springboot项目打包上传
- 使用maven命令打包后端项目
mvn clean install
java -jar system-0.0.1-SNAPSHOT.jar
使用上面的命令,在关闭远程连接工具之后,就会把进程关掉,不建议使用。建议通过后台启动的方式执行jar包
nohup java -jar system-0.0.1-SNAPSHOT.jar &
使用这种方法在退出远程连接工具之后,java程序仍然保持运行。
总结
这篇文章总结了Linux安装Nginx反向代理和负载均衡服务器,并将Vue项目部署到Nginx服务器上,以jar包形式打包Springboot后端项目,成功将项目部署到Linux(Centos7.6)服务器上。


