【单目3D目标检测】SMOKE + MonoFlex 论文解析与代码复现
文章目录
- 前言
- yacs库
-
- 简介
- 用法
- SMOKE
-
- 论文解析
-
- 概述
- 主要创新点
- 整体框架
-
- 主干网络
- 检测网络
- 损失函数
- 源码复现
-
- MMDetection3D版本(推荐)
- 官方版本(可选)
- MonoFlex
-
- 论文解析
-
- 概述
- 主要创新点
- 整体框架
- 问题陈述
- 对象解耦
- 边缘融合
- 损失函数
- 视觉特征的回归
- 自适应深度集成
- 源码复现
- Reference
前言
本文介绍单目3D目标检测领域的两个经典算法SMOKE(2020)和MonoFlex(2021)
- 为什么要介绍这俩算法呢?因为这俩算法结构简单命令,容易入门,并且已经有不少应用,参考资料较多
- 为什么要一起介绍呢?因为这俩算法的源码结构相同(Monoflex大量借鉴SMOKE),只不过MonoFlex要比SMOKE复杂一点,但也更好用
yacs库
在正篇之前,有必要先了解一下yacs库,因为这俩算法源码的参数配置文件,都是基于yacs库建立起来的,不学看不懂啊!!!!
简介
yacs是一个用于定义和管理参数配置的库(例如用于训练模型的超参数或可配置模型超参数等)。yacs使用yaml文件来配置参数。另外,yacs是在py-fast -rcnn和Detectron中使用的实验配置系统中发展起来的
用法
- 安装
pip install yacs
- 创建
defaults.py文件,然后导入包
from yacs.config import CfgNode as CN
- 创建
CN()容器来装载参数,并添加需要的参数
from yacs.config import CfgNode as CN
__C = CN()
__C.name = 'test'
__C.model = CN()  # 嵌套使用
__C.model.backbone = 'resnet'
__C.model.depth = 18

print(__C)
'''
  name: test
  model:
      backbone: resnet
      depth: 18
'''
- merge_from_file()
使用merge_from_file()这个方法,会将默认参数与特定参数不同的部分,用特定参数覆盖
__C.merge_from_file("./test_config.yaml")
- 来自SMOKE官方源码中的
defaults.py示例(默认参数):
import os

from yacs.config import CfgNode as CN

# -----------------------------------------------------------------------------
# Config definition
# -----------------------------------------------------------------------------

_C = CN()
_C.MODEL = CN()
_C.MODEL.SMOKE_ON = True
_C.MODEL.DEVICE = "cuda"
_C.MODEL.WEIGHT = ""

# -----------------------------------------------------------------------------
# INPUT
# -----------------------------------------------------------------------------

_C.INPUT = CN()
# Size of the smallest side of the image during training
_C.INPUT.HEIGHT_TRAIN = 384
# Maximum size of the side of the image during training
_C.INPUT.WIDTH_TRAIN = 1280
# Size of the smallest side of the image during testing
_C.INPUT.HEIGHT_TEST = 384
# Maximum size of the side of the image during testing
_C.INPUT.WIDTH_TEST = 1280
# Values to be used for image normalization
_C.INPUT.PIXEL_MEAN = [0.485, 0.456, 0.406]  # kitti
# Values to be used for image normalization
_C.INPUT.PIXEL_STD = [0.229, 0.224, 0.225]  # kitti
# Convert image to BGR format
_C.INPUT.TO_BGR = True
# Flip probability
_C.INPUT.FLIP_PROB_TRAIN = 0.5
# Shift and scale probability
_C.INPUT.SHIFT_SCALE_PROB_TRAIN = 0.3
_C.INPUT.SHIFT_SCALE_TRAIN = (0.2, 0.4)

# -----------------------------------------------------------------------------
# Dataset
# -----------------------------------------------------------------------------
_C.DATASETS = CN()
# List of the dataset names for training, as present in paths_catalog.py
_C.DATASETS.TRAIN = ()
# List of the dataset names for testing, as present in paths_catalog.py
_C.DATASETS.TEST = ()
# train split tor dataset
_C.DATASETS.TRAIN_SPLIT = ""
# test split for dataset
_C.DATASETS.TEST_SPLIT = ""
_C.DATASETS.DETECT_CLASSES = ("Car",)
_C.DATASETS.MAX_OBJECTS = 30

# -----------------------------------------------------------------------------
# DataLoader
# -----------------------------------------------------------------------------
_C.DATALOADER = CN()
# Number of data loading threads
_C.DATALOADER.NUM_WORKERS = 4
# If > 0, this enforces that each collated batch should have a size divisible
# by SIZE_DIVISIBILITY
_C.DATALOADER.SIZE_DIVISIBILITY = 0
# If True, each batch should contain only images for which the aspect ratio
# is compatible. This groups portrait images together, and landscape images
# are not batched with portrait images.
_C.DATALOADER.ASPECT_RATIO_GROUPING = False

# ---------------------------------------------------------------------------- #
# Backbone options
# ---------------------------------------------------------------------------- #
_C.MODEL.BACKBONE = CN()

# The backbone conv body to use
# The string must match a function that is imported in modeling.model_builder
_C.MODEL.BACKBONE.CONV_BODY = "DLA-34-DCN"

# Add StopGrad at a specified stage so the bottom layers are frozen
_C.MODEL.BACKBONE.FREEZE_CONV_BODY_AT = 0
# Normalization for backbone
_C.MODEL.BACKBONE.USE_NORMALIZATION = "GN"
_C.MODEL.BACKBONE.DOWN_RATIO = 4
_C.MODEL.BACKBONE.BACKBONE_OUT_CHANNELS = 64

# ---------------------------------------------------------------------------- #
# Group Norm options
# ---------------------------------------------------------------------------- #
_C.MODEL.GROUP_NORM = CN()
# Number of dimensions per group in GroupNorm (-1 if using NUM_GROUPS)
_C.MODEL.GROUP_NORM.DIM_PER_GP = -1
# Number of groups in GroupNorm (-1 if using DIM_PER_GP)
_C.MODEL.GROUP_NORM.NUM_GROUPS = 32
# GroupNorm's small constant in the denominator
_C.MODEL.GROUP_NORM.EPSILON = 1e-5

# ---------------------------------------------------------------------------- #
# Heatmap Head options
# ---------------------------------------------------------------------------- #

# --------------------------SMOKE Head--------------------------------
_C.MODEL.SMOKE_HEAD = CN()
_C.MODEL.SMOKE_HEAD.PREDICTOR = "SMOKEPredictor"
_C.MODEL.SMOKE_HEAD.LOSS_TYPE = ("FocalLoss", "DisL1")
_C.MODEL.SMOKE_HEAD.LOSS_ALPHA = 2
_C.MODEL.SMOKE_HEAD.LOSS_BETA = 4
# Channels for regression
_C.MODEL.SMOKE_HEAD.REGRESSION_HEADS = 8
# Specific channel for (depth_offset, keypoint_offset, dimension_offset, orientation)
_C.MODEL.SMOKE_HEAD.REGRESSION_CHANNEL = (1, 2, 3, 2)
_C.MODEL.SMOKE_HEAD.USE_NORMALIZATION = "GN"
_C.MODEL.SMOKE_HEAD.NUM_CHANNEL = 256
# Loss weight for hm and reg loss
_C.MODEL.SMOKE_HEAD.LOSS_WEIGHT = (1., 10.)
# Reference car size in (length, height, width)
# for (car, cyclist, pedestrian)
_C.MODEL.SMOKE_HEAD.DIMENSION_REFERENCE = ((3.88, 1.63, 1.53),
                                           (1.78, 1.70, 0.58),
                                           (0.88, 1.73, 0.67))
# Reference depth
_C.MODEL.SMOKE_HEAD.DEPTH_REFERENCE = (28.01, 16.32)
_C.MODEL.SMOKE_HEAD.USE_NMS = False

# ---------------------------------------------------------------------------- #
# Solver
# ---------------------------------------------------------------------------- #
_C.SOLVER = CN()
_C.SOLVER.OPTIMIZER = "Adam"
_C.SOLVER.MAX_ITERATION = 14500
_C.SOLVER.STEPS = (5850, 9350)

_C.SOLVER.BASE_LR = 0.00025
_C.SOLVER.BIAS_LR_FACTOR = 2
_C.SOLVER.LOAD_OPTIMIZER_SCHEDULER = True

_C.SOLVER.CHECKPOINT_PERIOD = 20
_C.SOLVER.EVALUATE_PERIOD = 20

# Number of images per batch
# This is global, so if we have 8 GPUs and IMS_PER_BATCH = 16, each GPU will
# see 2 images per batch
_C.SOLVER.IMS_PER_BATCH = 32
_C.SOLVER.MASTER_BATCH = -1

# ---------------------------------------------------------------------------- #
# Test
# ---------------------------------------------------------------------------- #
_C.TEST = CN()
# Number of images per batch
# This is global, so if we have 8 GPUs and IMS_PER_BATCH = 16, each GPU will
# see 2 images per batch
_C.TEST.SINGLE_GPU_TEST = True
_C.TEST.IMS_PER_BATCH = 1
_C.TEST.PRED_2D = True

# Number of detections per image
_C.TEST.DETECTIONS_PER_IMG = 50
_C.TEST.DETECTIONS_THRESHOLD = 0.25


# ---------------------------------------------------------------------------- #
# Misc options
# ---------------------------------------------------------------------------- #
# Directory where output files are written
_C.OUTPUT_DIR = "./output/exp"
# Set seed to negative to fully randomize everything.
# Set seed to positive to use a fixed seed. Note that a fixed seed does not
# guarantee fully deterministic behavior.
_C.SEED = -1
# Benchmark different cudnn algorithms.
# If input images have very different sizes, this option will have large overhead
# for about 10k iterations. It usually hurts total time, but can benefit for certain models.
# If input images have the same or similar sizes, benchmark is often helpful.
_C.CUDNN_BENCHMARK = True

_C.PATHS_CATALOG = os.path.join(os.path.dirname(__file__), "paths_catalog.py")
- 来自SMOKE官方源码中的
smoke_gn_vector.yaml示例(特定参数):
MODEL:
  WEIGHT: "catalog://ImageNetPretrained/DLA34"
INPUT:
  FLIP_PROB_TRAIN: 0.5
  SHIFT_SCALE_PROB_TRAIN: 0.3
DATASETS:
  DETECT_CLASSES: ("Car", "Cyclist", "Pedestrian")
  TRAIN: ("kitti_train",)
  TEST: ("kitti_test",)
  TRAIN_SPLIT: "trainval"
  TEST_SPLIT: "test"
SOLVER:
  BASE_LR: 2.5e-4
  STEPS: (10000, 18000)
  MAX_ITERATION: 25000
  IMS_PER_BATCH: 32
SMOKE
题目:SMOKE: Single-Stage Monocular 3D Object Detection via Keypoint Estimation
论文:https://arxiv.org/pdf/2002.10111.pdf
作者官方维护的源码:https://github.com/lzccccc/SMOKE
OpenMMLab复现的MMDetection3D版本:https://github.com/open-mmlab/mmdetection3d
论文解析
概述
SMOKE是一个One-Stage的单目3D检测模型,它认为2D检测对于单目3D检测任务来说是冗余的,且会引入噪声影响3D检测性能,所以直接用关键点预测和3D框回归的方式,将每个物体与单个关键点配对,结合单个关键点估计和回归的三维变量来预测每个被检测物体的三维边界框。
主要创新点
- 消除2D检测分支,估计投影在图像平面上的3D关键点
- 为3D边界盒回归提供了一种多步骤解纠缠方法,分离3D包围盒编码阶段和回归损失函数中每个参数的贡献,有助于有效地训练整个网络
整体框架
输入图像经过DLA-34网络进行特征提取,之后送入两个检测分支:关键点预测分支和3D边界框回归分支
- 关键点预测分支来定位前景目标,关键点分支输出的分辨率为 H / 4 × W / 4 × C H/4 \times W/4\times C H/4×W/4×C , C C C表示数据集中前景目标的类别个数
- 3D边界框回归分支输出的分辨率为 H / 4 × W / 4 × 8 H/4 \times W/4\times 8 H/4×W/4×8,表示描述3D边界框的参数有8个
主干网络
主干网络采用带有可变形卷积DCN(Deformable Convolution Network)以及GN(GroupNorm)标准化的DLA-34网络(与CenterNet类似)提取特征,网络输出分辨率为输入分辨率的四分之一。论文中采用DLA-34作为主干网络进行特征提取,以便对不同层之间的特征进行聚合。网络中主要做了两点改动如下:
- 将所有的分层聚合连接替换为可变形卷积
- 将所有的BN层用GN(GroupNorm)替换,因为GN对batch size大小不敏感,且对训练噪声更鲁棒,作者在实验部分也对这一点进行了验证
检测网络
SMOKE的检测网络主要包括关键点检测、3D边界框回归分支
- 在关键点分支中,图像中的每一个目标用一个关键点进行表示。 这里的关键点被定义为目标3D框的中心点在图像平面上的投影点,而不是目标的2D框中心点。如下图所示,红色点是目标的2D框中心点,橙色点是3D框的中心点在图像平面上的投影点

- 3D框回归用于预测与构建3D边界框相关的信息,该信息可以表示为一个8元组:
τ = ( δ z , δ x c , δ y c , δ h , δ w , δ l , s i n α , c o s α ) T \tau = (\delta_z, \delta_{x_c},\delta_{y_c},\delta_h,\delta_w,\delta_l,sin\alpha,cos\alpha)^T τ=(δz,δxc,δyc,δh,δw,δl,sinα,cosα)T - 其中各参数含义如下:
- δ z \delta_z δz:表示目标的深度偏移量
- δ x c \delta_{x_c} δxc:表示特征图的关键点坐标x方向的偏移量
- δ y c \delta_{y_c} δyc:表示特征图的关键点坐标y方向的偏移量
- δ h , δ w , δ l \delta_h,\delta_w,\delta_l δh,δw,δl:表示目标体积值的残差
- s i n α , c o s α sin\alpha,cos\alpha sinα,cosα:表示目标旋转角得向量化表示
- 由于网络中进行了特征图下采样,下采样后的特征图上的关键点坐标基于预定义的关键点坐标执行离散化下采样得到,但是这样计算出来的关键点坐标会存在误差,因此论文中设置了两个预测量 δ x c \delta_{x_c} δxc和 δ y c \delta_{y_c} δyc
损失函数
SMOKE的损失函数,包括关键点分类损失函数+3D边界框回归损失函数
- 关键点分类损失函数 L c l s L_\mathrm{cls} Lcls借鉴了CornerNet与CenterNet中的带惩罚因子的Focal Loss,引入了高斯核对关键点真值附近的点也分配了监督信号进行约束
- 3D边界框回归损失函数 L r e g L_\mathrm{reg} Lreg借鉴了“Disentangling Monocular 3D Object Detection”中所提出的解耦训练的方式,回归的对象是3D边界框的 ( δ z , δ x c , δ y c , δ h , δ w , δ l , s i n α , c o s α ) (\delta_z, \quad \delta_{x_c},\quad \delta_{y_c},\quad \delta_h\quad,\delta_w\quad,\delta_l\quad,sin\alpha\quad, cos\alpha) (δz,δxc,δyc,δh,δw,δl,sinα,cosα)八个参数,损失函数使用L1 Loss,3D边界框回归损失定义为:
L r e g = λ N ∥ B ^ − B ∥ 1 L_{\mathrm{reg}}=\frac{\lambda}{N}\|\hat{B}-B\|_1 Lreg=Nλ∥B^−B∥1 - 其中 B ^ \hat{B} B^为预测值, B B B为真实值, λ N \frac{\lambda}{N} Nλ系数是用作调节回归损失和关键点分类损失的占比的
- 总的损失函数为:
L = L c l s + ∑ i = 1 3 L r e g ( B ^ i ) L=L_{\mathrm{cls}}+\sum_{i=1}^3 L_{\mathrm{reg}}(\hat{B}_i) L=Lcls+i=1∑3Lreg(B^i)
源码复现
SMOKE算法的源码主要有两个版本:
- 作者官方维护的源码:https://github.com/lzccccc/SMOKE
- OpenMMLab复现的MMDetection3D版本:https://github.com/open-mmlab/mmdetection3d
根据本人实际使用的情况看,直接上手MMDetection3D版本就行(确实好用),官方版本目前只能实现训练和简单测试(还要额外添加其他库),很多功能还不完善,有兴趣的小伙伴可以尝试学习一下,就当做锻炼自己看代码的能力了
MMDetection3D版本(推荐)
https://github.com/open-mmlab/mmdetection3d
1、创建环境
# 在Anaconda中新建虚拟环境
conda create -n mmdet3d python=3.7 -y
conda activate mmdet3d

# 安装最新的PyTorch版本
conda install -c pytorch pytorch torchvision -y

# install mmcv
pip install mmcv-full

# install mmdetection
pip install git+https://github.com/open-mmlab/mmdetection.git

# install mmsegmentation
pip install git+https://github.com/open-mmlab/mmsegmentation.git

# install mmdetection3d
git clone https://github.com/open-mmlab/mmdetection3d.git
cd mmdetection3d
pip install -v -e . # or "python setup.py develop"
# -v:verbose, or more output
# -e:editable,修改本地文件,调用的模块以最新文件为准
2、kitti数据集准备
参考官方教程:3D 目标检测 KITTI 数据集
3、修改参数
- 数据集路径:打开
/mmdetection3d/configs/_base_/datasets/kitti-mono3d.py文件,修改data_root = '/your_datasets_root' - 训练参数:打开
/mmdetection3d/configs/smoke/smoke_dla34_pytorch_dlaneck_gn-all_8x4_6x_kitti-mono3d.py文件,按需修改参数(例如修改max_epochs、保存权重的间隔数等等)
4、训练
配置好环境、数据集、参数之后,就可以直接进行训练(以多卡训练为例):
CUDA_VISIBLE_DEVICES=0,1,2,3 tools/dist_train.sh configs/smoke/smoke_dla34_pytorch_dlaneck_gn-all_8x4_6x_kitti-mono3d.py 4
这里没有指定保存路径,默认保存至/mmdetection3d/work_dirs/smoke_dla34_pytorch_dlaneck_gn-all_8x4_6x_kitti-mono3d/文件夹中
6、测试及可视化
直接在命令行输入以下命令即可:
- [必选参数] config:配置文件
- [必选参数] checkpoint:训练生成的权重文件
- show:可视化
- show-dir:指定可视化结果生成的路径
python tools/test.py configs/smoke/smoke_dla34_pytorch_dlaneck_gn-all_8x4_6x_kitti-mono3d.py work_dirs/smoke_dla34_pytorch_dlaneck_gn-all_8x4_6x_kitti-mono3d/latest.pth --show --show-dir ./outputs/smoke/smoke_kitti_72e
目前对于SMOKE算法来说,是不可以通过改变score_thr参数,来调节可视化输出的3D框数量,原因是SMOKE的检测头SMOKEMono3D继承自SingleStageMono3DDetector:

而在SingleStageMono3DDetector类中,还未实现score_thr参数的调节功能(这个bug让我一顿好找o(╥﹏╥)o)
官方版本(可选)
https://github.com/lzccccc/SMOKE
1、创建环境
conda create -n smoke python=3.7 -y
conda activate smoke
pip install torch==1.4.0 torchvision==0.5.0
git clone https://github.com/lzccccc/SMOKE
cd smoke
python setup.py build develop
2、添加安装库文件:在smoke主目录下,新建requirements.txt文件,并写入以下安装包信息:
shapely
tqdm
tensorboard
tensorboardX
scikit-image
matplotlib
yacs
pyyaml
fire
pycocotools
fvcore
opencv-python
numba
inplace_abn
之后在命令行执行pip install -r requirements.txt进行安装
3、KITTI数据集下载及配置
具体下载步骤可参考这篇博客:【MMDetection3D】环境搭建,使用PointPillers训练&测试&可视化KITTI数据集,下载完成后,将数据集按照以下结构进行组织:
kitti
│──training
│    ├──calib
│    ├──label_2
│    ├──image_2
│    └──ImageSets
└──testing
     ├──calib
     ├──image_2
     └──ImageSets
4、修改数据集路径
方式一:软连接下载好的kitti数据集到datasets文件夹中,之后就不用管啦,默认路径就是datasets/kitti/,但是这种方式在之后的测试阶段会出现找不到文件的情况
mkdir datasets
ln -s /path_to_kitti_dataset datasets/kitti
方式二(推荐):打开/smoke/smoke/config/paths_catalog.py,直接修改数据集路径
class DatasetCatalog():
    DATA_DIR = "your_datasets_root/"
    DATASETS = {
        "kitti_train": {
            "root": "kitti/training/",
        },
        "kitti_test": {
            "root": "kitti/testing/",
        },
    }
5、修改训练设置(可选)
打开/smoke/configs/smoke_gn_vector.yaml文件,可以修改一些训练参数,比如训练迭代次数、batchsize等:
# 模型设置
MODEL:
  WEIGHT: "catalog://ImageNetPretrained/DLA34"
# 数据集设置
INPUT:
  FLIP_PROB_TRAIN: 0.5
  SHIFT_SCALE_PROB_TRAIN: 0.3
DATASETS:
  DETECT_CLASSES: ("Car", "Cyclist", "Pedestrian")
  TRAIN: ("kitti_train",)
  TEST: ("kitti_test",)
  TRAIN_SPLIT: "trainval"
  TEST_SPLIT: "test"
# 训练参数设置
SOLVER:
  BASE_LR: 2.5e-4
  STEPS: (10000, 15000)
  MAX_ITERATION: 20000  # 迭代次数
  IMS_PER_BATCH: 8  # 所有GPU的batch_size
6、全部参数设置
打开/smoke/smoke/config/defaults.py文件,可以修改全部配置参数,包括数据集输入、处理、模型结构、训练、测试等参数。这个文件最好不要动,如果要修改参数,就去上一步的smoke_gn_vector.yaml文件中进行修改。比如要修改训练、测试结果保存的路径,可以在最后直接加入:
# 模型设置
MODEL:
  WEIGHT: "catalog://ImageNetPretrained/DLA34"
# 数据集设置
INPUT:
  FLIP_PROB_TRAIN: 0.5
  SHIFT_SCALE_PROB_TRAIN: 0.3
DATASETS:
  DETECT_CLASSES: ("Car", "Cyclist", "Pedestrian")
  TRAIN: ("kitti_train",)
  TEST: ("kitti_test",)
  TRAIN_SPLIT: "trainval"
  TEST_SPLIT: "test"
# 训练参数设置
SOLVER:
  BASE_LR: 2.5e-4
  STEPS: (10000, 15000)
  MAX_ITERATION: 20000  # 迭代次数
  IMS_PER_BATCH: 8  # 所有GPU的batch_size
# 输出保存路径
OUTPUT_DIR: "./output/exp"
7、开始训练
- 单GPU训练:
python tools/plain_train_net.py --config-file "configs/smoke_gn_vector.yaml"
- 多GPU训练:
python tools/plain_train_net.py --num-gpus 4 --config-file "configs/smoke_gn_vector.yaml"
- 第一次训练,会自动下载预训练权重dla34-ba72cf86.pth,因为要,所以下载很慢,大家可以从这里直接下载到本地,然后上传到
/root/.torch/models/dla34-ba72cf86.pth即可
8、测试
SMOKE官方源码在测试时会有很多问题,作者在这篇issue中给出了解决方案:
You need to put offline kitti eval code under the folder “/smoke/data/datasets/evaluation/kitti/kitti_eval”
if you are using the train/val split. It will compile it automatically and evaluate the performance.
The eval code can be found here:
https://github.com/prclibo/kitti_eval (for 11 recall points)
https://github.com/lzccccc/kitti_eval_offline (for 40 recall points)
However, if you are using the trainval (namely the whole training set), there is no need to evaluate it offline. You need to log in to the kitti webset and submit your result.
具体的测试步骤如下:
- 下载kitti_eval到
/smoke/smoke/data/datasets/evaluation/kitti/文件夹中 - 修改测试集设置:打开
/smoke/configs/smoke_gn_vector.yaml文件,将DATASETS部分修改为:
DATASETS:
  DETECT_CLASSES: ("Car", "Cyclist", "Pedestrian")
  TRAIN: ("kitti_train",)
  TEST: ("kitti_train",)
  TRAIN_SPLIT: "train"
  TEST_SPLIT: "val"
- 修改
/smoke/smoke/data/datasets/evaluation/kitti/kitti_eval.py文件中的do_kitti_detection_evaluation函数:
def do_kitti_detection_evaluation(dataset,
                                  predictions,
                                  output_folder,
                                  logger
                                  ):
    predict_folder = os.path.join(output_folder, 'data')  # only recognize data
    mkdir(predict_folder)

    for image_id, prediction in predictions.items():
        predict_txt = image_id + '.txt'
        predict_txt = os.path.join(predict_folder, predict_txt)

        generate_kitti_3d_detection(prediction, predict_txt)

    logger.info("Evaluate on KITTI dataset")
    output_dir = os.path.abspath(output_folder)
    os.chdir('./smoke/data/datasets/evaluation/kitti/kitti_eval')
    # os.chdir('../smoke/data/datasets/evaluation/kitti/kitti_eval')
    label_dir = getattr(dataset, 'label_dir')
    if not os.path.isfile('evaluate_object_3d_offline'):
        subprocess.Popen('g++ -O3 -DNDEBUG -o evaluate_object_3d_offline evaluate_object_3d_offline.cpp', shell=True)
    command = "./evaluate_object_3d_offline {} {}".format(label_dir, output_dir)
    output = subprocess.check_output(command, shell=True, universal_newlines=True).strip()
    logger.info(output)
    os.chdir('./')
    # os.chdir('../')
- 开始测试,目前只支持单GPU测试,并且只得到txt形式的预测结果,没有可视化操作(后续我会尝试加入可视化功能)
- 其中ckpt参数为训练得到的最后模型权重
python tools/plain_train_net.py --eval-only --ckpt YOUR_CKPT --config-file "configs/smoke_gn_vector.yaml"
这里测试的逻辑是:
- 首先加载数据集(kitti_train),送入训练好的模型进行预测,得到预测结果(output)
- 然后进入
kitti_eval文件夹中,执行g++ -O3 -DNDEBUG -o evaluate_object_3d_offline evaluate_object_3d_offline.cpp,编译生成evaluate_object_3d_offline文件 - 最后在
kitti_eval文件夹中,执行./evaluate_object_3d_offline /your_root_dir/kitti/training/label_2/ /your_root_dir/smoke/output/exp4/inference/kitti_train,进行指标计算
注意!!测试这一步坑很多:
- 如果出现以下报错:定位到报错的函数
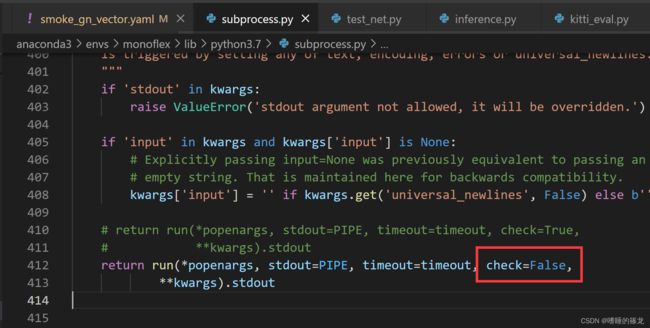
subprocess,第412行(不同版本位置可能不同),将check改为False即可
subprocess.CalledProcessError: Command './evaluate_object_3d_offline datasets/kitti/training/label_2 /home/rrl/det3d/smoke/output/exp4/inference/kitti_train' returned non-zero exit status 127.

- 如果出现类似下面的报错,一定要检查训练集的
label_2文件夹的路径,推荐使用绝对路径,而不是软连接(我一开始用的软连接,一直报这个错o(╥﹏╥)o)
Thank you for participating in our evaluation!
Loading detections...
number of files for evaluation: 3769
ERROR: Couldn't read: 006071.txt of ground truth. Please write me an email!
An error occured while processing your results.
9、可视化预测结果
Coming soon…
MonoFlex
题目:Objects are Different: Flexible Monocular 3D Object Detection
论文:https://arxiv.org/pdf/2104.02323.pdf
源码:https://github.com/zhangyp15/MonoFlex
论文解析
概述
现有单目3D目标检测大多忽略了对象之间的差异,对所有对象进行同等和联合处理可能会很难检测到严重截断的对象,并且这些硬样本会增加学习负担,并影响对一般对象的预测,造成检测性能下降。因此,统一的方法可能无法找到每个对象,也无法预测精确的3D位置。为此,作者提出了一种灵活的检测器,它考虑了对象之间的差异,并以自适应方式估计其3D位置。
主要创新点
主要贡献主要归纳为以下两点:
- 发现针对截断类(outside object)的目标,从2D到3D映射过程,需要的偏移量的分布与非截断类目标(inside objects)的偏移量分布差别很大,因此要解耦这两类目标,分别进行学习,也就是关注到单目三维目标检测中考虑目标间差异的重要性,提出了截断目标预测的解耦方法
- 提出了一种新的目标深度估计公式,它利用不确定性灵活地组合独立的估计器估计对象深度,而不是对所有对象采用单一方法
整体框架
Nonoflex框架以及检测思想是从CenterNet扩展而来的,CenterNet的核心思想是将目标作为一个点,即目标BBox的中心点,检测器采用关键点估计来找到中心点,并回归到其他目标属性,例如2D边界框、维度、方向、关键点和深度。最终深度估计是回归深度和根据估计的关键点和尺寸计算的深度的不确定性组合:

- 首先,CNN主干网络从单张图像中提取特征图作为多个预测头的输入,其中图像级定位涉及热图(Heatmap)和偏移量(Offsets)
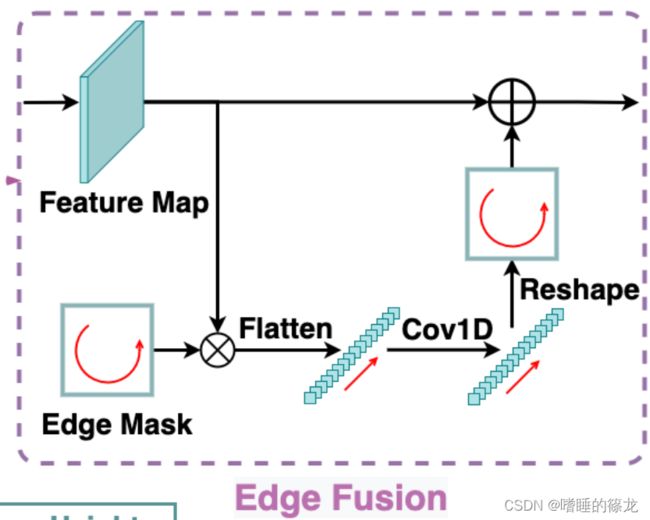
- 之后边缘融合(Edge Fusion)模块用于解耦截断对象的特征学习和预测
- 同时自适应深度集合采用四种方法进行深度估计,并同时预测其不确定性,从而形成不确定性加权预测
问题陈述
物体的3D检测包括估计其3D位置 ( x , y , z ) (x,y,z) (x,y,z)、尺寸 ( h , w , l ) (h,w,l) (h,w,l)和方向 θ \theta θ。尺寸和方向可以直接从基于外观的线索推断出来,而3D位置则转换为投影的3D中心 x c = ( u c , v c ) x_c=(u_c,v_c) xc=(uc,vc)和对象深度 z z z:
x = ( u c − c u ) z f y = ( v c − c v ) z f \begin{aligned} &x=\frac{\left(u_c-c_u\right) z}{f} \\ &y=\frac{\left(v_c-c_v\right) z}{f} \end{aligned} x=f(uc−cu)zy=f(vc−cv)z
其中, ( c u , c v ) (c_u,c_v) (cu,cv)为主点(principle point), f f f为焦距(focal length)。3D位置转换为投影中心和对象深度的示意图如下所示:

对象解耦
现有的单目3D检测方法对每个对象使用统一表示 x r x_r xr,即2D边界框 x b x_b xb的中心点。计算偏移 δ c = x c − x b \delta_c=x_c−x_b δc=xc−xb回归以导出投影的3D中心 x c x_c xc。根据物体的投影3D中心在图像内部还是外部,我们将物体分为两组,内部对象(Inside Objects)和外部对象(Outside Objects)在从2D中心到投影3D中心过程中,呈现完全不同的偏移 δ c \delta_c δc分布:

因此,作者将将内外对象的表示和偏移学习进行解耦:
- 对于投影的3D中心位于图像内部的对象,它们由 x c x_c xc直接识别,此时的偏移误差如下,其中 S S S为CNN下采样率:
δ i n = x c S − ⌊ x c S ⌋ \delta_{i n}=\frac{x_c}{S}-\left\lfloor\frac{x_c}{S}\right\rfloor δin=Sxc−⌊Sxc⌋ - 为了解耦外部对象的表示,作者通过 图像边缘 和 从 x b x_b xb到 x c x_c xc的之间的交点 x I x_I xI来识别外部对象,交点 x I x_I xI比简单地将 x b x_b xb或 x c x_c xc夹持到边界更有物理意义:
δ o u t = x c S − ⌊ x I S ⌋ \delta_{o u t}=\frac{x_c}{S}-\left\lfloor\frac{x_{I}}{S}\right\rfloor δout=Sxc−⌊SxI⌋

边缘融合
- 尽管内部和外部对象的表示在输出特征的内部和边缘区域中解耦,但共享卷积核仍然难以处理空间变量预测。因此,作者提出了一个边缘融合模块来进一步解耦外部对象的特征学习和预测
- 如下图所示,模块首先提取特征图的四个边界,并将它们按顺时针顺序(图文不一致)连接成边缘特征向量,然后由两个1×1卷积层处理,以学习截断对象的独特特征。最后,将处理后的向量重新映射到四个边界并添加到输入特征图。当应用于热图预测时,边缘特征可以专门预测外部对象的边缘热图,从而不会混淆内部对象的定位。为了回归偏移, δ i n \delta_{in} δin和 δ o u t \delta_{out} δout之间的显著尺度差异可以通过边缘融合模块解决

损失函数
作者采用L1 Loss回归 δ i n \delta_{in} δin,Log-Scale L1 Loss回归 δ o u t \delta_{out} δout,因为它对极端异常值更加鲁棒,偏移损失计算为:
L o f f = { ∣ δ i n − δ i n ∗ ∣ if inside log ( 1 + ∣ δ o u t − δ o u t ∗ ∣ ) otherwise L_{o f f}=\left\{\begin{array}{l}\left|\boldsymbol{\delta}_{i n}-\boldsymbol{\delta}_{i n}^*\right|\quad\text { if inside } \\ \log \left(1+\left|\boldsymbol{\delta}_{o u t}-\boldsymbol{\delta}_{o u t}^*\right|\right) \quad \text{otherwise} \end{array}\right. Loff={∣δin−δin∗∣ if inside log(1+∣δout−δout∗∣)otherwise
其中, δ i n \delta_{in} δin和 δ o u t \delta_{out} δout表示预测, δ i n ∗ \delta^*_{in} δin∗和 δ o u t ∗ \delta^*_{out} δout∗表示GT
视觉特征的回归
视觉属性的回归,包括对象的2D边界框、尺寸、方向和关键点
- 2D边界框:作者不将对象表示为2D中心,遵循FCOS将代表点 x r = ( u r , v r ) x_r=(u_r,v_r) xr=(ur,vr)的距离回归到2D边界框的四个侧面,其中代表点 x b x_b xb表示内部对象, x I x_I xI表示外部对象。此外,2D检测采用GIOU损失,因为它对规模变化的鲁棒性
- 尺寸:考虑到每个类别中对象之间的小方差,本文回归了相对于统计平均值的相对变化而不是绝对值,对于每个类 c c c,训练集的平均维数表示为 ( h c , w c , l c ) (h_c,w_c,l_c) (hc,wc,lc),那么尺寸回归的L1 loss表示为:
L d i m = ∑ k ∈ { h , w , l } ∣ k ˉ c e δ k − k ∗ ∣ L_{d i m}=\sum_{k \in\{h, w, l\}}\left|\bar{k}_c e^{\delta_k}-k^*\right| Ldim=k∈{h,w,l}∑∣ ∣kˉceδk−k∗∣ ∣ - 方向:方向可以表示为相机坐标系中的全局方向或相对于观察方向的局部方向。对于位于 ( x , y , z ) (x,y,z) (x,y,z)的对象,其全局方向 r y r_y ry和局部方向 α \alpha α满足:
r y = α + a r c t a n ( x / z ) r_y=\alpha+arctan(x/z) ry=α+arctan(x/z) - 具有相同全局方向但不同视角的对象将具有不同的局部方向和视觉外观。因此,我们选择使用MultiBin损失来估计局部方向,这将方向范围划分为无重叠区域,以便网络可以确定对象位于哪个区域,并估计区域中心的剩余旋转

- 关键点:为每个对象定义 N k = 10 N_k=10 Nk=10个关键点,其中包括3D边界框的8个顶点 k i , i = 1 … 8 {k_i,i=1…8} ki,i=1…8、底部中心 k 9 k_9 k9和顶部中心 k 10 k_{10} k10的投影:

自适应深度集成
Coming Soon…
源码复现
1、创建环境
# 创建conda虚拟环境:python==3.7, pytorch==1.4.0 and cuda==10.1
conda create -n monoflex python=3.7 -y
conda activate monoflex
pip install torch==1.4.0 torchvision==0.5.0

# clone代码
git clone https://github.com/zhangyp15/MonoFlex
cd monoflex
# 安装库文件
pip install -r requirements.txt

# Build DCNv2 and the project
cd model/backbone/DCNv2
. make.sh
cd ../../..
python setup.py build develop
2、准备数据集并修改路径
数据集下载及配置同SMOKE中的步骤。下载完成后,打开/monoflex/config/paths_catalog.py文件,修改数据集路径:
class DatasetCatalog():
    DATA_DIR = "/your_datasets_root/"
    DATASETS = {
        "kitti_train": {
            "root": "kitti/training/",
        },
        "kitti_test": {
            "root": "kitti/testing/",
        },

    }
3、修改训练及测试参数
打开/home/rrl/det3d/monoflex/runs/monoflex.yaml文件,按照需要进行修改:
SOLVER:
  OPTIMIZER: 'adamw'
  BASE_LR: 3e-4
  WEIGHT_DECAY: 1e-5
  LR_WARMUP: False
  WARMUP_STEPS: 2000

  # for 1 GPU
  LR_DECAY: 0.1
  # 使用epoch作为训练的次数,而不是iterations
  EVAL_AND_SAVE_EPOCH: True
  EVAL_EPOCH_INTERVAL: 1
  SAVE_CHECKPOINT_EPOCH_INTERVAL: 2
  # 训练epoch数
  MAX_EPOCHS: 100
  DECAY_EPOCH_STEPS: [80, 90]
  # batchsize大小
  IMS_PER_BATCH: 8
  EVAL_INTERVAL: 1000

TEST:
  UNCERTAINTY_AS_CONFIDENCE: True
  # 检测阈值越大,检测出来的框越少
  DETECTIONS_THRESHOLD: 0.9
  METRIC: ['R40']
# 保存路径
OUTPUT_DIR: "./output/exp1"
4、开始训练
- 单GPU训练
CUDA_VISIBLE_DEVICES=0 python tools/plain_train_net.py --batch_size 8 --config runs/monoflex.yaml --output output/exp
- 第一次训练,会自动下载预训练权重dla34-ba72cf86.pth,因为要,所以下载很慢,大家可以从这里直接下载到本地,然后上传到
/root/.cache/torch/checkpoints/dla34-ba72cf86.pth即可
5、测试及可视化
CUDA_VISIBLE_DEVICES=0 python tools/plain_train_net.py --config runs/monoflex.yaml --ckpt YOUR_CKPT --eval --vis
6、保存可视化图像(可选)
为了实时保存可视化图像,对源代码进行以下修改:
- 打开
/monoflex/engine/inference.py文件,在inference函数中调用compute_on_dataset函数的地方,添加新的传参output_dir = output_folder,也就是把保存路径传给之后的可视化函数,目的是将可视化结果保存在我们指定的目录下:
- 打开
/monoflex/engine/inference.py文件,在compute_on_dataset函数中添加新的传参output_dir = None,并且设置新的子文件夹save_jpg,将作为参数其传递给
show_image_with_boxes函数:
- 打开
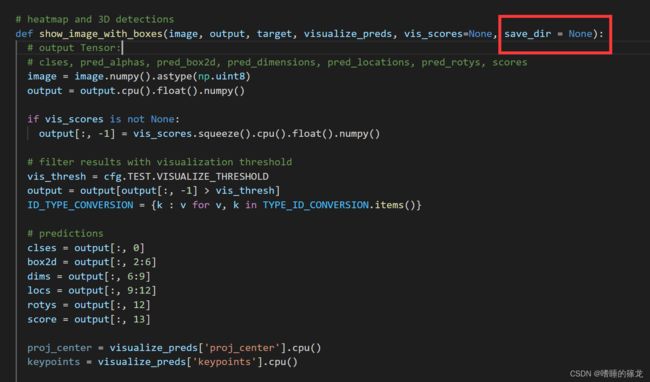
/monoflex/engine/visualize_infer.py文件,在show_image_with_boxes函数中添加新的传参save_dir = None,
- 最后,在
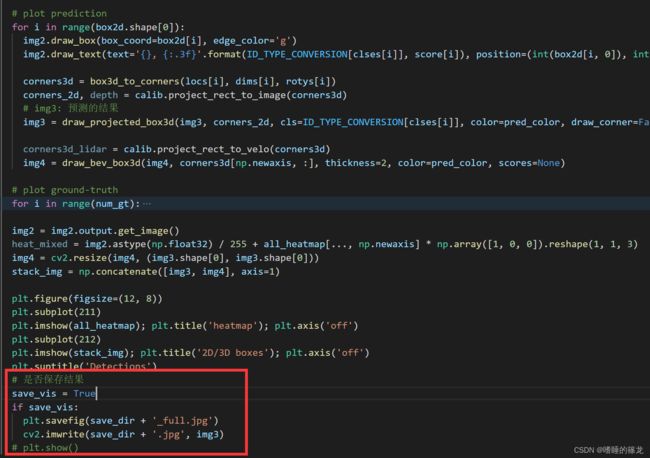
show_image_with_boxes函数的最后,添加保存图像的代码,这里既保存plt.fifure()合成的完整图像(包括热力图、检测结果图和BEV视角正确和错误的推理图),又保存检测结果图(即img3):
Reference
yacs的使用小记
https://github.com/lzccccc/SMOKE/issues/4
[CVPRW 2020] SMOKE: Single-Stage Monocular 3D Object Detection via Keypoint Estimation 论文阅读
Apollo 7.0障碍物感知模型原型!SMOKE 单目3D目标检测,代码开源!
【单目3D检测】Monoflex论文阅读
文献阅读:(CVPR2021)Objects are Different: Flexible Monocular 3D Object Detection


