一文带你了解Vite原理
Vite介绍
Vite号称是 下一代的前端开发和构建工具,它采用了全新的unbundle思想利用浏览器ESM特性导入组织代码,在服务器端进行按需编译返回,对于生产环境使用rollup打包。比起传统的webpack构建,在性能速度上都有了质的提高。
工作原理
esbuild
编译速度快
esbuild 使用go编写,cpu密集下更具性能优势,编译速度更快,相比较其他打包工具的速度提升10~100倍的差距。
预构建
Vite通过esbuild带来的好处:
模块化兼容: 现仍共存多种模块化标准代码,比如commonJs依赖,Vite在预构建阶段将依赖中各种其他模块化规范(CommonJS、UMD)转换 成ESM,以提供给浏览器进行加载。
性能优化: npm包中大量的ESM代码,大量的import请求,会造成网络拥塞。Vite使用esbuild,将有大量内部模块的ESM关系转换成单个模块,以减少 import模块请求次数。
预构建触发
Vite预编译之后,将文件缓存在node_modules/.vite/文件夹下。根据package.json中:dependencies是否发生变化以及包管理器的lockfile是否发生变化来重新执行预构建。
如果想强制让Vite执行预构建依赖,可以使用–force启动开发服务器,或者直接删掉node_modules/.vite/文件夹。
编译与打包
在Vite项目中的index.html中,我们可以看到如下代码,是用于请求我们的main.js:
<script type="module" src="/src/main.js"></script>
此时会向当前服务器发送一个GET请求用于请求main.ts
import { createApp } from 'vue'
import App from './App.vue'
createApp(App).mount('#app')
请求到了main.ts文件,检测到内部含有import引入的包,又会import 引用发起HTTP请求获取模块的内容文件,如App.vue或者其他的vue文件。
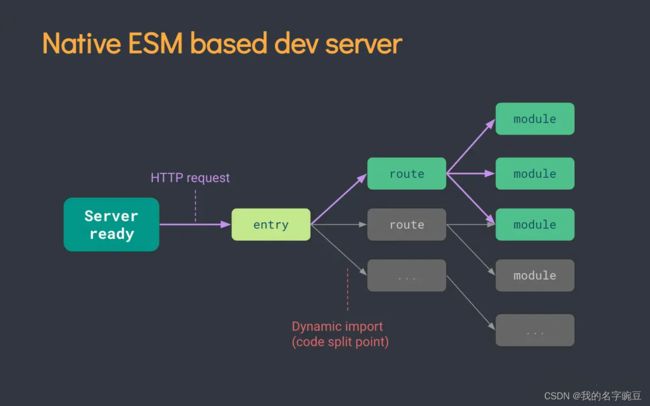
Vite其核心原理是利用浏览器现在已经支持ES6的import,碰见import就会发送一个HTTP请求去加载文件,Vite启动一个 koa 服务器拦截这些请求,并在后端进行相应的处理将项目中使用的文件通过简单的分解与整合(比如将 Vue 文件拆分成 template、style、script 三个部分),然后再以ESM格式返回返回给浏览器。Vite整个过程中没有对文件进行打包编译,做到了真正的按需加载,所以其运行速度比原始的webpack开发时还需进行编译编译打包的速度相比快出许多!
对于webpack传统打包构建工具,在服务器启动之前,需要从入口文件完整解析构建整个应用。因此,有大量的时间都花在了依赖生成,构建编译上。

而vite主要遵循的是使用ESM(Es modules模块)的规范来执行代码,我们只需要从main.ts入口文件, 在遇到对应的 import 语句时,将代码执行到对应的模块再进行加载到到浏览器中,本质上实现了动态加载,那么对于灰色的部分是暂时没有用到的路由,所以这部分不会进行加载,通过这种方式我们实现了按需引入。

对于webpack来讲初始化时,需要进行编译与打包,将多个文件进行打包为一个bundle.js(当然我们可以进行分包),那么如果进行热更新的话,试想如果依赖越来越多,就算只修改一个文件,理论上热更新的速度也会越来越慢。
对于Vite来讲,是只编译不打包,当浏览器解析到浏览器解析到 import { x } from ‘./x’ 时,会发起HTTP请求去请求x,就算不用打包,也可以加载到所需要的代码,在热更新的时候只需要重新编译被修改的文件即可,对于其他未修改的文件可以从缓存中拿到编译的结果。
当然两种方法对比起来,虽然Vite不需要打包,但是如果初始化时依赖过多则需要发送多个Http请求,也会带来初始化过慢的情况。
Vite运行Web应用
当我们运行起我们的Vite应用时,我们会发现,我们在main.ts的源码是这样的.
import { createApp } from 'vue'
import App from './App.vue'

createApp(App).mount('#app')
但是在请求中的main.ts发生了变化,如下:
 我们请求vue模块的内容发生了变化,去请求了node_modules中.vite的缓存模块,那么明明我们的代码是这样子的,为什么在浏览器中请求的代码却不一样呢?
我们平时我们写代码,如果直接使用 import xxx from ‘xxx’,此时是通过Webpack来帮我们去寻找这个路径。但是浏览器不知道你项目里有 node_modules,它只能通过相对路径去寻找模块。
我们在localhost:3000中去打开网页,此时我们的请求是请求的localhost:3000这个端口,此时会被Vite的开启的服务进行拦截,对直接引用 node_modules进行路径替换,然后换成了 /@modules/ 并返回回去。而后浏览器收到后,会发起对 /@modules/xxx 的请求,然后被 Vite 再次拦截,并由 Vite 内部去访问真正的模块,并将得到的内容再次做同样的处理后,返回给浏览器。
对于我们上述所说,实现原理上主要通过 es-module-lexer 和 magic-string 两个包进行替换,比起AST语义解析和转换,在性能上更有优势。源码位置如下:
src/node/plugins/importAnalysis
 async transform(source, importer, options) {
      const ssr = options?.ssr === true
      const prettyImporter = prettifyUrl(importer, root)

      if (canSkip(importer)) {
        isDebug && debug(chalk.dim(`[skipped] ${prettyImporter}`))
        return null
      }

      const start = performance.now()
      await init
      let imports: readonly ImportSpecifier[] = []
      // strip UTF-8 BOM
      if (source.charCodeAt(0) === 0xfeff) {
        source = source.slice(1)
      }
      try {
      	// 通过es-module-lexer进行解析
        imports = parseImports(source)[0]
      } catch (e: any) {
        const isVue = importer.endsWith('.vue')
        const maybeJSX = !isVue && isJSRequest(importer)

        const msg = isVue
          ? `Install @vitejs/plugin-vue to handle .vue files.`
          : maybeJSX
          ? `If you are using JSX, make sure to name the file with the .jsx or .tsx extension.`
          : `You may need to install appropriate plugins to handle the ${path.extname(
              importer
            )} file format.`

        this.error(
          `Failed to parse source for import analysis because the content ` +
            `contains invalid JS syntax. ` +
            msg,
          e.idx
        )
      }

  		.......
  		//  vite中使用了大量这个库做一些字符串的替换工作
  		let s: MagicString | undefined
      	const str = () => s || (s = new MagicString(source))

  		.......
  		// 最后将转换好的s进行返出
		if (s) {
	       return s.toString()
	    } else {
	       return source
	    }
    }

我们通过type去判断不同类型的文件,加载一些解析器对响应的文件进行解析。
这里我们引用下杨村长的手写vite原理部分,供大家参考:
const Koa = require('koa')
const fs = require('fs')
const path = require('path')
const compilerSFC = require('@vue/compiler-sfc')
const compilerDOM = require('@vue/compiler-dom')

const app = new Koa()

app.use(async (ctx) => {
  const { url, query } = ctx.request
  console.log(url)

  if (url === '/') {
    ctx.type = 'text/html'
    ctx.body = fs.readFileSync(path.join(__dirname, './index.html'), 'utf8')
  } else if (url.endsWith('.js')) {
    const p = path.join(__dirname, url)
    console.log(p)
    ctx.type = 'application/javascript'
    ctx.body = rewriteImport(fs.readFileSync(p, 'utf8'))
  } else if (url.startsWith('/@modules')) {
    // 以modules开头说明这是模块替换结果的加载
    const moduleName = url.replace('/@modules/', '')
    // node_modules目录中去查找,此时在node_modules获取到了对应包名的路径
    const prefix = path.join(__dirname, './node_modules', moduleName)
    // 在对应包中的package.json中获取module字段对应的值,因为module字段对应的值为打包后的js文件
    const module = require(prefix + '/package.json').module
    // 拼接前缀与对应的模块,此时就获取到对应包名所打包的那个文件
    const filePath = path.join(prefix, module)
    // 读取对应的文件
    const ret = fs.readFileSync(filePath, 'utf8')
    ctx.type = 'application/javascript'
    ctx.body = rewriteImport(ret)

  } else if (url.indexOf('.vue') > -1) {
    // sfc请求
    // 读取vue文件,解析为js
    console.log(url, 30);
    const p = path.join(__dirname, url.split('?')[0])
    // 得到一个ast
    const ast = compilerSFC.parse(fs.readFileSync(p, 'utf8'))
    console.log(ast)
    // 如果query中没有type是去请求其对应的vue文件,如果有type则可以进行请求css或者template
    if (!query.type) {
      // 从ast语法中获取
      const scriptContent = ast.descriptor.script.content
      // 替换默认导出为一个常量,方便后续修改
      // 将export default替换为const __script =
      const script = scriptContent.replace(
        'export default',
        'const __script = '
      )
      ctx.type = 'application/javascript'
      // 将对应的模块进行替换
      ctx.body = `
      ${rewriteImport(script)}
      // 解析template
      import {render as __render} from '${url}?type=template'
      __script.render = __render
      export default __script
    `
    } else if (query.type === 'template') {
      // 模板编译类型参数
      console.log('template')
      // 获取template的内容
      const tpl = ast.descriptor.template.content
      // 编译为 render 函数,
      const render = compilerDOM.compile(tpl, { mode: 'module' }).code
      ctx.type = 'application/javascript'
      ctx.body = rewriteImport(render)
    }else if(query.type === 'style'){

    }
  }
})

// 模块地址重写
function rewriteImport(content) {
  // 把所读取的文件内容的模块,进行更改
  // 把以.或者..开头,.或者..结尾中间的内容进行匹配
  // s1是匹配的部分,s2是分组的内容
  return content.replace(/ from ['"](.*)['"]/g, (s1, s2) => {
    // 如果是以./ / ../开头的话,则直接进行返回所匹配的内容
    console.log(s2,"-----")
    if (s2.startsWith('./') || s2.startsWith('/') || s2.startsWith('../'))
      return s1

    // 否则就返回对应modules的对应路径
    else return ` from '/@modules/${s2}'`
  })
}

app.listen(7001, () => {
  console.log('This is mini_vite')
})


// 替换后的样子
// // localhost:3000/App.vue
// import { updateStyle } from "/@hmr"

// // 抽出 script 逻辑
// const __script = {
//   data: () => ({ count: 0 }),
// }

// // 将 style 拆分成 /App.vue?type=style 请求,由浏览器继续发起请求获取样式
// updateStyle("c44b8200-0", "/App.vue?type=style&index=0&t=1588490870523")
// __script.__scopeId = "data-v-c44b8200" // 样式的 scopeId

// // 将 template 拆分成 /App.vue?type=template 请求,由浏览器继续发起请求获取 render function
// import { render as __render } from "/App.vue?type=template&t=1588490870523&t=1588490870523"
// __script.render = __render // render 方法挂载,用于 createApp 时渲染
// __script.__hmrId = "/App.vue" // 记录 HMR 的 id,用于热更新
// __script.__file = "/XXX/web/vite-test/App.vue" // 记录文件的原始的路径,后续热更新能用到
// export default __script
缓存
HTTP缓存: 充分利用http缓存做优化,依赖(不会变动的代码)部分用强缓存,源码部分用304协商缓存,提升页面打开速度。
文件系统缓存: Vite在预构建阶段,将构建后的依赖缓存到node_modules/.vite ,相关配置更改时,或手动控制时才会重新构建,以提升预构建速度。
热更新
对于Vite的热更新主要是通过WebSocket创建浏览器和服务器的通信监听文件的改变,当文件被修改时,服务端发送消息通知客户端修改相应的代码,客户端对应不同的文件进行不同操作的更新。
对比
Vite与Webpack相比较来讲,热更新还有所不同。
Webpack:重新编译打包,请求打包后的文件,客户端进行重新加载。
Vite:请求变更后的模块,浏览器直接重新加载。
实现
Vite 通过 chokidar 来监听文件系统的变更,只用对发生变更的模块重新加载,使得热更新的速度不会因为应用体积变大而变得更慢,对于Webpack来讲则需要再次经历一次打包。对于热更新,相比之下Vite表现要好于Webpack.
客户端
对于客户端的代码在src/src/client/client.ts,通过创建WebSocket客户端监听来自HMR的消息推送。
Vite的客户端代码主要监听这几种消息:
- connected: WebSocket 连接成功
- vue-reload: Vue 组件重新加载(当你修改了 script 里的内容时)
- vue-rerender: Vue 组件重新渲染(当你修改了 template 里的内容时)
- style-update: 样式更新
- style-remove: 样式移除
- js-update: js 文件更新
- full-reload: fallback 机制,网页重刷新
源码如下src/client/client.ts,对于payload的type分别进行判断:
async function handleMessage(payload: HMRPayload) {
  switch (payload.type) {
    case 'connected':
	  ...
    case 'update':
	  ...
    }
    case 'full-reload':
	  ...
    case 'prune':
      ...
    case 'error': {
	  ...
    }
    default: {
		...
    }
  }
}
服务端
对于服务端会调用createServer方法利用chokidar创建一个监听对象watcher对文件进行监听,核心代码如下:
src/node/server/index.ts
export async function createServer(
  inlineConfig: InlineConfig = {}
): Promise<ViteDevServer> {
  ....
  const ws = createWebSocketServer(httpServer, config, httpsOptions)
  const { ignored = [], ...watchOptions } = serverConfig.watch || {}
  const watcher = chokidar.watch(path.resolve(root), {
    ignored: [
      '**/node_modules/**',
      '**/.git/**',
      ...(Array.isArray(ignored) ? ignored : [ignored])
    ],
    ignoreInitial: true,
    ignorePermissionErrors: true,
    disableGlobbing: true,
    ...watchOptions
  }) as FSWatcher
  ....
  watcher.on('change', async (file) => {
	file = normalizePath(file)
    if (file.endsWith('/package.json')) {
      return invalidatePackageData(packageCache, file)
    }
    // 修改文件的缓存
    moduleGraph.onFileChange(file)
    if (serverConfig.hmr !== false) {
      try {
      	// 进行热更新
      	// handleHMRUpdate 模块主要是监听文件的更改,进行处理和判断通过WebSocket给客户端发送消息通知客户端去请求新的模块代码。
        await handleHMRUpdate(file, server)
      } catch (err) {
        ws.send({
          type: 'error',
          err: prepareError(err)
        })
      }
    }
  })
  watcher.on('add', (file) => {
  })
  watcher.on('unlink', (file) => {
  })
  ...
  return server
}
上述代码只是用于监听文件的变化,此时我们还需要去创建服务端的websocket。
src/node/server/ws.ts
export function createWebSocketServer(
  server: Server | null,
  config: ResolvedConfig,
  httpsOptions?: HttpsServerOptions
): WebSocketServer {
  let wss: WebSocket
  let httpsServer: Server | undefined = undefined
  // 热更新配置
  const hmr = isObject(config.server.hmr) && config.server.hmr
  const wsServer = (hmr && hmr.server) || server
  // 普通模式
  if (wsServer) {
    wss = new WebSocket({ noServer: true })
    wsServer.on('upgrade', (req, socket, head) => {
      // 监听通过vite客户端发送的websocket消息,通过HMR_HEADER区分
      if (req.headers['sec-websocket-protocol'] === HMR_HEADER) {
        wss.handleUpgrade(req, socket as Socket, head, (ws) => {
          wss.emit('connection', ws, req)
        })
      }
    })
  } else { // 中间件模式
    // vite dev server in middleware mode
    wss = new WebSocket(websocketServerOptions)
  }
  wss.on('connection', (socket) => {
    ...
  })
  // 错误处理
  wss.on('error', (e: Error & { code: string }) => {
    ...
  })
  // 返回
  return {
    on: wss.on.bind(wss),
    off: wss.off.bind(wss),
    send(payload: HMRPayload) {
      ...
    },
    close() {
      ...
    }
  }
}