Windows Phone Developer Tools RTW 新特性-Pivot控件(转自施炯的技术博客)
Windows Phone Developer Tools RTW 新特性-Pivot控件
IE9 Beta发布了,Windows Phone Developer Tools RTW也来了,开发者和发烧友又有得忙活了。园子里好多朋友已经开始了研究,包括马宁、张欣、Jake、randylee、chenkai等等,我也来加入吧。
刚刚安装了Windows Phone Developer Tools RTW,其中UI方面一些新特性,包括Bing Maps Silverlight Control for Windows Phone、Panorama Control for Windows Phone和Pivot Control for Windows Phone。这次就来实践一下Pivot控件。
首先,关于Pivot控件的介绍,大家可以参考《UI Design and Interaction Guide for Windows Phone 7-v2.0》这个文档。之前,园子里的几个朋友在WPMind站长小指的撮合下,对该文档的第一版联合进行了翻译,大家可以去http://www.wpmind.com/上下载。
枢轴(Pivot)控件提供了一种快速的方式来管理应用中的视图或页面。枢轴可以用来过滤大的数据集,浏览多个数据集,或者切换应用视图。枢轴控件水平并且相邻放置独立的视图,同时管理左侧和右侧的导航。可以通过Flick或者Pan手势来推动枢轴控件。
程序设计时,对于的Pivot考虑:
- 应用程序应该使得pivot页最少。
- pivot页面的内容由应用程序定义。
- pivot页面是循环的。
- pivot页面不能覆盖水平pan和水平flick功能,因为它与枢轴控件的交互设计相冲突。
- pivot标题文字的长度没有限制。显示文字的数量受制于枢轴控件的宽度。
- pivot标题高度固定,不能改变。
- 枢轴控件应该只用来显示相同类型的条目或者数据。
- 该控件不应该用来做任务流程。不同的页面应该在外观方面具备无缝切换。页面不应该极大地改变用户的活动。
- 枢轴控件应该少使用,在适当情况下才使用。
- 在用户没有可能添加信息的情况下,一个空的pivot页应该被删除。
下面我们来演示如何在应用程序中加入pivot控件。
1. 开启Visual Studio 2010 Express for Windows Phone,新建C#项目,选择Windows Phone Application模板,项目名为PivotDemo。
2. 为项目添加新的项目,选择Windows Phone Pivot Page,命名为PivotPage.xaml,如下图所示:
3.在MainPage.xaml文件中,为ContentPanel加入新的元素,代码如下:
<HyperlinkButton Content="Pivot Application Example" Height="57" HorizontalAlignment="Left" Margin="49,116,0,0" Name="hyperlinkButton1" VerticalAlignment="Top" Width="383" NavigateUri="/PivotPage1.xaml"/>
4.在PivotPage.xaml文件中,为其加入一个新的PivotItem,代码如下:
<!--Pivot item three.-->
<controls:PivotItem Header="item3">
<Grid/>
</controls:PivotItem>
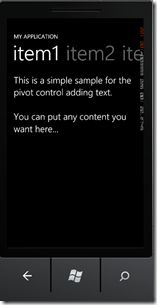
5.为Pivot Item添加控件和内容。为第一个PivotItem添加TextBlock control,代码如下:
<Grid>
<!--Added textbox control with formatted text.-->
<TextBlock
TextWrapping="Wrap"
Style="{StaticResource PhoneTextLargeStyle}">
<Run>This is a simple sample for the pivot control adding text.</Run>
<LineBreak/>
<LineBreak/>
<Run>You can put any content you want here...</Run>
</TextBlock>
</Grid>
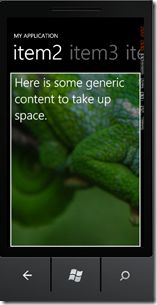
为第二个PivotItem添加背景图片和文字,代码如下:
<!--Added background image and text content.-->
<Border
BorderBrush="{StaticResource PhoneForegroundBrush}"
BorderThickness="{StaticResource PhoneBorderThickness}">
<Grid>
<Image
Source="PanoramaBG.png"
Stretch="UniformToFill"/>
<TextBlock
Text="Here is some generic content to take up space."
TextWrapping="Wrap"
Style="{StaticResource PhoneTextExtraLargeStyle}" />
</Grid>
</Border>
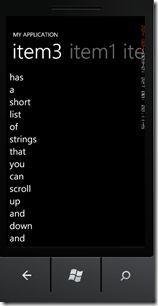
为第三个PivotItem添加ListBox,向其中写入一些string,支持垂直滚屏,代码如下:
<!--This code adds a series of string text values.-->
<Grid>
<ListBox FontSize="{StaticResource PhoneFontSizeLarge}">
<sys:String>This</sys:String>
<sys:String>item</sys:String>
<sys:String>has</sys:String>
<sys:String>a</sys:String>
<sys:String>short</sys:String>
<sys:String>list</sys:String>
<sys:String>of</sys:String>
<sys:String>strings</sys:String>
<sys:String>that</sys:String>
<sys:String>you</sys:String>
<sys:String>can</sys:String>
<sys:String>scroll</sys:String>
<sys:String>up</sys:String>
<sys:String>and</sys:String>
<sys:String>down</sys:String>
<sys:String>and</sys:String>
<sys:String>back</sys:String>
<sys:String>again.</sys:String>
</ListBox>
</Grid>
另外,为了使ListBox控件支持多行的string,必须添加引用:
xmlns:sys="clr-namespace:System;assembly=mscorlib"
6. 编译代码,进行模拟器调试,如下图所示。
附上源代码:PivotDemo.zip
视频演示地址:http://v.youku.com/v_show/id_XMjA4MTk3MDg0.html
参考链接:
Pivot Control for Windows Phone
《Windows Phone 7 UI设计及人机交互指南》第一版
《UI Design and Interaction Guide for Windows Phone 7》 v2.0


