【论文作图】使用PlotNeuralNet绘制卷积神经网络——以VGG-F为例
【论文作图】使用PlotNeuralNet绘制卷积神经网络——以VGG-F为例
- 前言
- 一、API
- 二、以VGG-F为例
-
- 1. VGG-F网络结构图
- 2. 代码
- 参考文献
前言
最近论文需要画出网络结构图,这里简单记录一下使用PlotNeuralNet画图的API。
其他工具还有 如何画出漂亮的神经网络图?
一、API
各层的定义在tikzeng.py文件中,具体参数可以查看代码。
- to_head(): 添加LaTeX中的头部标签及引用导入的库
- to_cor(): 添加颜色定义
- to_begin(): 添加开始标签
to_head()、to_cor()、to_begin()这三个函数是必须要调用的。
- to_input( pathfile, to=‘(-3,0,0)’, width=8, height=8, name=“temp” ): 可以向网络中添加图片
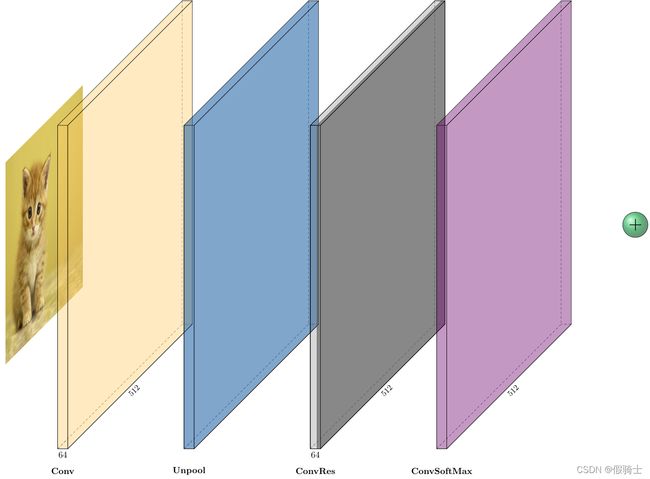
- to_Conv( name, s_filer=256, n_filer=64, offset=“(0,0,0)”, to=“(0,0,0)”, width=1, height=40, depth=40, caption=" " ): 添加一层卷积层
卷积层详细参数,to_ConvConvRelu()、to_ConvRes()、to_ConvSoftMax()同理,唯二不同的是因为比普通卷积层多了一层激活函数,to_ConvConvRelu()等函数的n_filer和width参数,以元组形式同时包括卷积层和激活层的尺寸,例如n_filer=(64,64), width=(2,2)
to_Conv(name,s_filer=256,n_filer=64,offset=“(0,0,0)”,to=“(0,0,0)”,width=1,height=40, depth=40, caption=" ")
name–名称(显示在当前层的下方)
s_filer–卷积层图像尺寸 # 指卷积层结构的参数,并非制图时的尺寸
n_filer–卷积层图像深度(通道数) # 指卷积层结构的参数,并非制图时的尺寸
offset–与前一层分别在x,y,z方向的距离
to–在x,y,z方向的坐标,
width–制图时的厚度
height、depth–制图时的长宽
width、height、depth指在制图时,卷积层的尺寸
caption–备注信息
- to_ConvConvRelu( name, s_filer=256, n_filer=(64,64), offset=“(0,0,0)”, to=“(0,0,0)”, width=(2,2), height=40, depth=40, caption=" " ):添加一层带Relu激活函数的卷积层
- to_Pool(name, offset=“(0,0,0)”, to=“(0,0,0)”, width=1, height=32, depth=32, opacity=0.5, caption=" "): 添加一层池化层
池化层详细参数
to_Pool(name,offset=“(0,0,0)”,to=“(0,0,0)”,width=1,height=32,depth=32,opacity=0.5,caption=" ")
部分参数与卷积层相同
opacity–透明度,0-1之间
to=“(conv1-east)”–在con1层的东侧
- to_UnPool(): 反池化层
- to_ConvRes(): 卷积加残差
- to_ConvSoftMax(): 添加一层带softmax的卷积层
- to_SoftMax(): 添加一层softmax
- to_Sum( name, offset=“(0,0,0)”, to=“(0,0,0)”, radius=2.5, opacity=0.6): 加号
- to_connection( of, to): 在两层之间建立连接(就是在两层之间加个箭头) # 水平连接,参数为:起始位置、中止位置
- to_skip( of, to, pos=1.25): 添加一层带Relu激活函数的卷积层,跨连接,参数为:起始位置、中止位置,pos默认为1.25
- to_end(): 添加添加LaTeX结束标签,这个也是必须要调用的
二、以VGG-F为例
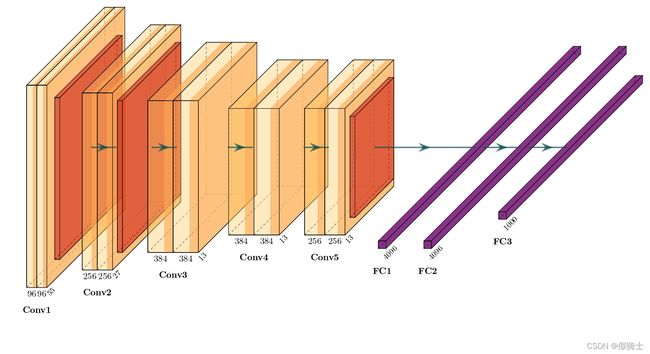
1. VGG-F网络结构图
2. 代码
import sys
sys.path.append('../')
from pycore.tikzeng import *
from pycore.blocks  import *

arch = [
    # 以VGG-F网络为例
    # conv1
    to_ConvConvRelu( name='conv1', s_filer=55, n_filer=(96,96), offset="(0,0,0)", to="(0,0,0)", width=(2,2), height=40, depth=40, caption='Conv1'  ),
    to_Pool(name="pool1", offset="(0,0,0)", to="(conv1-east)", width=1, height=32, depth=32, opacity=0.5),

    #conv2
    to_ConvConvRelu( name='conv2', s_filer=27, n_filer=(256,256), offset="(1,0,0)", to="(pool1-east)", width=(3,3), height=35, depth=35, caption='Conv2'  ),
    to_connection( "pool1", "conv2"),
    to_Pool(name="pool2", offset="(0,0,0)", to="(conv2-east)", width=1, height=30, depth=30, opacity=0.5),

    # conv3
    to_ConvConvRelu( name='conv3', s_filer=13, n_filer=(384,384), offset="(1,0,0)", to="(pool2-east)", width=(5,5), height=30, depth=30, caption='Conv3'  ),
    to_connection( "pool2", "conv3"),
    # conv4
    to_ConvConvRelu( name='conv4', s_filer=13, n_filer=(384,384), offset="(1,0,0)", to="(conv3-east)", width=(5,5), height=25, depth=25, caption='Conv4'  ),
    to_connection( "conv3", "conv4"),
    # conv5
    to_ConvConvRelu( name='conv5', s_filer=13, n_filer=(256,256), offset="(1,0,0)", to="(conv4-east)", width=(4,4), height=25, depth=25, caption='Conv5'  ),
    to_Pool(name="pool3", offset="(0,0,0)", to="(conv5-east)", width=1, height=20, depth=20, opacity=0.5),
    to_connection( "conv4", "conv5"),

    # fc1
    to_SoftMax(name='fc1', s_filer=4096, offset="(4,0,0)", to="(pool3-east)", width=1.5, height=1.5, depth=100, opacity=0.8, caption='FC1'),
    to_connection( "pool3", "fc1"),
    # fc2
    to_SoftMax(name='fc2', s_filer=4096, offset="(1.5,0,0)", to="(fc1-east)", width=1.5, height=1.5, depth=100, opacity=0.8, caption='FC2'),
    to_connection( "fc1", "fc2"),
    # fc1
    to_SoftMax(name='fc3', s_filer=1000, offset="(1.5,0,0)", to="(fc2-east)", width=1.5, height=1.5, depth=70, opacity=0.8, caption='FC3'),
    to_connection( "fc2", "fc3"),

    to_end()
    ]

def main():
    namefile = str(sys.argv[0]).split('.')[0]
    to_generate(arch, namefile + '.tex' )

if __name__ == '__main__':
    main()
参考文献
更详细信息可查看:
[1] 面向Python的PlotNeuralNet教程
[2] 使用PlotNeuralNet绘制深度学习网络图

