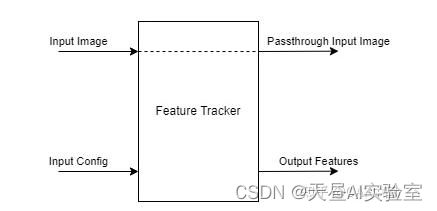
47、OAK测试FeatureTracker节点和ImageManip节点
基本思想:继续学习oak的例子和硬件模块
cmakelists.txt
cmake_minimum_required(VERSION 3.16)
project(depthai)
set(CMAKE_CXX_STANDARD 11)
find_package(OpenCV REQUIRED)
#message(STATUS ${OpenCV_INCLUDE_DIRS})
#添加头文件
include_directories(${OpenCV_INCLUDE_DIRS})
include_directories(${CMAKE_SOURCE_DIR}/include)
include_directories(${CMAKE_SOURCE_DIR}/include/utility)
#链接Opencv库
find_package(depthai CONFIG REQUIRED)
add_executable(depthai main.cpp include/utility/utility.cpp)
target_link_libraries(depthai ${OpenCV_LIBS}  depthai::opencv)
main.cpp
#include

#include "utility.hpp"

#include "depthai/depthai.hpp"


int main(int argc, char** argv) {
    dai::Pipeline pipeline;
    //定义相机
    auto camRgb=pipeline.create();
    camRgb->setBoardSocket(dai::CameraBoardSocket::RGB);
    camRgb->setResolution(dai::ColorCameraProperties::SensorResolution::THE_1080_P);
    auto config=pipeline.create();
    config->setStreamName("config");


    auto edge=pipeline.create();
    edge->setMaxOutputFrameSize(camRgb->getVideoWidth() * camRgb->getVideoHeight());
     //

    //定义输出
    auto xlinkoutfeatureOut=pipeline.create();
    xlinkoutfeatureOut->setStreamName("outfeature");

    auto xlinkoutpassthroghOut=pipeline.create();
    xlinkoutpassthroghOut->setStreamName("passthrogh");


//相机和输出链接
    camRgb->video.link(edge->inputImage);
    config->out.link(edge->inputConfig);
    edge->outputImage.link(xlinkoutfeatureOut->input);
    edge->passthroughInputImage.link(xlinkoutpassthroghOut->input);
    //结构推送相机
    dai::Device device(pipeline);
    //取帧显示
    auto  outqueue=device.getOutputQueue("outfeature",8, false);//maxsize 代表缓冲数据
    auto  passthroughqueue=device.getOutputQueue("passthrogh",8, false);//maxsize 代表缓冲数据
    while(1){


        auto outframe=outqueue->get();
        auto outimage=outframe->getCvFrame();


       cv::imshow("outimage",outimage);


        auto passframe=passthroughqueue->get();
        auto passimage=passframe->getCvFrame();

        cv::imshow("passimage",passimage);


        cv::imwrite("outimage.jpg",outimage);
        cv::imwrite("passimage.jpg",passimage);
        cv::waitKey(1);

    }


    return 0;
}
测试结果
设置配置cfg
#include

#include "utility.hpp"

#include "depthai/depthai.hpp"


int main(int argc, char** argv) {
    dai::Pipeline pipeline;
    //定义相机
    auto Mono=pipeline.create();
    Mono->setBoardSocket(dai::CameraBoardSocket::RGB);
    Mono->setResolution(dai::ColorCameraProperties::SensorResolution::THE_1080_P);
    auto config=pipeline.create();
    config->setStreamName("config");


    auto edge=pipeline.create();
    edge->setMaxOutputFrameSize(Mono->getResolutionWidth() * Mono->getResolutionHeight());
    //

    //定义输出
    auto xlinkoutfeatureOut=pipeline.create();
    xlinkoutfeatureOut->setStreamName("outfeature");

    auto xlinkoutpassthroghOut=pipeline.create();
    xlinkoutpassthroghOut->setStreamName("passthrogh");


//相机和输出链接
    Mono->video.link(edge->inputImage);
    config->out.link(edge->inputConfig);
    edge->outputImage.link(xlinkoutfeatureOut->input);
    edge->passthroughInputImage.link(xlinkoutpassthroghOut->input);
    //结构推送相机
    dai::Device device(pipeline);
    //取帧显示
    auto  outqueue=device.getOutputQueue("outfeature",8, false);//maxsize 代表缓冲数据
    auto  passthroughqueue=device.getOutputQueue("passthrogh",8, false);//maxsize 代表缓冲数据
    auto  cfgghqueue=device.getInputQueue("config");//maxsize 代表缓冲数据

    dai::EdgeDetectorConfig cfg;
    std::vector> sobelHorizontalKernel = {{1, 0, -1}, {2, 0, -2}, {1, 0, -1}};
    std::vector> sobelVerticalKernel = {{1, 2, 1}, {0, 0, 0}, {-1, -2, -1}};
    cfg.setSobelFilterKernels(sobelHorizontalKernel, sobelVerticalKernel);
    cfgghqueue->send(cfg);

    while(1){


        auto outframe=outqueue->get();
        auto outimage=outframe->getCvFrame();


        cv::imshow("outimage",outimage);


        auto passframe=passthroughqueue->get();
        auto passimage=passframe->getCvFrame();

        cv::imshow("passimage",passimage);


        cv::imwrite("outimage.jpg",outimage);
        cv::imwrite("passimage.jpg",passimage);
        cv::waitKey(1);

    }


    return 0;
}
测试结果
二、ImageManip节点
cmakelists.txt
cmake_minimum_required(VERSION 3.16)
project(depthai)
set(CMAKE_CXX_STANDARD 11)
find_package(OpenCV REQUIRED)
#message(STATUS ${OpenCV_INCLUDE_DIRS})
#添加头文件
include_directories(${OpenCV_INCLUDE_DIRS})
include_directories(${CMAKE_SOURCE_DIR}/include)
include_directories(${CMAKE_SOURCE_DIR}/include/utility)
#链接Opencv库
find_package(depthai CONFIG REQUIRED)
add_executable(depthai main.cpp include/utility/utility.cpp)
target_link_libraries(depthai ${OpenCV_LIBS}  depthai::opencv)
main.cpp
#include

#include "utility.hpp"

#include "depthai/depthai.hpp"


int main(int argc, char** argv) {
    dai::Pipeline pipeline;
    //定义相机
    auto rgb=pipeline.create();
    rgb->setBoardSocket(dai::CameraBoardSocket::RGB);
    rgb->setPreviewSize(rgb->getResolutionWidth(),rgb->getResolutionHeight());

    rgb->setResolution(dai::ColorCameraProperties::SensorResolution::THE_1080_P);


    auto config=pipeline.create();
    config->setStreamName("config");


    auto Man=pipeline.create();
    Man->setMaxOutputFrameSize(3*rgb->getResolutionWidth() * rgb->getResolutionHeight());//无额少取通道数
    //

    //定义输出
    auto xlinkoutpreviewOut=pipeline.create();
    xlinkoutpreviewOut->setStreamName("preview");


//相机和输出链接
    rgb->preview.link(Man->inputImage);
    config->out.link(Man->inputConfig);
    Man->out.link(xlinkoutpreviewOut->input);
     //结构推送相机
    dai::Device device(pipeline);
    //取帧显示
    auto  outqueue=device.getOutputQueue("preview",8, false);//maxsize 代表缓冲数据
    auto  cfgghqueue=device.getInputQueue("config");//maxsize 代表缓冲数据

    dai::ImageManipConfig cfg;
    cfg.setResize(800,800);
    cfg.setHorizontalFlip(1);

    cfgghqueue->send(cfg);

    while(1){

        auto outframe=outqueue->get();

        auto outimage=outframe->getCvFrame();

        cv::imshow("outimage",outimage);

        cv::imwrite("outimage.jpg",outimage);
         cv::waitKey(1);

    }


    return 0;
}
测试结果
参考:
OpenCV CEO教你用OAK(四):创建复杂的管道 - 知乎

