D6 Pytorch生态
Pytorch生态
- 1. torchvision
-
- 1.1 安装
- 1.2 官网文档
- 1.3 简单应用
-
- torchvision.datasets
- torchvision.transforms
- torchvision.models
- 1.4 torchvision.transformer处理图片
-
- CenterCrop & Resize
- ColorJitter & Grayscale
- RandomCrop 、RandomHorizontalFlip、RandomVerticalFlip、RandomResizedCrop
- 2. PyTorchVideo
- 3. torchtext
Pytorch生态,学习了常用的torchvision的常见库,通过查阅源码和官方文档可以方便的理解各个库函数的使用。
另外,简单了解了用于视频的pytorchVideo和用于NLP的torchtext。
1. torchvision
| torchvision | 介绍 |
|---|---|
torchvision.datasets |
包含了一些我们在计算机视觉中常见的数据集,如ImageNet,CIFAR,KITTI,KMNIST |
torchvision.transforms |
包含数据处理(如归一化和大小缩放)和增强(图片数据进行各种变换,如放缩和反转)方法 |
torchvision.models |
包含预训练模型,如AlexNet、VGG、ResNet、DenseNet、Inception v3、GoogLeNet… |
torchvision.io |
提供了视频、图片和文件的 IO 操作的功能,它们包括读取、写入、编解码处理操作 |
torchvision.ops |
提供了许多计算机视觉的特定操作,如NMS,RoIAlign,RoIPool |
torchvision.utils |
提供了一些可视化的方法,可以帮助我们将若干张图片拼接在一起、可视化检测和分割的效果 |
1.1 安装
pip install torchvision
需要注意和torch、CUDA的版本匹配问题
1.2 官网文档
源码
官方文档
1.3 简单应用
torchvision.datasets
# Image processing
img_transform = transforms.Compose([
    transforms.ToTensor(),
    transforms.Normalize((0.5,), (0.5,)),
])
# MNIST dataset
mnist = datasets.MNIST(
    root='./data/', train=True, transform=img_transform, download=True)
# Data loader
dataloader = torch.utils.data.DataLoader(
    dataset=mnist, batch_size=batch_size, shuffle=True)
torchvision.transforms
# 图像预处理步骤
transform = transforms.Compose([
    transforms.Resize(96), # 缩放到 96 * 96 大小
    transforms.ToTensor(), # 转化为Tensor
    transforms.Normalize((0.5, 0.5, 0.5), (0.5, 0.5, 0.5)) # 归一化
])
torchvision.models
import torchvision.models as models
resnet18 = models.resnet18()
resnet18 = models.resnet18(pretrained=True)
1.4 torchvision.transformer处理图片
from PIL import Image
from torchvision import transforms
import matplotlib.pyplot as plt
%matplotlib inline
# 加载原始图片
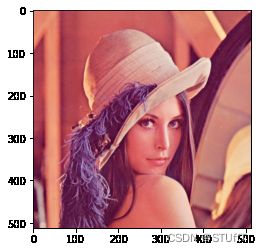
img = Image.open("./lenna.jpg")
print(img.size)
plt.imshow(img)
(512, 512)
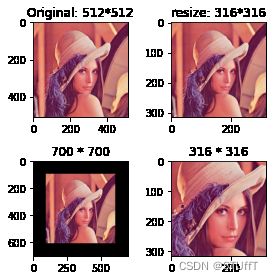
CenterCrop & Resize
# 对给定图片进行沿中心切割
# 对图片沿中心放大切割,超出图片大小的部分填0
img_centercrop1 = transforms.CenterCrop((700,700))(img)
print(img_centercrop1.size)
# 对图片沿中心缩小切割,超出期望大小的部分剔除
img_centercrop2 = transforms.CenterCrop((316,316))(img)
print(img_centercrop2.size)
# 等比缩放
img_resize = transforms.Resize(316)(img)
print(img_resize.size)

fig=plt.figure(num=1,figsize=(4,4))
ax1=fig.add_subplot(221)
ax1.imshow(img),ax1.set_title("Original: 512*512")
ax2=fig.add_subplot(222)
ax2.imshow(img_resize),ax2.set_title("resize: 316*316")
ax3=fig.add_subplot(223)
ax3.imshow(img_centercrop1),ax3.set_title("700 * 700")
ax4=fig.add_subplot(224)
ax4.imshow(img_centercrop2),ax4.set_title("316 * 316")

fig.tight_layout() # 调整间距
plt.show()
(700, 700)
(316, 316)
(316, 316)
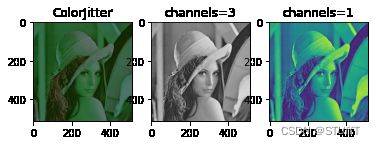
ColorJitter & Grayscale
# transforms.ColorJitter(brightness=0, contrast=0, saturation=0, hue=0)
img_CJ = transforms.ColorJitter(brightness=1,contrast=0.5,saturation=0.5,hue=0.5)(img)
# transforms.Grayscale(num_output_channels)
img_grey_c3 = transforms.Grayscale(num_output_channels=3)(img)
img_grey_c1 = transforms.Grayscale(num_output_channels=1)(img)

plt.subplot(1,3,1),plt.imshow(img_CJ),plt.title("ColorJitter")
plt.subplot(1,3,2),plt.imshow(img_grey_c3),plt.title("channels=3")
plt.subplot(1,3,3),plt.imshow(img_grey_c1),plt.title("channels=1")
plt.show()
RandomCrop 、RandomHorizontalFlip、RandomVerticalFlip、RandomResizedCrop
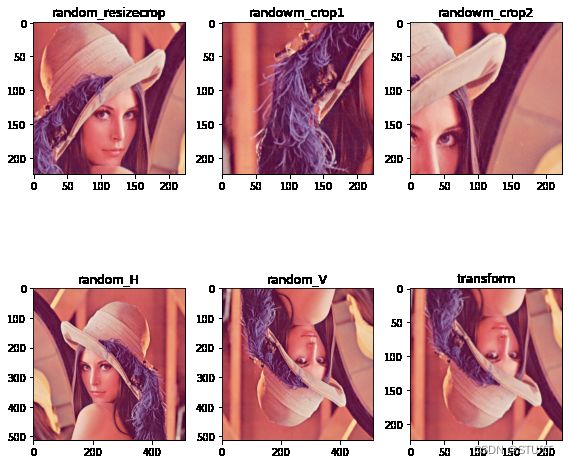
# 随机裁剪成指定大小
# 设立随机种子
import torch
torch.manual_seed(31)
# 随机裁剪
img_randowm_crop1 = transforms.RandomCrop(224)(img)
img_randowm_crop2 = transforms.RandomCrop(224)(img)
print(img_randowm_crop1.size)

# 随机左右旋转
# 设立随机种子,可能不旋转
import torch
torch.manual_seed(31)

img_random_H = transforms.RandomHorizontalFlip()(img)
print(img_random_H.size)


# 随机垂直方向旋转
img_random_V = transforms.RandomVerticalFlip()(img)
print(img_random_V.size)

# 随机裁剪成指定大小
img_random_resizecrop = transforms.RandomResizedCrop(224,scale=(0.5,0.5))(img)
print(img_random_resizecrop.size)

# 对一张图片的操作可能是多种的,我们使用transforms.Compose()将他们组装起来
transformer = transforms.Compose([
    transforms.Resize(256),
    transforms.transforms.RandomResizedCrop((224), scale = (0.5,1.0)),
    transforms.RandomVerticalFlip(),
])
img_transform = transformer(img)

fig=plt.figure(num=1,figsize=(8,8))#创建画布


ax1=fig.add_subplot(232)
ax1.imshow(img_randowm_crop1),plt.title("randowm_crop1")
ax2=fig.add_subplot(233)
ax2.imshow(img_randowm_crop2),plt.title("randowm_crop2")
ax3=fig.add_subplot(234)
ax3.imshow(img_random_H),plt.title("random_H")
ax4=fig.add_subplot(235)
ax4.imshow(img_random_V),plt.title("random_V")
ax5=fig.add_subplot(231)
ax5.imshow(img_random_resizecrop),plt.title("random_resizecrop")
ax6=fig.add_subplot(236)
ax6.imshow(img_transform),plt.title("transform")

fig.tight_layout() # 调整间距
plt.show()
(224, 224)
(512, 512)
(512, 512)
(224, 224)
参考:
知乎_TorchVision
torchvision详细介绍
2. PyTorchVideo
开源深度学习库,它为各种视频理解任务提供了一组丰富的模块化、高效和可复现的组件,包括分类、检测、自监督学习和low-level处理。
论文
代码
相关参考:
深入浅出Pytoch_PyTorchVideo简介
PyTorchVideo:视频理解的深度学习库
matplotlib.pyplot的使用总结大全
3. torchtext
用于自然语言处理(NLP)的工具包,包括:
- 数据处理工具 torchtext.data.functional、torchtext.data.utils
- 数据集 torchtext.data.datasets
- 词表工具 torchtext.vocab
- 评测指标 torchtext.metrics
官方文档
@夏日回音


