mmsegmentation使用记录
mmsegmentation使用记录
mmseg官方代码
https://github.com/open-mmlab/mmsegmentation
一、环境搭建
环境搭建可参考如下链接:
https://github.com/open-mmlab/mmsegmentation/blob/master/docs/get_started.md#installation
1.conda install pytorch=1.6.0 torchvision cudatoolkit=10.1 -c pytorch
2.pip install mmcv-full -f https://download.openmmlab.com/mmcv/dist/cu101/torch1.5.0/index.html
3.cd mmsegmentation
 python setup.py develop
查看是否成功安装:
from mmseg.apis import inference_segmentor, init_segmentor
import mmcv

config_file = 'configs/pspnet/pspnet_r50-d8_512x1024_40k_cityscapes.py'
checkpoint_file = 'checkpoints/pspnet_r50-d8_512x1024_40k_cityscapes_20200605_003338-2966598c.pth'

# build the model from a config file and a checkpoint file
model = init_segmentor(config_file, checkpoint_file, device='cuda:0')

# test a single image and show the results
img = 'test.jpg'  # or img = mmcv.imread(img), which will only load it once
result = inference_segmentor(model, img)
# visualize the results in a new window
model.show_result(img, result, show=True)
# or save the visualization results to image files
# you can change the opacity of the painted segmentation map in (0, 1].
model.show_result(img, result, out_file='result.jpg', opacity=0.5)

# test a video and show the results
video = mmcv.VideoReader('video.mp4')
for frame in video:
   result = inference_segmentor(model, frame)
   model.show_result(frame, result, wait_time=1)
二、mmseg使用
1.下载公开数据集:
这里使用cityscapes公开数据集,分为精细标注与粗略标注两部分,这里只利用精细标注的5000张图像,下载地址:https://aistudio.baidu.com/aistudio/datasetdetail/48855
下载之后把数据分别存放在gtFine与leftImg8bit两个文件夹下就可以了

2.处理数据:
推荐使用官方处理代码:https://github.com/mcordts/cityscapesScripts
其中主要修改两个文件:./helpers/labels.py和./preparation/createTrainIdLabelImgs.py
其中labels.py修改你想训练的类别,将不想训练的trainID设为255,ignoreInEval设为True
想训练的trainID为0-类别数,ignoreInEval设为False。然后将createTrainIdLabelImgs.py中的路径设置为你数据集的路径:
    # Where to look for Cityscapes
    # if 'CITYSCAPES_DATASET' in os.environ:
    #     cityscapesPath = os.environ['CITYSCAPES_DATASET']
    # else:
    #     cityscapesPath = os.path.join(os.path.dirname(os.path.realpath(__file__)),'..','..')
    cityscapesPath = 'E:\cityscapesScripts-master\data1'
    # how to search for all ground truth
    searchFine   = os.path.join( cityscapesPath , "gtFine"   , "*" , "*" , "*_gt*_polygons.json" )
    searchCoarse = os.path.join( cityscapesPath , "gtCoarse" , "*" , "*" , "*_gt*_polygons.json" )
之后运行createTrainIdLabelImgs.py进行数据转换
3.mmseg介绍:
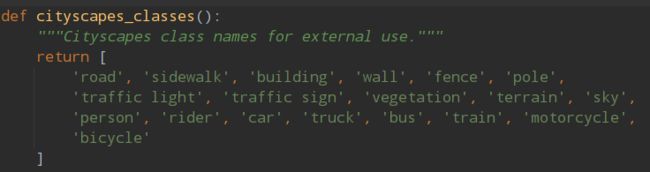
想要训练mmseg,主要修改为config文件与mmseg文件夹下的cityscapes.py和class_names.py
其中后两个文件主要为将标签类别数改为你需要的类别:
./mmseg/datasets/cityscapes.py
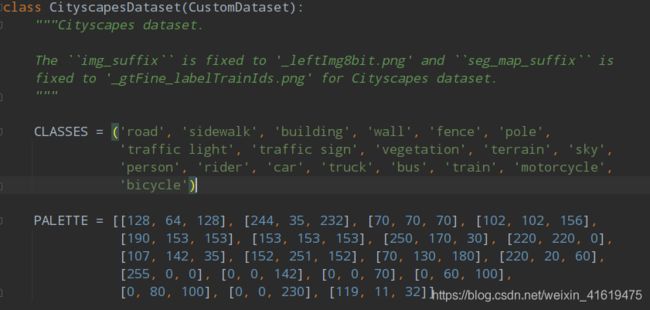
./mmseg/core/evaluation/class_names.py
配置文件以deeplabv3为例,在./configs/deeplabv3/deeplabv3_r50-d8_512x1024_40k_cityscapes.py中分为以下四个子文件:
_base_ = [
    '../_base_/models/deeplabv3_r50-d8.py', '../_base_/datasets/cityscapes.py',
    '../_base_/default_runtime.py', '../_base_/schedules/schedule_40k.py'
]
这四个文件分别为模型文件、数据集文件、默认文件与训练次数文件,分别可以进行以下修改:
models/*.py中可以调整num_classes(修改为训练类别数);
datasets/ *.py中可以调整图像crop尺寸、数据集路径、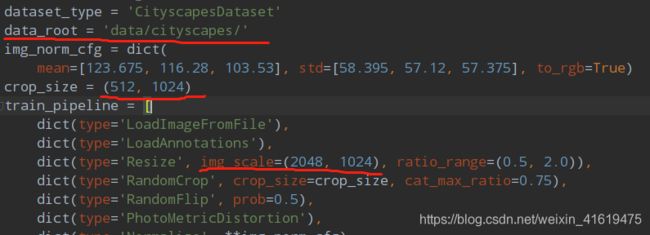
./schedules/*.py中可以调整总训练次数、多少次一保存与eval
修改完后,就可以进行训练了:
python train.py configs/deeplabv3/deeplabv3_r50-d8_512x1024_40k_cityscapes.py
4.制作自己的数据集:
这里利用labelme制作自己的数据集,打完标签后,会生成每张图像对应的json文件,讲文件与图像放到一个文件夹下,之后运行如下代码,其中train2017是图像及json文件路径,./replace(,)是你想要保存的路径。(这里要对labelme进行一些修改,具体见备注3)
json_files = glob(os.path.join(r"train2017/", "*.json"))
for json_file in json_files:
    os.system(f"labelme_json_to_dataset {json_file} -o {''.join(json_file.split('.')[:-1]).replace('train2017/', 'output/')}")
运行代码后,在文件夹里会生成多个文件夹,名字对应图像名字,每个子文件夹中包含img.png/imfo.yaml/label.png/label_names.txt/label_vis.png五个文件,其中img.png为待训练图像,label.py为标签图像
之后要对图像进行提取与重命名,使之符合cityscapes数据的命名规范:
json_path = './output'
for root, dirs, files in os.walk(json_path):
    for file in files:
        if file.strip() == "label.png":
            file_path = os.path.join(root, file)
            src_image_path = os.path.join(root, 'img.png')

            # image = cv2.resize(cv2.imread(file_path), (600,400))
            # src = cv2.resize(cv2.imread(src_image_path), (600,400))

            file_name = os.path.split(root)[-1]
            file_name = file_name.split('_')[0] + '.png'
            # label处理  直接取R通道的图像就是gtFine
            B, G, R = cv2.split(image)
            # R = R.astype('uint8')
            # print(thresh)
            w, h = R.shape
            for i in range(w):
                for j in range(h):
                    R[i][j] = 1 if R[i][j] == 128 else 0

            path = os.path.join(os.path.abspath('.'), 'gtFine')
            if not os.path.exists(path):
                os.makedirs(path)
            # print(path)
            labelId_image = os.path.join(path, file_name.split('.')[0] + '_gtFine_labelTrainIds.' + file_name.split('.')[-1])
            print(labelId_image)
            cv2.imwrite(labelId_image, R)

            src_image_path = os.path.join(os.path.abspath('.'), 'leftImg8bit')
            if not os.path.exists(src_image_path):
                os.makedirs(src_image_path)
            src_image = os.path.join(src_image_path, file_name.split('.')[0] + '_leftImg8bit.' + file_name.split('.')[-1])
            cv2.imwrite(src_image, src)
其中:
            image = cv2.resize(cv2.imread(file_path), (600,400))
            src = cv2.resize(cv2.imread(src_image_path), (600,400))
为对图像进行归一化大小,若图像大小不一致,在训练阶段会报错。
此时训练图像均保存在leftImg8bit文件夹中,标签均在gtFine文件夹中,train, val, test数量可自行分配。之后就可以进行训练了。
备注
1.环境搭建时conda安装pytorch死活安不上,换源啥的都不好使,最后只能pip安装,然后单独安装cudatoolkit(以为所用机器系统cuda为10.0版本,mmdsg要求10.1, 只能用conda装cudatoolkit)
pip install torch==1.6.0+cu101 torchvision==0.7.0+cu101 -f https://download.pytorch.org/whl/torch_stable.html
2.训练图像与标签的名称应该一致,并且以_leftImg8bit.png与_gtFine_labelTrainIds.png结尾,或者也可以直接修改./mmseg/datasets/cityscapes.py:

3.labelme标注在运行labelme_json_to_dataset *.json时,要对/home/ty/anaconda3/envs/mmdet/lib/python3.6/site-packages/labelme/cli/labelme_json_to_dataset.py以及/home/ty/anaconda3/envs/mmdet/lib/python3.6/site-packages/labelme/utils/draw.py进行修改,在labelme_json_to_dataset.py中:
	# 添加指定标签对应的label_value
    label_name_to_value = {'_background_': 0, 'a' : 1, 'b' : 2}

    # 下面注释掉
    # for shape in sorted(data['shapes'], key=lambda x: x['label']):
    #     label_name = shape['label']
    #     if label_name in label_name_to_value:
    #         label_value = label_name_to_value[label_name]
    #     else:
    #         label_value = len(label_name_to_value)
    #         label_name_to_value[label_name] = label_value
在draw.py中,其中*为任意数值:
    for i in range(0, N):
        id = i
        r, g, b = 0, 0, 0
        for j in range(0, 8):
            r = np.bitwise_or(r, (bitget(id, 0) << 7 - j))
            g = np.bitwise_or(g, (bitget(id, 1) << 7 - j))
            b = np.bitwise_or(b, (bitget(id, 2) << 7 - j))
            id = (id >> 3)
        cmap[i, 0] = r
        cmap[i, 1] = g
        cmap[i, 2] = b

        cmap[1, :] = [1, *, *]  # a
        cmap[2, :] = [2, *, *]  #b
    cmap = cmap.astype(np.float32) / 255
    return cmap
这里主要是因为在mmeg在对city数据集进行分析时,是以标签图像的像素值为类别标签(labelme生成的label.png中的红通道像素值),需要标签像素值为连续的1,2,3…否则会报错
参考网址:
https://blog.csdn.net/s534435877/article/details/106937561